


![[The AI Show Episode 142]: ChatGPT’s New Image Generator, Studio Ghibli Craze and Backlash, Gemini 2.5, OpenAI Academy, 4o Updates, Vibe Marketing & xAI Acquires X](https://www.marketingaiinstitute.com/hubfs/ep%20142%20cover.png)


![From drop-out to software architect with Jason Lengstorf [Podcast #167]](https://cdn.hashnode.com/res/hashnode/image/upload/v1743796461357/f3d19cd7-e6f5-4d7c-8bfc-eb974bc8da68.png?#)


.png?#)


(1).jpg?width=1920&height=1920&fit=bounds&quality=80&format=jpg&auto=webp#)


_Christophe_Coat_Alamy.jpg?#)
.webp?#)
.webp?#)


![Apple Considers Delaying Smart Home Hub Until 2026 [Gurman]](https://www.iclarified.com/images/news/96946/96946/96946-640.jpg)
![iPhone 17 Pro Won't Feature Two-Toned Back [Gurman]](https://www.iclarified.com/images/news/96944/96944/96944-640.jpg)
![Tariffs Threaten Apple's $999 iPhone Price Point in the U.S. [Gurman]](https://www.iclarified.com/images/news/96943/96943/96943-640.jpg)


Advanced OCI CLI Syntax and Commands
A brief tutorial of the more advanced command structures of the Oracle Cloud Infrastructure CLI The Command Line Interface tool of OCI allows us to manage resources on OCI using its API and your terminal. In this tutorial, we talk about using advanced command inputs to retrieve, filter, and beautify the outputs of the CLI. Installing the CLI We've written a blog post An introduction to OCI CLI that talks in-depth about installing the CLI and basic commands but for MacOS, it is simply: brew install oci-cli Make sure to have your OCI profiles at ~/.oci/config set up as well. Level 1: No flags The simplest CLI command to run without any additional flags is: oci iam compartment list which lists all the compartments in your tenancy. Level 2: Flags But the above gets us nowhere. In order to manage a specific resource, e.g., to get information about one specific compartment, we need to provide some additional information in flags like --compartment-id: oci iam compartment get --compartment-id ocid1.compartment.oc1..aaaaaaaan6rj3mk3u2no4lbodxpwwtaqyyffzxupzybfzsjak Or maybe even more: oci logging log get --log-group-id ocid1.loggroup.oc1.iad.amaaaaaa7ieyoyqawlje5wjoq2jhfmbozmomrraubytyacwajxv --log-id ocid1.log.oc1.iad.amaaaaaa7ieyoyqaod537dv6pbtthotmdufmzpcgjsncwsdrmhct --profile fdurrani where --profile fdurrani is required if you have multiple OCI profiles in your ~/.oci/config file like below: [DEFAULT] user=ocid1.user.oc1..aaaaaaaax6cyvvaiik6bstjbomeqtznuzbcyxjrmwvksjw fingerprint=a6:18:5e:b5:18:a2:e9:13:02:d1:39:50:bf:55:14:df tenancy=ocid1.tenancy.oc1..aaaaaaaanw5mqd2vtjbomeqtznuzbcyxjrmwvksjfedw region=us-ashburn-1 key_file=/Users/path/to/key.key [fdurrani] user=ocid1.user.oc1..aaaaaaaax6cyvvaqhhgfsdkedqpxkuydrsekmkiswesf fingerprint=a6:18:5e:b5:18:a2:e9:13:02:d1:39:50:bf:55:44:ge tenancy=ocid1.tenancy.oc1..aaaaaaaanw5qhhgfsdkedqpxkuydrsekmkis region=us-ashburn-1 key_file=/Users/path/to/key.key Of course, these flags are Google-able by just searching "oci cli log get": Level 3: Interactive Mode A very much underrated feature the CLI provides is the -i interactive mode which shows you all the possible selections after each keyword: Just type oci -i into your terminal (with an optional --profile flag) to launch the interactive mode. The interactive mode will also inform you which flags are required and which are optional. With that, you'll no longer need to Google the keywords needed. Level 4: Generating Parameter JSON Input Some inputs for the flags like --shape-details when creating a load balancer require a specific JSON format rather than a simple string or number. The quickest way to find out the required format is to use the --generate-param-json-input flag to produce the necessary JSON input format: Which will allow you to input the right values in the right format: oci lb load-balancer create --compartment-id ocid1.compartment.oc1..aaaaaaaa33ivyrzz6ydvabwkxkvrsvnzzuuwdiyjyj --display-name 'lb001' --shape-name 'flexible' --subnet-ids '["ocid1.subnet.oc1.iad.aaaaaaaadosokoflv4jydvabwkxkvrsvnzzuuwdiyjyj"]' --shape-details '{"maximumBandwidthInMbps": 10, "minimumBandwidthInMbps": 10}' --profile fdurrani Level 5: Using Data Query and JMESPath A lot of the times, your CLI will return a lot of information. Listing all load balancers, for example, will return the name, description, ID, IP addresses, backend sets, shape details, and lifecycle state for each LB. Which is a mouthful when you only want to get the name and states only. Enter the data --query flag, which allows you to use the JMESPath language to extract elements from a JSON object. 5.1: Simple Attribute View So, to get the name and lifecycle states of the Load Balancers, simply add the --query flag and filter the required attributes: oci lb load-balancer list --compartment-id ocid1.compartment.oc1..aaaaaaaa33ivyrzz6vffwqqtinbotytydxadfvxaejovjqzrnajp --profile fdurrani --query 'data[*]["display-name", "lifecycle-state"]' Or displaying the attributes in a JSON format: oci lb load-balancer list --compartment-id ocid1.compartment.oc1..aaaaaaaa33ivyrzz6vffevwdjgyqysqsnsmnejhjxhtit --profile fdurrani --query 'data[*].{name: "display-name", state: "lifecycle-state"}' 5.2: Filtering Items JMESPath can also be used to filter items using the ? keyword: oci lb load-balancer list --compartment-id ocid1.compartment.oc1..aaaaaaaa33ivyrzz6vffwqegidwzruirmthyccjjppixvmy --profile fdurrani --query 'data[?"display-name" == `lb001`]' Pay attention to the strict correct usages of `, ', and ". 5.3: Finding attributes containing a substring The command data[?contains("attribute-name", `myCustomName`)] allows you to further filter your resources by searching for a substring match in your results: oci iam compartment list --query 'data[?contains
A brief tutorial of the more advanced command structures of the Oracle Cloud Infrastructure CLI
The Command Line Interface tool of OCI allows us to manage resources on OCI using its API and your terminal. In this tutorial, we talk about using advanced command inputs to retrieve, filter, and beautify the outputs of the CLI.
Installing the CLI
We've written a blog post An introduction to OCI CLI that talks in-depth about installing the CLI and basic commands but for MacOS, it is simply:
brew install oci-cli
Make sure to have your OCI profiles at ~/.oci/config set up as well.
Level 1: No flags
The simplest CLI command to run without any additional flags is:
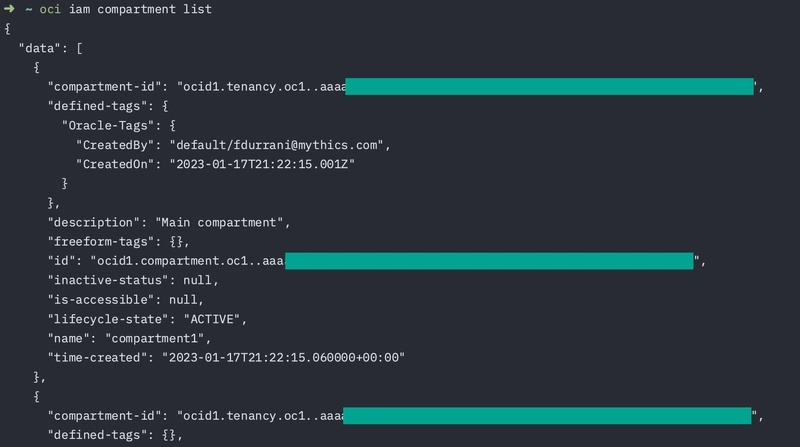
oci iam compartment list
which lists all the compartments in your tenancy.
Level 2: Flags
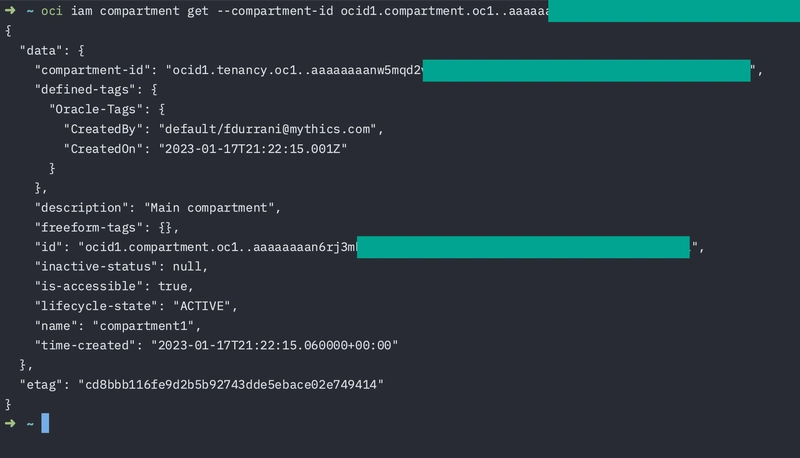
But the above gets us nowhere. In order to manage a specific resource, e.g., to get information about one specific compartment, we need to provide some additional information in flags like --compartment-id:
oci iam compartment get --compartment-id ocid1.compartment.oc1..aaaaaaaan6rj3mk3u2no4lbodxpwwtaqyyffzxupzybfzsjak
Or maybe even more:
oci logging log get --log-group-id ocid1.loggroup.oc1.iad.amaaaaaa7ieyoyqawlje5wjoq2jhfmbozmomrraubytyacwajxv --log-id ocid1.log.oc1.iad.amaaaaaa7ieyoyqaod537dv6pbtthotmdufmzpcgjsncwsdrmhct --profile fdurrani

where --profile fdurrani is required if you have multiple OCI profiles in your ~/.oci/config file like below:
[DEFAULT]
user=ocid1.user.oc1..aaaaaaaax6cyvvaiik6bstjbomeqtznuzbcyxjrmwvksjw
fingerprint=a6:18:5e:b5:18:a2:e9:13:02:d1:39:50:bf:55:14:df
tenancy=ocid1.tenancy.oc1..aaaaaaaanw5mqd2vtjbomeqtznuzbcyxjrmwvksjfedw
region=us-ashburn-1
key_file=/Users/path/to/key.key

[fdurrani]
user=ocid1.user.oc1..aaaaaaaax6cyvvaqhhgfsdkedqpxkuydrsekmkiswesf
fingerprint=a6:18:5e:b5:18:a2:e9:13:02:d1:39:50:bf:55:44:ge
tenancy=ocid1.tenancy.oc1..aaaaaaaanw5qhhgfsdkedqpxkuydrsekmkis
region=us-ashburn-1
key_file=/Users/path/to/key.key
Of course, these flags are Google-able by just searching "oci cli log get":
Level 3: Interactive Mode
A very much underrated feature the CLI provides is the -i interactive mode which shows you all the possible selections after each keyword:
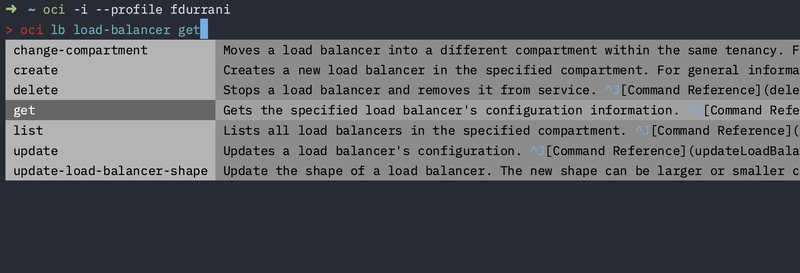
Just type oci -i into your terminal (with an optional --profile flag) to launch the interactive mode.
The interactive mode will also inform you which flags are required and which are optional.
With that, you'll no longer need to Google the keywords needed.
Level 4: Generating Parameter JSON Input
Some inputs for the flags like --shape-details when creating a load balancer require a specific JSON format rather than a simple string or number. The quickest way to find out the required format is to use the --generate-param-json-input flag to produce the necessary JSON input format:
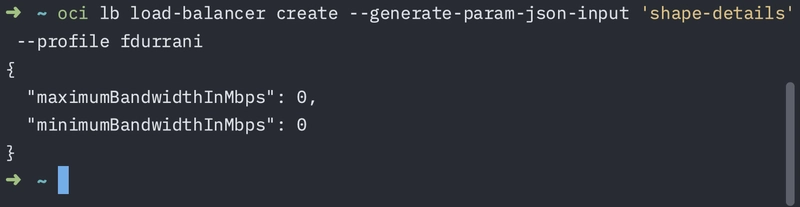
Which will allow you to input the right values in the right format:
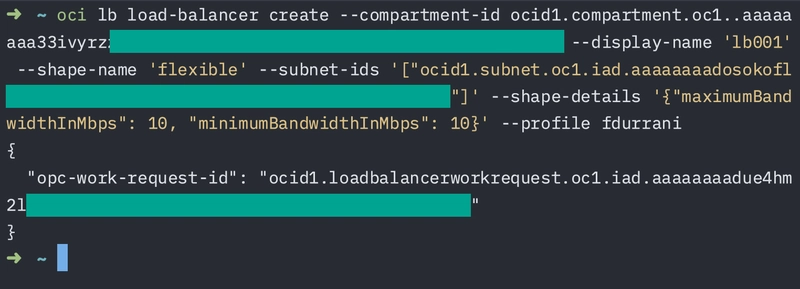
oci lb load-balancer create --compartment-id ocid1.compartment.oc1..aaaaaaaa33ivyrzz6ydvabwkxkvrsvnzzuuwdiyjyj --display-name 'lb001' --shape-name 'flexible' --subnet-ids '["ocid1.subnet.oc1.iad.aaaaaaaadosokoflv4jydvabwkxkvrsvnzzuuwdiyjyj"]' --shape-details '{"maximumBandwidthInMbps": 10, "minimumBandwidthInMbps": 10}' --profile fdurrani
Level 5: Using Data Query and JMESPath
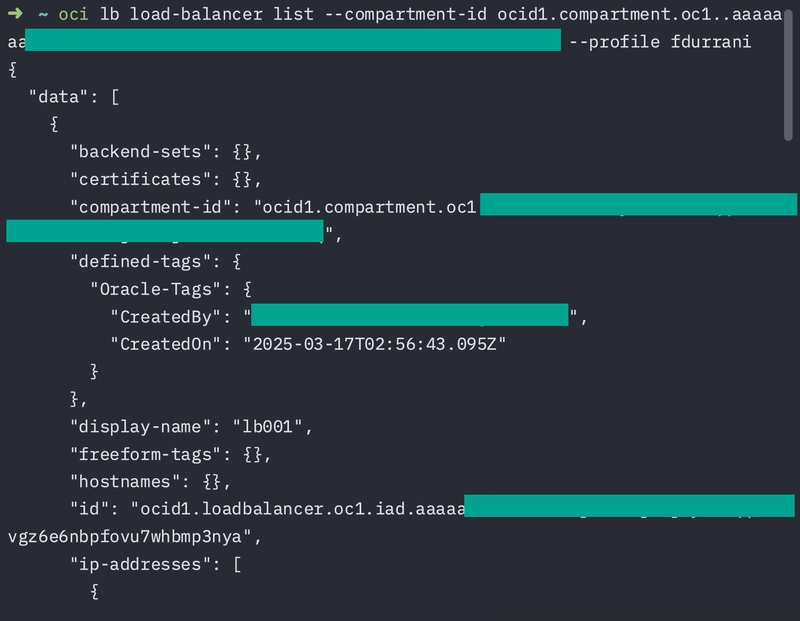
A lot of the times, your CLI will return a lot of information. Listing all load balancers, for example, will return the name, description, ID, IP addresses, backend sets, shape details, and lifecycle state for each LB. Which is a mouthful when you only want to get the name and states only.
Enter the data --query flag, which allows you to use the JMESPath language to extract elements from a JSON object.
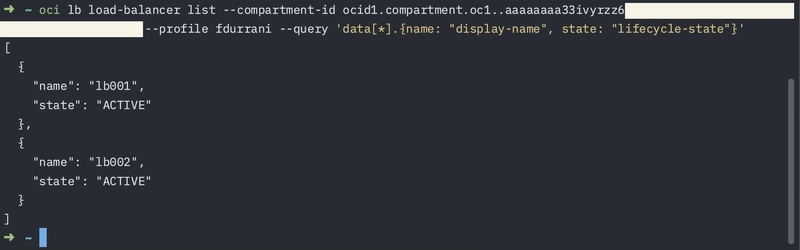
5.1: Simple Attribute View
So, to get the name and lifecycle states of the Load Balancers, simply add the --query flag and filter the required attributes:
oci lb load-balancer list --compartment-id ocid1.compartment.oc1..aaaaaaaa33ivyrzz6vffwqqtinbotytydxadfvxaejovjqzrnajp --profile fdurrani --query 'data[*]["display-name", "lifecycle-state"]'

Or displaying the attributes in a JSON format:
oci lb load-balancer list --compartment-id ocid1.compartment.oc1..aaaaaaaa33ivyrzz6vffevwdjgyqysqsnsmnejhjxhtit --profile fdurrani --query 'data[*].{name: "display-name", state: "lifecycle-state"}'
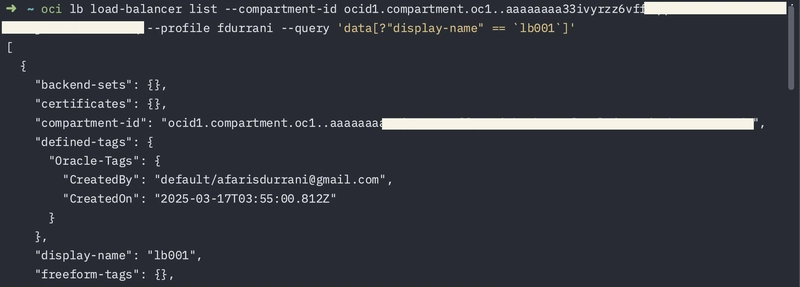
5.2: Filtering Items
JMESPath can also be used to filter items using the ? keyword:
oci lb load-balancer list --compartment-id ocid1.compartment.oc1..aaaaaaaa33ivyrzz6vffwqegidwzruirmthyccjjppixvmy --profile fdurrani --query 'data[?"display-name" == `lb001`]'
Pay attention to the strict correct usages of `, ', and ".
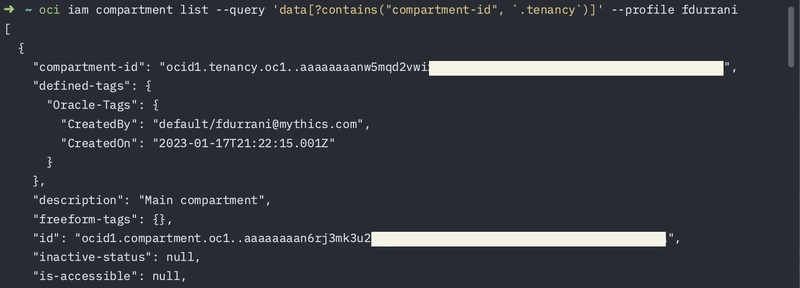
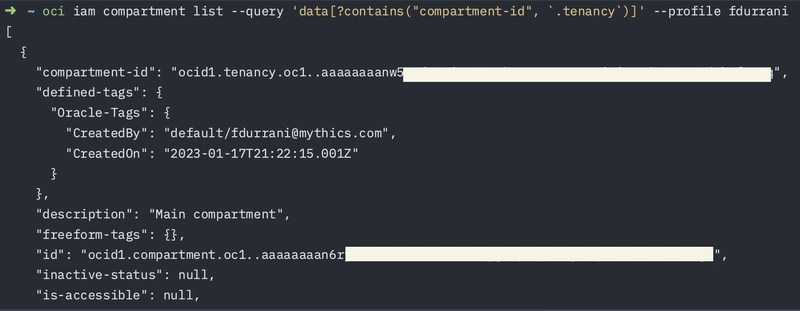
5.3: Finding attributes containing a substring
The command
data[?contains("attribute-name", `myCustomName`)]
allows you to further filter your resources by searching for a substring match in your results:
oci iam compartment list --query 'data[?contains("compartment-id", `.tenancy`)]' --profile fdurrani
5.4: Get length of results
Simply use length(...)
oci network subnet list --compartment-id ocid1.compartment.oc1..aaaaaaaa33ivyrzz6vffwqqtinb75beqvofivmyyasncytwuhtubqvz --query 'length(data)' --profile fdurrani

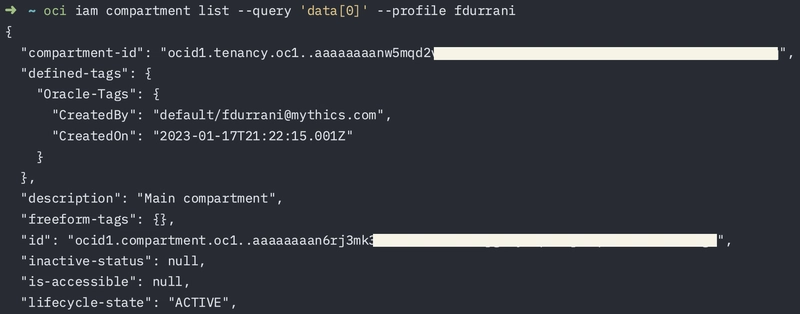
5.5: Getting an item in the list
To retrieve the first item from the data result list is just using a simple [0]. As is the next items in the list using 1, 2, 3...
oci iam compartment list --query 'data[0]' --profile fdurrani
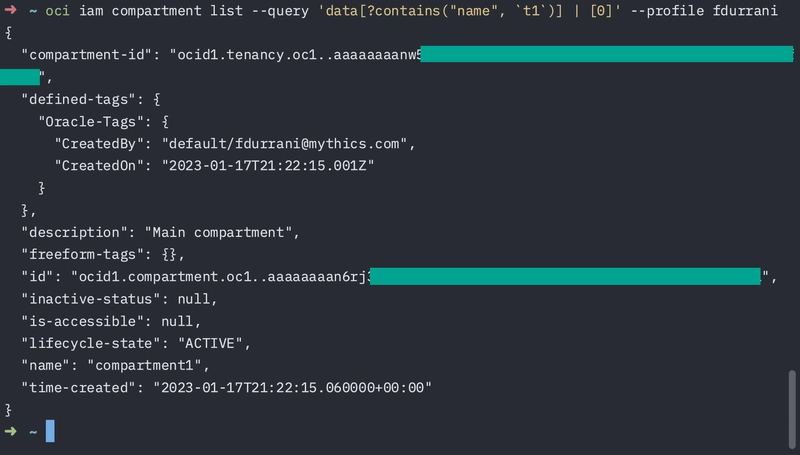
Getting an item using its index from a previously filtered list of results merely necessitates the | pipe command:
oci iam compartment list --query 'data[?contains("name", `t1`)] | [0]' --profile fdurrani
5.6: Getting the tenancy ID using OCI CLI
Now that we know how to get a compartment by using a substring search of its attributes, we can search for any mention of the .tenancy in the ID to get the tenancy ID:
oci iam compartment list --query 'data[?contains("compartment-id", `.tenancy`)]' --profile fdurrani
Getting the compartment-id attribute only:
oci iam compartment list --query 'data[?contains("compartment-id", `.tenancy`)]."compartment-id"' --profile fdurrani
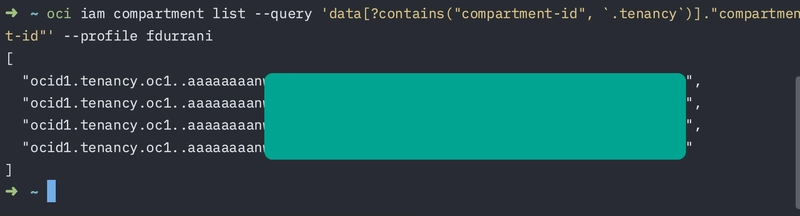
And getting the first result:
oci iam compartment list --query 'data[?contains("compartment-id", `.tenancy`)]."compartment-id" | [0]' --profile fdurrani

And removing the quotation marks " for good measure:
oci iam compartment list --query 'data[?contains("compartment-id", `.tenancy`)]."compartment-id" | [0]' --raw-output --profile fdurrani

That is how you get your tenancy ID using OCI CLI.
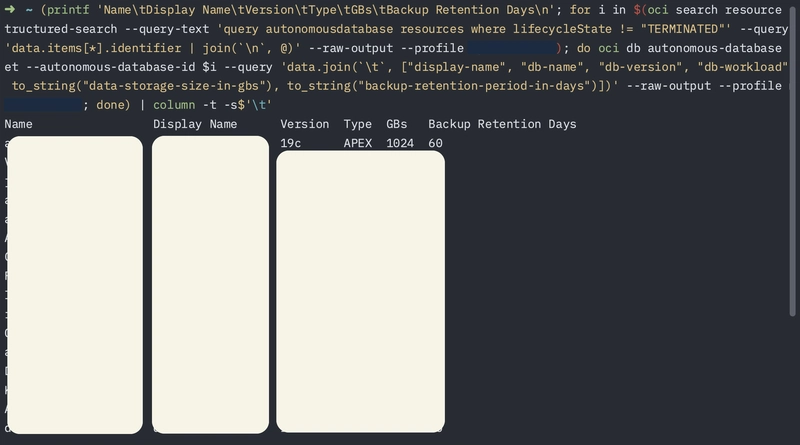
Go wild
When you really know Bash and JMESPath, you can create very complex commands. Such as this which shows the list of all autonomous databases in the tenancy in a table:
(printf 'Name\tDisplay Name\tVersion\tType\tGBs\tBackup Retention Days\n'; for i in $(oci search resource structured-search --query-text 'query autonomousdatabase resources where lifecycleState != "TERMINATED"' --query 'data.items[*].identifier | join(`\n`, @)' --raw-output --profile fdurrani); do oci db autonomous-database get --autonomous-database-id $i --query 'data.join(`\t`, ["display-name", "db-name", "db-version", "db-workload", to_string("data-storage-size-in-gbs"), to_string("backup-retention-period-in-days")])' --raw-output --profile fdurrani; done) | column -t -s$'\t'
References
Safe harbor statement
The information provided on this channel/article/story is solely intended for informational purposes and cannot be used as a part of any contractual agreement. The content does not guarantee the delivery of any material, code, or functionality, and should not be the sole basis for making purchasing decisions. The postings on this site are my own and do not necessarily reflect the views or work of Oracle or Mythics, LLC.
This work is licensed under a Creative Commons Attribution 4.0 International License.