Adding RAG and ML to AI files reorganization CLI (messy-folder-reorganizer-ai)
A month ago, I created the first naive version of a CLI tool for AI-powered file reorganization in Rust — messy-folder-reorganizer-ai. It sent file names and paths to Ollama and asked the LLM to generate new paths for each file. This worked fine for a small number of files, but once the count exceeded around 50, the LLM context filled up quickly. So, I decided to improve the entire workflow by integrating RAG (Retrieval-Augmented Generation). Version 0.2 Workflow Updates Here’s how adding RAG and a bit of ML helped improve the file reorganization flow in the CLI: 1. Custom Source and Destination Paths First, I allowed users to specify different paths: A source path where files are located. A destination path where files will be moved. 2. Adding RAG with Qdrant Next, I introduced RAG into the system. As a vector database, I chose Qdrant — an open-source, easy-to-run local vector store. Currently, users need to manually download and launch Qdrant. Automatic setup is planned for future versions. The core of RAG is generating embeddings from text. Here's the step-by-step: 3. Embedding Folder and File Names The CLI sends destination folder names and source file names to an Ollama embedding model. The model returns an embedding (vector) for each name. Contextualizing the Input Instead of sending raw names, I added context like: "This is a folder name: {folder_name}" A more detailed explanation will be in the next article. Embedding Model Selection Different models return vectors of different dimensions. I used the mxbai-embed-large:latest model from Ollama, which produces 1024-dimensional vectors. It performed well for most use cases. 4. Storing Folder Embeddings in Qdrant Each destination folder's embedding is stored in Qdrant, with the original folder name included as payload metadata. 5. Matching Files to Closest Folders For each source file embedding, the CLI searches Qdrant for the closest destination folder vector. Qdrant returns the most similar match along with a similarity score. More about similarity measures and why I picked a particular one will be covered in the third article. 6. Threshold-Based Filtering The CLI compares each similarity score to a configurable threshold (set via config files). If no suitable match is found, the file is filtered out and sent to an additional step — clustering and folder name generation via LLM. 7. Clustering Unmatched Files Since LLMs struggle with large input contexts, we split unmatched files into clusters using machine learning — specifically agglomerative hierarchical clustering. More details about clustering are in the fourth article in this series. 8. Naming Clusters via LLM Once clustering is complete, we end up with small, manageable groups of files. For each cluster, we send a prompt to the LLM to generate a suitable folder name. After some LLM thinking time, we receive the missing folder names and can show the user a preview of the proposed file reorganization. 9. Applying the Changes If the user is happy with the proposed structure, they can confirm it. The CLI will then move the files to their new paths accordingly. Conclusion In the upcoming articles, I’ll dive into some of the more technical and interesting parts of the project: How to choose a similarity search method. Ways to improve embeddings for files and folders. Selecting and preparing data for clustering. Looking for Feedback I’d really appreciate any feedback — positive or critical — on the project, the codebase, the article series, or the general approach used in the CLI. Thanks for Reading! Feel free to reach out here or connect with me on: GitHub LinkedIn Or just drop me a note if you want to chat about Rust, AI, or creative ways to clean up messy folders!
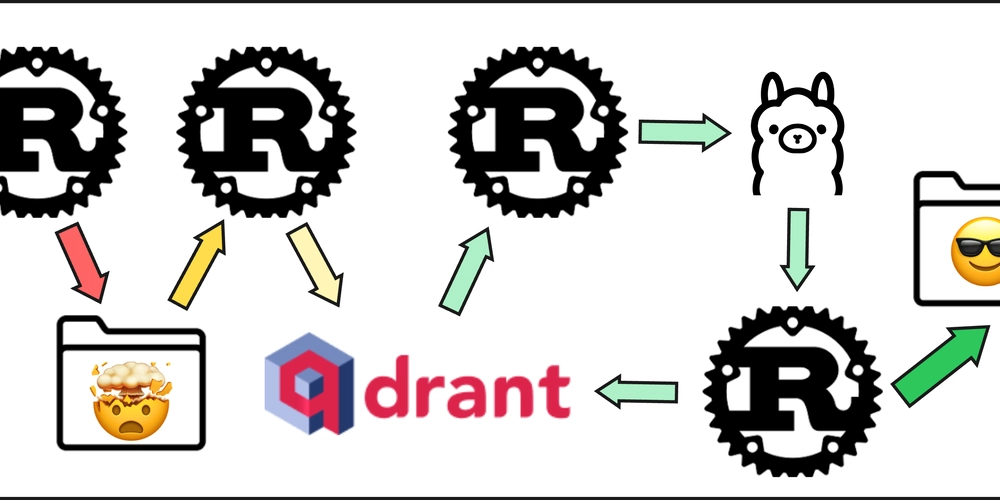
A month ago, I created the first naive version of a CLI tool for AI-powered file reorganization in Rust — messy-folder-reorganizer-ai. It sent file names and paths to Ollama and asked the LLM to generate new paths for each file. This worked fine for a small number of files, but once the count exceeded around 50, the LLM context filled up quickly.
So, I decided to improve the entire workflow by integrating RAG (Retrieval-Augmented Generation).
Version 0.2 Workflow Updates
Here’s how adding RAG and a bit of ML helped improve the file reorganization flow in the CLI:
1. Custom Source and Destination Paths
First, I allowed users to specify different paths:
- A source path where files are located.
- A destination path where files will be moved.
2. Adding RAG with Qdrant
Next, I introduced RAG into the system. As a vector database, I chose Qdrant — an open-source, easy-to-run local vector store.
Currently, users need to manually download and launch Qdrant. Automatic setup is planned for future versions.
The core of RAG is generating embeddings from text. Here's the step-by-step:
3. Embedding Folder and File Names
The CLI sends destination folder names and source file names to an Ollama embedding model. The model returns an embedding (vector) for each name.
Contextualizing the Input
Instead of sending raw names, I added context like:
"This is a folder name: {folder_name}"
A more detailed explanation will be in the next article.
Embedding Model Selection
Different models return vectors of different dimensions. I used the mxbai-embed-large:latest model from Ollama, which produces 1024-dimensional vectors. It performed well for most use cases.
4. Storing Folder Embeddings in Qdrant
Each destination folder's embedding is stored in Qdrant, with the original folder name included as payload metadata.
5. Matching Files to Closest Folders
For each source file embedding, the CLI searches Qdrant for the closest destination folder vector.
Qdrant returns the most similar match along with a similarity score.
More about similarity measures and why I picked a particular one will be covered in the third article.
6. Threshold-Based Filtering
The CLI compares each similarity score to a configurable threshold (set via config files). If no suitable match is found, the file is filtered out and sent to an additional step — clustering and folder name generation via LLM.
7. Clustering Unmatched Files
Since LLMs struggle with large input contexts, we split unmatched files into clusters using machine learning — specifically agglomerative hierarchical clustering.
More details about clustering are in the fourth article in this series.
8. Naming Clusters via LLM
Once clustering is complete, we end up with small, manageable groups of files. For each cluster, we send a prompt to the LLM to generate a suitable folder name.
After some LLM thinking time, we receive the missing folder names and can show the user a preview of the proposed file reorganization.
9. Applying the Changes
If the user is happy with the proposed structure, they can confirm it. The CLI will then move the files to their new paths accordingly.
Conclusion
In the upcoming articles, I’ll dive into some of the more technical and interesting parts of the project:
- How to choose a similarity search method.
- Ways to improve embeddings for files and folders.
- Selecting and preparing data for clustering.
Looking for Feedback
I’d really appreciate any feedback — positive or critical — on the project, the codebase, the article series, or the general approach used in the CLI.
Thanks for Reading!
Feel free to reach out here or connect with me on:
Or just drop me a note if you want to chat about Rust, AI, or creative ways to clean up messy folders!


![[The AI Show Episode 142]: ChatGPT’s New Image Generator, Studio Ghibli Craze and Backlash, Gemini 2.5, OpenAI Academy, 4o Updates, Vibe Marketing & xAI Acquires X](https://www.marketingaiinstitute.com/hubfs/ep%20142%20cover.png)






![[FREE EBOOKS] The Kubernetes Bible, The Ultimate Linux Shell Scripting Guide & Four More Best Selling Titles](https://www.javacodegeeks.com/wp-content/uploads/2012/12/jcg-logo.jpg)


![From drop-out to software architect with Jason Lengstorf [Podcast #167]](https://cdn.hashnode.com/res/hashnode/image/upload/v1743796461357/f3d19cd7-e6f5-4d7c-8bfc-eb974bc8da68.png?#)


.png?#)


.jpg?#)


_Christophe_Coat_Alamy.jpg?#)
















![Rapidus in Talks With Apple as It Accelerates Toward 2nm Chip Production [Report]](https://www.iclarified.com/images/news/96937/96937/96937-640.jpg)


