


![[The AI Show Episode 144]: ChatGPT’s New Memory, Shopify CEO’s Leaked “AI First” Memo, Google Cloud Next Releases, o3 and o4-mini Coming Soon & Llama 4’s Rocky Launch](https://www.marketingaiinstitute.com/hubfs/ep%20144%20cover.png)


![Blue Archive tier list [April 2025]](https://media.pocketgamer.com/artwork/na-33404-1636469504/blue-archive-screenshot-2.jpg?#)


.png?#)


.webp?#)


![[Update: Optional] Google rolling out auto-restart security feature to Android](https://i0.wp.com/9to5google.com/wp-content/uploads/sites/4/2025/01/google-play-services-2.jpg?resize=1200%2C628&quality=82&strip=all&ssl=1)


![Apple to Split Enterprise and Western Europe Roles as VP Exits [Report]](https://www.iclarified.com/images/news/97032/97032/97032-640.jpg)
![Nanoleaf Announces New Pegboard Desk Dock With Dual-Sided Lighting [Video]](https://www.iclarified.com/images/news/97030/97030/97030-640.jpg)


![Security Database Used by Apple Goes Independent After Funding Cut [Updated]](https://images.macrumors.com/t/FWFeAmxnHKf7vkk_MCBh9TcNMVg=/1600x/article-new/2023/05/bug-security-vulnerability-issue-fix-larry.jpg)


Virtual Tables in Dynamics 365 CE: Real-Time Integration with FinOps Invoices
Ever wanted to show real-time financial data in Dynamics 365 CE without duplicating records or setting up complex sync jobs? That’s exactly what we achieved using Virtual Tables—connecting Finance & Operations (FinOps) with Customer Engagement (CE) to display invoice data directly inside Account records. Why Virtual Tables? No data duplication – data stays in FinOps Real-time access – always fresh Native UI experience in model-driven apps Less maintenance vs. custom sync/integration Use Case: Invoice Visibility from FinOps in CE Our goal was to embed invoice records under the Account form in Dynamics 365 CE using a subgrid. These records were to be fetched live from FinOps, using Virtual Tables backed by OData. Step-by-Step Implementation 1. Install Required Solutions Install the Virtual Entity Bridge for FinOps Ensure Dual-write core components are set up Coordinate with the FinOps team to expose OData feeds (like Invoice headers) 2. Configure Virtual Entity Data Source Go to Advanced Settings > Administration > Virtual Entity Data Sources Create a new data source of type OData v4 Data Provider Provide the endpoint URL from FinOps Use Service Principal authentication for security 3. Define the Virtual Table In Power Apps: Go to Solutions > New Table Tick Virtual Table checkbox Bind it to the OData source Define key fields (InvoiceID, CustomerNumber, etc.) Add columns like date, amount, status, etc. 4. Add Subgrid to the Account Form Use the Form Editor on Account entity to insert a subgrid linked to the virtual table. Filter it by customer number or related lookup. Configure appropriate views. What We Gained Sales teams could view invoice payment status in real-time Finance data remained secure in FinOps No duplication = no sync jobs = no reconciliation headaches Minimal performance impact when used on-demand Tips Use indexed fields in your OData queries Don’t overload subgrids with unnecessary columns Test access with non-admin users Apply security roles cautiously Conclusion If you're running both Dynamics 365 CE and FinOps, Virtual Tables are a game changer. They provide seamless access to external data with minimal setup and maximum control.
Ever wanted to show real-time financial data in Dynamics 365 CE without duplicating records or setting up complex sync jobs?
That’s exactly what we achieved using Virtual Tables—connecting Finance & Operations (FinOps) with Customer Engagement (CE) to display invoice data directly inside Account records.
Why Virtual Tables?
- No data duplication – data stays in FinOps
- Real-time access – always fresh
- Native UI experience in model-driven apps
- Less maintenance vs. custom sync/integration
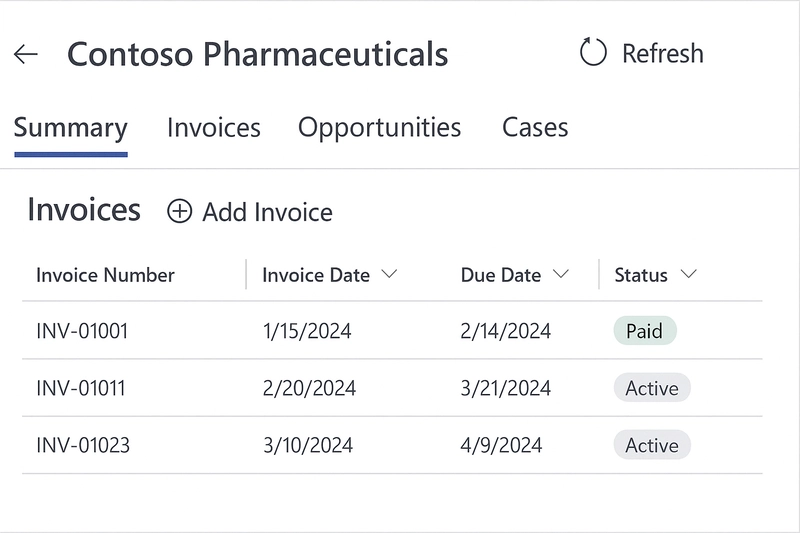
Use Case: Invoice Visibility from FinOps in CE
Our goal was to embed invoice records under the Account form in Dynamics 365 CE using a subgrid. These records were to be fetched live from FinOps, using Virtual Tables backed by OData.
Step-by-Step Implementation
1. Install Required Solutions
- Install the Virtual Entity Bridge for FinOps
- Ensure Dual-write core components are set up
- Coordinate with the FinOps team to expose OData feeds (like Invoice headers)
2. Configure Virtual Entity Data Source
Go to Advanced Settings > Administration > Virtual Entity Data Sources
Create a new data source of type OData v4 Data Provider
- Provide the endpoint URL from FinOps
- Use Service Principal authentication for security
3. Define the Virtual Table
In Power Apps:
- Go to Solutions > New Table
- Tick Virtual Table checkbox
- Bind it to the OData source
- Define key fields (
InvoiceID,CustomerNumber, etc.) - Add columns like date, amount, status, etc.
4. Add Subgrid to the Account Form
Use the Form Editor on Account entity to insert a subgrid linked to the virtual table.
- Filter it by customer number or related lookup.
- Configure appropriate views.
What We Gained
- Sales teams could view invoice payment status in real-time
- Finance data remained secure in FinOps
- No duplication = no sync jobs = no reconciliation headaches
- Minimal performance impact when used on-demand
Tips
- Use indexed fields in your OData queries
- Don’t overload subgrids with unnecessary columns
- Test access with non-admin users
- Apply security roles cautiously
Conclusion
If you're running both Dynamics 365 CE and FinOps, Virtual Tables are a game changer. They provide seamless access to external data with minimal setup and maximum control.