Using Model Context Protocol with Rig
Introduction The landscape of AI development is rapidly evolving, with large language models (LLMs) increasingly being called upon to interact with external tools and APIs to accomplish complex tasks. Anthropic's Model Context Protocol represents a significant step forward in this domain, providing a standardized approach for models like Claude to seamlessly interact with various tools. Recently, many companies have started looking to Model Context Protocol as a way for their users to be able to access their APIs through LLMs. When combined with the Rig framework's robust agent architecture in Rust, developers can create powerful, reliable AI agents capable of executing sophisticated workflows with enhanced reasoning capabilities. In this article, we'll explore how to implement Anthropic's Model Context Protocol within the Rig framework, offering Rust developers a pathway to building state-of-the-art agentic AI systems. We'll walk through practical implementation steps, best practices, and example use cases that demonstrate the potential of this powerful combination. Below is an example of the result of running the MCP server built in this article: What is Model Context Protocol? Model Context Protocol (MCP for short) is Anthropic's standardized interface for enabling AI models like Claude to interact with external tools and APIs. At its core, MCP defines a structured way for models to: Request tool use: Models can explicitly indicate when they need to use a specific tool Receive tool responses: Models can process and incorporate results from tool executions Maintain context awareness: Models can track the state of ongoing interactions across multiple tool calls Unlike traditional prompt engineering approaches, MCP provides a more reliable and consistent mechanism for tool use, reducing hallucinations and improving the model's ability to reason about when and how to use tools. The protocol uses a JSON-based format that clearly delineates between model reasoning, tool requests, and tool responses, making the interaction flow more predictable and traceable. Why is MCP useful? MCP is great because essentially, it allows you to create a proxy from your LLM to pretty much whatever you want. You can create an MCP to replicate certain services, or to create suites of utilities for your LLM. For example: many developers have already started creating and using MCP servers for various specific services like Stripe, Qdrant, and even things like Postgres - granting you full usage (at least insofar as the MCP server is capable) to the service from your LLM. You can also additionally create MCP servers for all the functionality that a certain role might find useful: for example, an MCP server for accountants. Or even an MCP server that calls other LLMs, which then talk to MCP servers... and so on and so forth. How do I use MCP with Rig? Fortunately for us, Model Context Protocol has an official Rust SDK which you can use today to be able to spin up your own MCP server and use it with Rig. There's two components to this: Creating your own MCP server Using an MCP server with Rig We'll be covering both of these components in this article. The example we will be using in this article is an MCP server which has a tool for adding numbers together. Building your own MCP server Building your own MCP server requires you to write tools with names, descriptions and parameters (as well as descriptions of those parameters, ideally!) and then adding them all to a server. Fortunately, the mcp-core crate provides most of this for us, leaving us to do primarily only the tool implementations. You can see what a tool looks like below: use mcp_core_macros::tool; use mcp_core::ToolResponseContent; use anyhow::Result; #[tool( name = "Add", description = "Adds two numbers together.", params(a = "The first number to add", b = "The second number to add") )] async fn add_tool(a: f64, b: f64) -> Result { Ok(tool_text_content!((a + b).to_string())) } The #[tool] macro generates a trait implementation which makes the tool compatible with the server (from the Rust side). Next, we need to create a mcp_core::Server that lists all the tools that we can do. Note that we have a single tool in the ServerCapabilities struct called listChanged - this simply tells the server whether or not we want to receive notifications on our MCP client when the list of tools has changed. let mcp_server_protocol = Server::builder("add".to_string(), "1.0".to_string()) .capabilities(ServerCapabilities { tools: Some(json!({ "listChanged": false, })), ..Default::default() }) .register_tool(AddTool::tool(), AddTool::call()) .build(); Note that you can basically register whatever tools you want to the server by using .register_tool() which takes the tool definition (from the add_tool function we created earlier),
Introduction
The landscape of AI development is rapidly evolving, with large language models (LLMs) increasingly being called upon to interact with external tools and APIs to accomplish complex tasks. Anthropic's Model Context Protocol represents a significant step forward in this domain, providing a standardized approach for models like Claude to seamlessly interact with various tools. Recently, many companies have started looking to Model Context Protocol as a way for their users to be able to access their APIs through LLMs.
When combined with the Rig framework's robust agent architecture in Rust, developers can create powerful, reliable AI agents capable of executing sophisticated workflows with enhanced reasoning capabilities. In this article, we'll explore how to implement Anthropic's Model Context Protocol within the Rig framework, offering Rust developers a pathway to building state-of-the-art agentic AI systems. We'll walk through practical implementation steps, best practices, and example use cases that demonstrate the potential of this powerful combination.
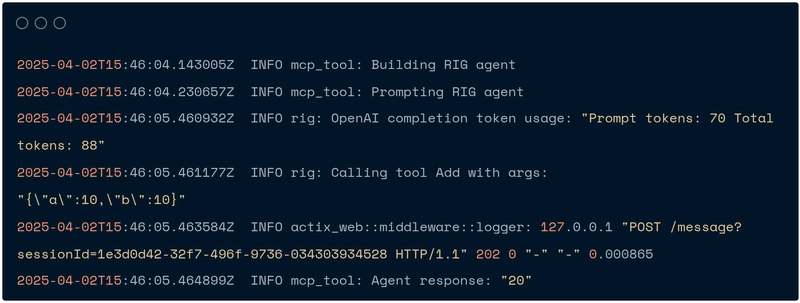
Below is an example of the result of running the MCP server built in this article:
What is Model Context Protocol?
Model Context Protocol (MCP for short) is Anthropic's standardized interface for enabling AI models like Claude to interact with external tools and APIs. At its core, MCP defines a structured way for models to:
- Request tool use: Models can explicitly indicate when they need to use a specific tool
- Receive tool responses: Models can process and incorporate results from tool executions
- Maintain context awareness: Models can track the state of ongoing interactions across multiple tool calls
Unlike traditional prompt engineering approaches, MCP provides a more reliable and consistent mechanism for tool use, reducing hallucinations and improving the model's ability to reason about when and how to use tools. The protocol uses a JSON-based format that clearly delineates between model reasoning, tool requests, and tool responses, making the interaction flow more predictable and traceable.
Why is MCP useful?
MCP is great because essentially, it allows you to create a proxy from your LLM to pretty much whatever you want. You can create an MCP to replicate certain services, or to create suites of utilities for your LLM. For example: many developers have already started creating and using MCP servers for various specific services like Stripe, Qdrant, and even things like Postgres - granting you full usage (at least insofar as the MCP server is capable) to the service from your LLM.
You can also additionally create MCP servers for all the functionality that a certain role might find useful: for example, an MCP server for accountants. Or even an MCP server that calls other LLMs, which then talk to MCP servers... and so on and so forth.
How do I use MCP with Rig?
Fortunately for us, Model Context Protocol has an official Rust SDK which you can use today to be able to spin up your own MCP server and use it with Rig.
There's two components to this:
- Creating your own MCP server
- Using an MCP server with Rig
We'll be covering both of these components in this article. The example we will be using in this article is an MCP server which has a tool for adding numbers together.
Building your own MCP server
Building your own MCP server requires you to write tools with names, descriptions and parameters (as well as descriptions of those parameters, ideally!) and then adding them all to a server.
Fortunately, the mcp-core crate provides most of this for us, leaving us to do primarily only the tool implementations. You can see what a tool looks like below:
use mcp_core_macros::tool;
use mcp_core::ToolResponseContent;
use anyhow::Result;

#[tool(
    name = "Add",
    description = "Adds two numbers together.",
    params(a = "The first number to add", b = "The second number to add")
)]
async fn add_tool(a: f64, b: f64) -> Result<ToolResponseContent> {
    Ok(tool_text_content!((a + b).to_string()))
}
The #[tool] macro generates a trait implementation which makes the tool compatible with the server (from the Rust side).
Next, we need to create a mcp_core::Server that lists all the tools that we can do. Note that we have a single tool in the ServerCapabilities struct called listChanged - this simply tells the server whether or not we want to receive notifications on our MCP client when the list of tools has changed.
let mcp_server_protocol = Server::builder("add".to_string(), "1.0".to_string())
    .capabilities(ServerCapabilities {
        tools: Some(json!({
            "listChanged": false,
        })),
        ..Default::default()
    })
    .register_tool(AddTool::tool(), AddTool::call())
    .build();
Note that you can basically register whatever tools you want to the server by using .register_tool() which takes the tool definition (from the add_tool function we created earlier), as well as a function pointer (which corresponds to the tool).
Next, we need to create an MCP transport server by simply creating a ServerSseTransport. We then plug this into Server::start() which starts up a web server and runs indefinitely (until it's shut down).
let mcp_server_transport =
    ServerSseTransport::new("127.0.0.1".to_string(), 3000, mcp_server_protocol);

Server::start(mcp_server_transport).await;
Note that if we also want to simultaneously do other things while the server is running, we can spawn a Tokio task which defers it to a separate concurrent task:
tokio::spawn( async move { Server::start(mcp_server_transport).await });
This can be quite useful for local testing purposes, although in production running the MCP server as a separate binary will be much more reliable as there won't be any other tasks which might hinder performance.
Using MCP servers with Rig
Using Rig, we can create an MCP client that connects to basically any MCP-compliant server we want. To do this, you'll need to enable the mcp feature and radd the mcp-core crate:
cargo add rig-core mcp-core -F rig-core/mcp
Next, we will need to create our client transport and use it in our builder. As a general rule, you can connect to MCP servers through one of two ways:
-
stdio("Standard IO") transport. -
ssetransport (connecting to an MCP-compliant server with an SSE route)
The example below will use sse transport.
// Create the MCP client
let client_transport = ClientSseTransportBuilder::new("http://127.0.0.1:3000/sse".to_string()).build();
let mcp_client = ClientBuilder::new(client_transport).build();

// Start the MCP client
mcp_client.open().await?;

let init_res = mcp_client
    .initialize(
        Implementation {
            name: "mcp-client".to_string(),
            version: "0.1.0".to_string(),
        },
        ClientCapabilities::default(),
    )
    .await?;
println!("Initialized: {:?}", init_res);

let tools_list_res = mcp_client.list_tools(None, None).await?;
println!("Tools: {:?}", tools_list_res);
Once we've connected to the server and got our list of tools, we can then create our AI agent, add the MCP tools to our agent and then build & prompt the agent.
tracing::info!("Building RIG agent");
let completion_model = providers::openai::Client::from_env();
let mut agent_builder = completion_model.agent("gpt-4o");

// Add MCP tools to the agent
agent_builder = tools_list_res
    .tools
    .into_iter()
    .fold(agent_builder, |builder, tool| {
        builder.mcp_tool(tool, mcp_client.clone().into())
    });
let agent = agent_builder.build();

tracing::info!("Prompting RIG agent");
let response = agent.prompt("Add 10 + 10").await?;
tracing::info!("Agent response: {:?}", response);
Finishing up
Thanks for reading! I hope this article has enlightened you on using MCP with different tools and how to implement MCP servers using Rig, as well as the future possibilities that can be achieved by using MCP. Stay tuned for more!
For additional Rig resources and community engagement:
Check out more examples in our gallery.
Contribute or report issues on our GitHub.
Join discussions in our Discord community!


![[The AI Show Episode 142]: ChatGPT’s New Image Generator, Studio Ghibli Craze and Backlash, Gemini 2.5, OpenAI Academy, 4o Updates, Vibe Marketing & xAI Acquires X](https://www.marketingaiinstitute.com/hubfs/ep%20142%20cover.png)




![[FREE EBOOKS] The Kubernetes Bible, The Ultimate Linux Shell Scripting Guide & Four More Best Selling Titles](https://www.javacodegeeks.com/wp-content/uploads/2012/12/jcg-logo.jpg)


![From drop-out to software architect with Jason Lengstorf [Podcast #167]](https://cdn.hashnode.com/res/hashnode/image/upload/v1743796461357/f3d19cd7-e6f5-4d7c-8bfc-eb974bc8da68.png?#)


.png?#)


.jpg?#)


_Christophe_Coat_Alamy.jpg?#)




![Rapidus in Talks With Apple as It Accelerates Toward 2nm Chip Production [Report]](https://www.iclarified.com/images/news/96937/96937/96937-640.jpg)


