


![[The AI Show Episode 144]: ChatGPT’s New Memory, Shopify CEO’s Leaked “AI First” Memo, Google Cloud Next Releases, o3 and o4-mini Coming Soon & Llama 4’s Rocky Launch](https://www.marketingaiinstitute.com/hubfs/ep%20144%20cover.png)


![GrandChase tier list of the best characters available [April 2025]](https://media.pocketgamer.com/artwork/na-33057-1637756796/grandchase-ios-android-3rd-anniversary.jpg?#)


.png?width=1920&height=1920&fit=bounds&quality=70&format=jpg&auto=webp#)


![Apple M4 13-inch iPad Pro On Sale for $200 Off [Deal]](https://www.iclarified.com/images/news/97056/97056/97056-640.jpg)
![Apple Shares New 'Mac Does That' Ads for MacBook Pro [Video]](https://www.iclarified.com/images/news/97055/97055/97055-640.jpg)


Step-by-step guide on Providing shared file storage for the company offices on Azure Portal.
Table of contents 1. Introduction 2. Create a storage account specifically for file shares. 3. Configure a file share and directory. 4. Configure snapshots and practice restoring files. 5. Configure restricting storage access to selected virtual networks and subnets. 6. Conclusion. Introduction. Setting up shared file storage on the Azure Portal enhances collaboration and streamlines access to files across company offices. This guide provides a straightforward, step-by-step approach to provisioning and configuring storage that ensures scalability, security, and ease of use for your organization's shared resources. Whether managing day-to-day operations or supporting team projects, this guide equips you with the tools to optimize file sharing within your company. First, search the link and follow the instructions on the Azure cloud storage exercises (https://microsoftlearning.github.io/Secure-storage-for-Azure-Files-and-Azure-Blob-Storage/Instructions/Labs/LAB_03_storage_file_shares.html) 2.0. Create a storage account specifically for file shares 2.1. Create a storage account for the finance department’s shared files. log in to the Azure portal, search for and select Storage accounts. Select + Create. For the Resource group select Create new. Give your resource group a name and select OK to save your changes. Provide a Storage account name. Ensure the name meets the naming requirements. Set the Performance to Premium. Set the Premium account type to File shares. Set the Redundancy to Zone-redundant storage. Select Review and then Create the storage account. Wait for the resource to deploy. Select Go to the resource. 3.0. Create and configure a file share with directory. 3.1. Create a file share for the corporate office. In the storage account, in the Data storage section, select the File shares blade. Select + File share and provide a Name. Review the other options, but take the defaults. Select Create 3.2. Add a directory to the file share for the finance department. For future testing, upload a file. Select your file share and select + Add directory. Name the new directory finance. Select Browse and then select the finance directory. Notice you can Add a directory to further organize your file share. Upload a file of your choosing. 4.0. Configure snapshots and practice restoring files. Similar to blob storage, you need to protect against accidental deletion of files. You decide to use snapshots. 4.1. Select your file share. In the Operations section, select the Snapshots blade. Select + Add snapshot. The comment is optional. Select OK. Select your snapshot and verify your file directory and uploaded file are included. 4.2. Practice using snapshots to restore a file. Return to your file share. Browse to your file directory. Locate your uploaded file and in the Properties pane select Delete. Select Yes to confirm the deletion. Select the Snapshots blade and then select your snapshot. Navigate to the file you want to restore Select the file and then select Restore. Provide a Restored file name. Verify your file directory has the restored file. 5.0. Configure restricting storage access to selected virtual networks The tasks in this section require a virtual network with the subnet. In a production environment, these resources would already be created. 5.1. Search for and select Virtual networks. Select Create. Select your resource group. and give the virtual network a name. Take the defaults for other parameters, select Review + Create, and then Create. Wait for the resource to deploy and select Go to the resource. In the Settings section, select the Subnets blade. Select the default subnet. In the Service endpoints section choose Microsoft.Storage in the Services drop-down. Save your changes. 5.2. The storage account should only be accessed from the virtual network you just created. 5.1. Return to your files storage account. In the Security + networking section, select the Networking blade. Change the Public network access to Enabled from selected virtual networks and IP addresses. In the Virtual Networks section, select Add existing virtual network. Select your virtual network and subnet, and select Add. Be sure to Save your changes. Select the Storage browser and navigate to your file share. Verify the message is not authorized to perform this operation. You are not connecting from the virtual network. Conclusion. By completing this guide, you’ve successfully set up shared file storage on the Azure Portal to streamline collaboration across company offices. This scalable and secure solution ensures seamless access to shared resources, enhancing productivity and teamwork. Regular monitoring and updates will help you maintain an efficient and reliable file-sharing environment for your organization.
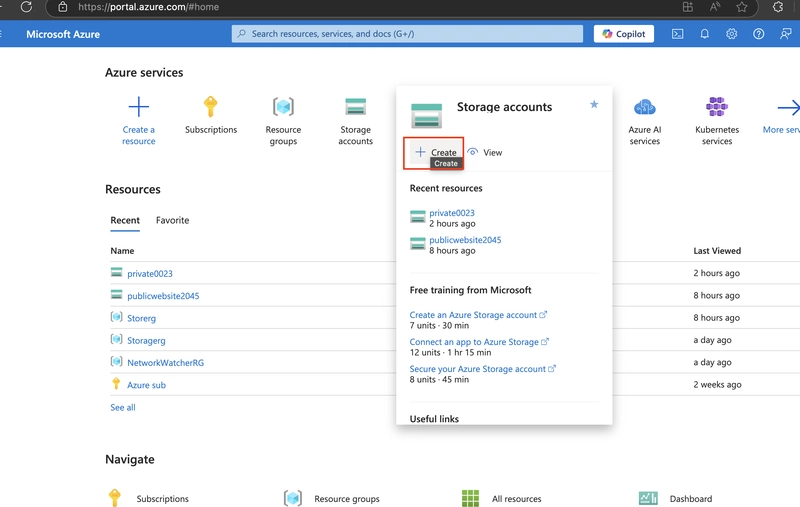
Table of contents
1. Introduction
2. Create a storage account specifically for file shares.
3. Configure a file share and directory.
4. Configure snapshots and practice restoring files.
5. Configure restricting storage access to selected virtual networks and subnets.
6. Conclusion.
Introduction.
Setting up shared file storage on the Azure Portal enhances collaboration and streamlines access to files across company offices. This guide provides a straightforward, step-by-step approach to provisioning and configuring storage that ensures scalability, security, and ease of use for your organization's shared resources. Whether managing day-to-day operations or supporting team projects, this guide equips you with the tools to optimize file sharing within your company.
First, search the link and follow the instructions on the Azure cloud storage exercises (https://microsoftlearning.github.io/Secure-storage-for-Azure-Files-and-Azure-Blob-Storage/Instructions/Labs/LAB_03_storage_file_shares.html)
2.0. Create a storage account specifically for file shares
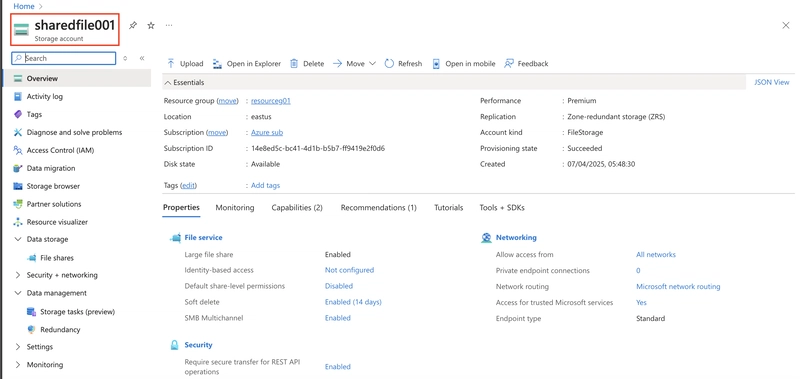
2.1. Create a storage account for the finance department’s shared files.
log in to the Azure portal, search for and select Storage accounts.
Select + Create.
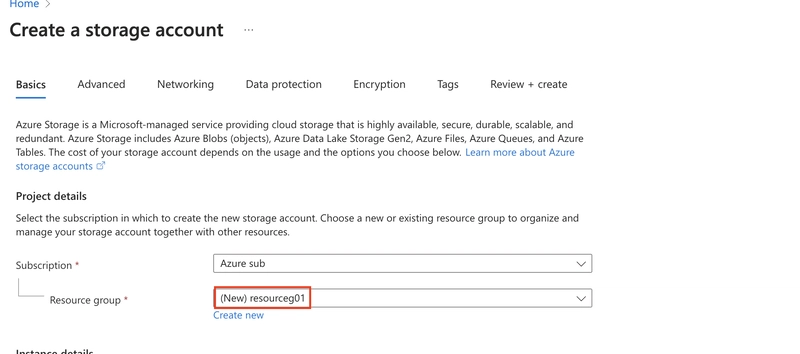
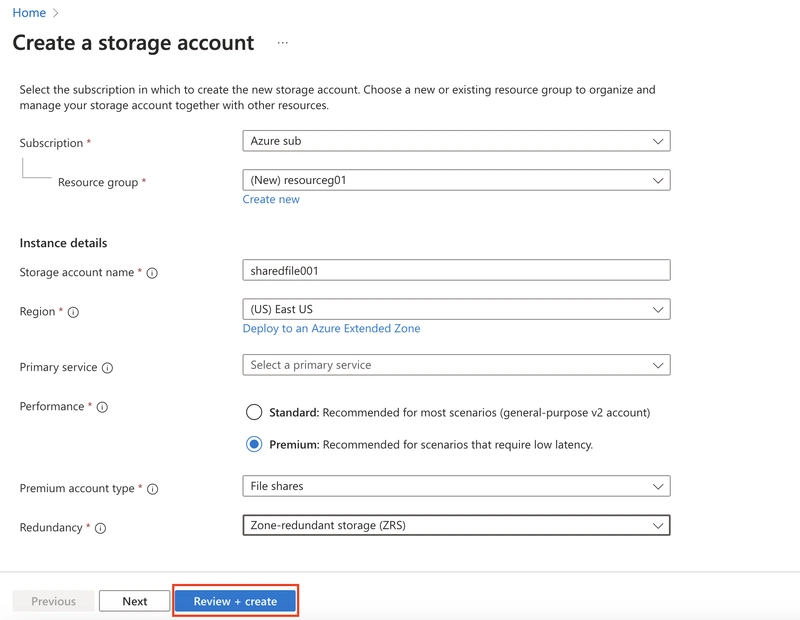
For the Resource group select Create new. Give your resource group a name and select OK to save your changes.
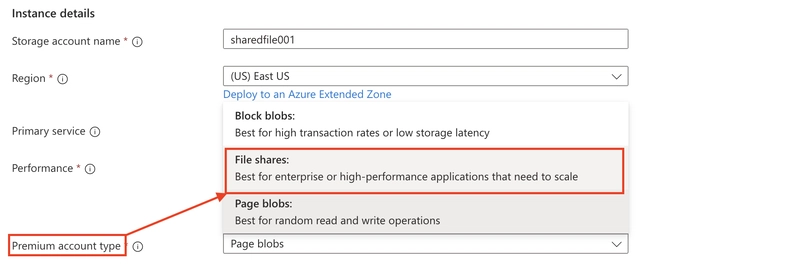
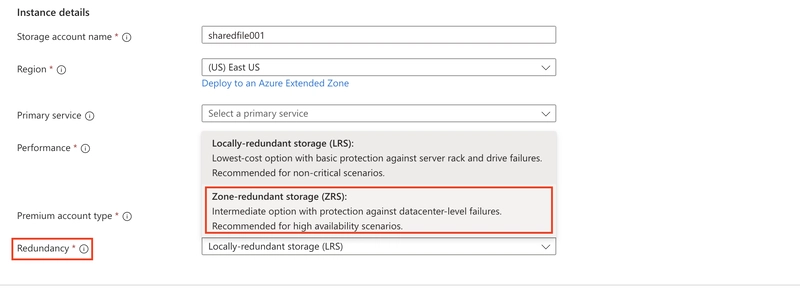
Provide a Storage account name. Ensure the name meets the naming requirements.

Set the Performance to Premium.

Set the Premium account type to File shares.
Set the Redundancy to Zone-redundant storage.
Select Review and then Create the storage account.

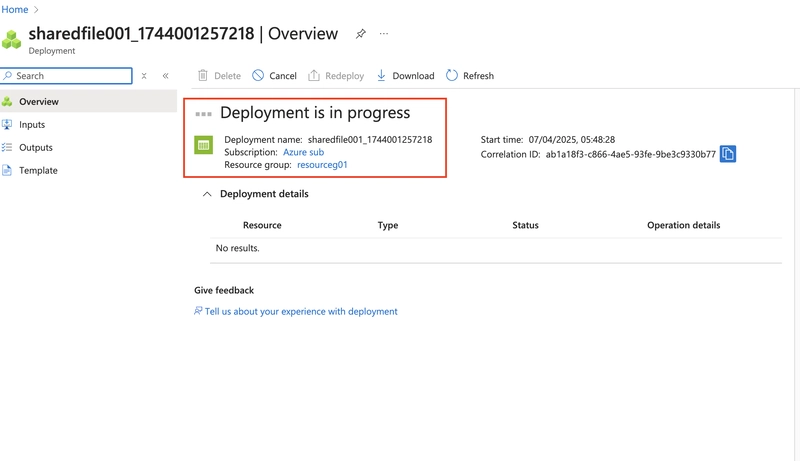
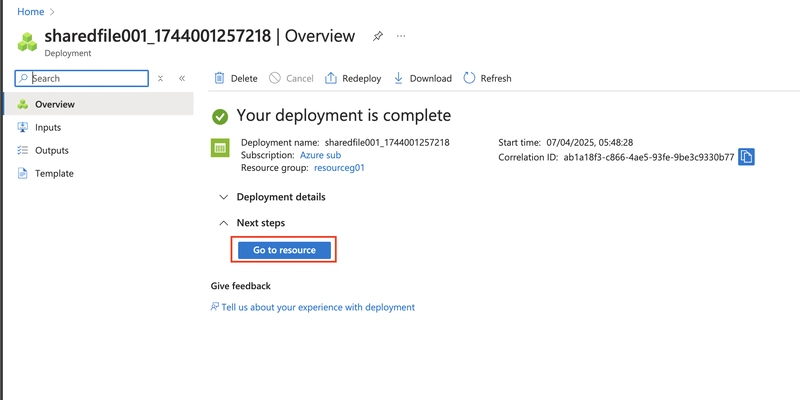
Wait for the resource to deploy.
Select Go to the resource.

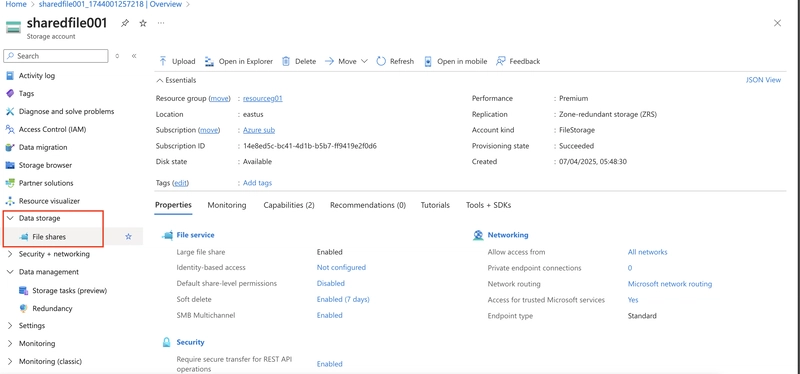
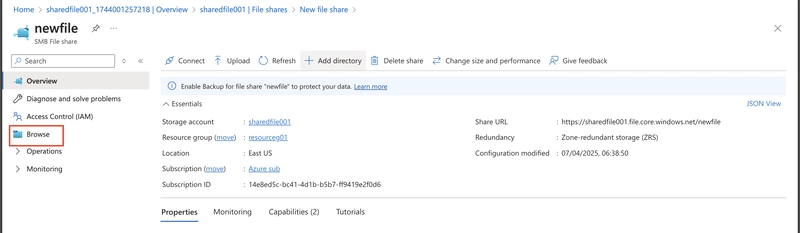
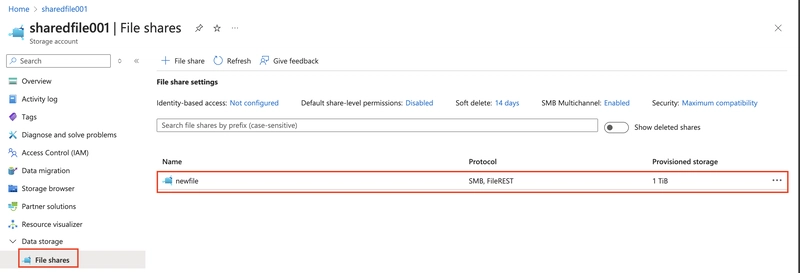
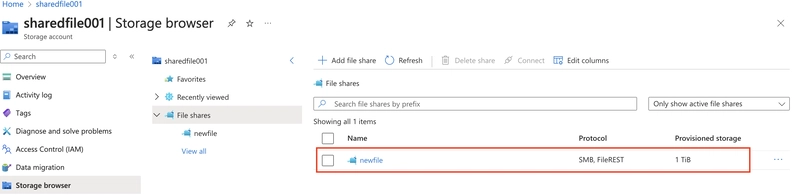
3.0. Create and configure a file share with directory.
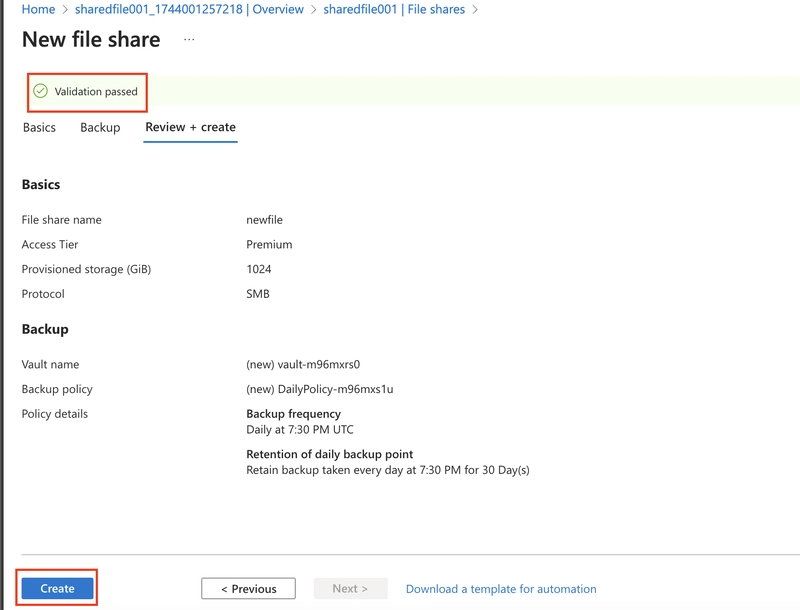
3.1. Create a file share for the corporate office.
In the storage account, in the Data storage section, select the File shares blade.
Select + File share and provide a Name.
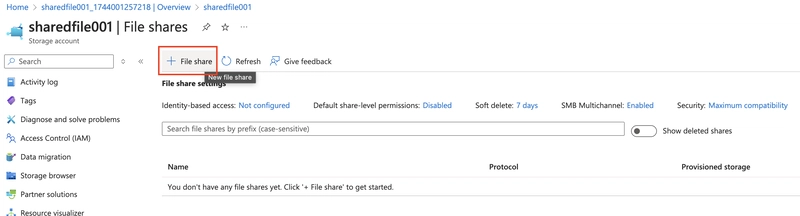
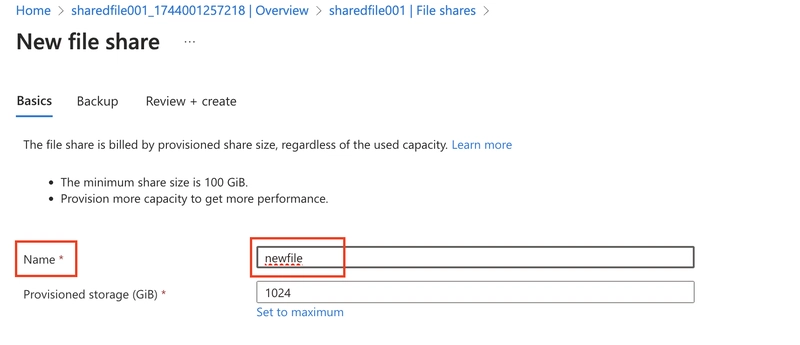
Review the other options, but take the defaults.
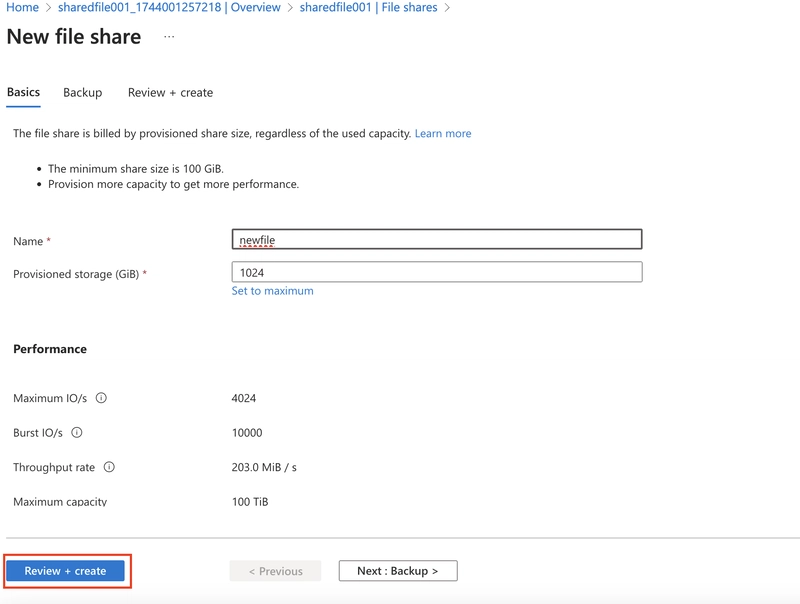
Select Create
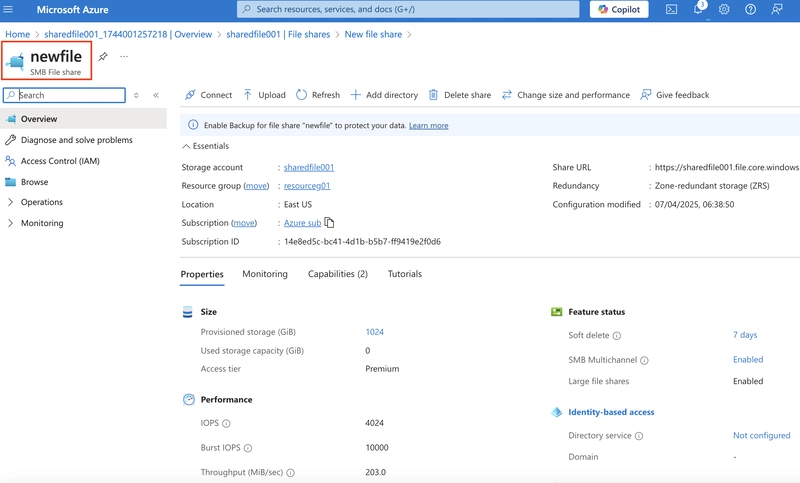
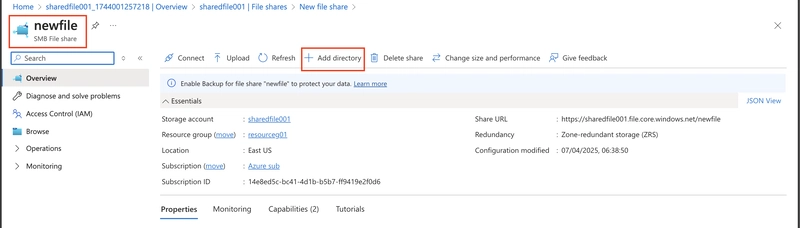
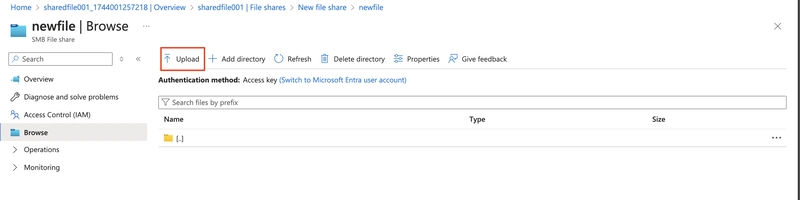
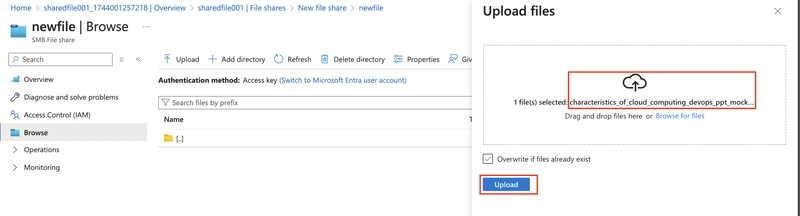
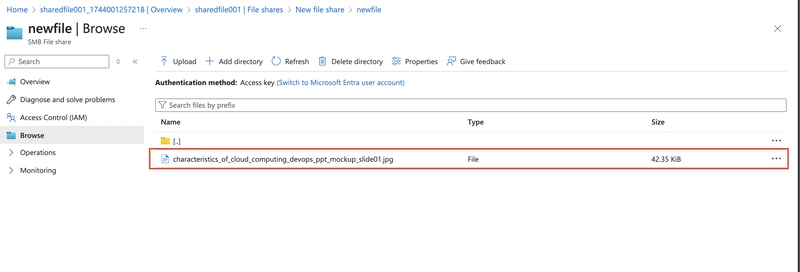
3.2. Add a directory to the file share for the finance department. For future testing, upload a file.
Select your file share and select + Add directory.
Name the new directory finance.
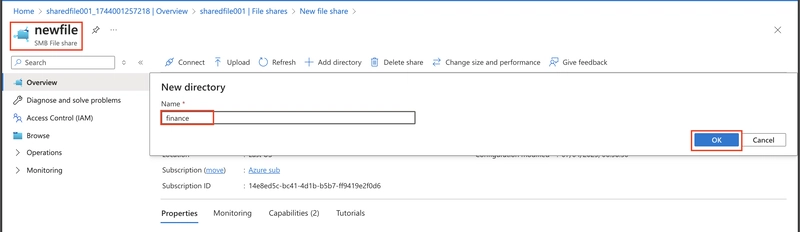
Select Browse and then select the finance directory.
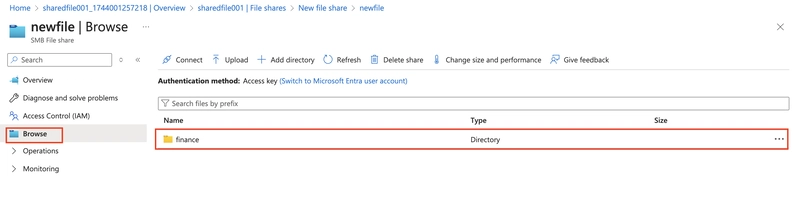
Notice you can Add a directory to further organize your file share.
Upload a file of your choosing.
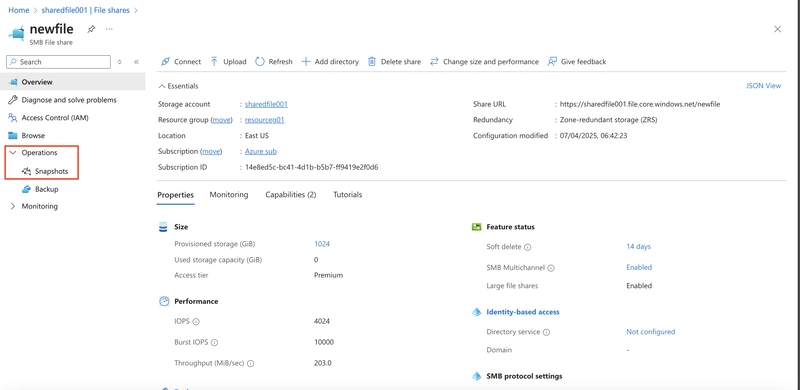
4.0. Configure snapshots and practice restoring files.
Similar to blob storage, you need to protect against accidental deletion of files. You decide to use snapshots.
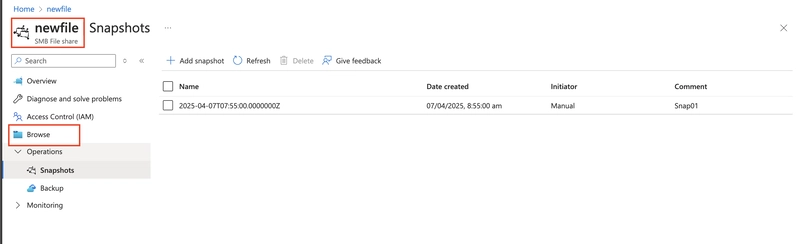
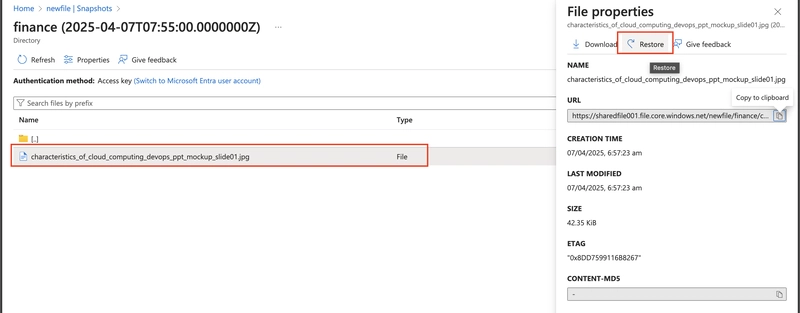
4.1. Select your file share.
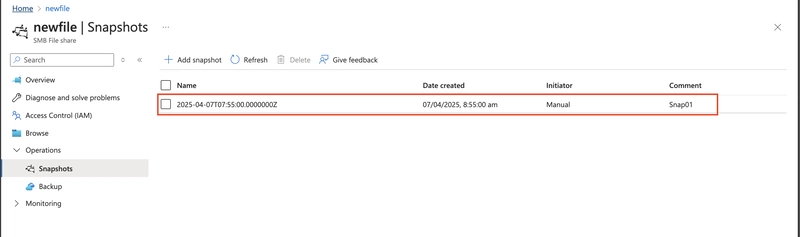
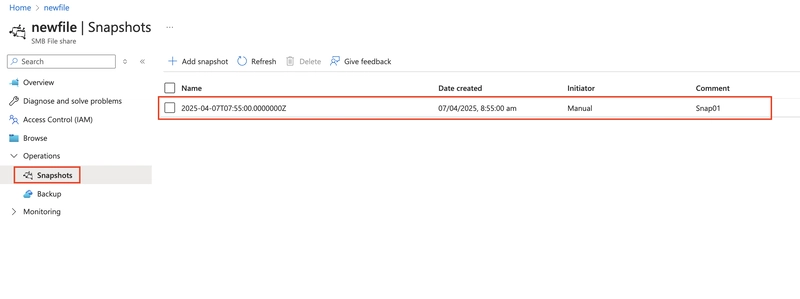
In the Operations section, select the Snapshots blade.
Select + Add snapshot. The comment is optional. Select OK.
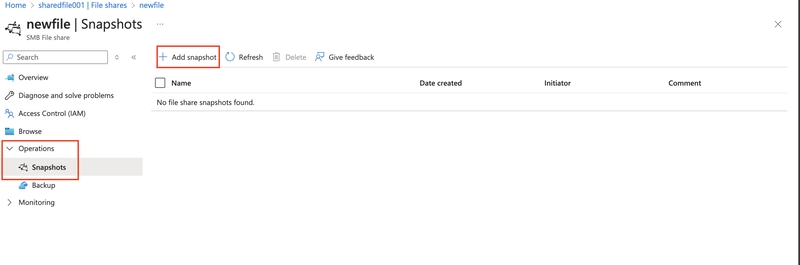
Select your snapshot and verify your file directory and uploaded file are included.

4.2. Practice using snapshots to restore a file.
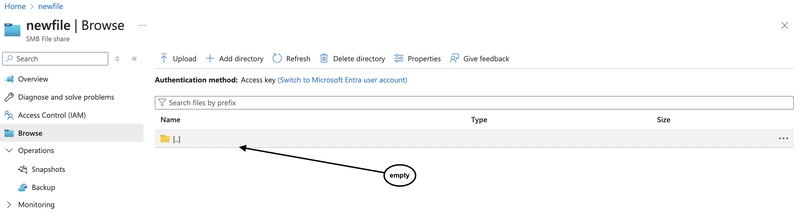
Return to your file share.
Browse to your file directory.
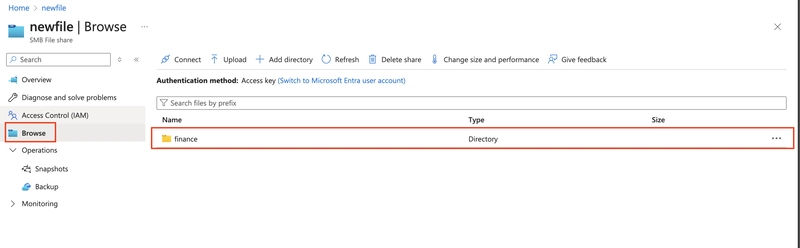
Locate your uploaded file and in the Properties pane select Delete.
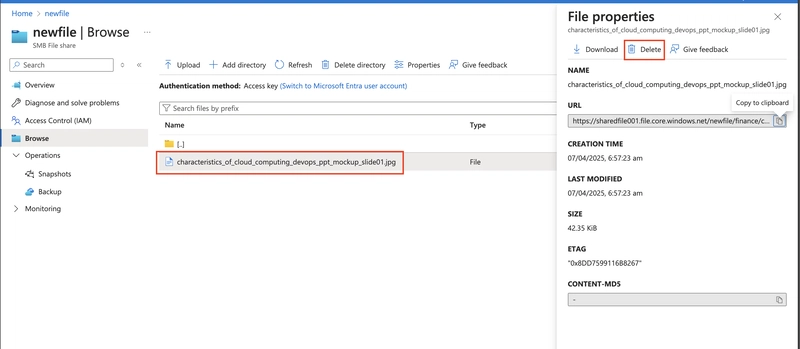
Select Yes to confirm the deletion.

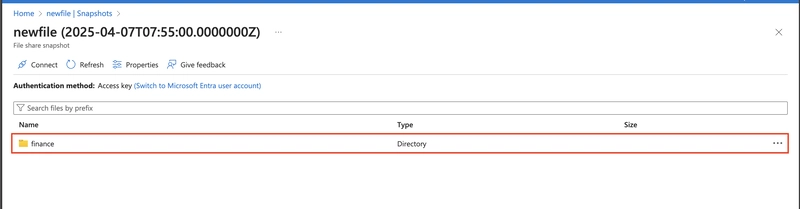
Select the Snapshots blade and then select your snapshot.
Navigate to the file you want to restore
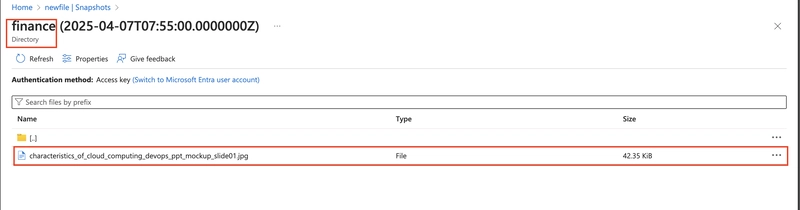
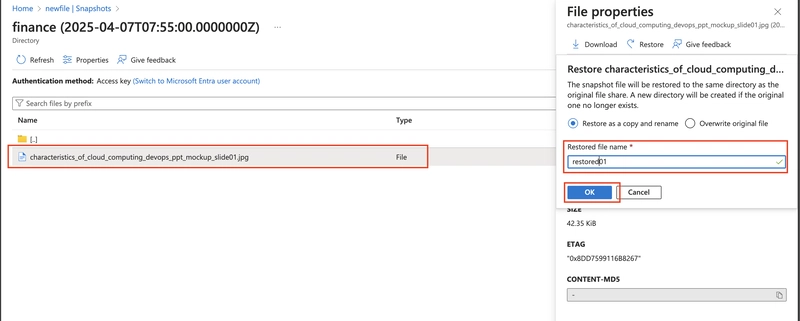
Select the file and then select Restore.
Provide a Restored file name.
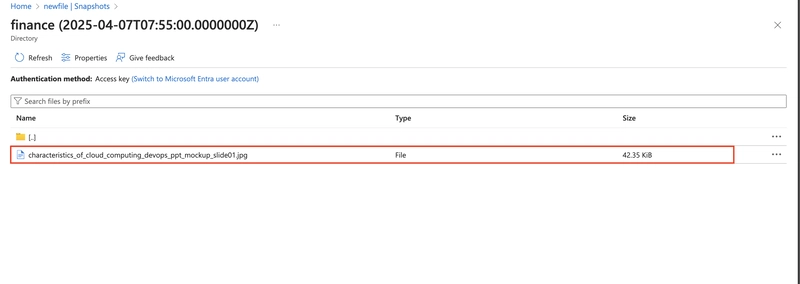
Verify your file directory has the restored file.
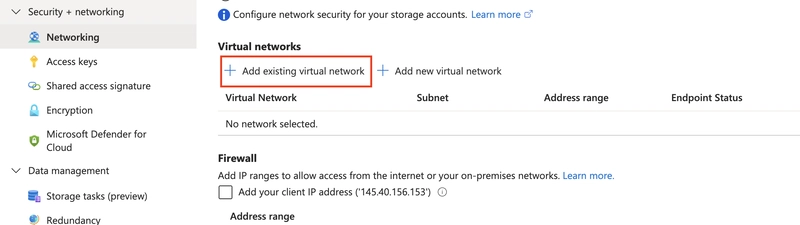
5.0. Configure restricting storage access to selected virtual networks
The tasks in this section require a virtual network with the subnet. In a production environment, these resources would already be created.
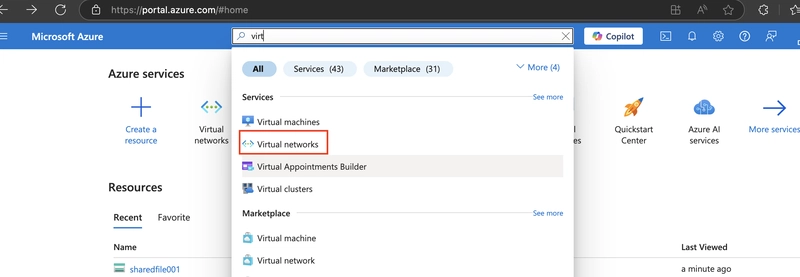
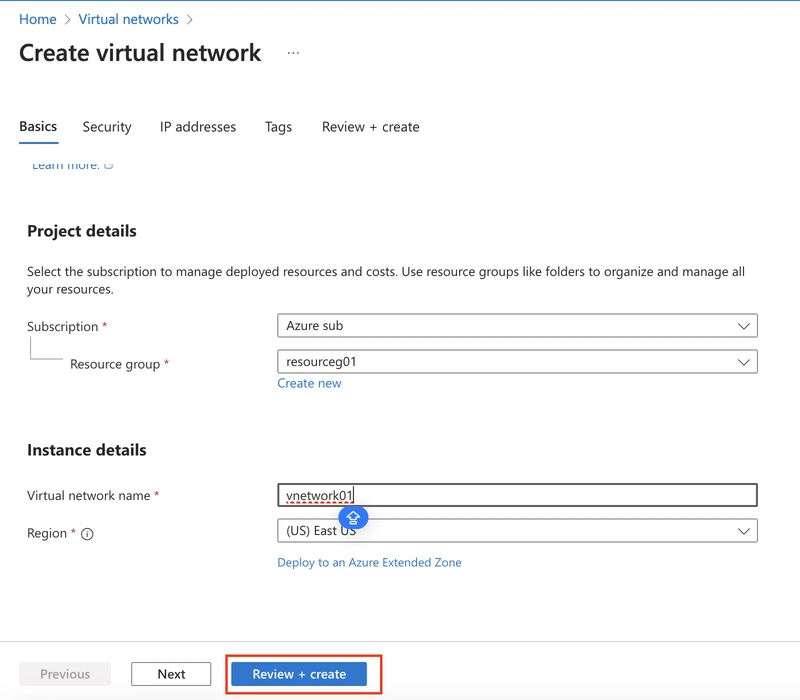
5.1. Search for and select Virtual networks.
Select Create. Select your resource group. and give the virtual network a name.

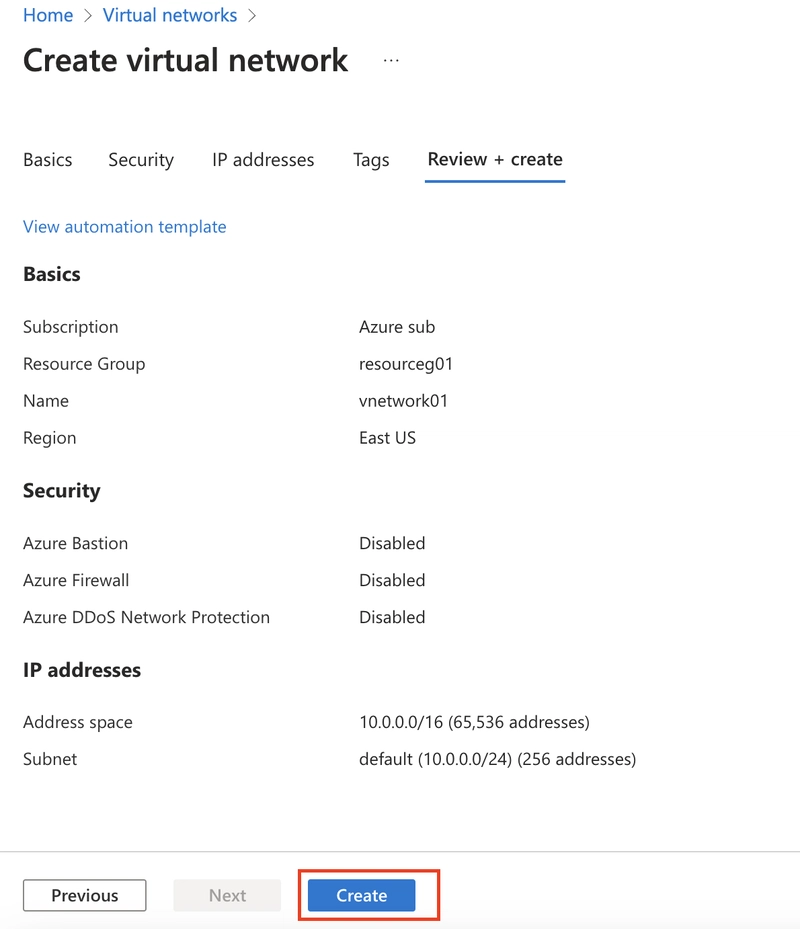
Take the defaults for other parameters, select Review + Create, and then Create.
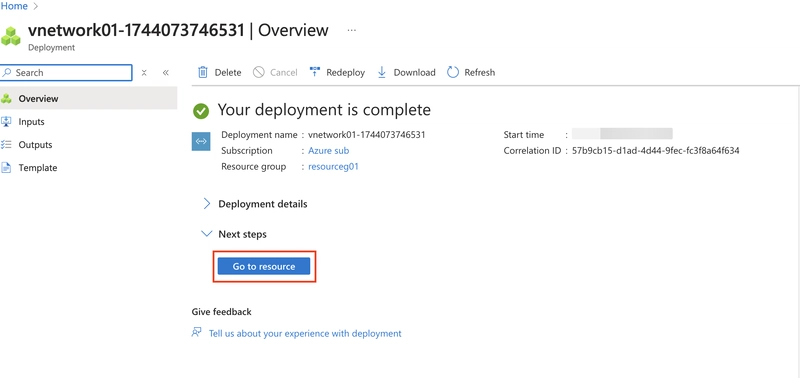
Wait for the resource to deploy and select Go to the resource.
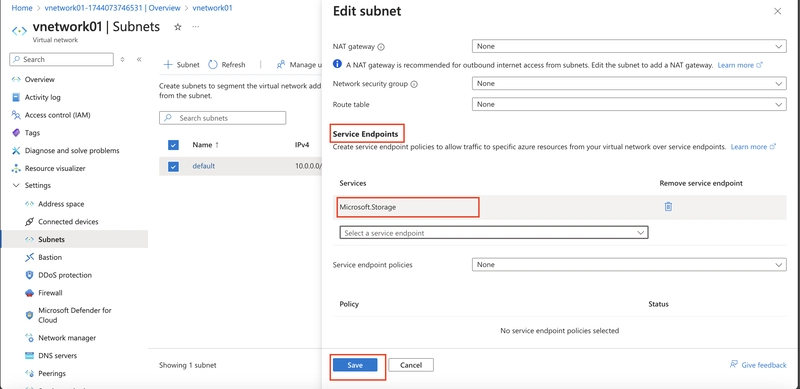
In the Settings section, select the Subnets blade.
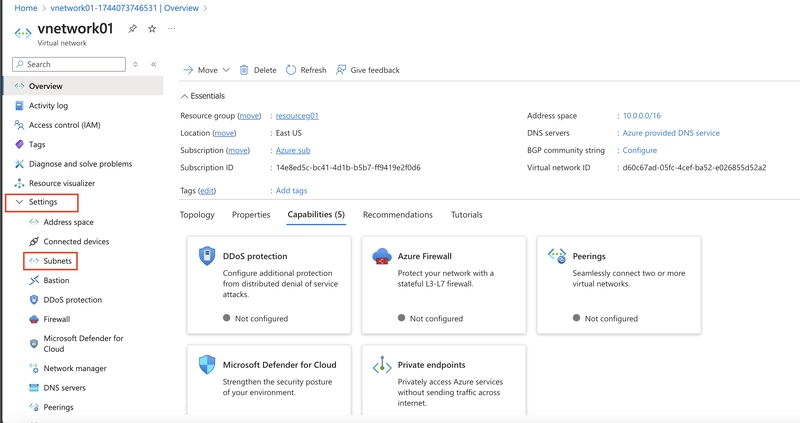
Select the default subnet.

In the Service endpoints section choose Microsoft.Storage in the Services drop-down. Save your changes.
5.2. The storage account should only be accessed from the virtual network you just created.
5.1. Return to your files storage account.
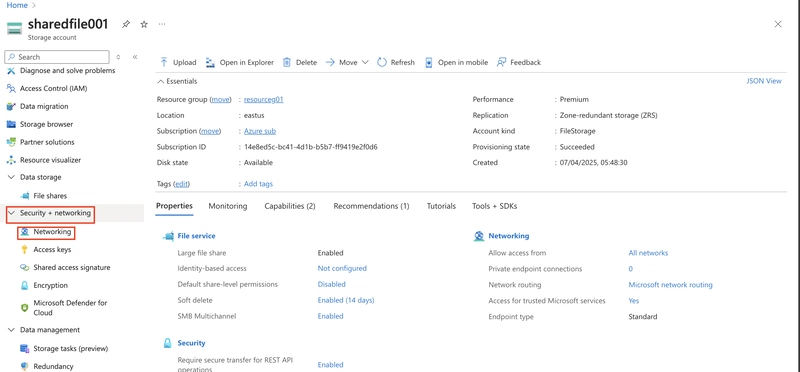
In the Security + networking section, select the Networking blade.
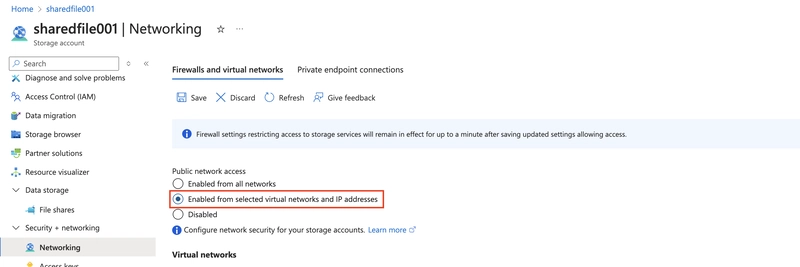
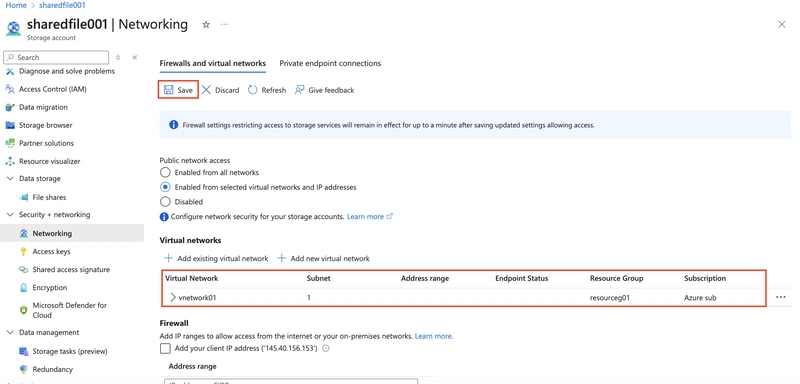
Change the Public network access to Enabled from selected virtual networks and IP addresses.
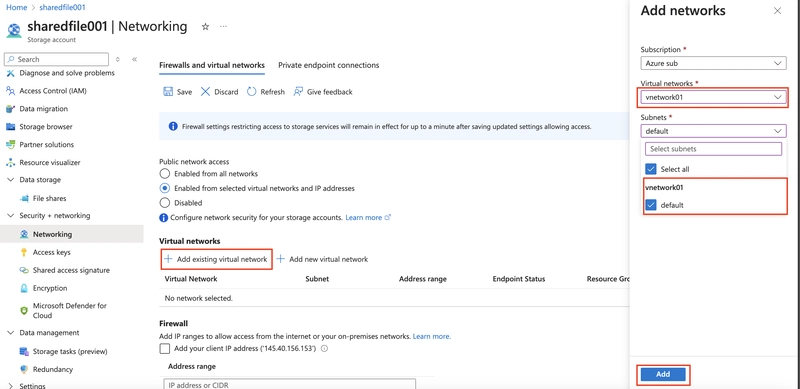
In the Virtual Networks section, select Add existing virtual network.
Select your virtual network and subnet, and select Add.
Be sure to Save your changes.
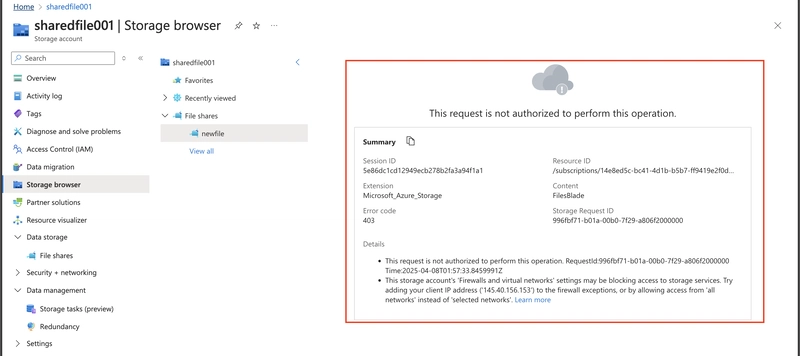
Select the Storage browser and navigate to your file share.
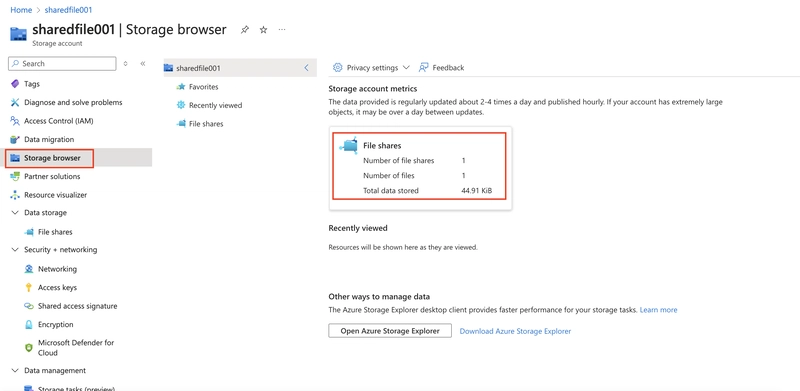
Verify the message is not authorized to perform this operation. You are not connecting from the virtual network.
Conclusion.
By completing this guide, you’ve successfully set up shared file storage on the Azure Portal to streamline collaboration across company offices. This scalable and secure solution ensures seamless access to shared resources, enhancing productivity and teamwork. Regular monitoring and updates will help you maintain an efficient and reliable file-sharing environment for your organization.