![[The AI Show Episode 142]: ChatGPT’s New Image Generator, Studio Ghibli Craze and Backlash, Gemini 2.5, OpenAI Academy, 4o Updates, Vibe Marketing & xAI Acquires X](https://www.marketingaiinstitute.com/hubfs/ep%20142%20cover.png)


![From drop-out to software architect with Jason Lengstorf [Podcast #167]](https://cdn.hashnode.com/res/hashnode/image/upload/v1743796461357/f3d19cd7-e6f5-4d7c-8bfc-eb974bc8da68.png?#)


.png?#)


_Christophe_Coat_Alamy.jpg?#)
.webp?#)
 (1).webp?#)


![Apple Considers Delaying Smart Home Hub Until 2026 [Gurman]](https://www.iclarified.com/images/news/96946/96946/96946-640.jpg)
![iPhone 17 Pro Won't Feature Two-Toned Back [Gurman]](https://www.iclarified.com/images/news/96944/96944/96944-640.jpg)
![Tariffs Threaten Apple's $999 iPhone Price Point in the U.S. [Gurman]](https://www.iclarified.com/images/news/96943/96943/96943-640.jpg)


Set Up Shadcn Canary with Tailwind CSS 4 in a React Vite Project (JavaScript Only)
create a react project using vite: npm create vite@latest (choose React and then JavaScript in options) install tailwind css npm install tailwindcss @tailwindcss/vite (installs tailwind css v4 by default) add the "tailwind plugin", "resolve" and "path" in the vite.config.json import path from "path" import tailwindcss from "@tailwindcss/vite" import react from "@vitejs/plugin-react" import { defineConfig } from "vite" export default defineConfig({ plugins: [react(), tailwindcss()], resolve: { alias: { "@": path.resolve(__dirname, "./src"), }, }, }) import tailwind at the top of src/index.css : @import "tailwindcss"; create a file called jsconfig.json in the root directory { "compilerOptions": { "baseUrl": ".", "paths": { "@/*": ["./src/*"] } } } run npm add -D @types/node install shadcn canary npx shadcn@canary init i chose “zinc”, then “yes” for css variables, and then “use —force” checkout the difference between Default and New York theme in shadcn and colors it provides. now select “use —force” whenever u install a component example: npx shadcn@latest add button src/App.jsx : import './App.css' import { Button } from './components/ui/button' function App() { return ( Button ) } export default App do npm run dev That’s how you install and configure Shadcn Canary with Tailwind CSS 4 in a React Vite JavaScript project without TypeScript. Whether you were searching for "How to install Shadcn with Tailwind CSS 4 in a React Vite project (No TypeScript)" or "Shadcn Canary setup with Tailwind CSS 4 and Vite in a React project (JavaScript only)," this guide covers everything you need to get started.

-
create a react project using vite:
npm create vite@latest(choose React and then JavaScript in options)
-
install tailwind css
npm install tailwindcss @tailwindcss/vite(installs tailwind css v4 by default)
-
add the "tailwind plugin", "resolve" and "path" in the
vite.config.json
import path from "path"
import tailwindcss from "@tailwindcss/vite"
import react from "@vitejs/plugin-react"
import { defineConfig } from "vite"

export default defineConfig({
  plugins: [react(), tailwindcss()],
  resolve: {
    alias: {
      "@": path.resolve(__dirname, "./src"),
    },
  },
})
-
import tailwind at the top of
src/index.css:
@import "tailwindcss";
-
create a file called
jsconfig.jsonin the root directory
{
  "compilerOptions": {
    "baseUrl": ".",
    "paths": {
      "@/*": ["./src/*"]
    }
  }
}
run
npm add -D @types/node
-
install shadcn canary
npx shadcn@canary initi chose “zinc”, then “yes” for css variables, and then “use —force”
checkout the difference between Default and New York theme in shadcn and colors it provides.
-
now select “use —force” whenever u install a component
example:npx shadcn@latest add button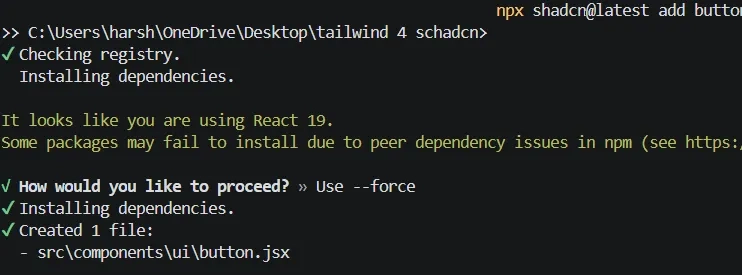
src/App.jsx:
   import './App.css'
   import { Button } from './components/ui/button'

   function App() {
     return (
       <>
         <Button variant="default">ButtonButton>

     )
   }

   export default App
do
npm run dev
That’s how you install and configure Shadcn Canary with Tailwind CSS 4 in a React Vite JavaScript project without TypeScript. Whether you were searching for "How to install Shadcn with Tailwind CSS 4 in a React Vite project (No TypeScript)" or "Shadcn Canary setup with Tailwind CSS 4 and Vite in a React project (JavaScript only)," this guide covers everything you need to get started.