


![[The AI Show Episode 144]: ChatGPT’s New Memory, Shopify CEO’s Leaked “AI First” Memo, Google Cloud Next Releases, o3 and o4-mini Coming Soon & Llama 4’s Rocky Launch](https://www.marketingaiinstitute.com/hubfs/ep%20144%20cover.png)


.jpg?width=1920&height=1920&fit=bounds&quality=70&format=jpg&auto=webp#)


_Olekcii_Mach_Alamy.jpg?width=1280&auto=webp&quality=80&disable=upscale#)


![Most iPhones Sold in the U.S. Will Be Made in India by 2026 [Report]](https://www.iclarified.com/images/news/97130/97130/97130-640.jpg)
![Apple to Shift Robotics Unit From AI Division to Hardware Engineering [Report]](https://www.iclarified.com/images/news/97128/97128/97128-640.jpg)


Self-Hosting Node.js/Express Web App Behind CGNAT (No Port Forwarding) via Dynamic DNS & Tunneling
Co-Authored with @r3j6gm: Renz Jaepril G. Mongaya Are you tired of the frustrations that come with cloud services, where you can be charged for nearly everything you do? When you launch a project on a VPS, you might forget about it for a few days, only to suddenly receive a bill full of unexpected charges. If this sounds familiar, perhaps self-hosting is a better option for you! What is Self-Hosting? Self-hosting is the practice of running and maintaining your own servers and software, instead of relying on third-party services or cloud providers. Why would you want to self host? You own and control the hardware. Self-hosting allows you to customize your configuration to meet your needs. You even use a banged up laptop from 10 years ago. You control what happens with your data. Since the data are on-premises, you can control it whatever happens to it. Cost Efficient. Once the initial investment towards the hardware is made, the monthly fees are significantly lower than the recurring subscription plans that the cloud providers offer. If you are a student. Self-hosting provides hands-on experience with server administration, networking, software management, and programming that may impress employers in the future. Why do we need Dynamic Domain Name System (DDNS) and tunneling services? If you want to host a website or service from your home, you most likely will encounter two big issues: CGNAT and dynamic IP addresses. Most internet service providers use Carrier-Grade Network Address Translation (CGNAT) to save public IPv4 addresses by assigning a single public IP address to multiple users’ routers making it difficult to directly communicate between devices on different networks. CGNAT prevents Port forwarding, which normally can expose local services to the internet. Complicating matters, the given public IP is dynamic, meaning it frequently changes. This means even if the port forwarding is actually working, your site will be unreachable once the IP address changes. The Solution: Tunneling Services Tunneling Services creates a secure connection between your local server/computer to a public accessible server. It can bypass CGNAT, so users can access your own website. It does not require any router configuration. Assigns a public URL or address to the home server. However, in utilizing the tunneling services, the assigned address from it might still change frequently making it unstable. The Role of Dynamic DNS (DDNS) DDNS provides a stable address mapping or domain name that automatically updates once your tunnel address changes, ensuring that users can still reach your website. Prerequisites A working Node.js/Express.js application running locally on your machine. An active internet connection In this tutorial, we used Node.js./Express.js as our backend framework. But you can use other frameworks. Let’s Get Started! 1. Get your local website running on your chosen port Ensure your Node.js/Express.js app is running on a specific port (e.g. Port 3000). Verify you can access the web app locally (make sure localhost:3000 outputs something). 2. Set up Dynamic DNS Choose a DDNS provider. We recommend ClouDNS as they offer generous free tier limits (4 Unicast DNS servers, 50 DNS records, 500k DNS queries per month, and many more). i. Sign up for a free account. ii. Follow the needed steps and open the email sent to you. iii. The website will ask you if you want to create your first free DNS Zone or Zone. Press yes and select the Free Zone when prompted. iv. Enter your personal domain name. You can customize the name to your liking. Also make sure Dynamic DNS is activated. v. Copy the URL on the top and open it on another tab. This will log your current IP address. vi. Close the modal and you will see an updating logo. Wait for it to stop spinning and when it stops, the DNS/Zone is ready to use. 3. Bypass CGNAT Using a Tunnel Service Choose a Tunneling Service. We suggest PageKite because they offer free accounts, simple requirements, and ease of use. i. Create an account under PageKite. ii. Install python 2.7 iii. Download PageKite.py iv. Insert your custom domain and remember it. After opening the account activation email, you should see the PageKite dashboard. Now, let's set up the tunneling service on your local computer. i. In the directory where you saved the pagekite.py file, open CMD by clicking the address bar to select it (or press Alt+D). Type "cmd" into the address bar and hit Enter. ii. Enter “python pagekite.py“ to open the python file in the CMD. Or you can right-click the file and run it as a python.exe. python pagekite.py iii. Type 'Y' when asked “Use the Pagekite.net service?”. iv. Enter your email address you used to create an account. v. Name your kite or input the name you inputted during sign up. vi. Enter your password you used in creating your account. If it says try again, you can change the password in the
Co-Authored with @r3j6gm: Renz Jaepril G. Mongaya
Are you tired of the frustrations that come with cloud services, where you can be charged for nearly everything you do? When you launch a project on a VPS, you might forget about it for a few days, only to suddenly receive a bill full of unexpected charges. If this sounds familiar, perhaps self-hosting is a better option for you!
What is Self-Hosting?
Self-hosting is the practice of running and maintaining your own servers and software, instead of relying on third-party services or cloud providers.
Why would you want to self host?
You own and control the hardware. Self-hosting allows you to customize your configuration to meet your needs. You even use a banged up laptop from 10 years ago.
You control what happens with your data. Since the data are on-premises, you can control it whatever happens to it.
Cost Efficient. Once the initial investment towards the hardware is made, the monthly fees are significantly lower than the recurring subscription plans that the cloud providers offer.
If you are a student. Self-hosting provides hands-on experience with server administration, networking, software management, and programming that may impress employers in the future.
Why do we need Dynamic Domain Name System (DDNS) and tunneling services?
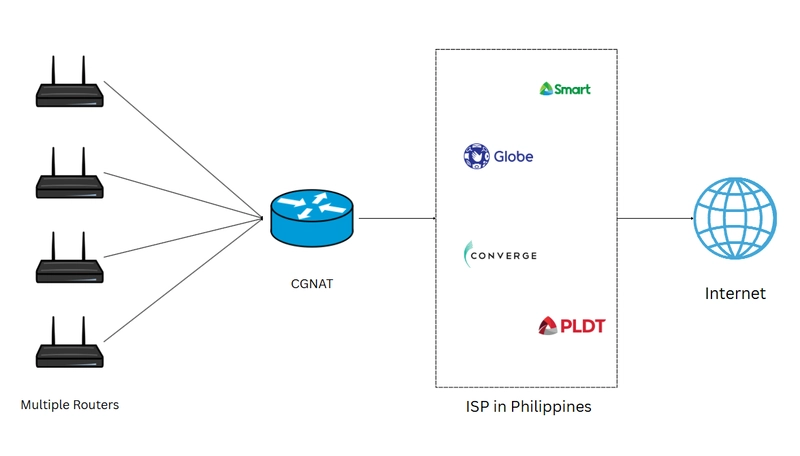
If you want to host a website or service from your home, you most likely will encounter two big issues: CGNAT and dynamic IP addresses.
Most internet service providers use Carrier-Grade Network Address Translation (CGNAT) to save public IPv4 addresses by assigning a single public IP address to multiple users’ routers making it difficult to directly communicate between devices on different networks. CGNAT prevents Port forwarding, which normally can expose local services to the internet.
Complicating matters, the given public IP is dynamic, meaning it frequently changes. This means even if the port forwarding is actually working, your site will be unreachable once the IP address changes.
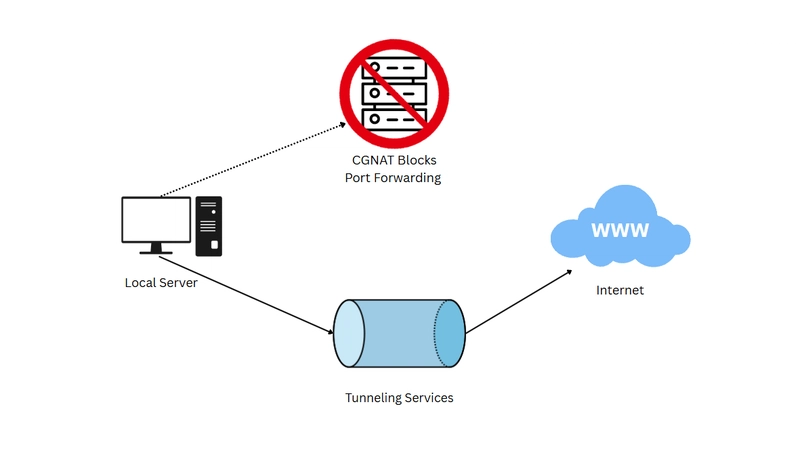
The Solution: Tunneling Services
Tunneling Services creates a secure connection between your local server/computer to a public accessible server.
It can bypass CGNAT, so users can access your own website.
It does not require any router configuration.
Assigns a public URL or address to the home server. However, in utilizing the tunneling services, the assigned address from it might still change frequently making it unstable.
The Role of Dynamic DNS (DDNS)
DDNS provides a stable address mapping or domain name that automatically updates once your tunnel address changes, ensuring that users can still reach your website.
Prerequisites
A working Node.js/Express.js application running locally on your machine.
An active internet connection
In this tutorial, we used Node.js./Express.js as our backend framework. But you can use other frameworks.
Let’s Get Started!
1. Get your local website running on your chosen port
Ensure your Node.js/Express.js app is running on a specific port (e.g. Port 3000).
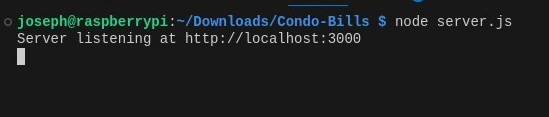
Verify you can access the web app locally (make sure localhost:3000 outputs something).
2. Set up Dynamic DNS
Choose a DDNS provider. We recommend ClouDNS as they offer generous free tier limits (4 Unicast DNS servers, 50 DNS records, 500k DNS queries per month, and many more).
i. Sign up for a free account.
ii. Follow the needed steps and open the email sent to you.
iii. The website will ask you if you want to create your first free DNS Zone or Zone. Press yes and select the Free Zone when prompted.
iv. Enter your personal domain name. You can customize the name to your liking. Also make sure Dynamic DNS is activated.
v. Copy the URL on the top and open it on another tab. This will log your current IP address.
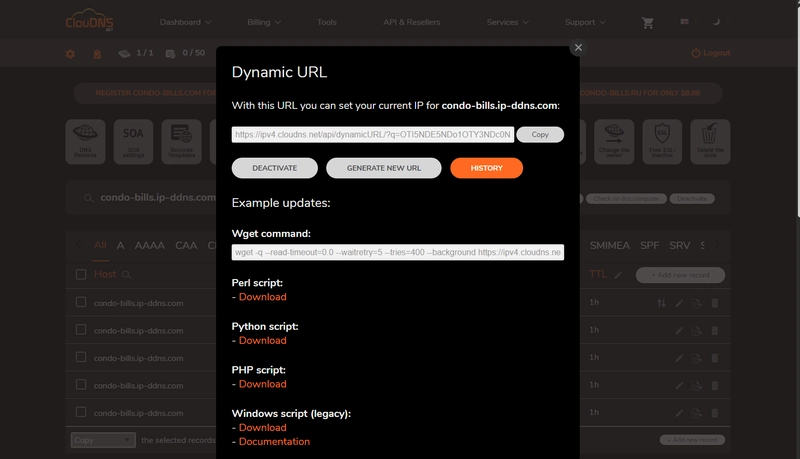
vi. Close the modal and you will see an updating logo. Wait for it to stop spinning and when it stops, the DNS/Zone is ready to use.
3. Bypass CGNAT Using a Tunnel Service
Choose a Tunneling Service. We suggest PageKite because they offer free accounts, simple requirements, and ease of use.
i. Create an account under PageKite.
ii. Install python 2.7
iii. Download PageKite.py
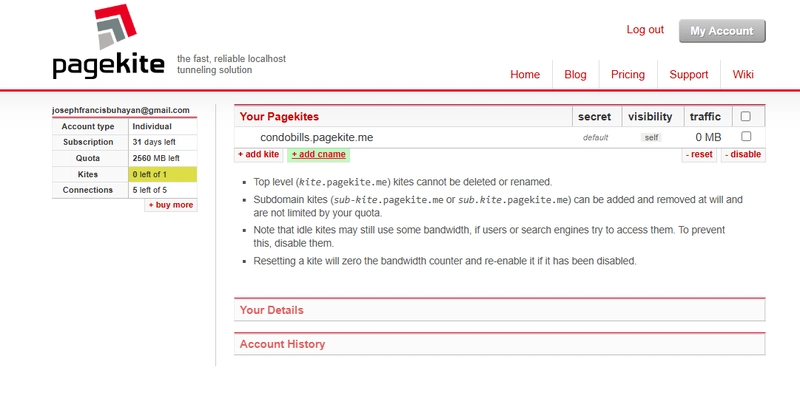
iv. Insert your custom domain and remember it.
After opening the account activation email, you should see the PageKite dashboard.
Now, let's set up the tunneling service on your local computer.
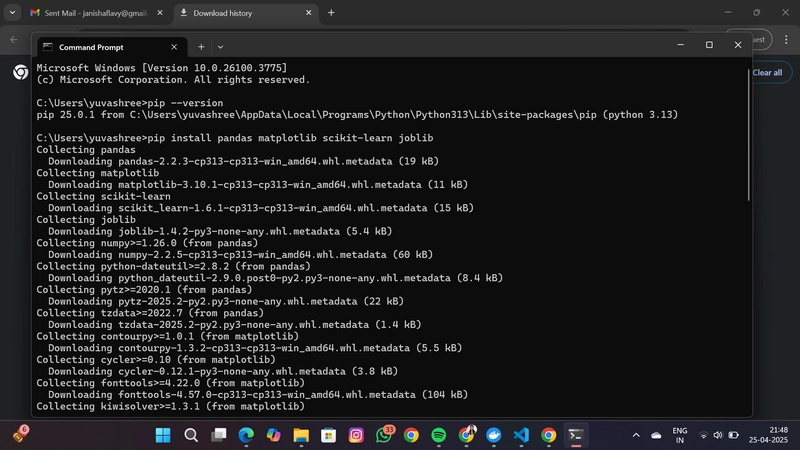
i. In the directory where you saved the pagekite.py file, open CMD by clicking the address bar to select it (or press Alt+D). Type "cmd" into the address bar and hit Enter.
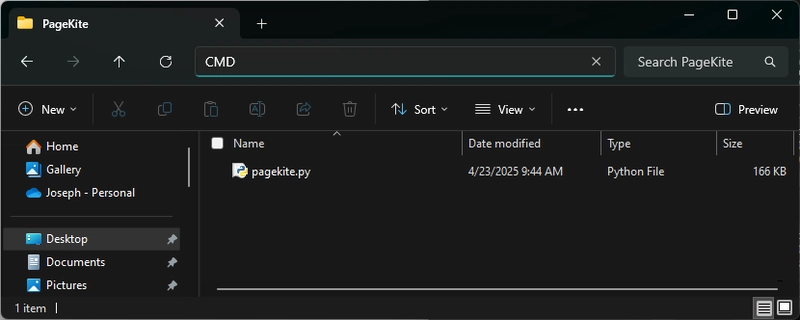
ii. Enter “python pagekite.py“ to open the python file in the CMD. Or you can right-click the file and run it as a python.exe.
python pagekite.py
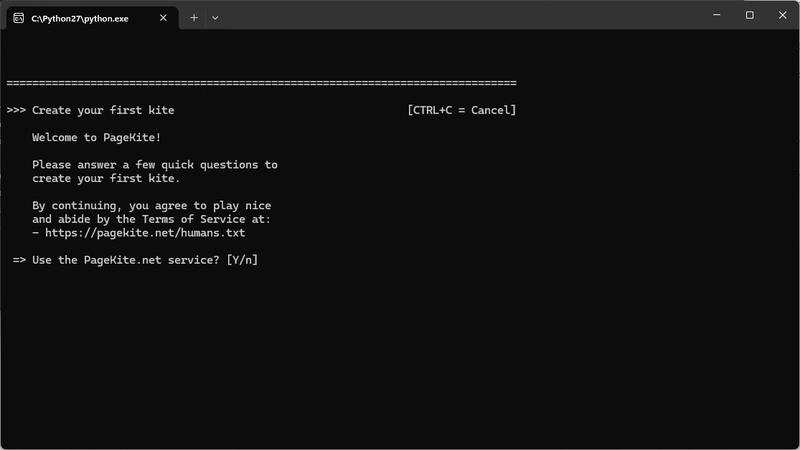
iii. Type 'Y' when asked “Use the Pagekite.net service?”.
iv. Enter your email address you used to create an account.
v. Name your kite or input the name you inputted during sign up.
vi. Enter your password you used in creating your account. If it says try again, you can change the password in the PageKite dashboard.
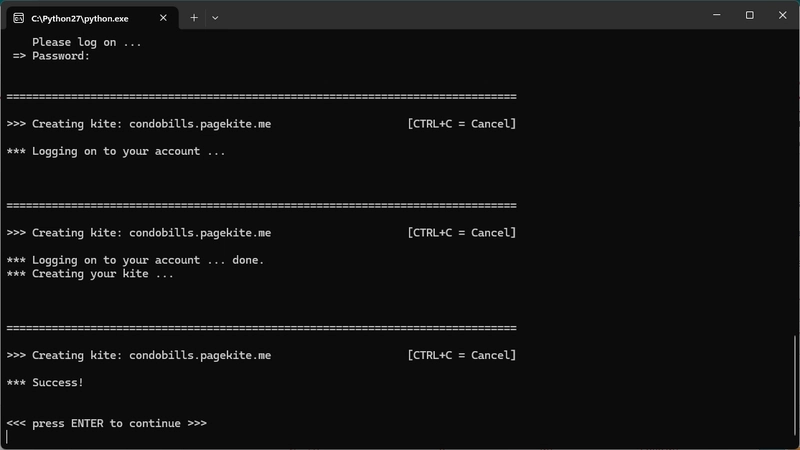
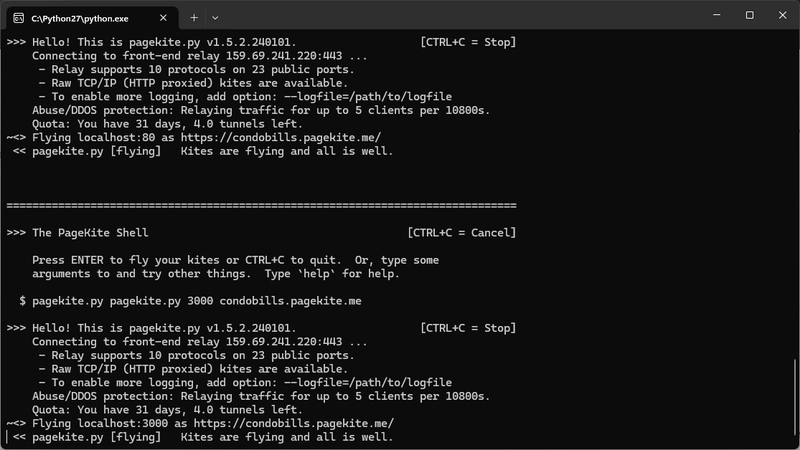
vii. Press Enter and wait until PageKite opens a tunnel. In the case that Pagekite forwards the wrong port, exit the running process by pressing CTRL+C and by typing this command.
pagekite.py 3000 yourkitename.pagekite.me
Replace ‘3000’ with your port and ‘yourkitename’ with the Kite name you used on the sign up.
viii. Continue the process until you see the “Kites are flying all is well.” message.
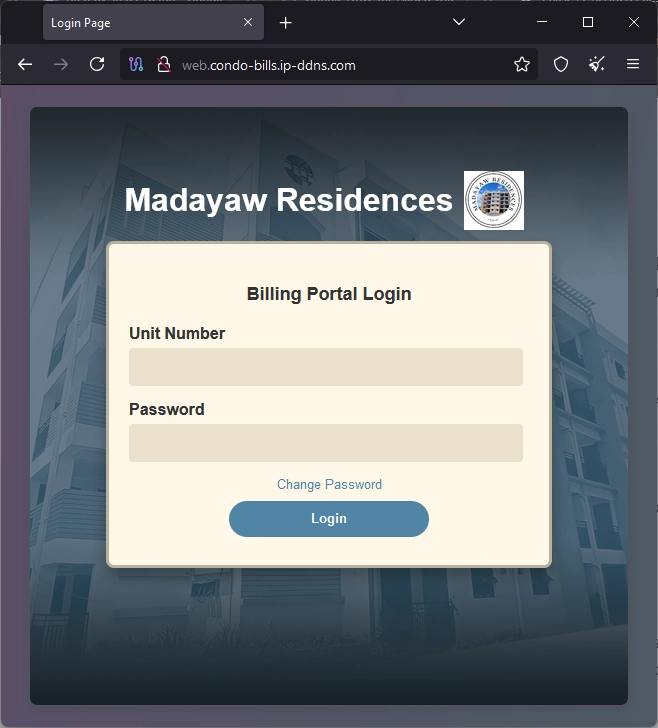
ix. If you open the link given, it will redirect you to your web app.
4. Configuring DNS
You can use the given PageKite link without doing any more change, but you can also use the DNS we got from ClouDNS. If you want to, follow these steps below.
i. Go back to the ClouDNS dashboard and add a new CNAME. Use the CNAME/link from PageKite.
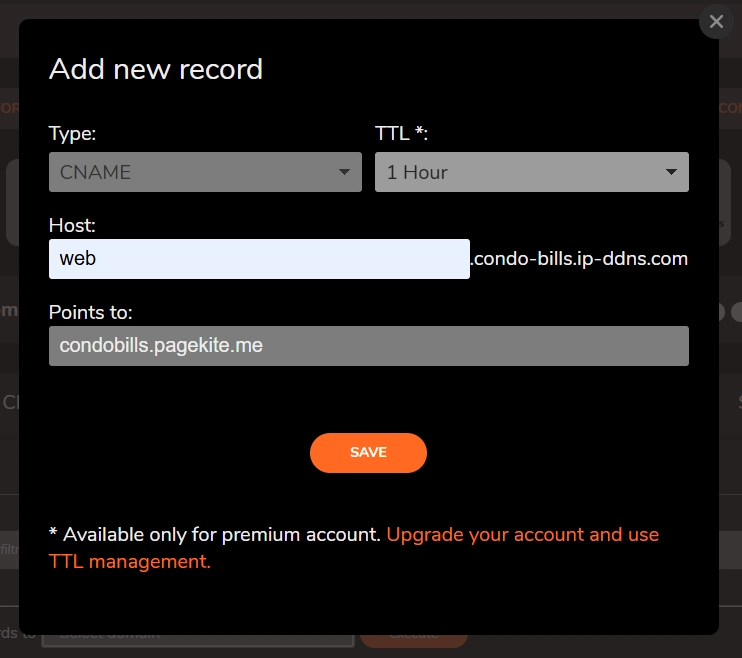
ii. Go back to the PageKite dashboard and add a new CNAME, use the CNAME from CloudDNS.

iii. Add your ClouDNS name to your PageKite account using this form. Make sure you are logged in to your Pagekite Account before accessing the link.

iv. If you did not close your PageKite instance on your CMD, press CTRL+C to close it.
v. Find your configuration file named pagekite.cfg. It is usually found in your users directory. C:\Users\YourUserName.
vi. Add these line to the configuration file
service_on=http:www.domain.com:localhost:80:SECRET
SECRET is your PageKite secret - (you can use "@kitesecret" if you've loaded the variable or you can put the actual string of your secret). It should look like this.

vii. Rerun the instance with this command.
pagekite.py 3000 condobills.pagekite.me AND web.condo-bills.ip-ddns.com
The “AND” makes sure that both the PageKite link and the ClouDNS link are initialized.
After following all these steps, you may now use the DNS you got from ClouDNS to access your website. Using the ClouDNS on top of the PageKite domain provides a layer of abstraction and independence between your identity online and the PageKite Service.
Conclusion
Running a home server from behind a CGNAT (Carrier-Grade Network Address Translation) is possible. By using intelligent routing and tunneling services, we can connect our web app to the internet without port forwarding. Dynamic DNS (DDNS) also addresses the challenge of unstable IP addresses. These tools effectively and securely enable the operation of home servers, even in the presence of dynamic IP addresses or changes made by the ISP.
Thank you for reading!!
It’s a statement about who I am and what I stand for. I personally value decentralisation, true ownership and transparency: you do what is best and if you f*ck it up, your damn problem ¯(ツ)/¯ I see my services and my machines as an extension of myself; just like a baby, you must take care of it.
-- sushikingdom _ on _reddit/selfhosted talking about self-hosting