


![[The AI Show Episode 144]: ChatGPT’s New Memory, Shopify CEO’s Leaked “AI First” Memo, Google Cloud Next Releases, o3 and o4-mini Coming Soon & Llama 4’s Rocky Launch](https://www.marketingaiinstitute.com/hubfs/ep%20144%20cover.png)


![Is this too much for a modular monolith system? [closed]](https://i.sstatic.net/pYL1nsfg.png)


_Andreas_Prott_Alamy.jpg?width=1280&auto=webp&quality=80&disable=upscale#)


![What features do you get with Gemini Advanced? [April 2025]](https://i0.wp.com/9to5google.com/wp-content/uploads/sites/4/2024/02/gemini-advanced-cover.jpg?resize=1200%2C628&quality=82&strip=all&ssl=1)


![Apple Shares Official Trailer for 'Long Way Home' Starring Ewan McGregor and Charley Boorman [Video]](https://www.iclarified.com/images/news/97069/97069/97069-640.jpg)
![Apple Watch Series 10 Back On Sale for $299! [Lowest Price Ever]](https://www.iclarified.com/images/news/96657/96657/96657-640.jpg)
![EU Postpones Apple App Store Fines Amid Tariff Negotiations [Report]](https://www.iclarified.com/images/news/97068/97068/97068-640.jpg)
![Apple Slips to Fifth in China's Smartphone Market with 9% Decline [Report]](https://www.iclarified.com/images/news/97065/97065/97065-640.jpg)


Securing Kubernetes: Encrypting Data at Rest with kubeadm and containerd on Amazon Linux 2023
Introduction: This project documents the process of setting up a Kubernetes cluster using kubeadm on an Amazon Linux 2023 EC2 instance, from Docker to containerd as the container runtime as containerd is native so I found out half way through setting up. The project is about enabling Encryption at Rest for Kubernetes secrets. The journey includes installing necessary tools, configuring the cluster, addressing errors, and securing sensitive data. This write-up is intended for those looking to set up a secure Kubernetes cluster in a production-like environment while learning from the challenges encountered. Project Overview The goal of this project was to deploy a Kubernetes cluster on an Amazon Linux 2023 EC2 instance using kubeadm, with a focus on securing sensitive data by enabling Encryption at Rest for Kubernetes secrets. Initially, I started with Docker as the container runtime, but I learned that Docker’s integration with Kubernetes (via Dockershim) was deprecated since Kubernetes 1.24. so I switched to containerd, a more native and recommended runtime, and successfully set up a single-node cluster, installed Calico for networking, and enabled encryption for secrets stored in etcd. Prerequisites EC2 Instance: Amazon Linux 2023 AMI, t2.large instance type (2 vCPUs, 8 GiB RAM), with appropriate security groups (allow ports 6443, 10250, 179 for Calico, and SSH) and more . . . Access: SSH key pair for accessing the EC2 instance. Tools: Basic familiarity with Linux commands, systemd, and Kubernetes concepts. Step 1: Launch the EC2 Instance I began by launching an EC2 instance to set up my Kubernetes cluster. Initially, I used an Ubuntu 24.04 AMI, but I encountered issues that led me to switch to an Amazon Linux 2023 AMI, which I found more reliable for my setup. Image Type: I used a Amazon Linux 2023 AMI (initially tried Ubuntu 24.04 AMI but switched due to compatibility and setup challenges). Instance Type: t2.large (2 vCPUs, 8GiB RAM), suitable for a small Kubernetes cluster. Created Key Pair: Generated a key pair named my-key for SSH access. Network Settings: Security Group: Configured to allow inbound traffic on ports 22 (SSH), 6443 (Kubernetes API server), 10250 (kubelet), and 179 (Calico BGP for networking), 2379–2380 etcd Server Client API, 10250 Kubectl — Self, Control Plane, 10256 kube-proxy — Self, Load Balancers, 10257 kube-controller, 10259 kube-scheduler, 443 HTTPS, 8080, 80, 30000–32767 NodePort Services Subnet: Placed in a public subnet within my VPC (e.g., subnet-xxxxxxxx in us-east-1). I began by launching an EC2 instance using the Amazon Linux 2023 AMI. This can be done via the AWS Management Console or CLI. Here’s the CLI command I used: aws ec2 run-instances --image-id ami-0c55b159cbfafe1f0 --instance-type t2.large --key-name my-kube-key --security-group-ids sg-xxxxxxxx --subnet-id subnet-xxxxxxxx --region us-east-1 After launching, I connected to the instance: ssh -i my-kube-key.pem ec2-user@ The instance’s private IP (e.g., 172.xx.xx.x) was used for cluster configuration. Step 2: Initial Attempt with Docker (Later Switched to containerd) I initially attempted to set up the cluster using Docker as the container runtime, with Ubuntu as it was familiar. Here are the steps I followed: Install Docker sudo yum update -y sudo yum install docker -y Installing Docker to use with the AWS SAM CLI Start and Enable Docker sudo systemctl start docker sudo systemctl enable docker Add ec2-user to Docker Group To avoid using sudo for Docker commands: sudo usermod -aG docker ec2-user exit # Re-SSH to apply group changes Verify Docker Installation docker run hello-world This confirmed Docker was working, but I later learned that Docker’s integration with Kubernetes (via Dockershim) was deprecated, which is why I switch to containerd. Step 3: Switch to containerd Since Docker’s support in Kubernetes is deprecated, I switched to containerd, a native container runtime recommended for Kubernetes I heard of it before, but I was just staying in my comfort zone. I installed specific versions of containerd, runc, and CNI plugins manually to ensure compatibility. Install containerd v2.0.4 curl -LO https://github.com/containerd/containerd/releases/download/v2.0.4/containerd-2.0.4-linux-amd64.tar.gz sudo tar Cxzvf /usr/local containerd-2.0.4-linux-amd64.tar.gz Getting started with containerd Created the systemd Directory The /usr/local/lib/systemd/system directory didn’t exist, so I created it: sudo mkdir -p /usr/local/lib/systemd/system Installed containerd systemd Service sudo curl -L https://raw.githubusercontent.com/containerd/containerd/main/containerd.service -o /usr/local/lib/systemd/system/containerd.service sudo systemctl daemon-reload sudo systemctl enable --now containerd https://raw.githubusercontent.com/containerd/containerd/main/containerd.service Installed runc v1.2.6 runc curl -LO https://github.com/opencontainers/runc/releases/downloa
Introduction: This project documents the process of setting up a Kubernetes cluster using kubeadm on an Amazon Linux 2023 EC2 instance, from Docker to containerd as the container runtime as containerd is native so I found out half way through setting up. The project is about enabling Encryption at Rest for Kubernetes secrets. The journey includes installing necessary tools, configuring the cluster, addressing errors, and securing sensitive data. This write-up is intended for those looking to set up a secure Kubernetes cluster in a production-like environment while learning from the challenges encountered.
Project Overview
The goal of this project was to deploy a Kubernetes cluster on an Amazon Linux 2023 EC2 instance using kubeadm, with a focus on securing sensitive data by enabling Encryption at Rest for Kubernetes secrets. Initially, I started with Docker as the container runtime, but I learned that Docker’s integration with Kubernetes (via Dockershim) was deprecated since Kubernetes 1.24. so I switched to containerd, a more native and recommended runtime, and successfully set up a single-node cluster, installed Calico for networking, and enabled encryption for secrets stored in etcd.
Prerequisites
EC2 Instance: Amazon Linux 2023 AMI, t2.large instance type (2 vCPUs, 8 GiB RAM), with appropriate security groups (allow ports 6443, 10250, 179 for Calico, and SSH) and more . . .
Access: SSH key pair for accessing the EC2 instance.
Tools: Basic familiarity with Linux commands, systemd, and Kubernetes concepts.
Step 1: Launch the EC2 Instance
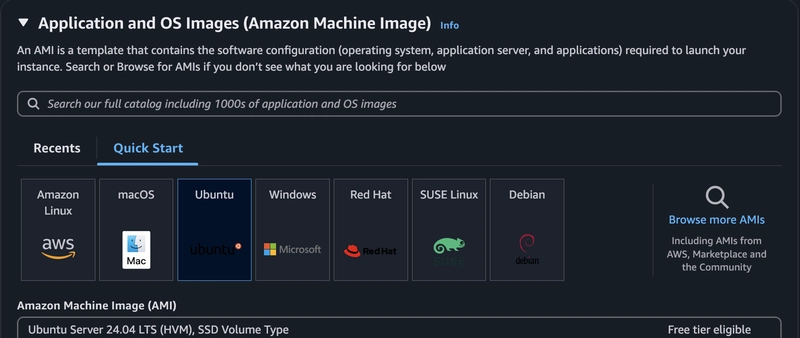
I began by launching an EC2 instance to set up my Kubernetes cluster. Initially, I used an Ubuntu 24.04 AMI, but I encountered issues that led me to switch to an Amazon Linux 2023 AMI, which I found more reliable for my setup.
Image Type: I used a Amazon Linux 2023 AMI (initially tried Ubuntu 24.04 AMI but switched due to compatibility and setup challenges).
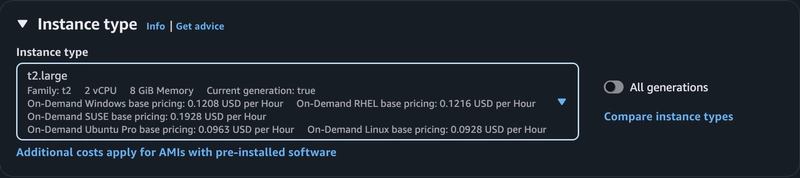
Instance Type: t2.large (2 vCPUs, 8GiB RAM), suitable for a small Kubernetes cluster.
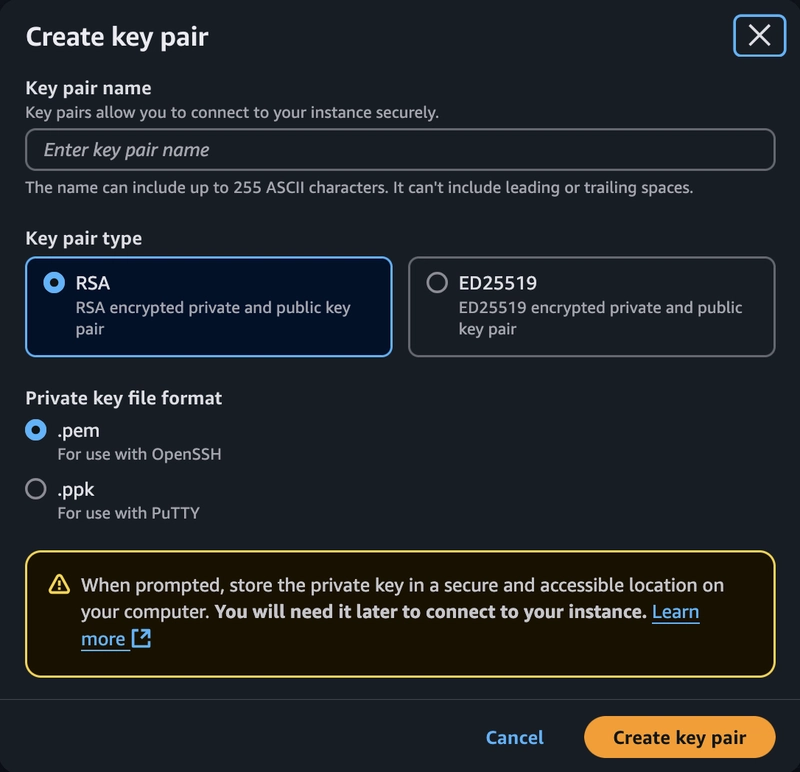
Created Key Pair: Generated a key pair named my-key for SSH access.

Network Settings:
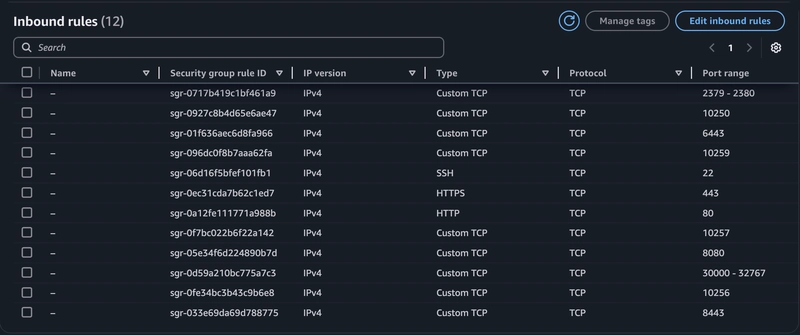
Security Group: Configured to allow inbound traffic on ports 22 (SSH), 6443 (Kubernetes API server), 10250 (kubelet), and 179 (Calico BGP for networking), 2379–2380 etcd Server Client API, 10250 Kubectl — Self, Control Plane, 10256 kube-proxy — Self, Load Balancers, 10257 kube-controller, 10259 kube-scheduler, 443 HTTPS, 8080, 80, 30000–32767 NodePort Services
Subnet: Placed in a public subnet within my VPC (e.g., subnet-xxxxxxxx in us-east-1).
I began by launching an EC2 instance using the Amazon Linux 2023 AMI. This can be done via the AWS Management Console or CLI. Here’s the CLI command I used:
aws ec2 run-instances --image-id ami-0c55b159cbfafe1f0 --instance-type t2.large --key-name my-kube-key --security-group-ids sg-xxxxxxxx --subnet-id subnet-xxxxxxxx --region us-east-1
After launching, I connected to the instance:
ssh -i my-kube-key.pem ec2-user@
The instance’s private IP (e.g., 172.xx.xx.x) was used for cluster configuration.
Step 2: Initial Attempt with Docker (Later Switched to containerd)
I initially attempted to set up the cluster using Docker as the container runtime, with Ubuntu as it was familiar. Here are the steps I followed:
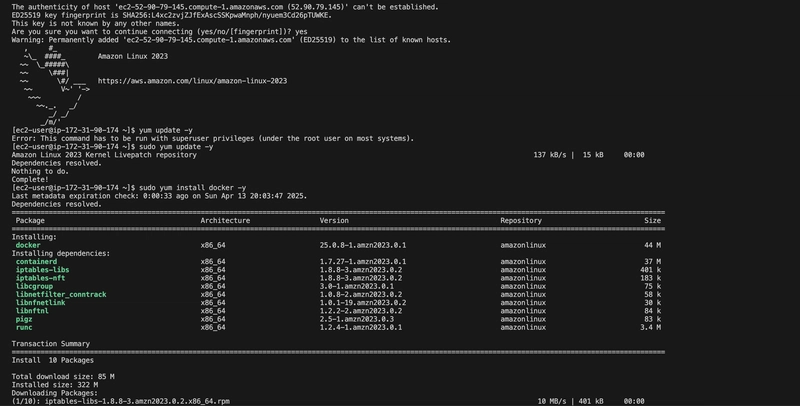
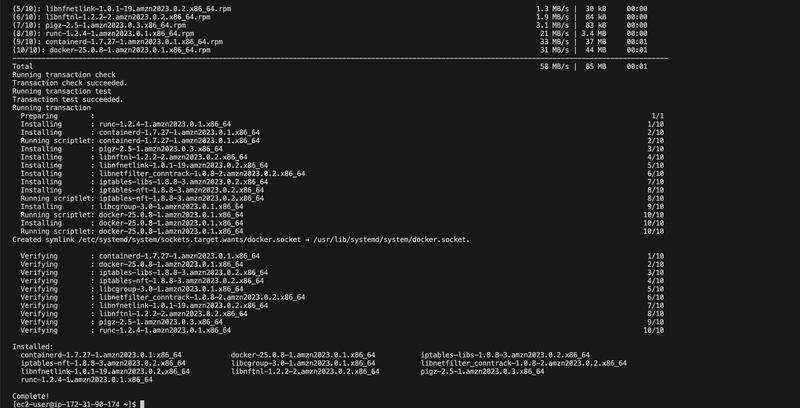
Install Docker
sudo yum update -y

sudo yum install docker -y
Installing Docker to use with the AWS SAM CLI
Start and Enable Docker
sudo systemctl start docker

sudo systemctl enable docker
Add ec2-user to Docker Group
To avoid using sudo for Docker commands:
sudo usermod -aG docker ec2-user

exit  # Re-SSH to apply group changes

Verify Docker Installation
docker run hello-world
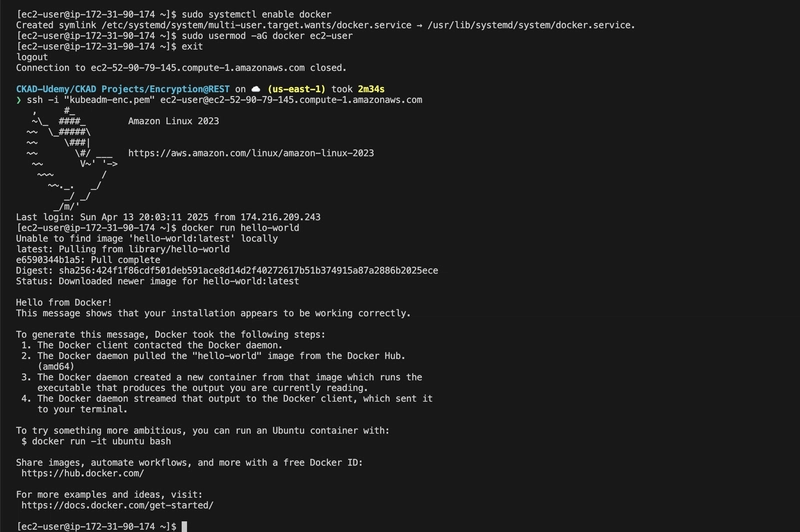
This confirmed Docker was working, but I later learned that Docker’s integration with Kubernetes (via Dockershim) was deprecated, which is why I switch to containerd.
Step 3: Switch to containerd
Since Docker’s support in Kubernetes is deprecated, I switched to containerd, a native container runtime recommended for Kubernetes I heard of it before, but I was just staying in my comfort zone. I installed specific versions of containerd, runc, and CNI plugins manually to ensure compatibility.
Install containerd v2.0.4
curl -LO https://github.com/containerd/containerd/releases/download/v2.0.4/containerd-2.0.4-linux-amd64.tar.gz

sudo tar Cxzvf /usr/local containerd-2.0.4-linux-amd64.tar.gz
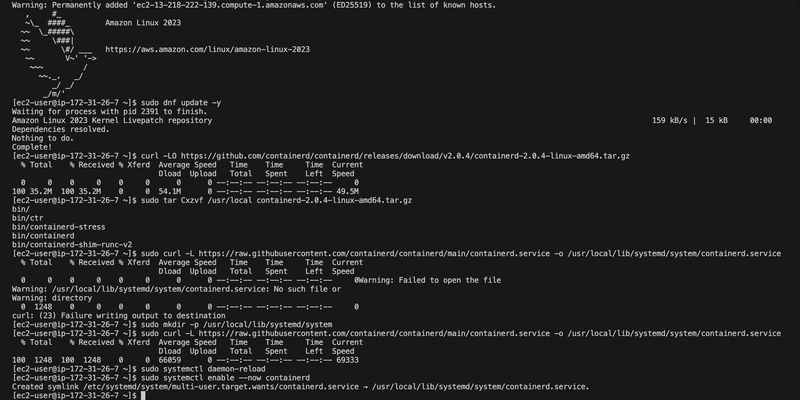
Getting started with containerd
Created the systemd Directory
The /usr/local/lib/systemd/system directory didn’t exist, so I created it:
sudo mkdir -p /usr/local/lib/systemd/system
![]()
Installed containerd systemd Service
sudo curl -L https://raw.githubusercontent.com/containerd/containerd/main/containerd.service -o /usr/local/lib/systemd/system/containerd.service

sudo systemctl daemon-reload

sudo systemctl enable --now containerd
https://raw.githubusercontent.com/containerd/containerd/main/containerd.service
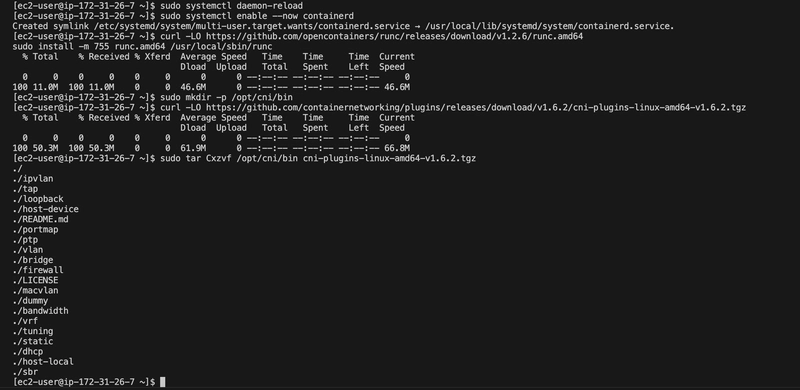
Installed runc v1.2.6
runc
curl -LO https://github.com/opencontainers/runc/releases/download/v1.2.6/runc.amd64

sudo install -m 755 runc.amd64 /usr/local/sbin/runc
Install CNI Plugins v1.6.2
sudo mkdir -p /opt/cni/bin

curl -LO https://github.com/containernetworking/plugins/releases/download/v1.6.2/cni-plugins-linux-amd64-v1.6.2.tgz

sudo tar Cxzvf /opt/cni/bin cni-plugins-linux-amd64-v1.6.2.tgz
Step 4: Installed Kubernetes Tools
I set up the Kubernetes repository for version 1.32 and installed kubeadm, kubelet, and kubectl.
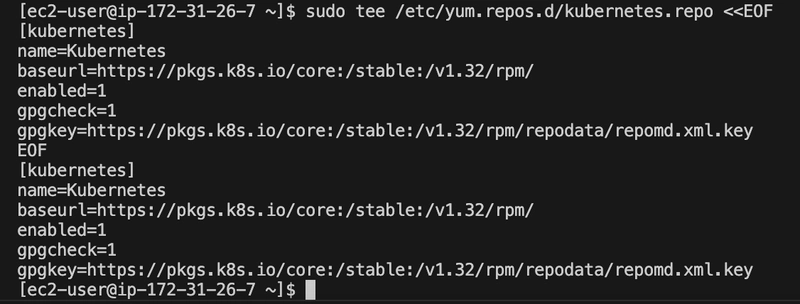
Added Kubernetes Repositories (v1.32)
sudo tee /etc/yum.repos.d/kubernetes.repo <
name=Kubernetes
baseurl=https://pkgs.k8s.io/core:/stable:/v1.32/rpm/
enabled=1
gpgcheck=1
gpgkey=https://pkgs.k8s.io/core:/stable:/v1.32/rpm/repodata/repomd.xml.key
EOF
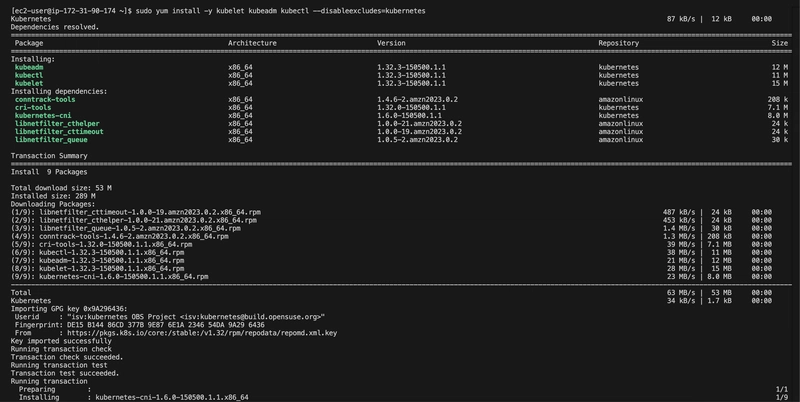
Install kubeadm, kubelet, and kubectl
sudo dnf install -y kubeadm kubelet kubectl
Installed the versionlock Plugin (Optional, to Prevent Updates)
The versionlock plugin wasn’t available by default, so I installed it:
sudo dnf install -y 'dnf-command(versionlock)'

sudo dnf versionlock add kubeadm kubelet kubectl
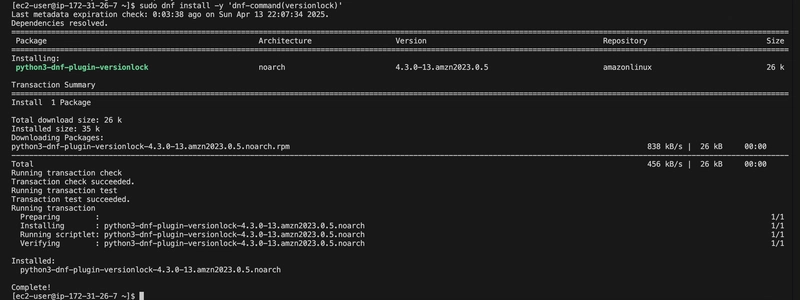

Note: I initially considered preventing updates to ensure stability but learned that updates are important for security fixes, bug resolutions, and compatibility. In a production environment, controlled upgrades are recommended instead of locking versions.
Step 5: Prepared the System for Kubernetes
Kubernetes requires specific system settings to function properly like,
Disabling Swap
sudo swapoff -a

sudo sed -i '/ swap / s/^/#/' /etc/fstab

Set SELinux to Permissive per documentation
Kubernetes can have issues with SELinux in enforcing mode, so I set it to permissive:
sudo setenforce 0

sudo sed -i 's/^SELINUX=enforcing$/SELINUX=permissive/' /etc/selinux/config

Enable IP Forwarding
I encountered a preflight error [ERROR FileContent — proc-sys-net-ipv4-ip_forward]. Kubernetes requires IP forwarding to be enabled:
sudo sysctl -w net.ipv4.ip_forward=1

sudo sh -c 'echo "net.ipv4.ip_forward=1" >> /etc/sysctl.conf'

sudo sysctl -p
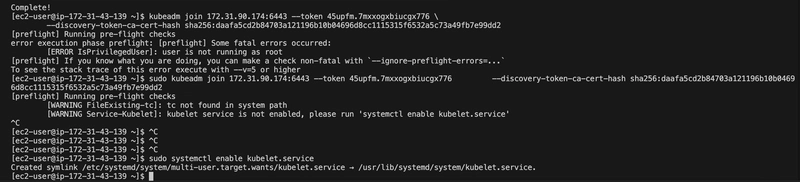
It was complaining about kubelet Service so I Enabled kubelet Service
sudo systemctl enable kubelet.service
Step 6: Initialized the Control Plane
I initialized the Kubernetes control plane using kubeadm. Initially, I ran into a preflight warning [WARNING FileExisting-tc] because the tc command (from iproute) wasn’t in the default path, even though it was installed.
Fixed the tc Path
[WARNING FileExisting-tc]: tc not found in system path

sudo yum install iproute

which tc

export PATH=$PATH:/sbin
sudo PATH=$PATH:/sbin kubeadm init --apiserver-advertise-address=172.31.26.7 --pod-network-cidr=192.168.0.0/16

sudo systemctl enabled kubelet.service
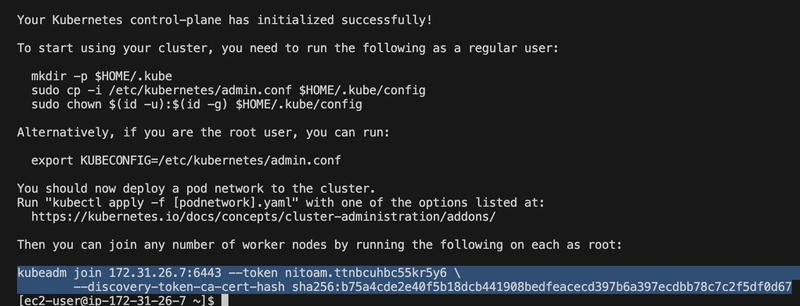
The init command above succeeded, initializing the control plane with Kubernetes v1.32.3.
Step 7: Set Up kubeconfig
To interact with the cluster using kubectl, I set up the kubeconfig file:
mkdir -p $HOME/.kube

sudo cp -i /etc/kubernetes/admin.conf $HOME/.kube/config

sudo chown $(id -u):$(id -g) $HOME/.kube/config

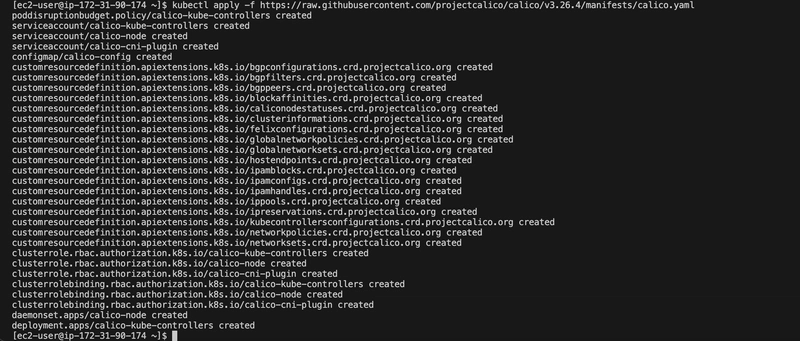
Step 8: Installed Calico for Pod Networking
Kubernetes requires a CNI plugin for pod-to-pod networking. I chose Calico because it matched my — pod-network-cidr=192.168.0.0/16 and integrates well with AWS:
kubectl apply -f https://raw.githubusercontent.com/projectcalico/calico/v3.26.4/manifests/calico.yaml
I verified the cluster was operational:
kubectl get pods -n kube-system

kubectl get nodes

Had to wait for the start didnt get that screenshot — oversight
Step 9: Install etcd Client for Verification
To verify encryption later, I needed the etcdctl client. I installed it manually:
Download and Extracted etcd v3.5.21
curl -LO https://github.com/etcd-io/etcd/releases/download/v3.5.21/etcd-v3.5.21-linux-amd64.tar.gz

tar xzf etcd-v3.5.21-linux-amd64.tar.gz
Move etcdctl to PATH
sudo mv etcd-v3.5.21-linux-amd64/etcdctl /usr/local/bin/
Verified Installation
etcdctl version
Note: I didn’t need to run an external etcd server because kubeadm deploys etcd as a pod (etcd-) in the kube-system namespace. However, I initially installed etcd manually and tried to configure it, which led to errors (e.g., unsupported — etcd-endpoints flag). I resolved this by letting kubeadm manage etcd.
Step 10: Enabled Encryption at Rest
The main goal was to enable Encryption at Rest for Kubernetes secrets, which are stored in etcd. By default, secrets are stored unencrypted (base64-encoded but readable), posing a security risk.
Verify etcd Pod
kubectl get pods -n kube-system

This showed the etcd-ip-172–31–90–174 pod running.
Check for etcd Certificates
ls /etc/kubernetes/pki/etcd

This confirmed the presence of ca.crt, server.crt, and server.key.
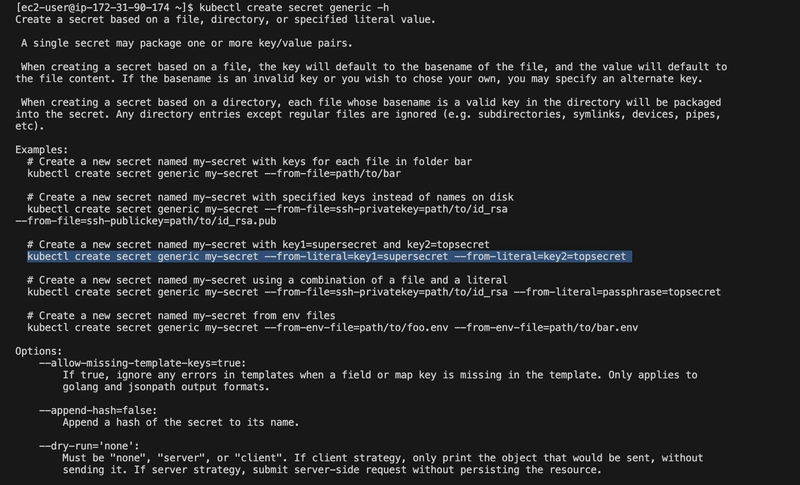
Check Current Secret State (Unencrypted)
I created a test secret:
kubectl create secret generic my-secret-1 --from-literal=key1=topsecret

kubectl get secrets

I checked its state in etcd:
ETCDCTL_API=3 etcdctl \

   --cacert=/etc/kubernetes/pki/etcd/ca.crt \

   --cert=/etc/kubernetes/pki/etcd/server.crt \

   --key=/etc/kubernetes/pki/etcd/server.key \

   get /registry/secrets/default/my-secret-1 | hexdump -C
Operating etcd clusters for Kubernetes
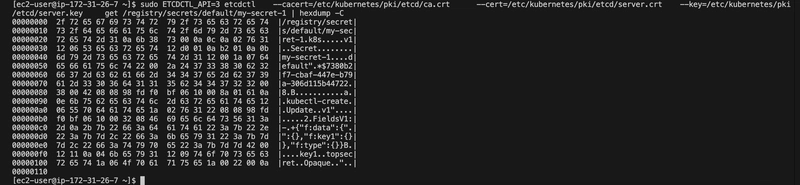
Here the secret is unencrypted
The output showed the secret in plaintext (base64-decodable), confirming it was unencrypted.
Check if Encryption Is Enabled
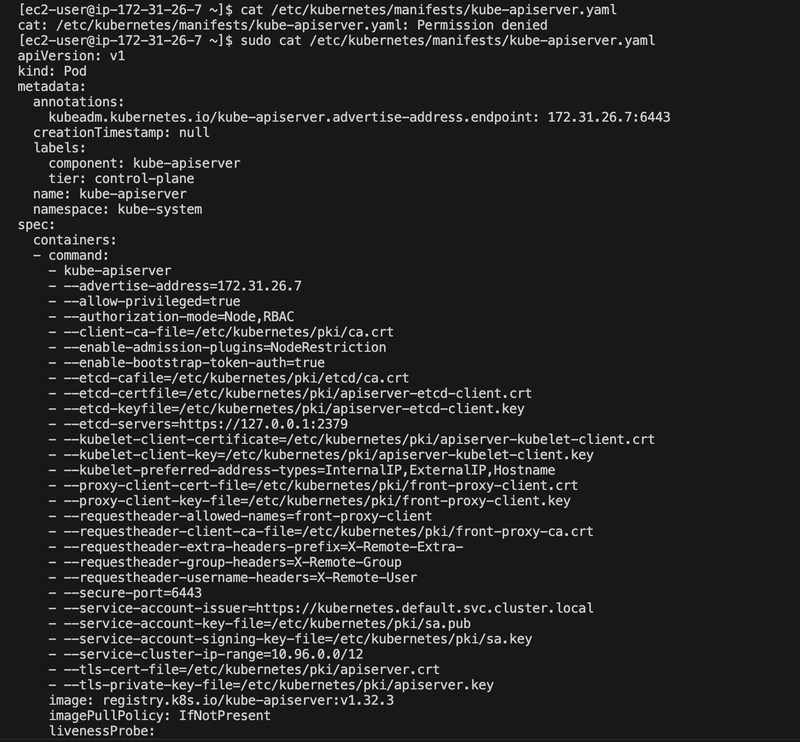
I checked the API server configuration:
ps -aux | grep kube-api | grep encryption-provider-config

cat /etc/kubernetes/manifests/kube-apiserver.yaml
No — encryption-provider-config flag was present, indicating encryption wasn’t enabled.
Create Encryption Configuration
I chose the aescbc provider for simplicity, though stronger options like kms v2 are recommended for production. I generated a key:
head -c 32 /dev/urandom | base64
I created an encryption configuration file (enc.yaml):
![]()
Created a file for the secret per documentation
`cat < Encrypting Confidential Data at Rest
Move Configuration File
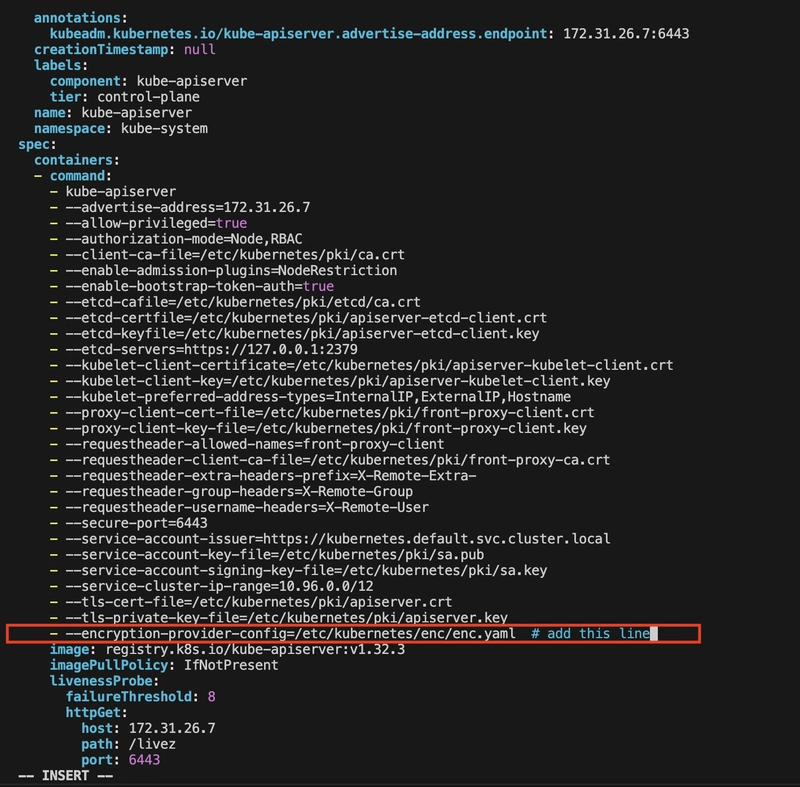
Update kube-apiserver Manifest
I edited the API server manifest to enable encryption:
Added the following:
Under spec.containers[0].command:
Under spec.containers[0].volumeMounts:
Under spec.volumes:
The API server pod automatically restarted after saving the changes.
Verify Encryption
I created a new secret:
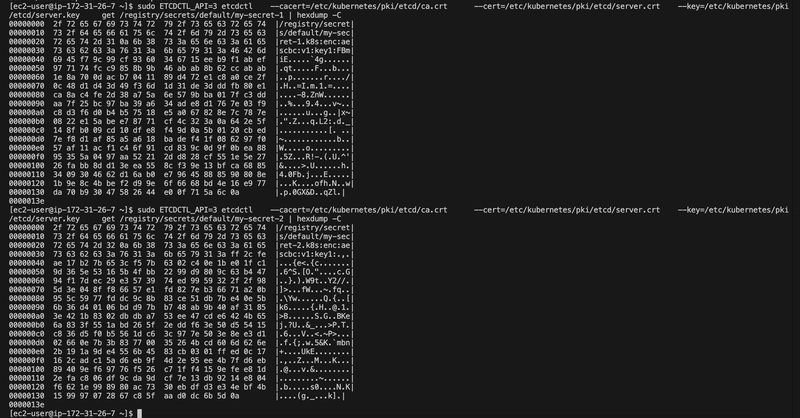
Checked its state in etcd:
The output showed encrypted data (starting with k8s:enc:aescbc:v1:), confirming encryption was enabled. The original secret (my-secret-1) remained unencrypted because encryption only applies to new or updated secrets.
Encrypt Existing Secrets
To encrypt all existing secrets: This is getting the secrets and replacing them with them same json file, basically updating the objects with the same data so now everything is locked down and encrypted.
Step 11: Joining Worker Nodes Challenges and Lessons Learned
Docker Deprecation:
Preflight Errors:
External etcd Configuration:
Encryption Providers:
Best Practices for Production
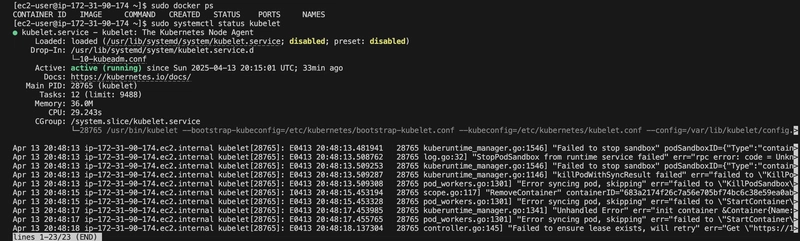
Other Issues: I installed Docker, but by default kubeadm and kubelet no longer natively use Docker As of Kubernetes v1.24+, Docker is not the default runtime — it uses containerd (or CRI-O). This meant my kubectl couldn’t talk to the Kubernetes API server — it was basically refusing the connection. The node wasn’t properly connected to the control plane (master). Even though I ran kubeadm join, the node was probably still be initializing, or something broke during setup either way Containerd fixed everything for me.
Conclusion
In this project I successfully deployed a Kubernetes cluster on Amazon Linux 2023 using kubeadm and containerd, with Calico for networking and Encryption at Rest enabled for secrets. The journey involved overcoming challenges like runtime deprecation, preflight errors, and etcd configuration, providing valuable lessons for setting up secure Kubernetes clusters. By encrypting secrets in etcd, I ensured sensitive data was protected, achieving the primary goal of enhancing cluster security.
Connect with me on my Socials:
kind: EncryptionConfiguration
resources:
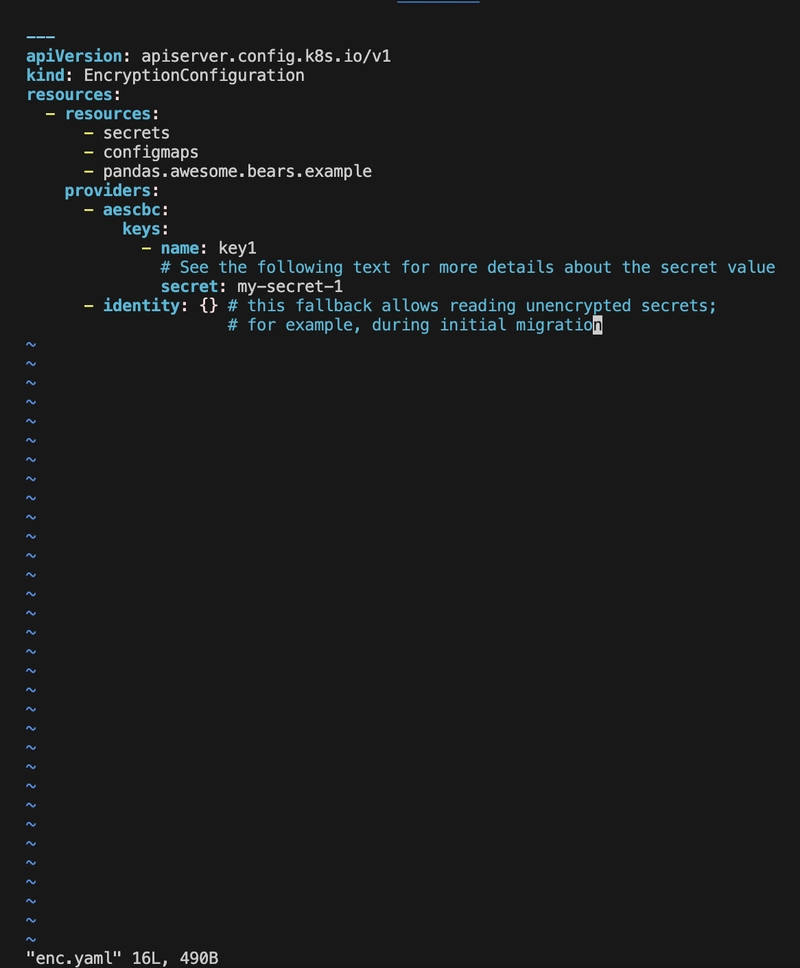
the key here is not the format its a code from the command | head -c 32 /dev/urandom | base64 I replaced it with the correct key
sudo mkdir -p /etc/kubernetes/enc

sudo mv enc.yaml /etc/kubernetes/enc

sudo ls /etc/kubernetes/enc
![]()

sudo vi /etc/kubernetes/manifests/kube-apiserver.yaml
- --encryption-provider-config=/etc/kubernetes/enc/enc.yaml
- name: enc

  mountPath: /etc/kubernetes/enc

  readOnly: true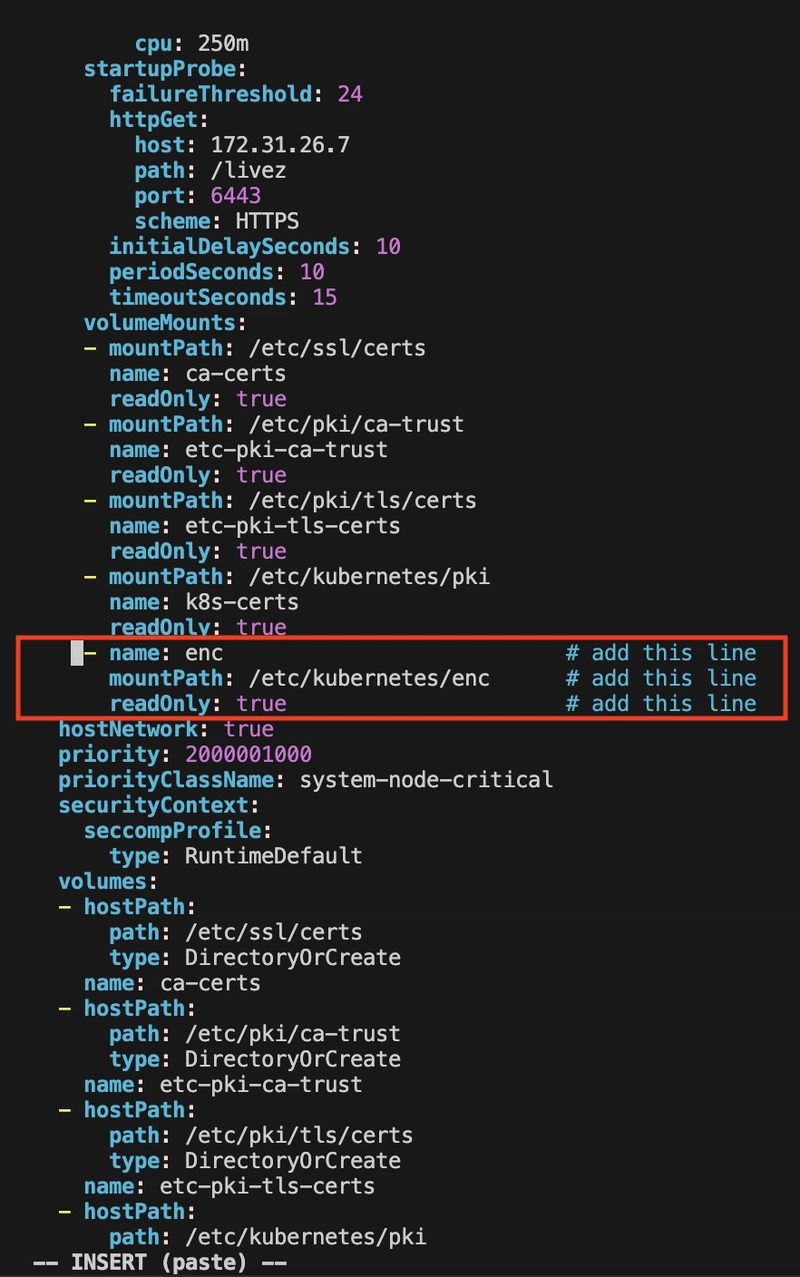
- name: enc

  hostPath:

    path: /etc/kubernetes/enc

    type: DirectoryOrCreate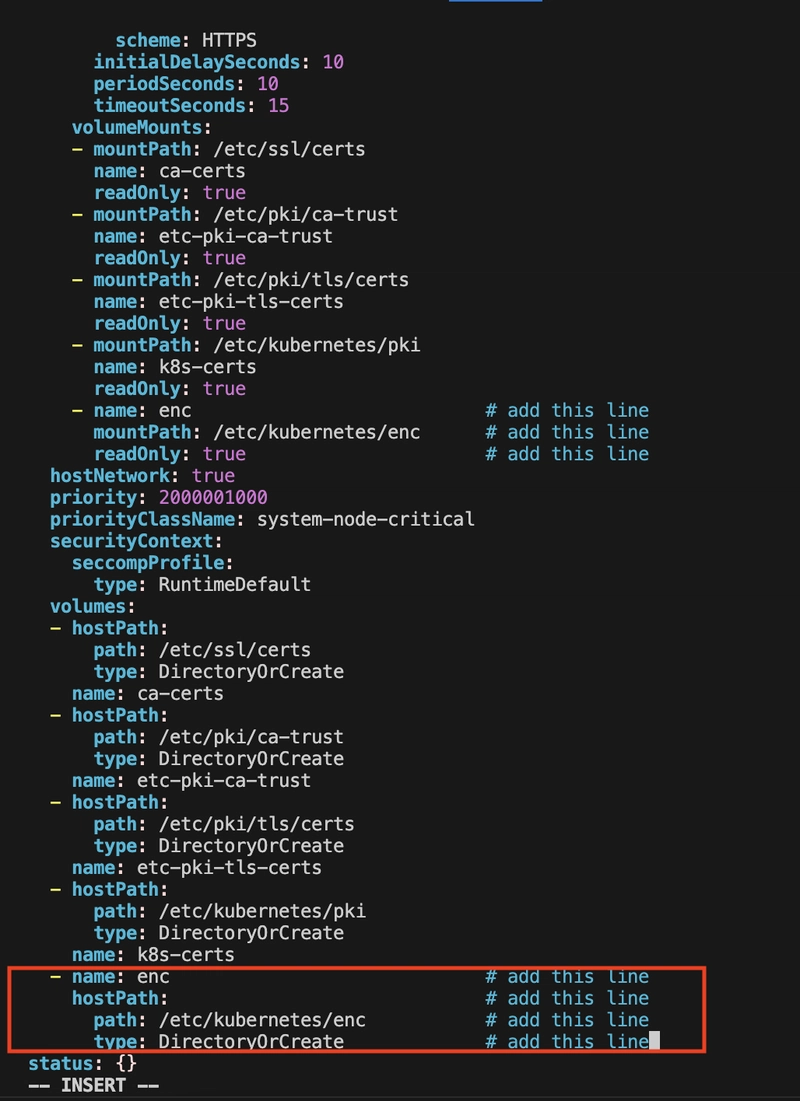
kubectl create secret generic my-secret-2 --from-literal=key2=topsecret
![]()
ETCDCTL_API=3 etcdctl \

   --cacert=/etc/kubernetes/pki/etcd/ca.crt \

   --cert=/etc/kubernetes/pki/etcd/server.crt \

   --key=/etc/kubernetes/pki/etcd/server.key \

   get /registry/secrets/default/my-secret-2 | hexdump -C
The secret is encrytped as you cant see the word topsecret in the bottom of the right like secret 1
kubectl get secrets --all-namespaces -o json | kubectl replace -f -

The command that ensured all secrets will be encrypted moving forward
After the command was ran both secrets were updated and encrypted secret 1 & secret 2

Kube-api file showing the line we added in the manifest

used grep to highlight the exact line that was used to encrypt
To scale the cluster, I prepared a worker node by installing containerd, kubeadm, and kubelet (same steps as the master, minus kubectl). I joined the worker node using the kubeadm join command provided by kubeadm init:
sudo kubeadm join 172.31.26.7:6443 --token nitoam.ttnbcuhbc55kr5y6 --discovery-token-ca-cert-hash sha256:b75a4cde2e40f5b18dcb441908bedfeacecd397b6a397ecdbb78c7c2f5df0d67
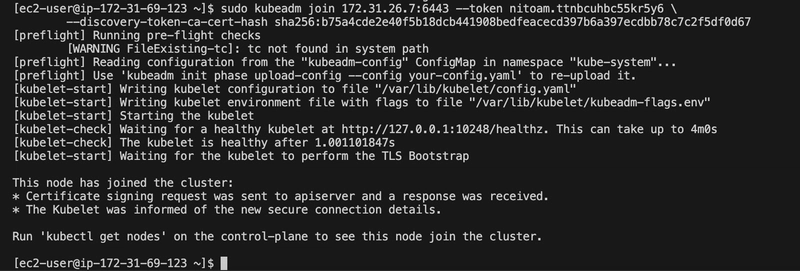
And I only installed Docker but not the Docker shim (cri-dockerd), kubelet cannot talk to Docker directly anymore. That’s why kubelet was up, but the pods were dead.
error: failed to create secret Post "https://172.31.90.174:6443/...": dial tcp 172.31.90.174:6443: connect: connection refused
error: failed to create secret Post "http://localhost:8080/...": dial tcp 127.0.0.1:8080: connect: connection refused