![[The AI Show Episode 142]: ChatGPT’s New Image Generator, Studio Ghibli Craze and Backlash, Gemini 2.5, OpenAI Academy, 4o Updates, Vibe Marketing & xAI Acquires X](https://www.marketingaiinstitute.com/hubfs/ep%20142%20cover.png)


![From drop-out to software architect with Jason Lengstorf [Podcast #167]](https://cdn.hashnode.com/res/hashnode/image/upload/v1743796461357/f3d19cd7-e6f5-4d7c-8bfc-eb974bc8da68.png?#)


.png?#)


.webp?#)


_Christophe_Coat_Alamy.jpg?#)
 (1).webp?#)


![Apple Considers Delaying Smart Home Hub Until 2026 [Gurman]](https://www.iclarified.com/images/news/96946/96946/96946-640.jpg)
![iPhone 17 Pro Won't Feature Two-Toned Back [Gurman]](https://www.iclarified.com/images/news/96944/96944/96944-640.jpg)
![Tariffs Threaten Apple's $999 iPhone Price Point in the U.S. [Gurman]](https://www.iclarified.com/images/news/96943/96943/96943-640.jpg)


Secure Your REST API Using Keycloak Role-Based Access Control
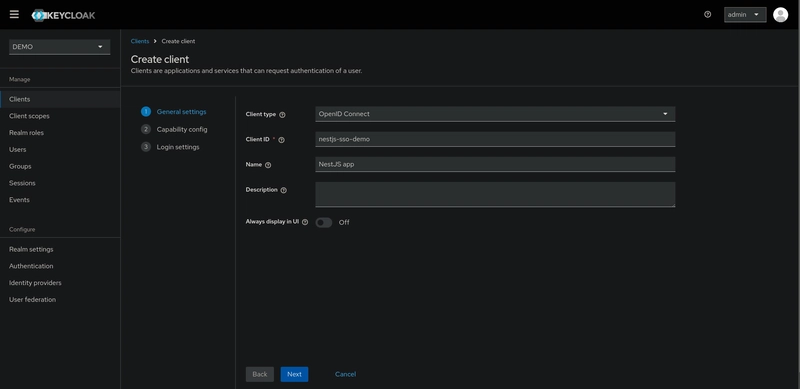
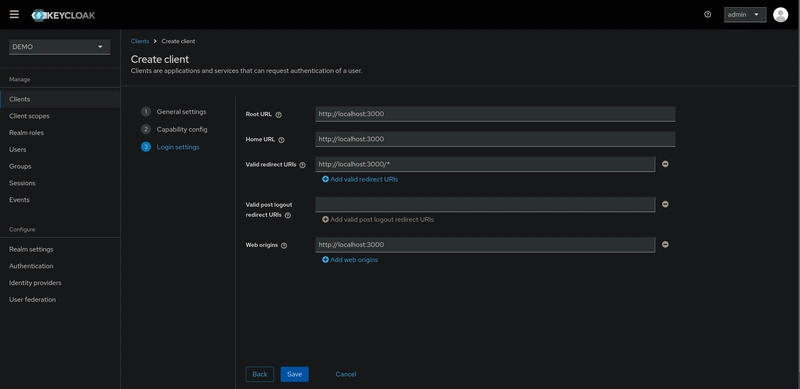
When building a REST API, security is a top priority. One of the best ways to manage authentication and authorization is by using Keycloak, an open-source Identity and Access Management (IAM) solution. In this guide, we will walk through how to secure a REST API using Keycloak's Role-Based Access Control (RBAC). If you're new to Keycloak, check out my previous article: Getting Started with Keycloak: Understanding the Basics to understand how to set up and configure Keycloak. What is Keycloak RBAC? Role-Based Access Control (RBAC) is a method in which users are assigned roles, and these roles determine the resources they can access. A resource can be a set of one or more application endpoints or a traditional web page (HTML page). By integrating this method into your RESTful API ecosystem, you can ensure that only authorized users have access to your resources and protect sensitive data. In this article, we will walk through a step-by-step process to secure a Nest.js RESTful API using Keycloak. This includes setting up an application client and configuring authentication and RBAC for your API endpoints. Keycloak Configuration After installing Keycloak in your local environment, it's time to get started. Let's begin by creating our first realm. Create Realm: A realm in Keycloak is an isolated environment where you manage clients, users, roles, and authentication settings. It allows multiple realms to exist independently within the same Keycloak instance. When you first enter into keycloak, a predefined realm is created. This initial realm is called the master realm and is the king of all realms. Admins in this realm have permissions to view and manage any other realm created on the server instance. When you define your initial admin account, you are creating an account in the master realm. Your initial login to the admin console will also be through the master realm. It is recommended not to use the master realm for managing users and applications in your organization. Instead, keep it reserved for super admins who create and manage other realms, ensuring a clean and organized setup. Now, we need to create our demo realm. To do this, hover over the dropdown menu in the top-left corner, which is labeled master, and click the Create realm button (or Add realm in older versions). Create Realm After creating your realm, you will be automatically redirected into it, and you'll be ready to proceed to the next step. Create Client: Clients are entities that can request user authentication. They can represent an application or a service. To create an client go to the Clients left menu item. On this page you’ll see a Create button on the top. This will bring you to the Create Client page. First step is to set the client name and client id. For this demo the client id is nestjs-sso-demo. Since we have a server-side application, we need to enable Client Authentication. This involves setting the Access Type to confidential, which allows us to access the secret key. Leave the other options as they are. The last step is to set the URLs of your application. In my case, I set the Valid Redirect URIs to http://localhost:3000, which is the URL for my NestJS app. Make sure to update this with the correct URL for your app and click on Save. Create Client Roles: After creating the client, you will be redirected into it. Now, it's time to define the app roles. Client roles serve as granular definitions of access privileges within a specific client application or service. These roles delineate the actions and permissions that users associated with the client can perform within the application. Client roles are distinct from realm roles, which apply globally across all clients within a Keycloak realm. Instead, client roles are scoped to individual clients, allowing for fine-grained control over access within each application or service. To create a client role, go to the Roles tab inside the client details and click on Create role button. In this demo, we will define some CRUD roles: CREATE_USER: Allows us to create a new user using the NestJS API. READ_USERS: Allows us to read user data. UPDATE_USER: Allows us to update user data. DELETE_USER: Allows us to delete user data. Here we go ;) Create User For demo purposes, we will create a demo user and assign specific roles to each one. To create an user go to the Users left menu item. On this page you’ll see a Create new user button. The first user is a viewer user with the username read-user. After creating the read-user, we will assign them the READ_USERS role. Similarly, we will create another user with the username admin-user and assign all available roles to this user, including: CREATE_USER READ_USERS UPDATE_USER DELETE_USER Here we go ;) The beast has been tamed after we struggled with Keycloak configurations for some time! Now, let’s jump into
When building a REST API, security is a top priority. One of the best ways to manage authentication and authorization is by using Keycloak, an open-source Identity and Access Management (IAM) solution. In this guide, we will walk through how to secure a REST API using Keycloak's Role-Based Access Control (RBAC).
If you're new to Keycloak, check out my previous article: Getting Started with Keycloak: Understanding the Basics to understand how to set up and configure Keycloak.
What is Keycloak RBAC?
Role-Based Access Control (RBAC) is a method in which users are assigned roles, and these roles determine the resources they can access. A resource can be a set of one or more application endpoints or a traditional web page (HTML page).
By integrating this method into your RESTful API ecosystem, you can ensure that only authorized users have access to your resources and protect sensitive data.
In this article, we will walk through a step-by-step process to secure a Nest.js RESTful API using Keycloak. This includes setting up an application client and configuring authentication and RBAC for your API endpoints.
Keycloak Configuration
After installing Keycloak in your local environment, it's time to get started. Let's begin by creating our first realm.
Create Realm:
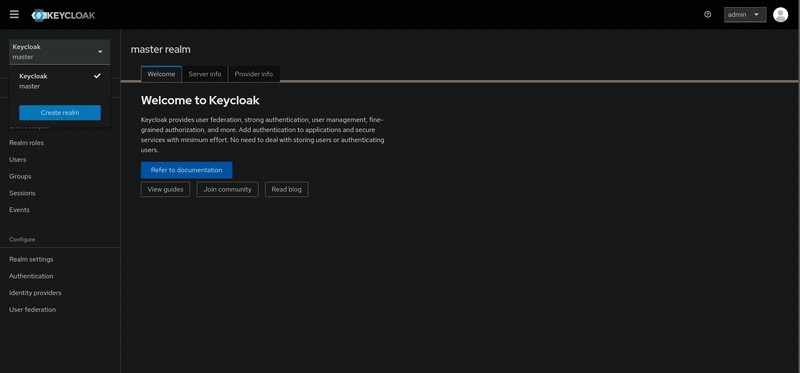
A realm in Keycloak is an isolated environment where you manage clients, users, roles, and authentication settings. It allows multiple realms to exist independently within the same Keycloak instance.
When you first enter into keycloak, a predefined realm is created. This initial realm is called the master realm and is the king of all realms. Admins in this realm have permissions to view and manage any other realm created on the server instance. When you define your initial admin account, you are creating an account in the master realm. Your initial login to the admin console will also be through the master realm.
It is recommended not to use the master realm for managing users and applications in your organization. Instead, keep it reserved for super admins who create and manage other realms, ensuring a clean and organized setup.
Now, we need to create our demo realm. To do this, hover over the dropdown menu in the top-left corner, which is labeled master, and click the Create realm button (or Add realm in older versions).
Create Realm
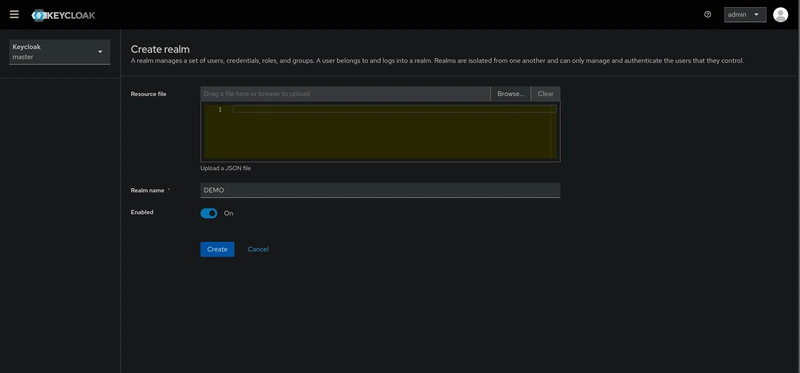
After creating your realm, you will be automatically redirected into it, and you'll be ready to proceed to the next step.
Create Client:
Clients are entities that can request user authentication. They can represent an application or a service.
To create an client go to the Clients left menu item. On this page you’ll see a Create button on the top.
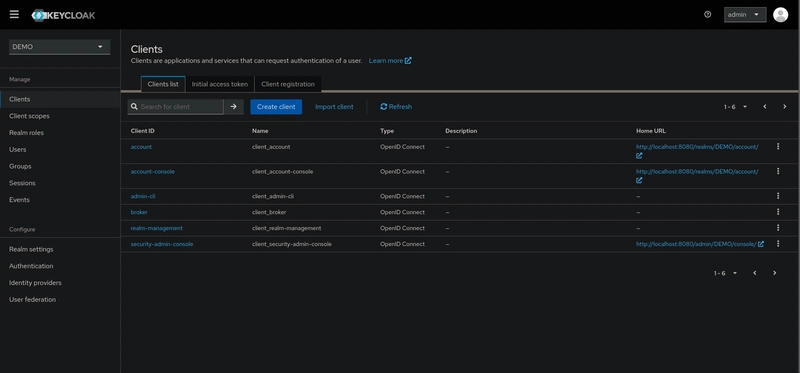
This will bring you to the Create Client page.
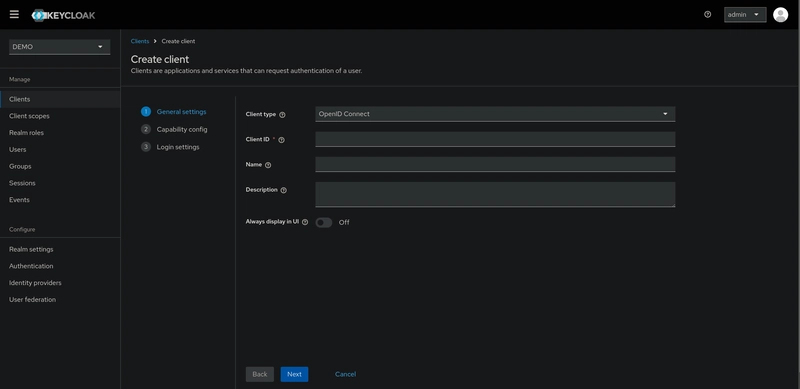
First step is to set the client name and client id. For this demo the client id is nestjs-sso-demo.
Since we have a server-side application, we need to enable Client Authentication. This involves setting the Access Type to confidential, which allows us to access the secret key. Leave the other options as they are.

The last step is to set the URLs of your application. In my case, I set the Valid Redirect URIs to http://localhost:3000, which is the URL for my NestJS app. Make sure to update this with the correct URL for your app and click on Save.
Create Client Roles:
After creating the client, you will be redirected into it. Now, it's time to define the app roles.
Client roles serve as granular definitions of access privileges within a specific client application or service. These roles delineate the actions and permissions that users associated with the client can perform within the application.
Client roles are distinct from realm roles, which apply globally across all clients within a Keycloak realm. Instead, client roles are scoped to individual clients, allowing for fine-grained control over access within each application or service.
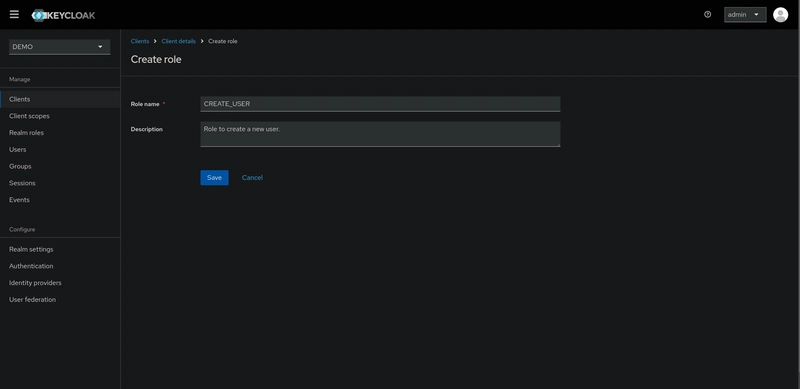
To create a client role, go to the Roles tab inside the client details and click on Create role button.
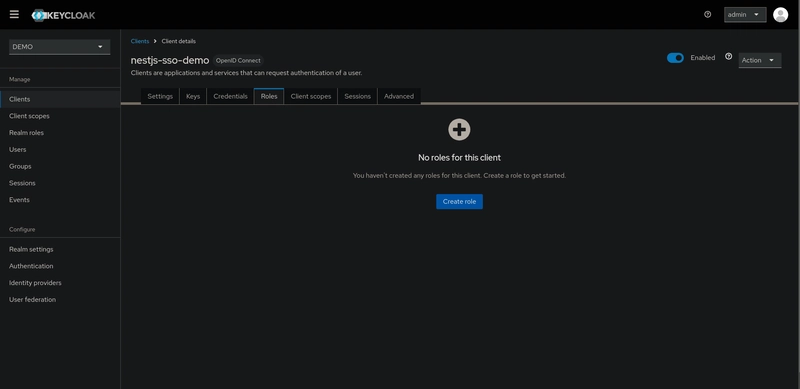
In this demo, we will define some CRUD roles:
-
CREATE_USER: Allows us to create a new user using the NestJS API. -
READ_USERS: Allows us to read user data. -
UPDATE_USER: Allows us to update user data. -
DELETE_USER: Allows us to delete user data.
Here we go ;)

Create User
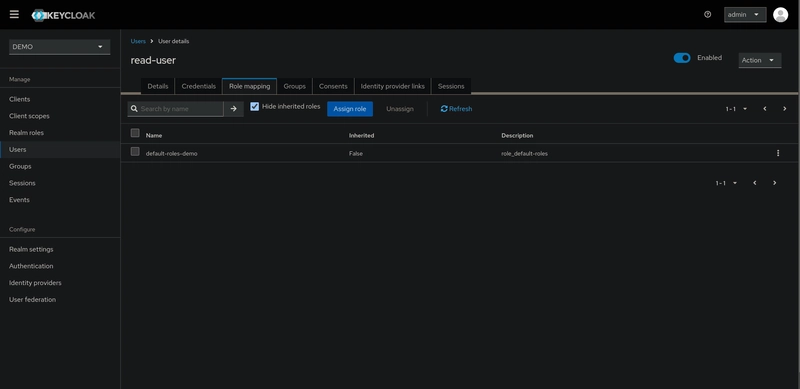
For demo purposes, we will create a demo user and assign specific roles to each one.
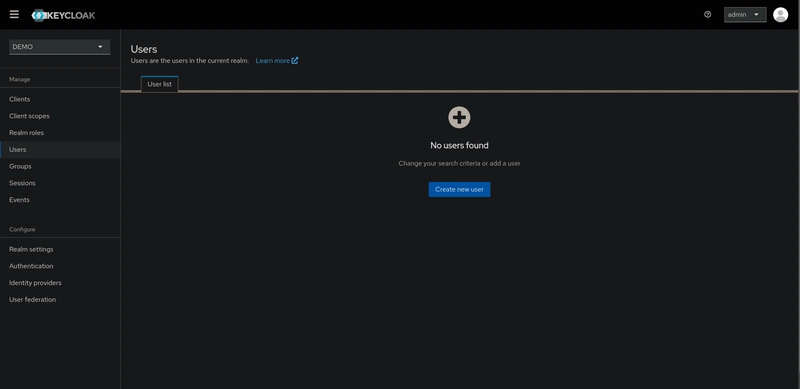
To create an user go to the Users left menu item. On this page you’ll see a Create new user button.
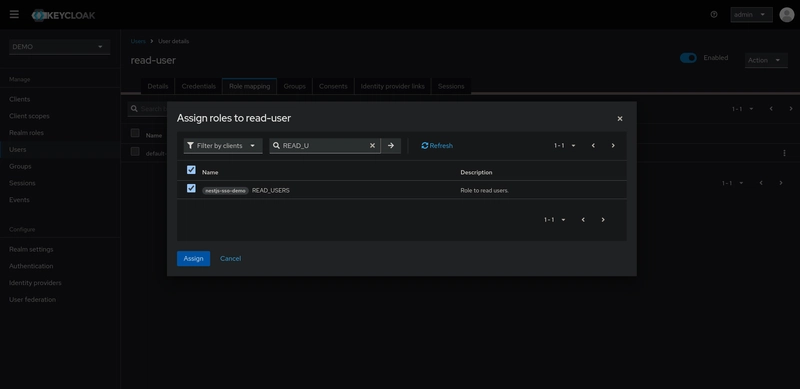
The first user is a viewer user with the username read-user.
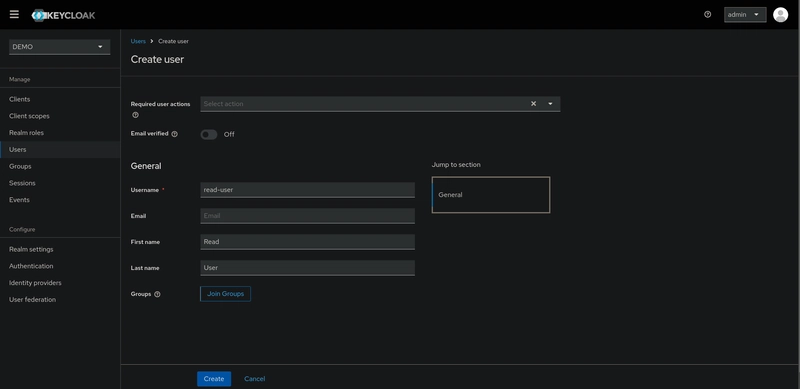
After creating the read-user, we will assign them the READ_USERS role.
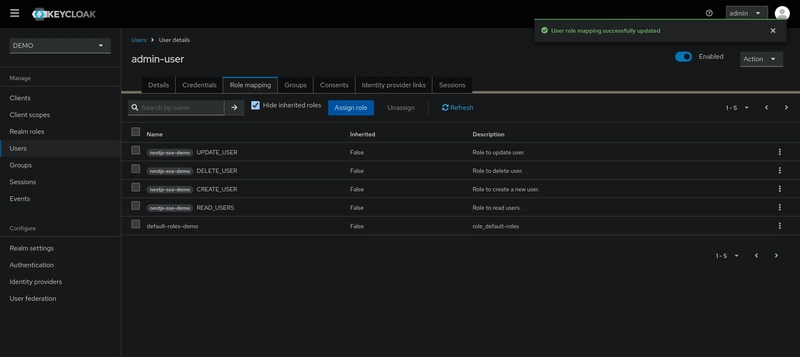
Similarly, we will create another user with the username admin-user and assign all available roles to this user, including:
CREATE_USERREAD_USERSUPDATE_USERDELETE_USER
Here we go ;)
The beast has been tamed after we struggled with Keycloak configurations for some time! Now, let’s jump into the application configuration and put these roles to the test inside our NestJS app. It's time to check if all that setup was worth it!
Application Configuration
I’m assuming you have basic knowledge of how to create a NestJS application with a basic setup. If not, no worries! You can check out the NestJS documentation, it’s very simple and easy to get started with.
We are using nest-keycloak-connect client adapter to communicate with Keycloak server.
Keycloak client adapters are libraries that make it very easy to secure applications and services with Keycloak. We call these adapters rather than libraries as they provide a tight integration to the underlying platform and framework. This makes adapters easy to use and require less boilerplate code than what is typically required by a library.
Installation:
First let install those libraries
npm i @nestjs/config keycloak-connect nest-keycloak-connect
Usage:
We need to add Keycloak configuration to Nest.js.
import { Module } from "@nestjs/common";
import { ConfigModule, ConfigService } from "@nestjs/config";
import { APP_GUARD } from "@nestjs/core";
import {
  AuthGuard,
  KeycloakConnectConfig,
  KeycloakConnectModule,
  ResourceGuard,
  RoleGuard,
} from "nest-keycloak-connect";
import { AppController } from "./app.controller";
import { AppService } from "./app.service";
import { UserModule } from "./user/user.module";

@Module({
  imports: [
    ConfigModule.forRoot({
      isGlobal: true,
    }),
    KeycloakConnectModule.registerAsync({
      inject: [ConfigService],
      useFactory: (configService: ConfigService): KeycloakConnectConfig => ({
        authServerUrl: configService.get("KC_AUTH_SERVER_URL"),
        realm: configService.get("KC_REALM"),
        clientId: configService.get("KC_CLIENT_ID"),
        secret: configService.get("KC_SECRET"),
        useNestLogger: true,
      }),
    }),
    UserModule,
  ],
  controllers: [AppController],
  providers: [
    AppService,
    // This adds a global level authentication guard,
    // you can also have it scoped
    // if you like.
    //
    // Will return a 401 unauthorized when it is unable to
    // verify the JWT token or Bearer header is missing.
    {
      provide: APP_GUARD,
      useClass: AuthGuard,
    },
    // This adds a global level resource guard, which is permissive.
    // Only controllers annotated with @Resource and
    // methods with @Scopes
    // are handled by this guard.
    {
      provide: APP_GUARD,
      useClass: ResourceGuard,
    },
    // New in 1.1.0
    // This adds a global level role guard, which is permissive.
    // Used by `@Roles` decorator with the
    // optional `@AllowAnyRole` decorator for allowing any
    // specified role passed.
    {
      provide: APP_GUARD,
      useClass: RoleGuard,
    },
  ],
})
export class AppModule {}
Here we are using nest-keycloak-connect’s AuthGuard, ResourceGuard and RoleGuard to protect our endpoints.
For the environment variables :
KC_AUTH_SERVER_URL=http://localhost:8080/ # Keycloak Instance
KC_REALM=DEMO
KC_CLIENT_ID=nestjs-sso-demo
KC_SECRET=Pvbc37M7ThncsenGa71Xrj52eLLLHsM2 # Client secret from `Credentials` tab
Now we add following endpoints to our User Controller.
import {
  Body,
  Controller,
  Delete,
  Get,
  Param,
  Post,
  Put,
} from "@nestjs/common";
import { UserService } from "./user.service";
import { User } from "./models/user";
import { Roles } from "nest-keycloak-connect";
import { ROLES } from "./models/roles.enum";

@Controller("user")
export class UserController {
  constructor(private readonly userService: UserService) {}

  @Post("create")
  @Roles({ roles: [ROLES.CREATE_USER] })
  createUser(@Body() payload: User) {
    return this.userService.createUser(payload);
  }

  @Put(':userId/update')
  @Roles({ roles: [ROLES.UPDATE_USER] })
  updateUser(@Param('userId') userId: number, @Body() payload: User) {
    return this.userService.updateUser(userId, payload);
  }

  @Delete("delete/:id")
  @Roles({ roles: [ROLES.DELETE_USER] })
  deleteUser(@Param("id") id: number) {
    return this.userService.deleteUser(id);
  }

  @Get("all")
  @Roles({ roles: [ROLES.READ_USERS] })
  findAllUsers() {
    return this.userService.findAllUsers();
  }
}
Also, we’ll create a simple "Hello World" endpoint inside the App Controller that does not require authentication, using the @Unprotected decorator (You can also use @AllowAnyRole decorator that allow access for any role.).
import { Controller, Get } from "@nestjs/common";
import { AppService } from "./app.service";
import { Unprotected } from "nest-keycloak-connect";
@Controller()
export class AppController {
  constructor(private readonly appService: AppService) {}
  @Get()
  @Unprotected()
  getHello(): string {
    return this.appService.getHello();
  }
}
Endpoint Tests
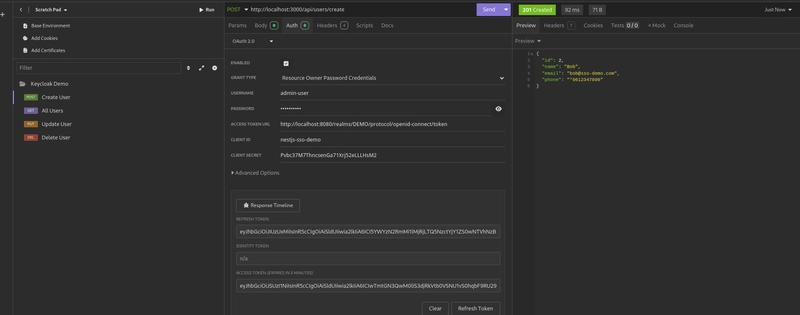
After setting up our endpoints, it's time to test them using Insomnia or any API tool.
- Admin User:
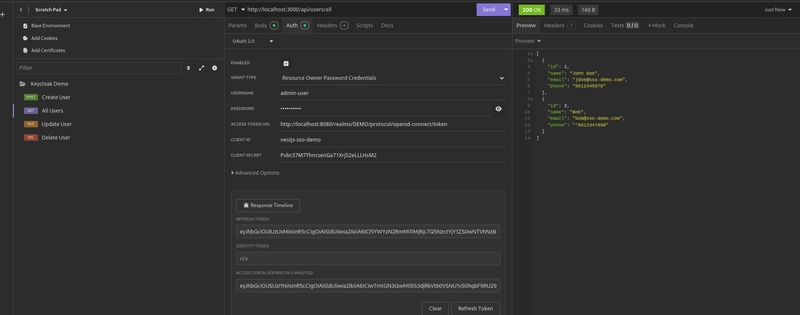
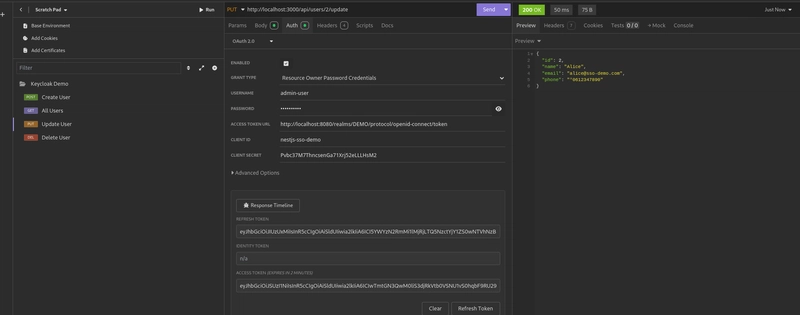
First, we tested accessing the endpoint to create a new user, using the admin-user attached with the JWT token in the Authorization header.
Same for update or delete user and read all users.
Get all users:
Update User:
-
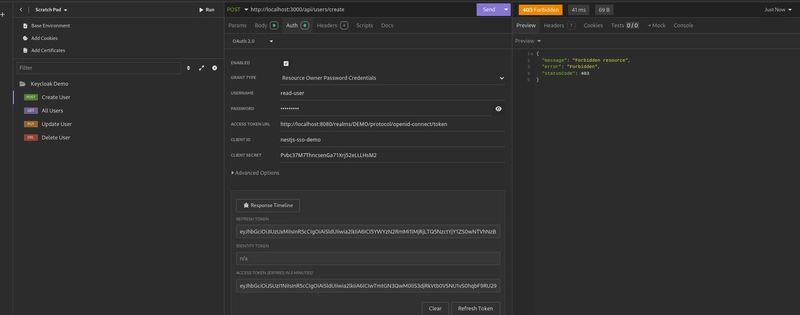
Viewer User:
The viewer user has only the
READ_USERSrole, which gives them access to the/api/users/allendpoint.

However, if the same user tries to access other protected endpoints, such as the create user endpoint, the Keycloak guard will throw a forbidden error. This means the user doesn't have the necessary permissions to access that ressource.
Conclusion
Using Keycloak with RBAC makes securing your REST API easy and scalable. You can manage users, roles, and permissions without hardcoding them into your application. By following this guide, you have set up authentication and role-based authorization for your API.
However, RBAC has some limitations:
- Resources and roles are tightly coupled, meaning changes to roles can impact multiple resources.
- Security requirement changes may require deep modifications to application code.
- Managing roles in large applications can become complex and error-prone.
- RBAC lacks contextual information, means that if you have a role, you have access, regardless of the specific context.
In our next article, we will explore Keycloak Authorization Services, which provide:
- Fine-grained authorization policies and various access control mechanisms.
- Centralized resource, permission, and policy management.
- REST security using Keycloak’s authorization services.
- An infrastructure to reduce code replication and quickly adapt to security changes.