


![[The AI Show Episode 145]: OpenAI Releases o3 and o4-mini, AI Is Causing “Quiet Layoffs,” Executive Order on Youth AI Education & GPT-4o’s Controversial Update](https://www.marketingaiinstitute.com/hubfs/ep%20145%20cover.png)


![Apple Shares Official Teaser for 'Highest 2 Lowest' Starring Denzel Washington [Video]](https://www.iclarified.com/images/news/97221/97221/97221-640.jpg)

![Under-Display Face ID Coming to iPhone 18 Pro and Pro Max [Rumor]](https://www.iclarified.com/images/news/97215/97215/97215-640.jpg)


Secure and High-Availability Corporate Storage with Azure: Blobs, File Shares and Snapshots
There’s something comforting about knowing your company’s documents are safe, backed up, and only accessible to the right people. In this post, we’ll walk through setting up Azure storage for your internal files—complete with geo‑redundancy, private containers, easy partner sharing, automated cost‑savings, file shares with snapshots, and even locking it all down to your corporate network. Grab a coffee, fire up the Azure portal, and let’s make your files bulletproof! 1. Build Your Private Document Stronghold What we’re doing: Creating a storage account that survives whole‑region outages by replicating data to another region. In the Azure portal, click Storage accounts → + Create. Select the resource group you used before. Give your account a unique name like secureclient. Under Redundancy, pick Geo‑redundant storage (GRS)—that’s your insurance policy. Hit Review + create, then Create, and when it’s ready, click Go to resource. 2. Lock Down Your “Private” Container Goal: Keep prying eyes out while you store sensitive documents. Inside your new account, go to Containers → + Container. Name it private, and choose Private (no anonymous access). Click Create, then upload a small test file. Copy its URL into a browser, if you see “Access denied,” you nailed it. 3. Give Partners Just‑Enough Access with SAS Why SAS? You need to let an outside consultant view (or update) a single file for a day—without handing over your master keys. Select your blob, click Generate SAS. Grant only Read permission, set start to now and expiry to 24 hrs from now. Click Generate, copy the SAS URL, and paste it in your browser. Voilà—secure, time‑limited access. 4. Automate Cost‑Saving with Lifecycle Rules Think of it like your digital housecleaning: move files you haven’t touched in 30 days from Hot to Cool storage automatically. Open Lifecycle management under Data management. Click Add rule, name it MoveToCool. Scope: All blobs; Condition: Last modified > 30 days; Action: Move to cool storage. Save the rule and cross that off your to‑do list. 5. Mirror Public Assets into Your Private “Backup” Container Double up the safety net by replicating your public website’s images and docs into a private backup. In your private account, create a backup container. Switch to your publicwebsite account and open Object replication → Create replication rule. Source: public container. Destination: your private backup. Click Create and watch the magic happen when you upload new files. 6. Share Files the Old‑School Way with Azure File Shares Sometimes you need familiar drive‑letter file shares for finance, HR, or other teams. In the private account, go to File shares → + File share. Name it corporatefiles. Click into that share, + Add directory, call it finance, then upload a sample file there. 7. Protect & Recover with Snapshots Snapshots are your undo button for accidental deletions. Within your file share, select Snapshots → + Add snapshot. Confirm your /finance folder and file appear. Delete the file from /finance, then open Snapshots, find your snapshot, select the file, and click Restore—and just like that, it’s back. 8. Gate Access to Your Corporate Network Only The last piece of the puzzle: lock the storage account so only your office network can reach it. Under Virtual networks, click + Create and spin up a simple VNet with one subnet (defaults are fine). In that subnet’s settings, add a Service endpoint for Microsoft.Storage → Save. Back in your storage account’s Networking tab, set Public network access to Selected networks only, then add your VNet/subnet → Save. Try browsing your file share from home—you’ll see “Not authorized,” because only your office network is allowed. t]* Wrapping Up And there you have it—a comprehensive, yet down‑to‑earth guide to building a secure, high‑availability storage solution in Azure. You’ve: Created a geo‑redundant “private” account Locked down your containers and granted temporary partner access Automated cost‑saving lifecycle rules Replicated public assets to private backup Set up classic file shares with snapshots Locked everything to your corporate network
There’s something comforting about knowing your company’s documents are safe, backed up, and only accessible to the right people. In this post, we’ll walk through setting up Azure storage for your internal files—complete with geo‑redundancy, private containers, easy partner sharing, automated cost‑savings, file shares with snapshots, and even locking it all down to your corporate network. Grab a coffee, fire up the Azure portal, and let’s make your files bulletproof!
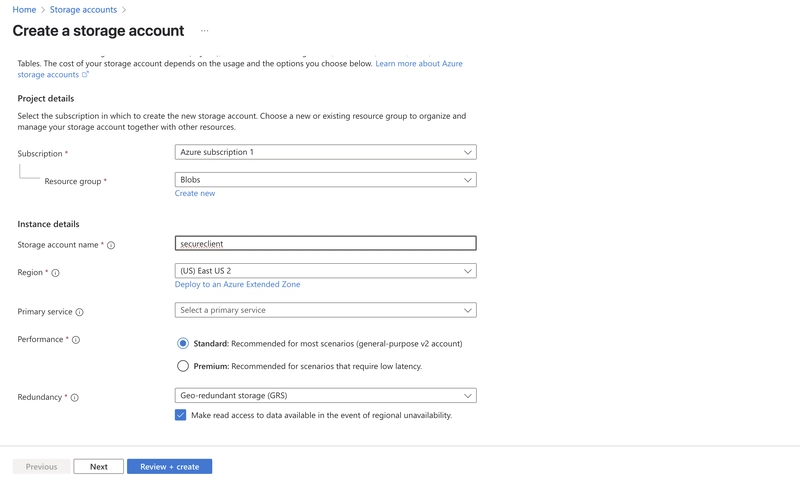
1. Build Your Private Document Stronghold
What we’re doing: Creating a storage account that survives whole‑region outages by replicating data to another region.
- In the Azure portal, click Storage accounts → + Create.
- Select the resource group you used before.
- Give your account a unique name like
secureclient. - Under Redundancy, pick Geo‑redundant storage (GRS)—that’s your insurance policy.
- Hit Review + create, then Create, and when it’s ready, click Go to resource.
2. Lock Down Your “Private” Container
Goal: Keep prying eyes out while you store sensitive documents.
- Inside your new account, go to Containers → + Container.
- Name it private, and choose Private (no anonymous access).
- Click Create, then upload a small test file.
- Copy its URL into a browser, if you see “Access denied,” you nailed it.
3. Give Partners Just‑Enough Access with SAS
Why SAS? You need to let an outside consultant view (or update) a single file for a day—without handing over your master keys.
- Select your blob, click Generate SAS.
- Grant only Read permission, set start to now and expiry to 24 hrs from now.
- Click Generate, copy the SAS URL, and paste it in your browser. Voilà—secure, time‑limited access.

4. Automate Cost‑Saving with Lifecycle Rules
Think of it like your digital housecleaning: move files you haven’t touched in 30 days from Hot to Cool storage automatically.
- Open Lifecycle management under Data management.
- Click Add rule, name it MoveToCool.
- Scope: All blobs; Condition: Last modified > 30 days; Action: Move to cool storage.
- Save the rule and cross that off your to‑do list.

5. Mirror Public Assets into Your Private “Backup” Container
Double up the safety net by replicating your public website’s images and docs into a private backup.
- In your private account, create a
backupcontainer. - Switch to your
publicwebsiteaccount and open Object replication → Create replication rule. - Source:
publiccontainer. Destination: your privatebackup. - Click Create and watch the magic happen when you upload new files.

6. Share Files the Old‑School Way with Azure File Shares
Sometimes you need familiar drive‑letter file shares for finance, HR, or other teams.
- In the private account, go to File shares → + File share. Name it corporatefiles.
- Click into that share, + Add directory, call it finance, then upload a sample file there.

7. Protect & Recover with Snapshots
Snapshots are your undo button for accidental deletions.
- Within your file share, select Snapshots → + Add snapshot.
- Confirm your
/financefolder and file appear. - Delete the file from
/finance, then open Snapshots, find your snapshot, select the file, and click Restore—and just like that, it’s back.

8. Gate Access to Your Corporate Network Only
The last piece of the puzzle: lock the storage account so only your office network can reach it.
- Under Virtual networks, click + Create and spin up a simple VNet with one subnet (defaults are fine).
- In that subnet’s settings, add a Service endpoint for Microsoft.Storage → Save.
- Back in your storage account’s Networking tab, set Public network access to Selected networks only, then add your VNet/subnet → Save.
- Try browsing your file share from home—you’ll see “Not authorized,” because only your office network is allowed.
t]*


Wrapping Up
And there you have it—a comprehensive, yet down‑to‑earth guide to building a secure, high‑availability storage solution in Azure. You’ve:
- Created a geo‑redundant “private” account
- Locked down your containers and granted temporary partner access
- Automated cost‑saving lifecycle rules
- Replicated public assets to private backup
- Set up classic file shares with snapshots
- Locked everything to your corporate network