


![[The AI Show Episode 144]: ChatGPT’s New Memory, Shopify CEO’s Leaked “AI First” Memo, Google Cloud Next Releases, o3 and o4-mini Coming Soon & Llama 4’s Rocky Launch](https://www.marketingaiinstitute.com/hubfs/ep%20144%20cover.png)


![Is this too much for a modular monolith system? [closed]](https://i.sstatic.net/pYL1nsfg.png)


_Andreas_Prott_Alamy.jpg?width=1280&auto=webp&quality=80&disable=upscale#)


![What features do you get with Gemini Advanced? [April 2025]](https://i0.wp.com/9to5google.com/wp-content/uploads/sites/4/2024/02/gemini-advanced-cover.jpg?resize=1200%2C628&quality=82&strip=all&ssl=1)


![Apple Shares Official Trailer for 'Long Way Home' Starring Ewan McGregor and Charley Boorman [Video]](https://www.iclarified.com/images/news/97069/97069/97069-640.jpg)
![Apple Watch Series 10 Back On Sale for $299! [Lowest Price Ever]](https://www.iclarified.com/images/news/96657/96657/96657-640.jpg)
![EU Postpones Apple App Store Fines Amid Tariff Negotiations [Report]](https://www.iclarified.com/images/news/97068/97068/97068-640.jpg)
![Apple Slips to Fifth in China's Smartphone Market with 9% Decline [Report]](https://www.iclarified.com/images/news/97065/97065/97065-640.jpg)


Say Hello to UV: A Fast Python Package & Project Manager Written in Rust
If you’ve been managing Python projects long enough, you’ve probably dealt with a mess of tools: pip, pip-tools, poetry, virtualenv, conda, maybe even pdm. Each brings something useful to the table, but also adds to the complexity. UV — a fast, Rust-powered Python package and project manager that aims to unify and simplify all of this. What is UV? UV is a blazing-fast package and project manager for Python, written in Rust. Think of it as a single tool to replace: pip pip-tools virtualenv pyenv poetry pdm and more... It handles dependency installation, environment management, Python version management, and script execution, all from a single CLI tool. Why is UV So Fast? The secret sauce? UV is written in Rust, which brings serious speed gains over traditional Python-based tooling. Benchmarks from the UV docs claim it's 10 to 100 times faster than pip. And in practice, it does feel ridiculously quick — installing NumPy, pandas, and other large libraries takes seconds, not minutes. Installing UV To get started: pip install uv You can also install it via curl or PowerShell, and it works across macOS, Linux, and Windows. Getting Started with UV Let’s walk through a quick project setup using UV. Step 1: Create a New Project uv init uv-demo This creates a structured project folder: uv-demo/ ├── .gitignore ├── main.py ├── project.uv.toml ├── README.md └── .python-version Step 2: Create a Virtual Environment uv venv This instantly creates a virtual environment using the selected Python version — no more typing python -m venv venv. To activate it (Linux/macOS): source .venv/bin/activate Or on Windows: .venv\Scripts\activate Step 3: Add Dependencies Adding dependencies is straightforward: uv add numpy pandas This installs the packages and updates your project.uv.toml file: Step 4: Install from requirements.txt You can even install dependencies from a requirements.txt file: # requirements.txt numpy pandas Then run: uv add -r requirements.txt Step 5: Run Python Scripts Instead of: python main.py With UV, just use: uv run main.py This runs your script using the active environment. Managing Python Versions UV also supports managing Python versions: uv python install 3.12 uv python install 3.11 Then create environments using a specific version: uv venv --python 3.11 Highlights ⚡ Lightning-fast installs (thanks, Rust)
If you’ve been managing Python projects long enough, you’ve probably dealt with a mess of tools: pip, pip-tools, poetry, virtualenv, conda, maybe even pdm.
Each brings something useful to the table, but also adds to the complexity.
UV — a fast, Rust-powered Python package and project manager that aims to unify and simplify all of this.
What is UV?
UV is a blazing-fast package and project manager for Python, written in Rust.
Think of it as a single tool to replace:
pippip-toolsvirtualenvpyenvpoetrypdm- and more...
It handles dependency installation, environment management, Python version management, and script execution, all from a single CLI tool.
Why is UV So Fast?
The secret sauce? UV is written in Rust, which brings serious speed gains over traditional Python-based tooling.
Benchmarks from the UV docs claim it's 10 to 100 times faster than pip. And in practice, it does feel ridiculously quick — installing NumPy, pandas, and other large libraries takes seconds, not minutes.
Installing UV
To get started:
pip install uv
You can also install it via curl or PowerShell, and it works across macOS, Linux, and Windows.
Getting Started with UV
Let’s walk through a quick project setup using UV.
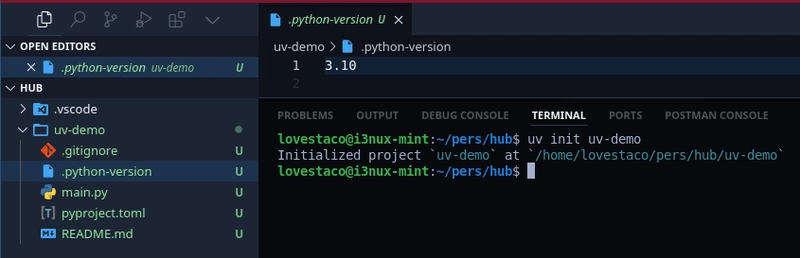
Step 1: Create a New Project
uv init uv-demo
This creates a structured project folder:
uv-demo/
├── .gitignore
├── main.py
├── project.uv.toml
├── README.md
└── .python-version
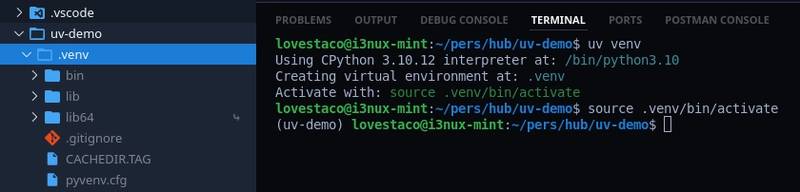
Step 2: Create a Virtual Environment
uv venv
This instantly creates a virtual environment using the selected Python version — no more typing python -m venv venv.
To activate it (Linux/macOS):
source .venv/bin/activate
Or on Windows:
.venv\Scripts\activate
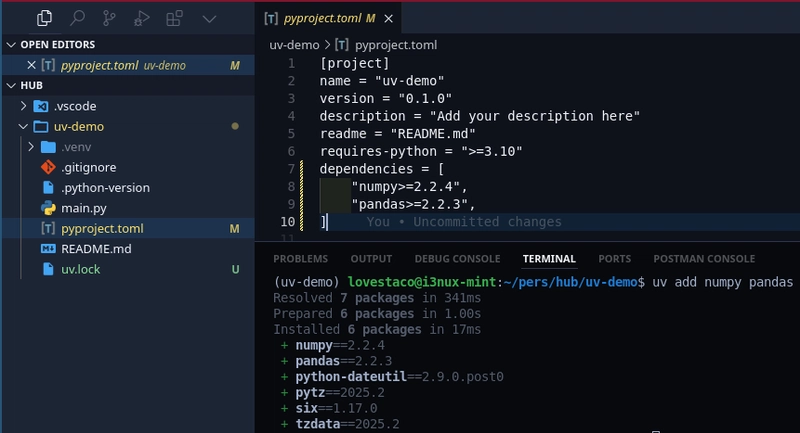
Step 3: Add Dependencies
Adding dependencies is straightforward:
uv add numpy pandas
This installs the packages and updates your project.uv.toml file:
Step 4: Install from requirements.txt
You can even install dependencies from a requirements.txt file:
# requirements.txt
numpy
pandas
Then run:
uv add -r requirements.txt
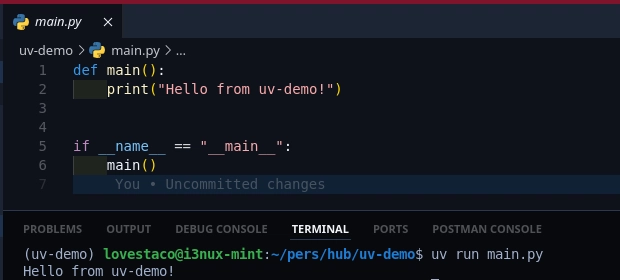
Step 5: Run Python Scripts
Instead of:
python main.py
With UV, just use:
uv run main.py
This runs your script using the active environment.
Managing Python Versions
UV also supports managing Python versions:
uv python install 3.12
uv python install 3.11
Then create environments using a specific version:
uv venv --python 3.11

Highlights
- ⚡ Lightning-fast installs (thanks, Rust)