


![[The AI Show Episode 144]: ChatGPT’s New Memory, Shopify CEO’s Leaked “AI First” Memo, Google Cloud Next Releases, o3 and o4-mini Coming Soon & Llama 4’s Rocky Launch](https://www.marketingaiinstitute.com/hubfs/ep%20144%20cover.png)


![Is this too much for a modular monolith system? [closed]](https://i.sstatic.net/pYL1nsfg.png)


_Andreas_Prott_Alamy.jpg?width=1280&auto=webp&quality=80&disable=upscale#)


![What features do you get with Gemini Advanced? [April 2025]](https://i0.wp.com/9to5google.com/wp-content/uploads/sites/4/2024/02/gemini-advanced-cover.jpg?resize=1200%2C628&quality=82&strip=all&ssl=1)


![Apple Shares Official Trailer for 'Long Way Home' Starring Ewan McGregor and Charley Boorman [Video]](https://www.iclarified.com/images/news/97069/97069/97069-640.jpg)
![Apple Watch Series 10 Back On Sale for $299! [Lowest Price Ever]](https://www.iclarified.com/images/news/96657/96657/96657-640.jpg)
![EU Postpones Apple App Store Fines Amid Tariff Negotiations [Report]](https://www.iclarified.com/images/news/97068/97068/97068-640.jpg)
![Apple Slips to Fifth in China's Smartphone Market with 9% Decline [Report]](https://www.iclarified.com/images/news/97065/97065/97065-640.jpg)


An Easy Step-by-Step Guide on How to Deploy a Windows 11 Virtual Machine on Microsoft Azure
Deploying a Windows 11 virtual machine on Microsoft Azure is quick and straightforward. Whether you're developing, learning, or experimenting, this guide will walk you through the process. Grab your laptop and lets go. Step 1. Log In to Azure On your web browser, head over to https://portal.azure.com and log in with your Microsoft account. If you dont have an account, click on sign up and provide the required information so your Microsoft account can be activated. A successful login bring you to this page below, Step 2. Create a New Virtual Machine To create a Virtual Machine, click on Create a resource as indicated in the image below Click on Virtual machine For the Basics configurations, fill in the tabs as follows: Subscription: Azure subscription 1 Resource Group: Use an existing or create a resource group Virtual machine name: mywindows11vm Region: Select a nearby or preferred location Image: Select Windows 11 Pro Size: Use Standard D2s or similar Authentication: Username and password Inbound port rules: Allow selected ports and choose RDP (3389) for Windows access Step 3. Configure Disks Click on Next : Disks >, this leads you to on the next page, you can use the default OS disk size, use the Image default (127 GiB) and for the OS disk type, use the default settings Premium SSD (locally-redundant storage) unless you have unique configuration requirements. Step 4. Networking Configuration On the bottow of the last page in Step 3, Click on Next : Networking >, this leads you to the Network interface page below: Use the default setting as provided by Azure in the above image. This is to ensure the RDP is enabled so you can easily connect to your VM. Step 5. Management Configuration Click on Enable auto-shutdown Stroll down and click on Review + create. A successful setup will bring you to the page as seen below: Click on Create, this leads to the creation of the VM and it deploying as seen in the image below; After a successful VM deployment process, the page will change into this Click on Go to resource, then click on Connect On the Native RDP, click on Select, a screen will pop up, showing the Native RDP configurations, click on Download RDP file. After downloading the file, install the application. Input the password you used when creating the VM during the Basics Configuration setup, Click on Yes. Congratulations! You've successfully set up and deployed a Windows 11 virtual machine in the cloud using Microsoft Azure—a valuable step forward in your Cloud and DevOps journey. To keep your environment efficient and cost-effective, regularly monitor your usage through Azure’s Cost Management tools, and remember to stop or deallocate your VM when it's not in use to avoid unexpected charges. CloudComputing #DevOps #Azure #VirtualMachines #CloudDeployment

Deploying a Windows 11 virtual machine on Microsoft Azure is quick and straightforward. Whether you're developing, learning, or experimenting, this guide will walk you through the process. Grab your laptop and lets go.
Step 1. Log In to Azure
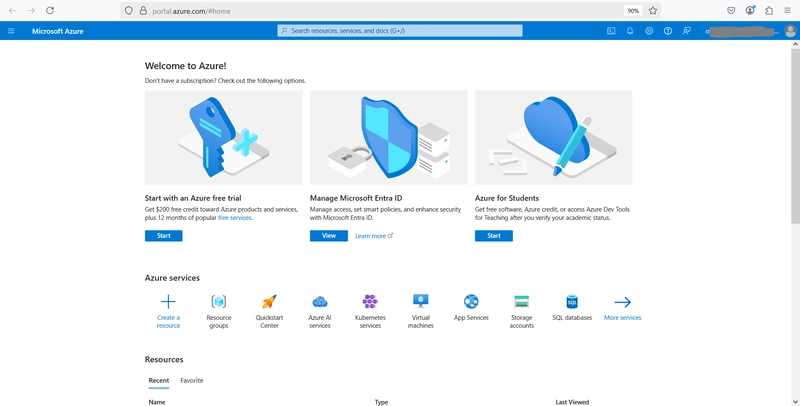
On your web browser, head over to https://portal.azure.com and log in with your Microsoft account. If you dont have an account, click on sign up and provide the required information so your Microsoft account can be activated.
A successful login bring you to this page below,
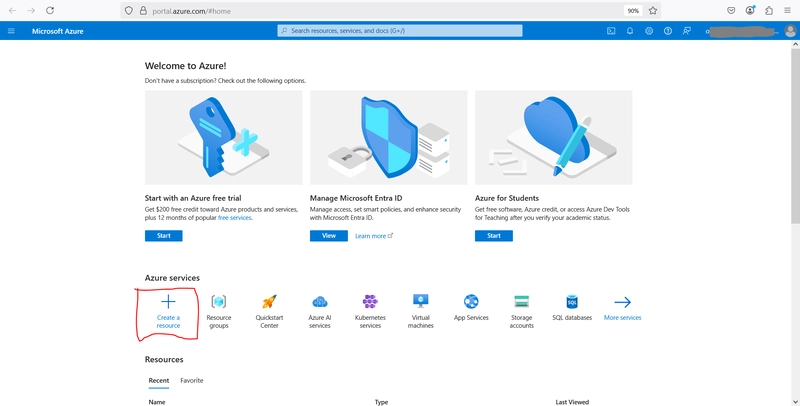
Step 2. Create a New Virtual Machine
To create a Virtual Machine, click on Create a resource as indicated in the image below
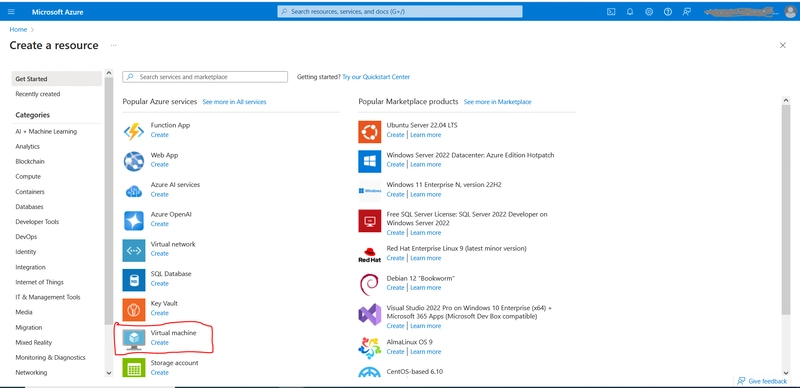
Click on Virtual machine
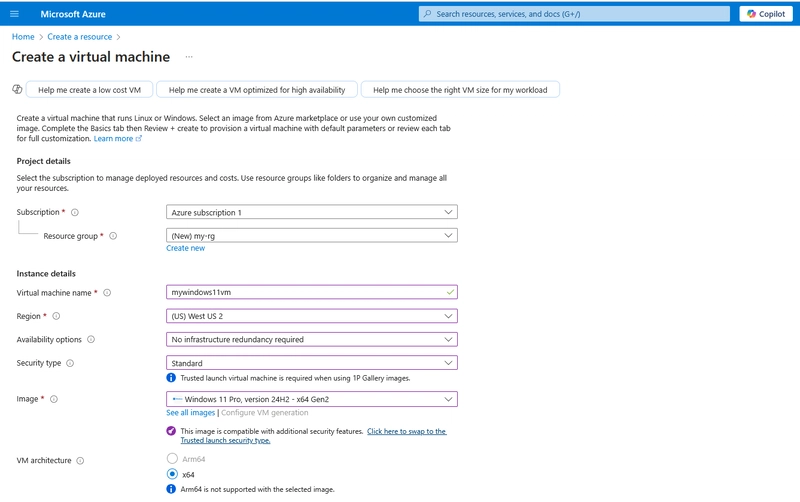
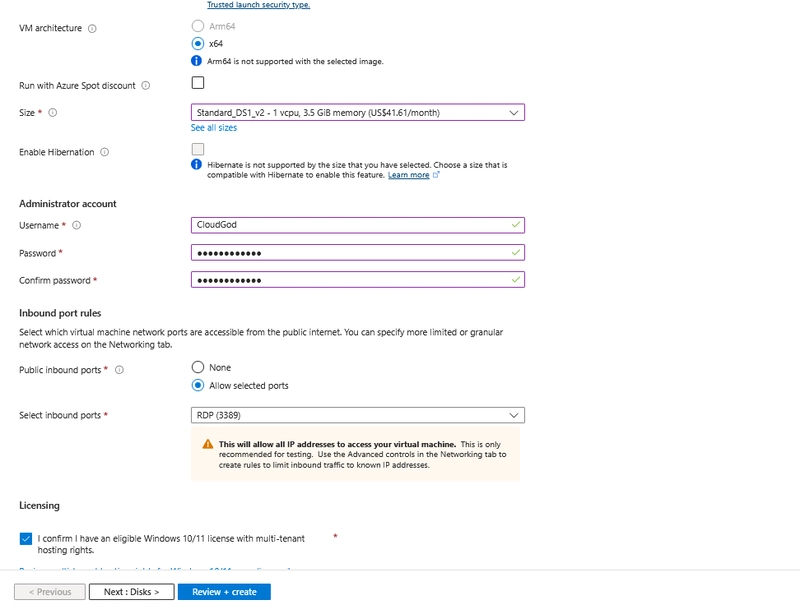
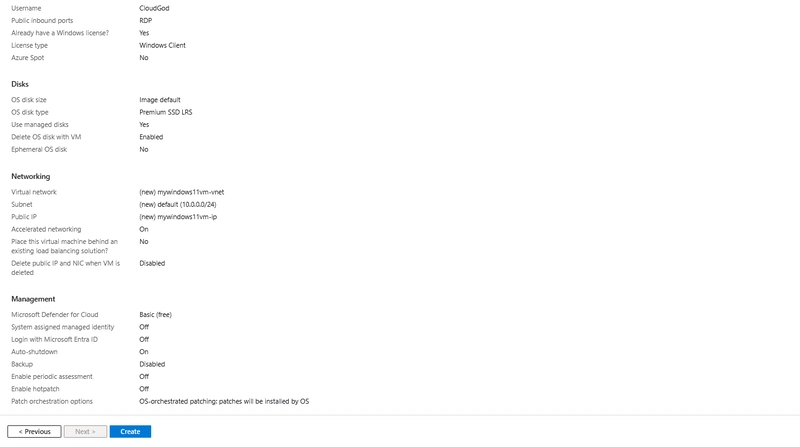
For the Basics configurations, fill in the tabs as follows:
- Subscription: Azure subscription 1
- Resource Group: Use an existing or create a resource group
- Virtual machine name: mywindows11vm
- Region: Select a nearby or preferred location
- Image: Select Windows 11 Pro
- Size: Use Standard D2s or similar
- Authentication: Username and password
- Inbound port rules: Allow selected ports and choose RDP (3389) for Windows access
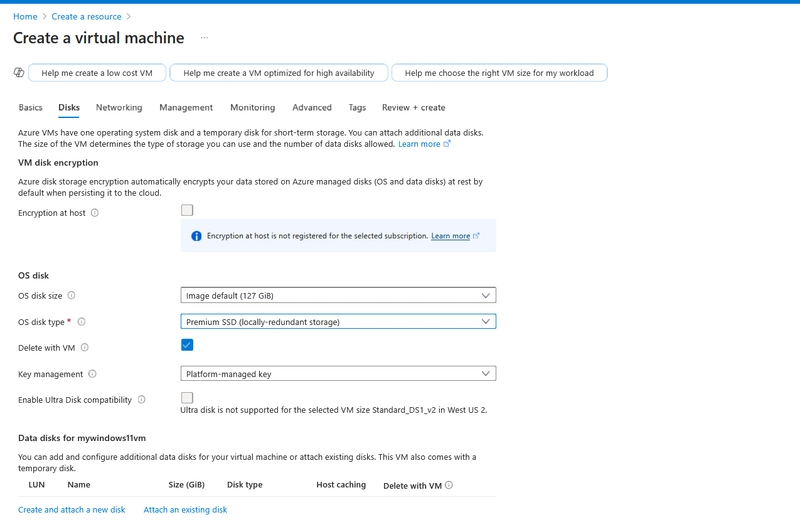
Step 3. Configure Disks
Click on Next : Disks >, this leads you to on the next page, you can use the default OS disk size, use the Image default (127 GiB) and for the OS disk type, use the default settings Premium SSD (locally-redundant storage) unless you have unique configuration requirements.
Step 4. Networking Configuration
On the bottow of the last page in Step 3, Click on Next : Networking >, this leads you to the Network interface page below:
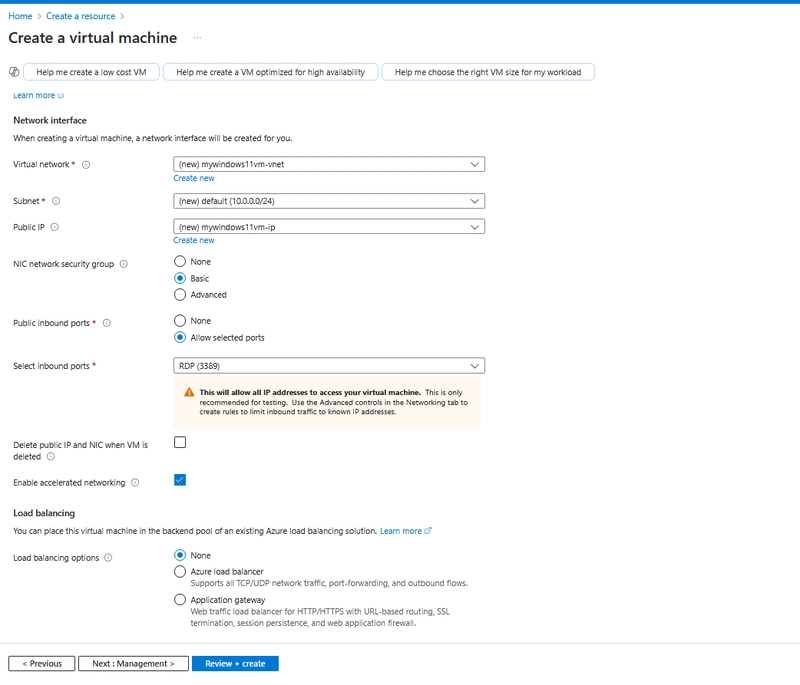
Use the default setting as provided by Azure in the above image. This is to ensure the RDP is enabled so you can easily connect to your VM.
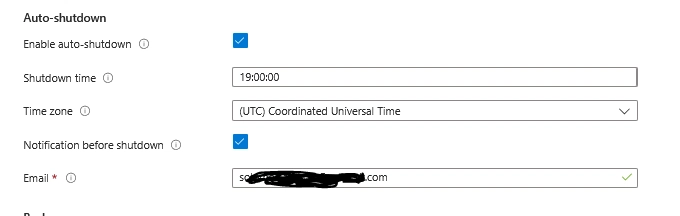
Step 5. Management Configuration
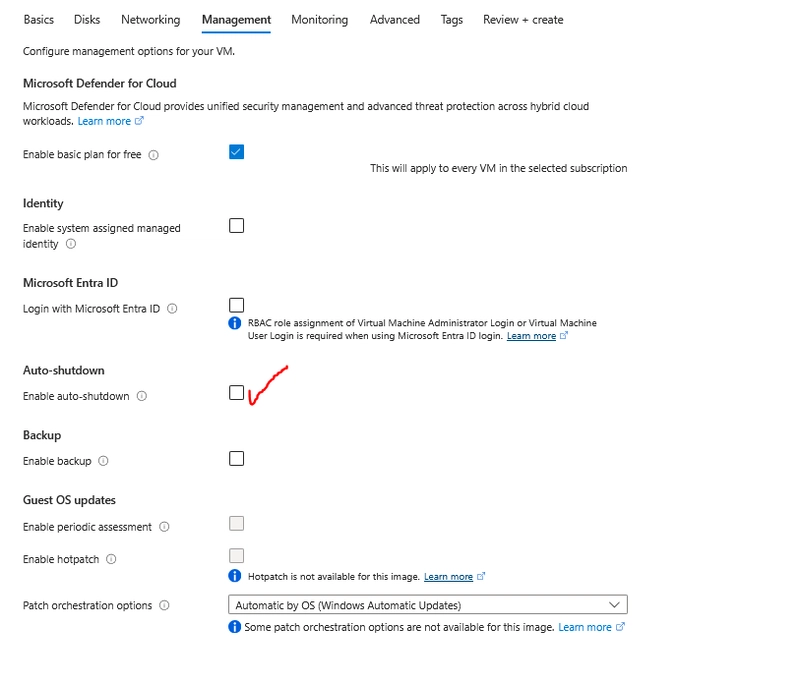
Click on Enable auto-shutdown
Stroll down and click on Review + create.
A successful setup will bring you to the page as seen below:

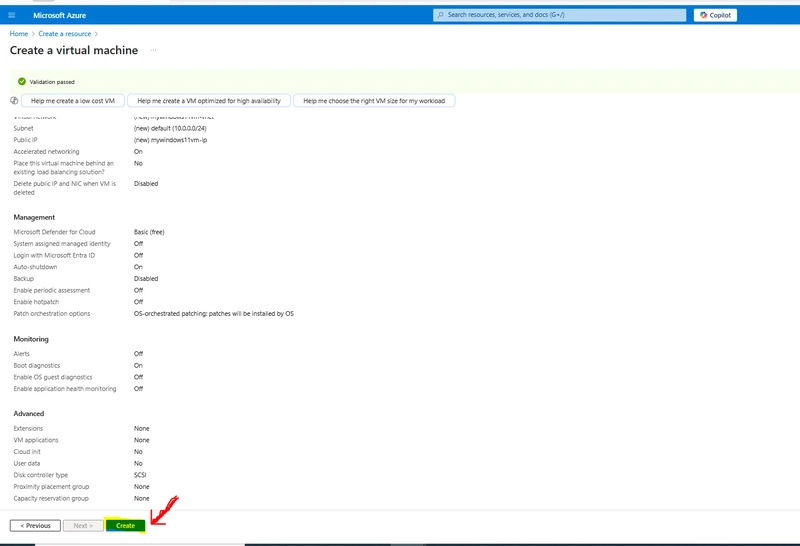
Click on Create, this leads to the creation of the VM and it deploying as seen in the image below;
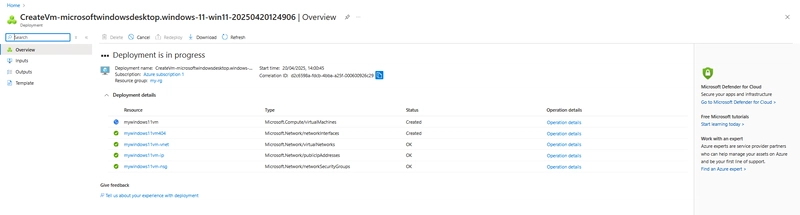
After a successful VM deployment process, the page will change into this
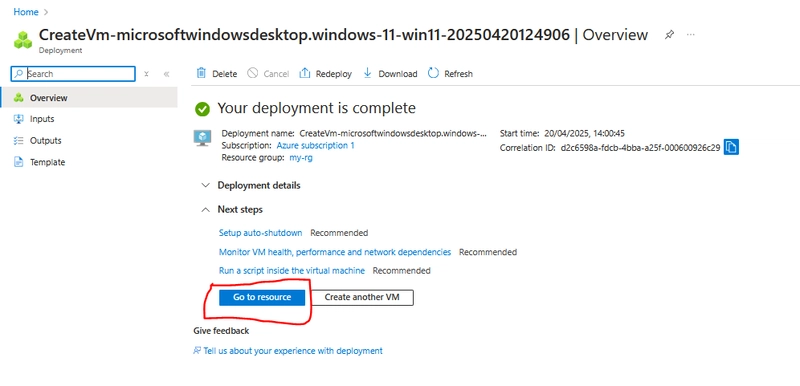
Click on Go to resource, then click on Connect
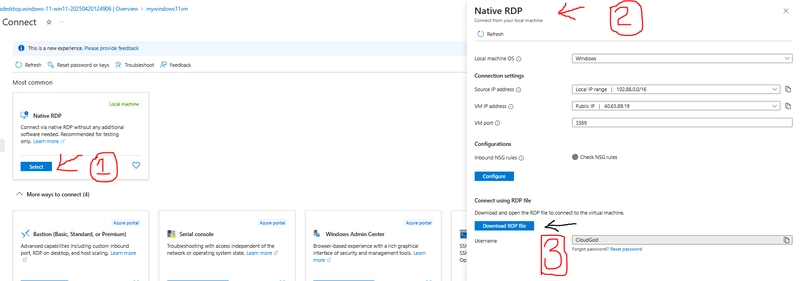
On the Native RDP, click on Select, a screen will pop up, showing the Native RDP configurations, click on Download RDP file. After downloading the file, install the application.
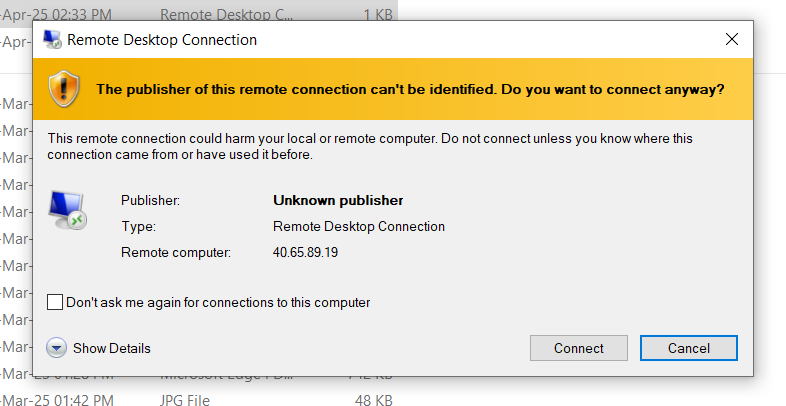
Input the password you used when creating the VM during the Basics Configuration setup,

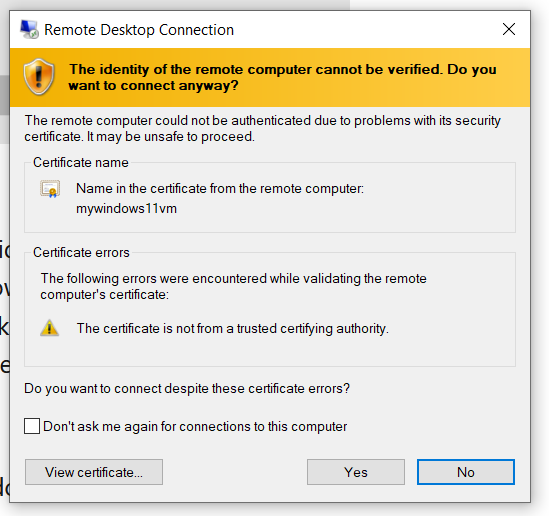
Click on Yes.
Congratulations! You've successfully set up and deployed a Windows 11 virtual machine in the cloud using Microsoft Azure—a valuable step forward in your Cloud and DevOps journey.
To keep your environment efficient and cost-effective, regularly monitor your usage through Azure’s Cost Management tools, and remember to stop or deallocate your VM when it's not in use to avoid unexpected charges.