![[The AI Show Episode 143]: ChatGPT Revenue Surge, New AGI Timelines, Amazon’s AI Agent, Claude for Education, Model Context Protocol & LLMs Pass the Turing Test](https://www.marketingaiinstitute.com/hubfs/ep%20143%20cover.png)


![From drop-out to software architect with Jason Lengstorf [Podcast #167]](https://cdn.hashnode.com/res/hashnode/image/upload/v1743796461357/f3d19cd7-e6f5-4d7c-8bfc-eb974bc8da68.png?#)


.jpg?#)


_ArtemisDiana_Alamy.jpg?#)


 (1).webp?#)


-xl.jpg)


![Yes, the Gemini icon is now bigger and brighter on Android [U]](https://i0.wp.com/9to5google.com/wp-content/uploads/sites/4/2025/02/Gemini-on-Galaxy-S25.jpg?resize=1200%2C628&quality=82&strip=all&ssl=1)


![Apple Rushes Five Planes of iPhones to US Ahead of New Tariffs [Report]](https://www.iclarified.com/images/news/96967/96967/96967-640.jpg)
![Apple Vision Pro 2 Allegedly in Production Ahead of 2025 Launch [Rumor]](https://www.iclarified.com/images/news/96965/96965/96965-640.jpg)


Phase 2: Connecting a GitHub Repo with AWS
Overview In Phase 1 of the Seven Days DevOps Challenge, I set up an EC2 instance on AWS and configured a remote SSH connection using VS Code. Now, in Phase 2, I'll be integrating GitHub with the AWS environment to implement version control for the cloud-based web application. This phase is important for DevOps workflows because it enables automatic code updates on AWS whenever changes are pushed to GitHub. Whether you deploy manually using git pull or automate with AWS CodeDeploy, this setup enhances efficiency. Key Learnings Through this phase, I gained valuable knowledge on the following GitHub Authentication Methods I understood the secure alternatives to password authentication and how to implement them. Git Workflow Management I learnt how to handle common scenarios like merging changes, resolving conflicts, and synchronizing local and remote repositories. Credential Management I properly secured and configured Git credentials for ongoing use. AWS and GitHub Integration I established a connection between cloud resources and version control systems, which is fundamental for DevOps practices. Key Tools and Concepts For this phase, I used the following tools and services: GitHub A platform where developers store and manage their code. It helps track changes and collaborate with others. Git A tool that records changes in code, allowing developers to revert, update, and share their work easily. Personal Access Token (PAT) A secure key used instead of a password to connect GitHub with Git on the command line. Git Commands Basic commands I used to manage code changes: git init – Starts a new Git repository. git add – Prepares files for a commit. git commit – Saves the changes with a message. git push – Sends the changes to GitHub. Steps Step 1: Creating a GitHub Repository To start integrating my web application with GitHub, I first by signed into my GitHub account and created a new repository to host the web application code. I named the repository "nextwork-devops-day2-kene" and added this description "This project demonstrates how to set up a web application in the cloud and integrate it with AWS services". Step 2: Setting Up GitHub Authentication To connect securely from my EC2 instance to GitHub, I needed to set up proper authentication. GitHub no longer supports password authentication for Git operations, so I created a Personal Access Token by navigating to GitHub Settings > Developer settings > Personal access tokens. I created a new personal access token for EC2 instance access then set an expiration period of 7 days (until March 19, 2025) I selected the necessary scopes for the token: repo (Full control of private repositories) public_repo (Access public repositories) repo:status (Access commit status) repo_deployment (Access deployment status) repo:invite (Access repository invitations) security_events (Read and write security events) After generating the token, I copied it immediately because GitHub only displays it once for security reasons. Step 3: Installing Git on EC2 Before I could connect to GitHub from my EC2 instance, I needed to install Git: sudo dnf update -y sudo dnf install git -y I verified the installation by checking the Git version: git --version Step 4: Initializing the Local Git Repository Next, I initialized a Git repository in my existing web application directory: git init Git responded with a hint that it's using 'master' as the default branch name, while suggesting alternatives like 'main', 'trunk', or 'development' as more commonly used names. Step 5: Configuring Git Authentication To push to GitHub, I needed to set up my authentication credentials. When attempting to push using my username and password, I encountered an authentication error because GitHub has deprecated password authentication. To resolve this issue i used my username and Personal Access Token to continue. Step 6: Resolving Push and Pull Conflicts When trying to push my changes to GitHub, I encountered a rejection because the remote repository contained a file (README.md) that I didn't have locally. To solve this problem i first pulled the repository to my local system before trying to push the changes again Because I did not want to keep writing my username and Personal Access Token and solved this problem by configuring Git to use my personal access token by storing my credentials. git config --global credential.helper store This command allowed me to push to the repository without authenticating everytime my token. Step 7: Final Push and Verification I completed a few more commits and pushes to ensure all my changes were synchronized with GitHub. The web application code, including the index.jsp file, was now properly stored in the GitHub repository and accessible for collaboration. I verified the changes were reflected in GitHub by viewing the repository, which showed my JSP file w
Overview
In Phase 1 of the Seven Days DevOps Challenge, I set up an EC2 instance on AWS and configured a remote SSH connection using VS Code. Now, in Phase 2, I'll be integrating GitHub with the AWS environment to implement version control for the cloud-based web application.
This phase is important for DevOps workflows because it enables automatic code updates on AWS whenever changes are pushed to GitHub. Whether you deploy manually using git pull or automate with AWS CodeDeploy, this setup enhances efficiency.
Key Learnings
Through this phase, I gained valuable knowledge on the following
GitHub Authentication Methods
I understood the secure alternatives to password authentication and how to implement them.
Git Workflow Management
I learnt how to handle common scenarios like merging changes, resolving conflicts, and synchronizing local and remote repositories.
Credential Management
I properly secured and configured Git credentials for ongoing use.
AWS and GitHub Integration
I established a connection between cloud resources and version control systems, which is fundamental for DevOps practices.
Key Tools and Concepts
For this phase, I used the following tools and services:
GitHub
A platform where developers store and manage their code. It helps track changes and collaborate with others.
Git
A tool that records changes in code, allowing developers to revert, update, and share their work easily.
Personal Access Token (PAT)
A secure key used instead of a password to connect GitHub with Git on the command line.
Git Commands
Basic commands I used to manage code changes:
- git init – Starts a new Git repository.
- git add – Prepares files for a commit.
- git commit – Saves the changes with a message.
- git push – Sends the changes to GitHub.
Steps
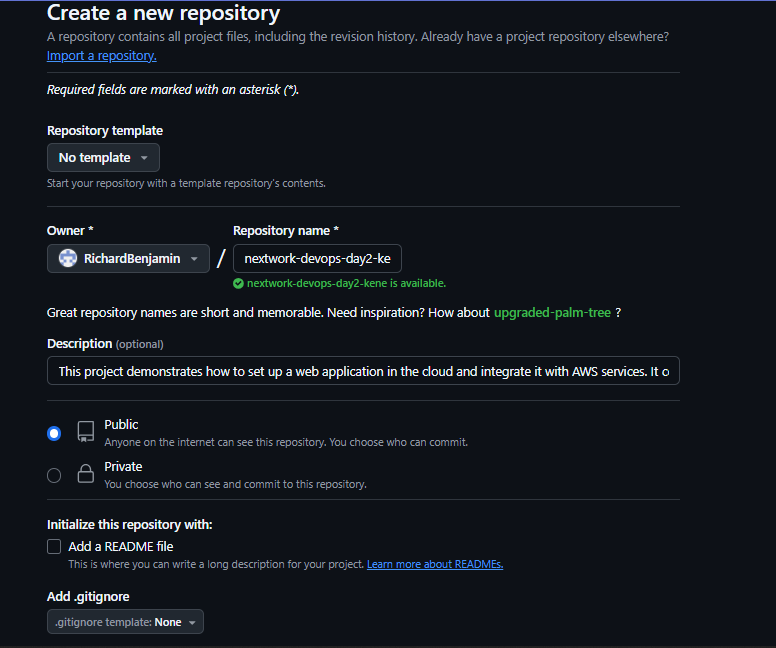
Step 1: Creating a GitHub Repository
- To start integrating my web application with GitHub, I first by signed into my GitHub account and created a new repository to host the web application code. I named the repository "nextwork-devops-day2-kene" and added this description "This project demonstrates how to set up a web application in the cloud and integrate it with AWS services".
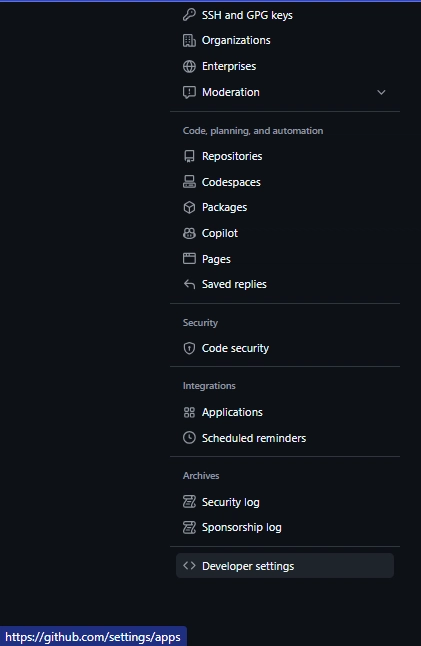
Step 2: Setting Up GitHub Authentication
- To connect securely from my EC2 instance to GitHub, I needed to set up proper authentication. GitHub no longer supports password authentication for Git operations, so I created a Personal Access Token by navigating to GitHub Settings > Developer settings > Personal access tokens. I created a new personal access token for EC2 instance access then set an expiration period of 7 days (until March 19, 2025)
I selected the necessary scopes for the token:
- repo (Full control of private repositories)
- public_repo (Access public repositories)
- repo:status (Access commit status)
- repo_deployment (Access deployment status)
- repo:invite (Access repository invitations)
- security_events (Read and write security events)
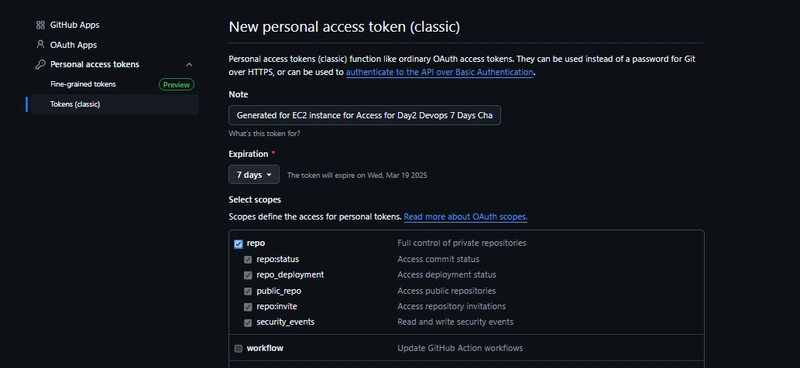
After generating the token, I copied it immediately because GitHub only displays it once for security reasons.
Step 3: Installing Git on EC2
Before I could connect to GitHub from my EC2 instance, I needed to install Git:
sudo dnf update -y
sudo dnf install git -y
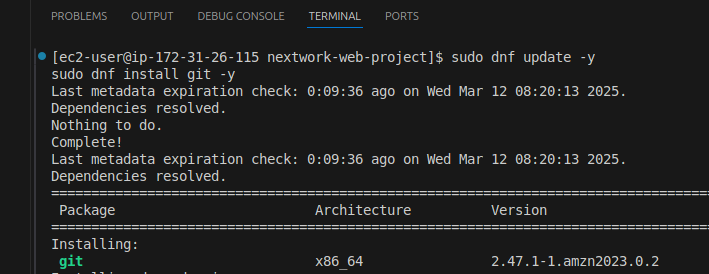
I verified the installation by checking the Git version:
git --version
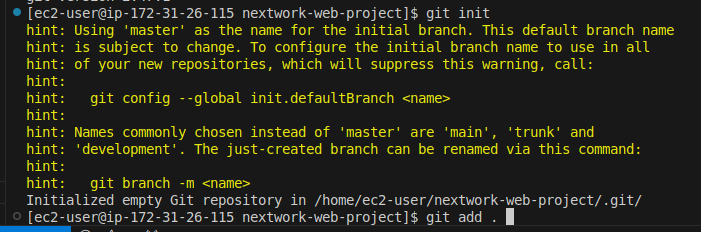
Step 4: Initializing the Local Git Repository
Next, I initialized a Git repository in my existing web application directory:
git init
Git responded with a hint that it's using 'master' as the default branch name, while suggesting alternatives like 'main', 'trunk', or 'development' as more commonly used names.
Step 5: Configuring Git Authentication
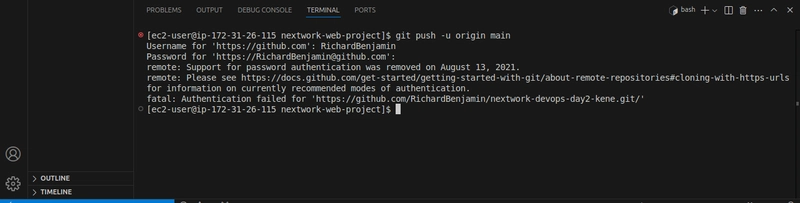
To push to GitHub, I needed to set up my authentication credentials. When attempting to push using my username and password, I encountered an authentication error because GitHub has deprecated password authentication. To resolve this issue i used my username and Personal Access Token to continue.
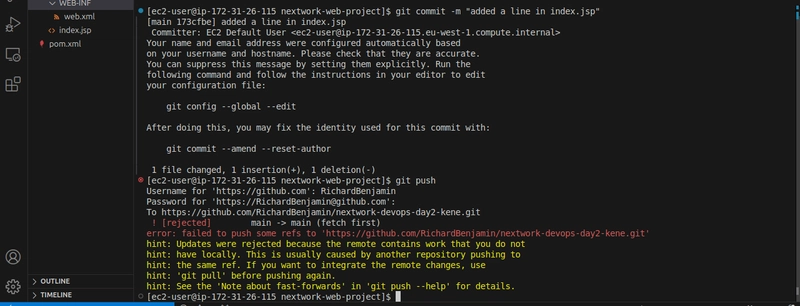
Step 6: Resolving Push and Pull Conflicts
When trying to push my changes to GitHub, I encountered a rejection because the remote repository contained a file (README.md) that I didn't have locally. To solve this problem i first pulled the repository to my local system before trying to push the changes again
Because I did not want to keep writing my username and Personal Access Token and solved this problem by configuring Git to use my personal access token by storing my credentials.
git config --global credential.helper store
This command allowed me to push to the repository without authenticating everytime my token.
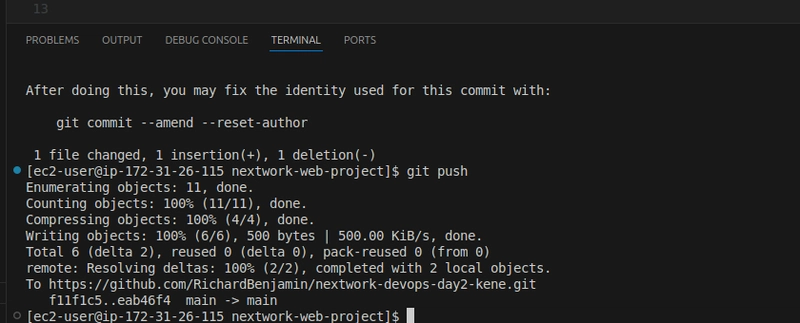
Step 7: Final Push and Verification
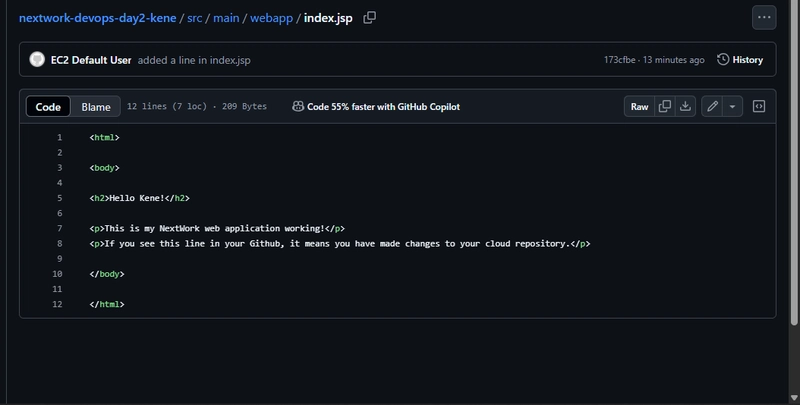
I completed a few more commits and pushes to ensure all my changes were synchronized with GitHub. The web application code, including the index.jsp file, was now properly stored in the GitHub repository and accessible for collaboration. I verified the changes were reflected in GitHub by viewing the repository, which showed my JSP file with the updated content.
Challenges and Solutions
During this phase, I encountered several common Git workflow challenges:
Authentication Failure
GitHub has deprecated password authentication, requiring the use of a personal access token or SSH key. I resolved this by creating a personal access token and configuring Git to store my credentials.
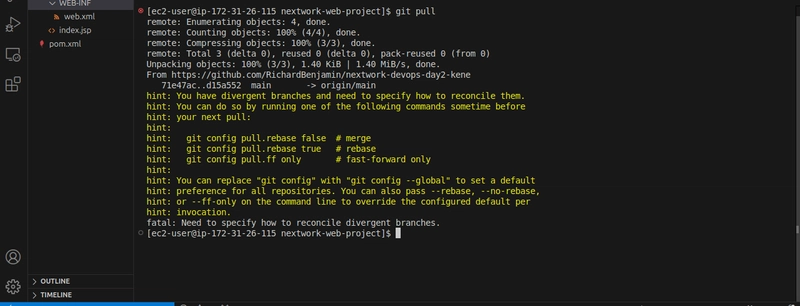
Divergent Branches
When pulling from GitHub after creating files both locally and on GitHub, I faced a divergent branches error. I needed to specify a merge strategy (using git config pull.rebase false) to reconcile these differences.
Push Rejection
My initial push was rejected because the remote repository contained files not present in my local repository. I resolved this by pulling first, then pushing after the merge.
Conclusion
Phase 2 of the Seven Days DevOps Challenge shows how to integrate GitHub with an AWS EC2 instance. This integration ensures that the code is properly tracked, backed up, and can be shared among team members, which is essential for software development workflows.
Stay tuned for Phase 3, where i'll explore storing of dependencies in CodeArtifact