


![[The AI Show Episode 144]: ChatGPT’s New Memory, Shopify CEO’s Leaked “AI First” Memo, Google Cloud Next Releases, o3 and o4-mini Coming Soon & Llama 4’s Rocky Launch](https://www.marketingaiinstitute.com/hubfs/ep%20144%20cover.png)


![Is this too much for a modular monolith system? [closed]](https://i.sstatic.net/pYL1nsfg.png)


_Andreas_Prott_Alamy.jpg?width=1280&auto=webp&quality=80&disable=upscale#)


![What features do you get with Gemini Advanced? [April 2025]](https://i0.wp.com/9to5google.com/wp-content/uploads/sites/4/2024/02/gemini-advanced-cover.jpg?resize=1200%2C628&quality=82&strip=all&ssl=1)


![Apple Shares Official Trailer for 'Long Way Home' Starring Ewan McGregor and Charley Boorman [Video]](https://www.iclarified.com/images/news/97069/97069/97069-640.jpg)
![Apple Watch Series 10 Back On Sale for $299! [Lowest Price Ever]](https://www.iclarified.com/images/news/96657/96657/96657-640.jpg)
![EU Postpones Apple App Store Fines Amid Tariff Negotiations [Report]](https://www.iclarified.com/images/news/97068/97068/97068-640.jpg)
![Apple Slips to Fifth in China's Smartphone Market with 9% Decline [Report]](https://www.iclarified.com/images/news/97065/97065/97065-640.jpg)


Laravel PWA: The Ultimate Guide to Progressive Web Apps with Laravel in 2025
Progressive Web Applications (PWAs) have revolutionized how users interact with web applications by offering native app-like experiences directly in the browser. For Laravel developers looking to enhance their projects with PWA capabilities, the erag/laravel-pwa package offers a streamlined solution that works seamlessly with Laravel 8, 9, 10, 11, and 12. In this comprehensive guide, we'll walk through everything you need to know about implementing PWA functionality in your Laravel applications - from initial setup to advanced features and best practices. What is Laravel PWA? Laravel PWA is a specialized package designed to integrate Progressive Web Application functionality into Laravel projects with minimal effort. This package handles the complex aspects of PWA implementation, allowing developers to focus on building great applications while benefiting from: Automatic manifest generation Service worker registration Configurable installation buttons Cross-platform compatibility Getting Started with Laravel PWA Prerequisites Before diving into implementation, ensure your application meets these requirements: A Laravel application (version 8 or newer) Composer for package installation HTTPS connection for production deployment ⚠️ Important: PWAs require a secure HTTPS connection to function correctly. Without HTTPS, service workers and other PWA features will not work as expected. Installation Process Setting up Laravel PWA is straightforward. Begin by installing the package through Composer: composer require erag/laravel-pwa After installation, publish the configuration files with: php artisan erag:install-pwa This command creates the required configuration file config/pwa.php and establishes the PWA foundation for your application. Configuration Options The Main Configuration File The heart of your PWA setup lives in config/pwa.php. Here's what a typical configuration looks like: return [ 'install-button' => true, // Show or hide the installation button 'manifest' => [ 'name' => 'Laravel PWA', 'short_name' => 'LPT', 'background_color' => '#6777ef', 'display' => 'fullscreen', 'description' => 'A Progressive Web Application setup for Laravel projects.', 'theme_color' => '#6777ef', 'icons' => [ [ 'src' => 'logo.png', 'sizes' => '512x512', 'type' => 'image/png', ], ], ], 'debug' => env('APP_DEBUG', false), // Control console.log visibility ]; This configuration defines how your PWA will appear and behave when installed on a user's device. Key elements include: name: The full name of your application short_name: Abbreviated name displayed under the app icon background_color: Color shown during app loading display: Screen presentation mode (fullscreen, standalone, minimal-ui, browser) theme_color: Controls the UI elements color in the operating system icons: Array of icons in different sizes for various devices Updating the Manifest File After modifying your configuration, you'll need to update the PWA manifest: php artisan erag:update-manifest This command regenerates the manifest.json file in your public directory with your latest settings. Implementation in Your Laravel Application Adding Required Directives To enable PWA functionality, add these Blade directives to your layout files: First, add the PWA meta tags in your section: @PwaHead Your App Title Register the service worker just before the closing tag: @RegisterServiceWorkerScript These directives inject the necessary HTML tags and JavaScript code to transform your Laravel application into a PWA. Customizing Your PWA Changing the Application Logo The logo is a critical visual element of your PWA. To update it programmatically: Create a controller method to handle logo uploads: namespace App\Http\Controllers; use EragLaravelPwa\Core\PWA; use Illuminate\Http\Request; use Illuminate\Routing\Controller; class SettingsController extends Controller { public function uploadLogo(Request $request) { $response = PWA::processLogo($request); if ($response['status']) { return redirect()->back()->with('success', $response['message']); } return redirect()->back()->withErrors($response['errors'] ?? ['Something went wrong.']); } } Create an upload form in your view: Note: For optimal results, use a PNG image that's at least 512×512 pixels and under 1024 KB. Once uploaded, the new logo will be accessible at http://yourdomain.com/logo.png and automatically integrated into your PWA manifest. The User Experience Installation Prompt With Laravel PWA correctly configured, users will see a

Progressive Web Applications (PWAs) have revolutionized how users interact with web applications by offering native app-like experiences directly in the browser. For Laravel developers looking to enhance their projects with PWA capabilities, the erag/laravel-pwa package offers a streamlined solution that works seamlessly with Laravel 8, 9, 10, 11, and 12.
In this comprehensive guide, we'll walk through everything you need to know about implementing PWA functionality in your Laravel applications - from initial setup to advanced features and best practices.
What is Laravel PWA?
Laravel PWA is a specialized package designed to integrate Progressive Web Application functionality into Laravel projects with minimal effort. This package handles the complex aspects of PWA implementation, allowing developers to focus on building great applications while benefiting from:
- Automatic manifest generation
- Service worker registration
- Configurable installation buttons
- Cross-platform compatibility
Getting Started with Laravel PWA
Prerequisites
Before diving into implementation, ensure your application meets these requirements:
- A Laravel application (version 8 or newer)
- Composer for package installation
- HTTPS connection for production deployment
⚠️ Important: PWAs require a secure HTTPS connection to function correctly. Without HTTPS, service workers and other PWA features will not work as expected.
Installation Process
Setting up Laravel PWA is straightforward. Begin by installing the package through Composer:
composer require erag/laravel-pwa
After installation, publish the configuration files with:
php artisan erag:install-pwa
This command creates the required configuration file config/pwa.php and establishes the PWA foundation for your application.
Configuration Options
The Main Configuration File
The heart of your PWA setup lives in config/pwa.php. Here's what a typical configuration looks like:
return [
    'install-button' => true, // Show or hide the installation button

    'manifest' => [
        'name' => 'Laravel PWA',
        'short_name' => 'LPT',
        'background_color' => '#6777ef',
        'display' => 'fullscreen',
        'description' => 'A Progressive Web Application setup for Laravel projects.',
        'theme_color' => '#6777ef',
        'icons' => [
            [
                'src' => 'logo.png',
                'sizes' => '512x512',
                'type' => 'image/png',
            ],
        ],
    ],

    'debug' => env('APP_DEBUG', false), // Control console.log visibility
];
This configuration defines how your PWA will appear and behave when installed on a user's device. Key elements include:
- name: The full name of your application
- short_name: Abbreviated name displayed under the app icon
- background_color: Color shown during app loading
- display: Screen presentation mode (fullscreen, standalone, minimal-ui, browser)
- theme_color: Controls the UI elements color in the operating system
- icons: Array of icons in different sizes for various devices
Updating the Manifest File
After modifying your configuration, you'll need to update the PWA manifest:
php artisan erag:update-manifest
This command regenerates the manifest.json file in your public directory with your latest settings.
Implementation in Your Laravel Application
Adding Required Directives
To enable PWA functionality, add these Blade directives to your layout files:
- First, add the PWA meta tags in your
section:
    @PwaHead
    Your App Title
- Register the service worker just before the closing
tag:
@RegisterServiceWorkerScript
These directives inject the necessary HTML tags and JavaScript code to transform your Laravel application into a PWA.
Customizing Your PWA
Changing the Application Logo
The logo is a critical visual element of your PWA. To update it programmatically:
- Create a controller method to handle logo uploads:
namespace App\Http\Controllers;

use EragLaravelPwa\Core\PWA;
use Illuminate\Http\Request;
use Illuminate\Routing\Controller;

class SettingsController extends Controller
{
    public function uploadLogo(Request $request)
    {
        $response = PWA::processLogo($request);

        if ($response['status']) {
            return redirect()->back()->with('success', $response['message']);
        }

        return redirect()->back()->withErrors($response['errors'] ?? ['Something went wrong.']);
    }
}
- Create an upload form in your view:
type="file" name="logo" accept=".png">
Note: For optimal results, use a PNG image that's at least 512×512 pixels and under 1024 KB.
Once uploaded, the new logo will be accessible at http://yourdomain.com/logo.png and automatically integrated into your PWA manifest.
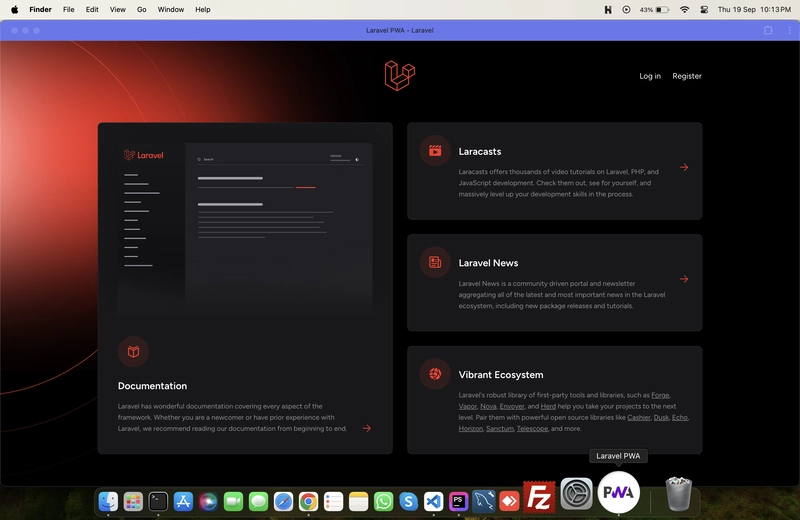
The User Experience
Installation Prompt
With Laravel PWA correctly configured, users will see an installation prompt in supported browsers, allowing them to add your application to their home screen:
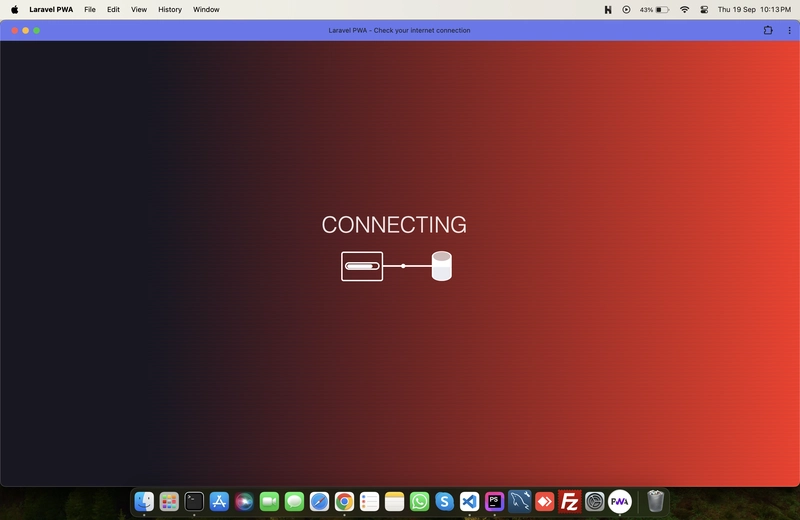
Offline Functionality
One of the most powerful PWA features is offline capability. Laravel PWA automatically provides a basic offline experience:
Implementation Workflow: Step by Step
For quick reference, here's the complete workflow to implement Laravel PWA:
- Install the package via Composer:
composer require erag/laravel-pwa
- Publish configuration files:
php artisan erag:install-pwa
Add the
@PwaHeaddirective in your layout'ssectionAdd the
@RegisterServiceWorkerScriptdirective before the closingtagCustomize
config/pwa.phpto match your application's brandingUpdate the manifest:
php artisan erag:update-manifest
- Test your PWA on different devices and browsers
Advanced Customization
Modifying Service Worker Behavior
The service worker controls how your PWA behaves offline and manages caching. While the package provides sensible defaults, you can extend functionality by customizing the service worker script.
Progressive Enhancement
For optimal user experience, implement your PWA features progressively. Start with core functionality that works everywhere, then enhance the experience for users with PWA-capable browsers.
Troubleshooting Common Issues
Service Worker Not Registering
If your service worker isn't registering:
- Verify your site uses HTTPS (required for service workers)
- Check browser console for errors
- Ensure the
@RegisterServiceWorkerScriptdirective is correctly placed
PWA Not Installing
If installation isn't working:
- Confirm manifest.json is properly generated
- Verify your logo meets size requirements
- Test in different browsers (Chrome offers the best PWA support)
Contributing to the Laravel PWA Package
The Laravel PWA package is an open-source project that welcomes community contributions. To get involved:
- Fork the repository on GitHub
- Clone your fork:
git clone https://github.com/your-username/laravel-pwa.git
- Follow coding standards (PSR-12)
- Submit pull requests with clear descriptions
When reporting issues, include:
- Steps to reproduce
- Expected vs. actual behavior
- Laravel version information
- Relevant logs/screenshots
Conclusion
Implementing PWA functionality in Laravel has never been easier thanks to the erag/laravel-pwa package. By following this guide, you can quickly transform your Laravel application into a modern Progressive Web App that offers users a faster, more engaging experience across all devices.
PWAs represent the future of web development, combining the best aspects of web and native applications. Start enhancing your Laravel projects today and stay ahead of the curve with Laravel PWA integration.