


![[The AI Show Episode 144]: ChatGPT’s New Memory, Shopify CEO’s Leaked “AI First” Memo, Google Cloud Next Releases, o3 and o4-mini Coming Soon & Llama 4’s Rocky Launch](https://www.marketingaiinstitute.com/hubfs/ep%20144%20cover.png)


![Is this too much for a modular monolith system? [closed]](https://i.sstatic.net/pYL1nsfg.png)


_Andreas_Prott_Alamy.jpg?width=1280&auto=webp&quality=80&disable=upscale#)


![What features do you get with Gemini Advanced? [April 2025]](https://i0.wp.com/9to5google.com/wp-content/uploads/sites/4/2024/02/gemini-advanced-cover.jpg?resize=1200%2C628&quality=82&strip=all&ssl=1)


![Apple Shares Official Trailer for 'Long Way Home' Starring Ewan McGregor and Charley Boorman [Video]](https://www.iclarified.com/images/news/97069/97069/97069-640.jpg)
![Apple Watch Series 10 Back On Sale for $299! [Lowest Price Ever]](https://www.iclarified.com/images/news/96657/96657/96657-640.jpg)
![EU Postpones Apple App Store Fines Amid Tariff Negotiations [Report]](https://www.iclarified.com/images/news/97068/97068/97068-640.jpg)
![Apple Slips to Fifth in China's Smartphone Market with 9% Decline [Report]](https://www.iclarified.com/images/news/97065/97065/97065-640.jpg)


Is Llama 4 really a failure or disaster ?
A few days ago, Meta released Llama 4 in three variants — Behemoth, Maverick and Scout. Groq have Llama 4 Scout in their model hub and it can be easily accessed with their playground and the API service as well. There are several discussions around the model metrics. Some say llama 4 failed to give what people expected (did not get any better than llama 3), good thing is I did not set one :) Let us look at a basic tutorial on creating a web application to get an image input from the user and then try to generate a table data (if the image is chart, graph or anything equivalent to a tabular data) Application Code I liked the name TabWiz :) but not necessarily. App code is explained briefly in sections. app.py import os from flask import Flask, render_template, request, jsonify, url_for, send_file from werkzeug.utils import secure_filename from groq import Groq import base64 import pandas as pd from io import StringIO Firstly, libraries that are required for web server, data (tabular) processing and accessing the Llama 4 model via Groq library, are imported in the beginning. # Function to encode the image def encode_image(image_path): with open(image_path, "rb") as image_file: return base64.b64encode(image_file.read()).decode('utf-8') Then, the above function is defined to encode the image file as base64 data. This is to process the image and send it to our language model. app = Flask(__name__) app.config['UPLOAD_FOLDER'] = 'static/uploads' os.makedirs(app.config['UPLOAD_FOLDER'], exist_ok=True) static folder is created to store the file uploads done through the web form. The folder is added to the application config. client = Groq(api_key='') Then, Groq API client object is created with the api_key (generated from the groq console). You can create an account as a developer in Groq platform and can explore the features of the console (https://console.groq.com) to create a free API key. @app.route('/') def index(): return render_template('index.html') Then, the home/root API endpoint is created with the HTML template to display the file upload form. @app.route('/chat', methods=['POST']) def chat(): user_message = request.form.get('message') image_file = request.files.get('image') file_ext = '' image_url = None if image_file: filename = secure_filename(image_file.filename) filepath = os.path.join(app.config['UPLOAD_FOLDER'], filename) image_file.save(filepath) image_url = url_for('static', filename=f'uploads/{filename}', _external=True) file_ext = filename.split('.')[-1] messages = [ { "role": "system", "content": "You are an expert in parsing the given image and fetch all details very accurately and then return a csv data to be enough to create a table. Do not return any other text except for the csv." }, { "role": "user", "content": [ # { # "type": "text", # "text": user_message # }, { "type": "image_url", "image_url": { "url": f"data:image/{file_ext};base64,{encode_image(filepath)}" } } ] } ] completion = client.chat.completions.create( model="meta-llama/llama-4-scout-17b-16e-instruct", messages=messages, temperature=0.7, max_completion_tokens=1024, top_p=1, stream=False, stop=None, ) response_text = completion.choices[0].message.content # Create a pandas DataFrame from the raw CSV content df = pd.read_csv(StringIO(response_text)) # Save the DataFrame to a CSV file df.to_csv('output.csv', index=False) # download return send_file('output.csv', as_attachment=True) return jsonify({'response': response_text}) Then, the Chat API endpoint is created only with POST method allowed. This is called when the file upload form is submitted, and then the image file is processed into base64 data, which in turn is passed as a message to the llama-4-scout model. And the output from the model is expected to be a response just with CSV data, which is flushed into a file for download. if __name__ == '__main__': app.run(debug=True) That’s it. The above code is added finally to have the script run as a server when executed in shell. Make sure to have the libraries (flask & groq) installed in the environment. Server can be started with the command in the shell python app.py The above image is the sample input file that I’ve uploaded and the model successfully processed it to generate the CSV data as expected. The above table is the generated CSV data from the model. It is pretty good and got generated without any mistakes. I am not sure if it is really a failure or a disaster to peo
A few days ago, Meta released Llama 4 in three variants — Behemoth, Maverick and Scout. Groq have Llama 4 Scout in their model hub and it can be easily accessed with their playground and the API service as well. There are several discussions around the model metrics. Some say llama 4 failed to give what people expected (did not get any better than llama 3), good thing is I did not set one :)
Let us look at a basic tutorial on creating a web application to get an image input from the user and then try to generate a table data (if the image is chart, graph or anything equivalent to a tabular data)
Application Code
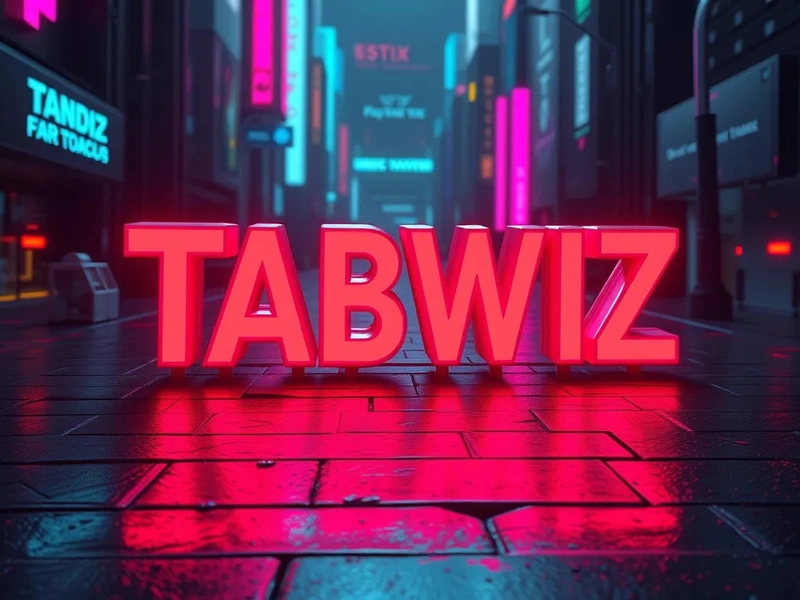
I liked the name TabWiz :) but not necessarily. App code is explained briefly in sections.
app.py
import os
from flask import Flask, render_template, request, jsonify, url_for, send_file
from werkzeug.utils import secure_filename
from groq import Groq
import base64
import pandas as pd
from io import StringIO
Firstly, libraries that are required for web server, data (tabular) processing and accessing the Llama 4 model via Groq library, are imported in the beginning.
# Function to encode the image
def encode_image(image_path):
  with open(image_path, "rb") as image_file:
    return base64.b64encode(image_file.read()).decode('utf-8')
Then, the above function is defined to encode the image file as base64 data. This is to process the image and send it to our language model.
app = Flask(__name__)
app.config['UPLOAD_FOLDER'] = 'static/uploads'
os.makedirs(app.config['UPLOAD_FOLDER'], exist_ok=True)
static folder is created to store the file uploads done through the web form. The folder is added to the application config.
client = Groq(api_key='')
Then, Groq API client object is created with the api_key (generated from the groq console). You can create an account as a developer in Groq platform and can explore the features of the console (https://console.groq.com) to create a free API key.
@app.route('/')
def index():
    return render_template('index.html')
Then, the home/root API endpoint is created with the HTML template to display the file upload form.
@app.route('/chat', methods=['POST'])
def chat():
    user_message = request.form.get('message')
    image_file = request.files.get('image')
    file_ext = ''
    image_url = None
    if image_file:
        filename = secure_filename(image_file.filename)
        filepath = os.path.join(app.config['UPLOAD_FOLDER'], filename)
        image_file.save(filepath)
        image_url = url_for('static', filename=f'uploads/{filename}', _external=True)
        file_ext = filename.split('.')[-1]

    messages = [
        {
            "role": "system",
            "content": "You are an expert in parsing the given image and fetch all details very accurately and then return a csv data to be enough to create a table. Do not return any other text except for the csv."
        },
        {
            "role": "user",
            "content": [
                # {
                #     "type": "text",
                #     "text": user_message
                # },
                {
                    "type": "image_url",
                    "image_url": {
                        "url": f"data:image/{file_ext};base64,{encode_image(filepath)}"
                    }
                }
            ]
        }
    ]

    completion = client.chat.completions.create(
        model="meta-llama/llama-4-scout-17b-16e-instruct",
        messages=messages,
        temperature=0.7,
        max_completion_tokens=1024,
        top_p=1,
        stream=False,
        stop=None,
    )

    response_text = completion.choices[0].message.content

    # Create a pandas DataFrame from the raw CSV content
    df = pd.read_csv(StringIO(response_text))
    # Save the DataFrame to a CSV file
    df.to_csv('output.csv', index=False)
    # download
    return send_file('output.csv', as_attachment=True)

    return jsonify({'response': response_text})
Then, the Chat API endpoint is created only with POST method allowed. This is called when the file upload form is submitted, and then the image file is processed into base64 data, which in turn is passed as a message to the llama-4-scout model. And the output from the model is expected to be a response just with CSV data, which is flushed into a file for download.
if __name__ == '__main__':
    app.run(debug=True)
That’s it. The above code is added finally to have the script run as a server when executed in shell. Make sure to have the libraries (flask & groq) installed in the environment. Server can be started with the command in the shell python app.py

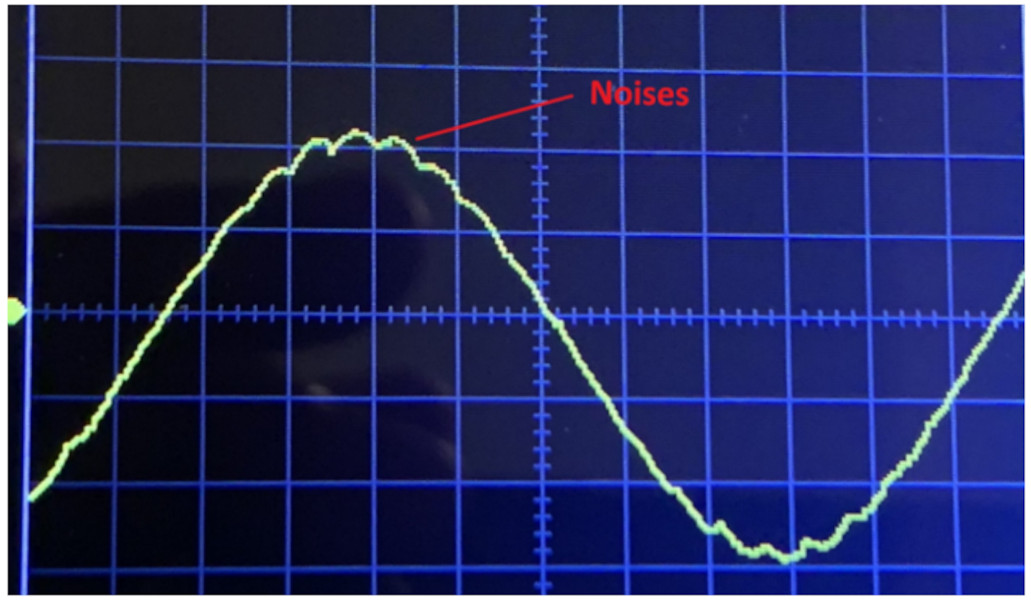
The above image is the sample input file that I’ve uploaded and the model successfully processed it to generate the CSV data as expected.
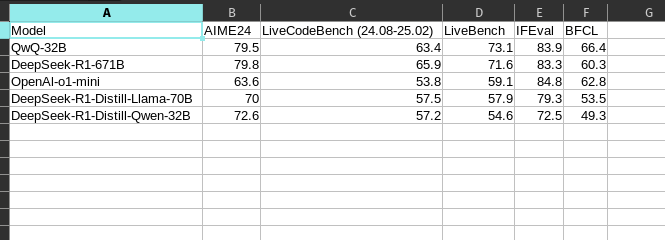
The above table is the generated CSV data from the model. It is pretty good and got generated without any mistakes. I am not sure if it is really a failure or a disaster to people. But for an open model, it is working fine with the multimodal capabilities.
Happy Learning !