![[Webinar] AI Is Already Inside Your SaaS Stack — Learn How to Prevent the Next Silent Breach](https://blogger.googleusercontent.com/img/b/R29vZ2xl/AVvXsEiOWn65wd33dg2uO99NrtKbpYLfcepwOLidQDMls0HXKlA91k6HURluRA4WXgJRAZldEe1VReMQZyyYt1PgnoAn5JPpILsWlXIzmrBSs_TBoyPwO7hZrWouBg2-O3mdeoeSGY-l9_bsZB7vbpKjTSvG93zNytjxgTaMPqo9iq9Z5pGa05CJOs9uXpwHFT4/s1600/ai-cyber.jpg?#)


![[The AI Show Episode 144]: ChatGPT’s New Memory, Shopify CEO’s Leaked “AI First” Memo, Google Cloud Next Releases, o3 and o4-mini Coming Soon & Llama 4’s Rocky Launch](https://www.marketingaiinstitute.com/hubfs/ep%20144%20cover.png)


![Rogue Company Elite tier list of best characters [April 2025]](https://media.pocketgamer.com/artwork/na-33136-1657102075/rogue-company-ios-android-tier-cover.jpg?#)


_Andreas_Prott_Alamy.jpg?width=1280&auto=webp&quality=80&disable=upscale#)


![What’s new in Android’s April 2025 Google System Updates [U: 4/18]](https://i0.wp.com/9to5google.com/wp-content/uploads/sites/4/2025/01/google-play-services-3.jpg?resize=1200%2C628&quality=82&strip=all&ssl=1)


![Apple Watch Series 10 Back On Sale for $299! [Lowest Price Ever]](https://www.iclarified.com/images/news/96657/96657/96657-640.jpg)
![EU Postpones Apple App Store Fines Amid Tariff Negotiations [Report]](https://www.iclarified.com/images/news/97068/97068/97068-640.jpg)
![Apple Slips to Fifth in China's Smartphone Market with 9% Decline [Report]](https://www.iclarified.com/images/news/97065/97065/97065-640.jpg)


How to uninstall CrashPlan from Mac
When apps stop getting updates, especially backup or security-related ones, they quickly become outdated and even risky. CrashPlan hadn’t been maintained since 2017, so I knew it was time to let it go. I also didn’t want any old system files hanging around, possibly interfering with macOS performance. So I decided to completely uninstall CrashPlan from my Mac. In this article, I'll explain how I did it. Before writing this guide, I uninstalled CrashPlan using the steps provided on the CrashPlan official web page. Unfortunately, the provided manual does not uninstall the application completely. I will explain how to find CrashPlan leftovers manually and automatically, even if you have already removed CrashPlan from your Mac. Method 1: Remove CrashPlan with App Cleaner & Uninstaller App Cleaner & Uninstaller is a utility that scans the whole Mac’s hard drive and finds applications’ service files. Also, you can find the remaining files of the previously deleted applications. Here's how to use the app: Launch App Cleaner & Uninstaller. Select CrashPlan in the list of scanned applications. Click on Remove. Confirm the uninstallation. Tip: If CrashPlan won’t uninstall Note If you get a notification that CrashPlan can’t be removed, you will most likely, use the version in which developers locked the applications from being uninstalled. You can check it by calling the “Get info” command – you will see that it is locked. You can unlock CrashPlan with the Terminal app. Copy and paste the following command and press Return: sudo chflags nouchg /Applications/CrashPlan.app It will ask for your admin password. Type it and press Return. In case you have logged in to Mac via your user account, you should re-login as Admin. Method 2: Uninstall CrashPlan using its native uninstaller I will start by uninstalling CrashPlan with its native uninstaller and then explain how to check your Mac for its remaining files. Quit CrashPlan. Find the CrashPlan uninstallation file. For this, open Finder and press the Shift+Command+G shortcut. If the app is installed for everyone, navigate the location /Library/Application Support/CrashPlan/Uninstall.app and press Return. If the app is installed per user, navigate this location: ~/Library/Application Support/CrashPlan/Uninstall.app. Double-click on the Uninstall.app file.the CrashPlan uninstall file in Finder. In the appeared window, click the Uninstall button and follow the prompts to uninstall CrashPlan from your Mac. How to remove CrashPlan remaining files from Mac I opened Finder again, used Shift + Command + G, and checked the following folders for any remaining files related to CrashPlan: ~/Library/Saved Application State ~/Library/Caches/ ~/Library/Logs ~/Library/Preferences ~/Library/Application Support /Library/Caches/ /Library/Logs /Library/Preferences /Library/Application Support ~/private/var/db/receipts I manually deleted anything with “crashplan” in the name. Then I emptied the Trash and restarted my Mac. What I use instead of CrashPlan These days I rely on Time Machine, which is built into macOS. It’s reliable, gets the job done, and I don’t have to worry about third-party support. So if you’re holding on to old, unused apps like CrashPlan, now might be the perfect time to let them go. Your Mac (and your brain) will thank you.
When apps stop getting updates, especially backup or security-related ones, they quickly become outdated and even risky. CrashPlan hadn’t been maintained since 2017, so I knew it was time to let it go. I also didn’t want any old system files hanging around, possibly interfering with macOS performance.
So I decided to completely uninstall CrashPlan from my Mac. In this article, I'll explain how I did it.
Before writing this guide, I uninstalled CrashPlan using the steps provided on the CrashPlan official web page. Unfortunately, the provided manual does not uninstall the application completely.
I will explain how to find CrashPlan leftovers manually and automatically, even if you have already removed CrashPlan from your Mac.
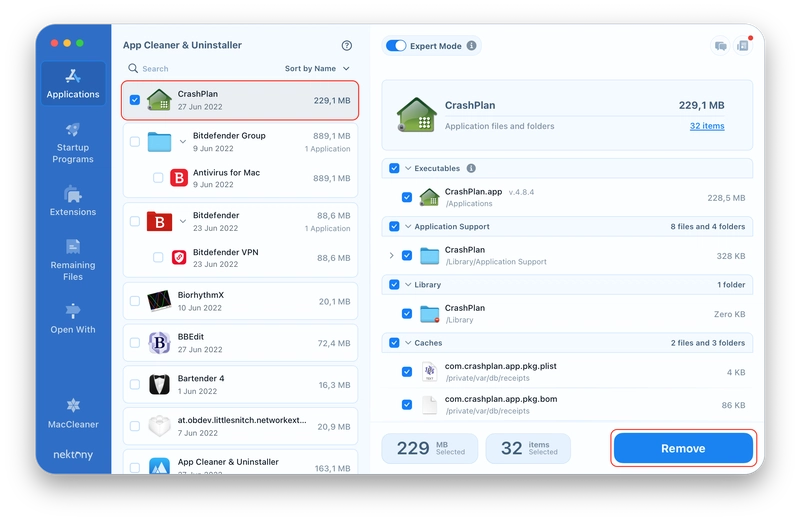
Method 1: Remove CrashPlan with App Cleaner & Uninstaller
App Cleaner & Uninstaller is a utility that scans the whole Mac’s hard drive and finds applications’ service files. Also, you can find the remaining files of the previously deleted applications.
Here's how to use the app:
- Launch App Cleaner & Uninstaller.
- Select CrashPlan in the list of scanned applications.
- Click on Remove.
- Confirm the uninstallation.
Tip: If CrashPlan won’t uninstall
Note If you get a notification that CrashPlan can’t be removed, you will most likely, use the version in which developers locked the applications from being uninstalled. You can check it by calling the “Get info” command – you will see that it is locked.
You can unlock CrashPlan with the Terminal app. Copy and paste the following command and press Return:
sudo chflags nouchg /Applications/CrashPlan.app

It will ask for your admin password. Type it and press Return.
In case you have logged in to Mac via your user account, you should re-login as Admin.
Method 2: Uninstall CrashPlan using its native uninstaller
I will start by uninstalling CrashPlan with its native uninstaller and then explain how to check your Mac for its remaining files.
- Quit CrashPlan.
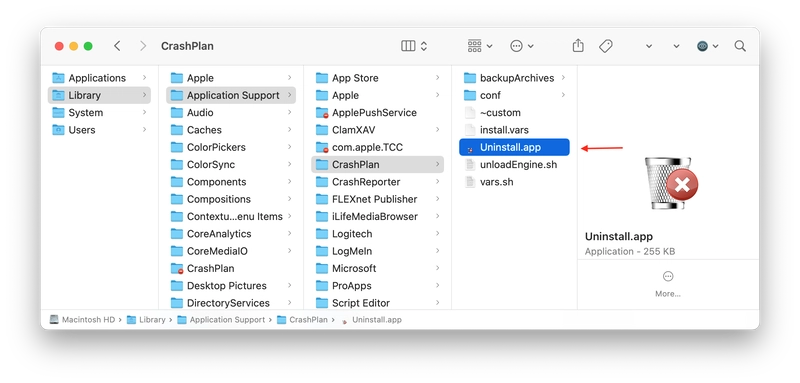
- Find the CrashPlan uninstallation file. For this, open Finder and press the Shift+Command+G shortcut. If the app is installed for everyone, navigate the location /Library/Application Support/CrashPlan/Uninstall.app and press Return.
- If the app is installed per user, navigate this location: ~/Library/Application Support/CrashPlan/Uninstall.app.
- Double-click on the Uninstall.app file.the CrashPlan uninstall file in Finder.
- In the appeared window, click the Uninstall button and follow the prompts to uninstall CrashPlan from your Mac.
How to remove CrashPlan remaining files from Mac
I opened Finder again, used Shift + Command + G, and checked the following folders for any remaining files related to CrashPlan:
- ~/Library/Saved Application State
- ~/Library/Caches/
- ~/Library/Logs
- ~/Library/Preferences
- ~/Library/Application Support
- /Library/Caches/
- /Library/Logs
- /Library/Preferences
- /Library/Application Support
- ~/private/var/db/receipts
I manually deleted anything with “crashplan” in the name. Then I emptied the Trash and restarted my Mac.
What I use instead of CrashPlan
These days I rely on Time Machine, which is built into macOS. It’s reliable, gets the job done, and I don’t have to worry about third-party support.
So if you’re holding on to old, unused apps like CrashPlan, now might be the perfect time to let them go. Your Mac (and your brain) will thank you.