


![[The AI Show Episode 147]: OpenAI Abandons For-Profit Plan, AI College Cheating Epidemic, Apple Says AI Will Replace Search Engines & HubSpot’s AI-First Scorecard](https://www.marketingaiinstitute.com/hubfs/ep%20147%20cover.png)


.jpeg?width=1920&height=1920&fit=bounds&quality=70&format=jpg&auto=webp#)


![Apple Working on Brain-Controlled iPhone With Synchron [Report]](https://www.iclarified.com/images/news/97312/97312/97312-640.jpg)


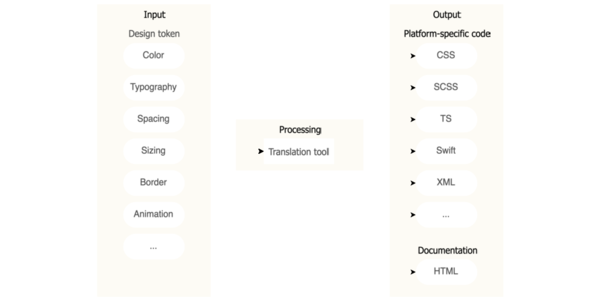
How to Install Meta Perception LM 8B Locally?
Perception-LM-8B is a powerful multimodal model designed to understand both images and videos in depth. Built by Meta’s FAIR research team, it combines a lightweight language decoder with a highly capable vision encoder to generate detailed, structured responses from visual content. Whether it’s identifying objects in a photo or analyzing complex temporal events in video, this model handles it with remarkable clarity. Instead of relying on closed or proprietary components, Perception-LM is trained using open-access data and reproducible methods. It’s optimized for tasks like visual question answering, video reasoning, and fine-grained recognition — all while maintaining transparency in how it works. From describing what’s happening in a single frame to interpreting events over time, Perception-LM-8B is a step forward in making visual understanding more open, accessible, and research-ready. Resource Hugging Face Link: https://huggingface.co/facebook/Perception-LM-8B GitHub Link: https://github.com/facebookresearch/perception_models Step-by-Step Process to Install Meta Perception LM 8B Locally For the purpose of this tutorial, we will use a GPU-powered Virtual Machine offered by NodeShift; however, you can replicate the same steps with any other cloud provider of your choice. NodeShift provides the most affordable Virtual Machines at a scale that meets GDPR, SOC2, and ISO27001 requirements. Step 1: Access model from Hugging Face Link: https://huggingface.co/facebook/Perception-LM-8B You need to agree to share your contact information to access this model. Fill in all the mandatory details, such as your name and email, and then wait for approval from Hugging Face and Meta to gain access and use the model. You will be granted access to this model within an hour, provided you have filled in all the details correctly. Step 2: Sign Up and Set Up a NodeShift Cloud Account Visit the NodeShift Platform and create an account. Once you’ve signed up, log into your account. Follow the account setup process and provide the necessary details and information. Step 3: Create a GPU Node (Virtual Machine) GPU Nodes are NodeShift’s GPU Virtual Machines, on-demand resources equipped with diverse GPUs ranging from H100s to A100s. These GPU-powered VMs provide enhanced environmental control, allowing configuration adjustments for GPUs, CPUs, RAM, and Storage based on specific requirements. Navigate to the menu on the left side. Select the GPU Nodes option, create a GPU Node in the Dashboard, click the Create GPU Node button, and create your first Virtual Machine deploy Step 4: Select a Model, Region, and Storage In the “GPU Nodes” tab, select a GPU Model and Storage according to your needs and the geographical region where you want to launch your model. We will use 1 x RTXA6000 GPU for this tutorial to achieve the fastest performance. However, you can choose a more affordable GPU with less VRAM if that better suits your requirements. Step 5: Select Authentication Method There are two authentication methods available: Password and SSH Key. SSH keys are a more secure option. To create them, please refer to our official documentation. Step 6: Choose an Image Next, you will need to choose an image for your Virtual Machine. We will deploy Meta Perception LM on an NVIDIA Cuda Virtual Machine. This proprietary, closed-source parallel computing platform will allow you to install Meta Perception LM on your GPU Node. After choosing the image, click the ‘Create’ button, and your Virtual Machine will be deployed. Step 7: Virtual Machine Successfully Deployed You will get visual confirmation that your node is up and running. Step 8: Connect to GPUs using SSH NodeShift GPUs can be connected to and controlled through a terminal using the SSH key provided during GPU creation. Once your GPU Node deployment is successfully created and has reached the ‘RUNNING’ status, you can navigate to the page of your GPU Deployment Instance. Then, click the ‘Connect’ button in the top right corner. Now open your terminal and paste the proxy SSH IP or direct SSH IP. Next, if you want to check the GPU details, run the command below: nvidia-smi Step 9: Check the Available Python version and Install the new version Run the following commands to check the available Python version. If you check the version of the python, system has Python 3.8.1 available by default. To install a higher version of Python, you’ll need to use the deadsnakes PPA. Run the following commands to add the deadsnakes PPA: sudo apt update sudo apt install -y software-properties-common sudo add-apt-repository -y ppa:deadsnakes/ppa sudo apt update Step 10: Install Python 3.11 Now, run the following command to install Python 3.11 or another desired version: sudo apt install -y python3.11 python3.11-distuti
Perception-LM-8B is a powerful multimodal model designed to understand both images and videos in depth. Built by Meta’s FAIR research team, it combines a lightweight language decoder with a highly capable vision encoder to generate detailed, structured responses from visual content. Whether it’s identifying objects in a photo or analyzing complex temporal events in video, this model handles it with remarkable clarity.
Instead of relying on closed or proprietary components, Perception-LM is trained using open-access data and reproducible methods. It’s optimized for tasks like visual question answering, video reasoning, and fine-grained recognition — all while maintaining transparency in how it works.
From describing what’s happening in a single frame to interpreting events over time, Perception-LM-8B is a step forward in making visual understanding more open, accessible, and research-ready.
Resource
Hugging Face
Link: https://huggingface.co/facebook/Perception-LM-8B
GitHub
Link: https://github.com/facebookresearch/perception_models

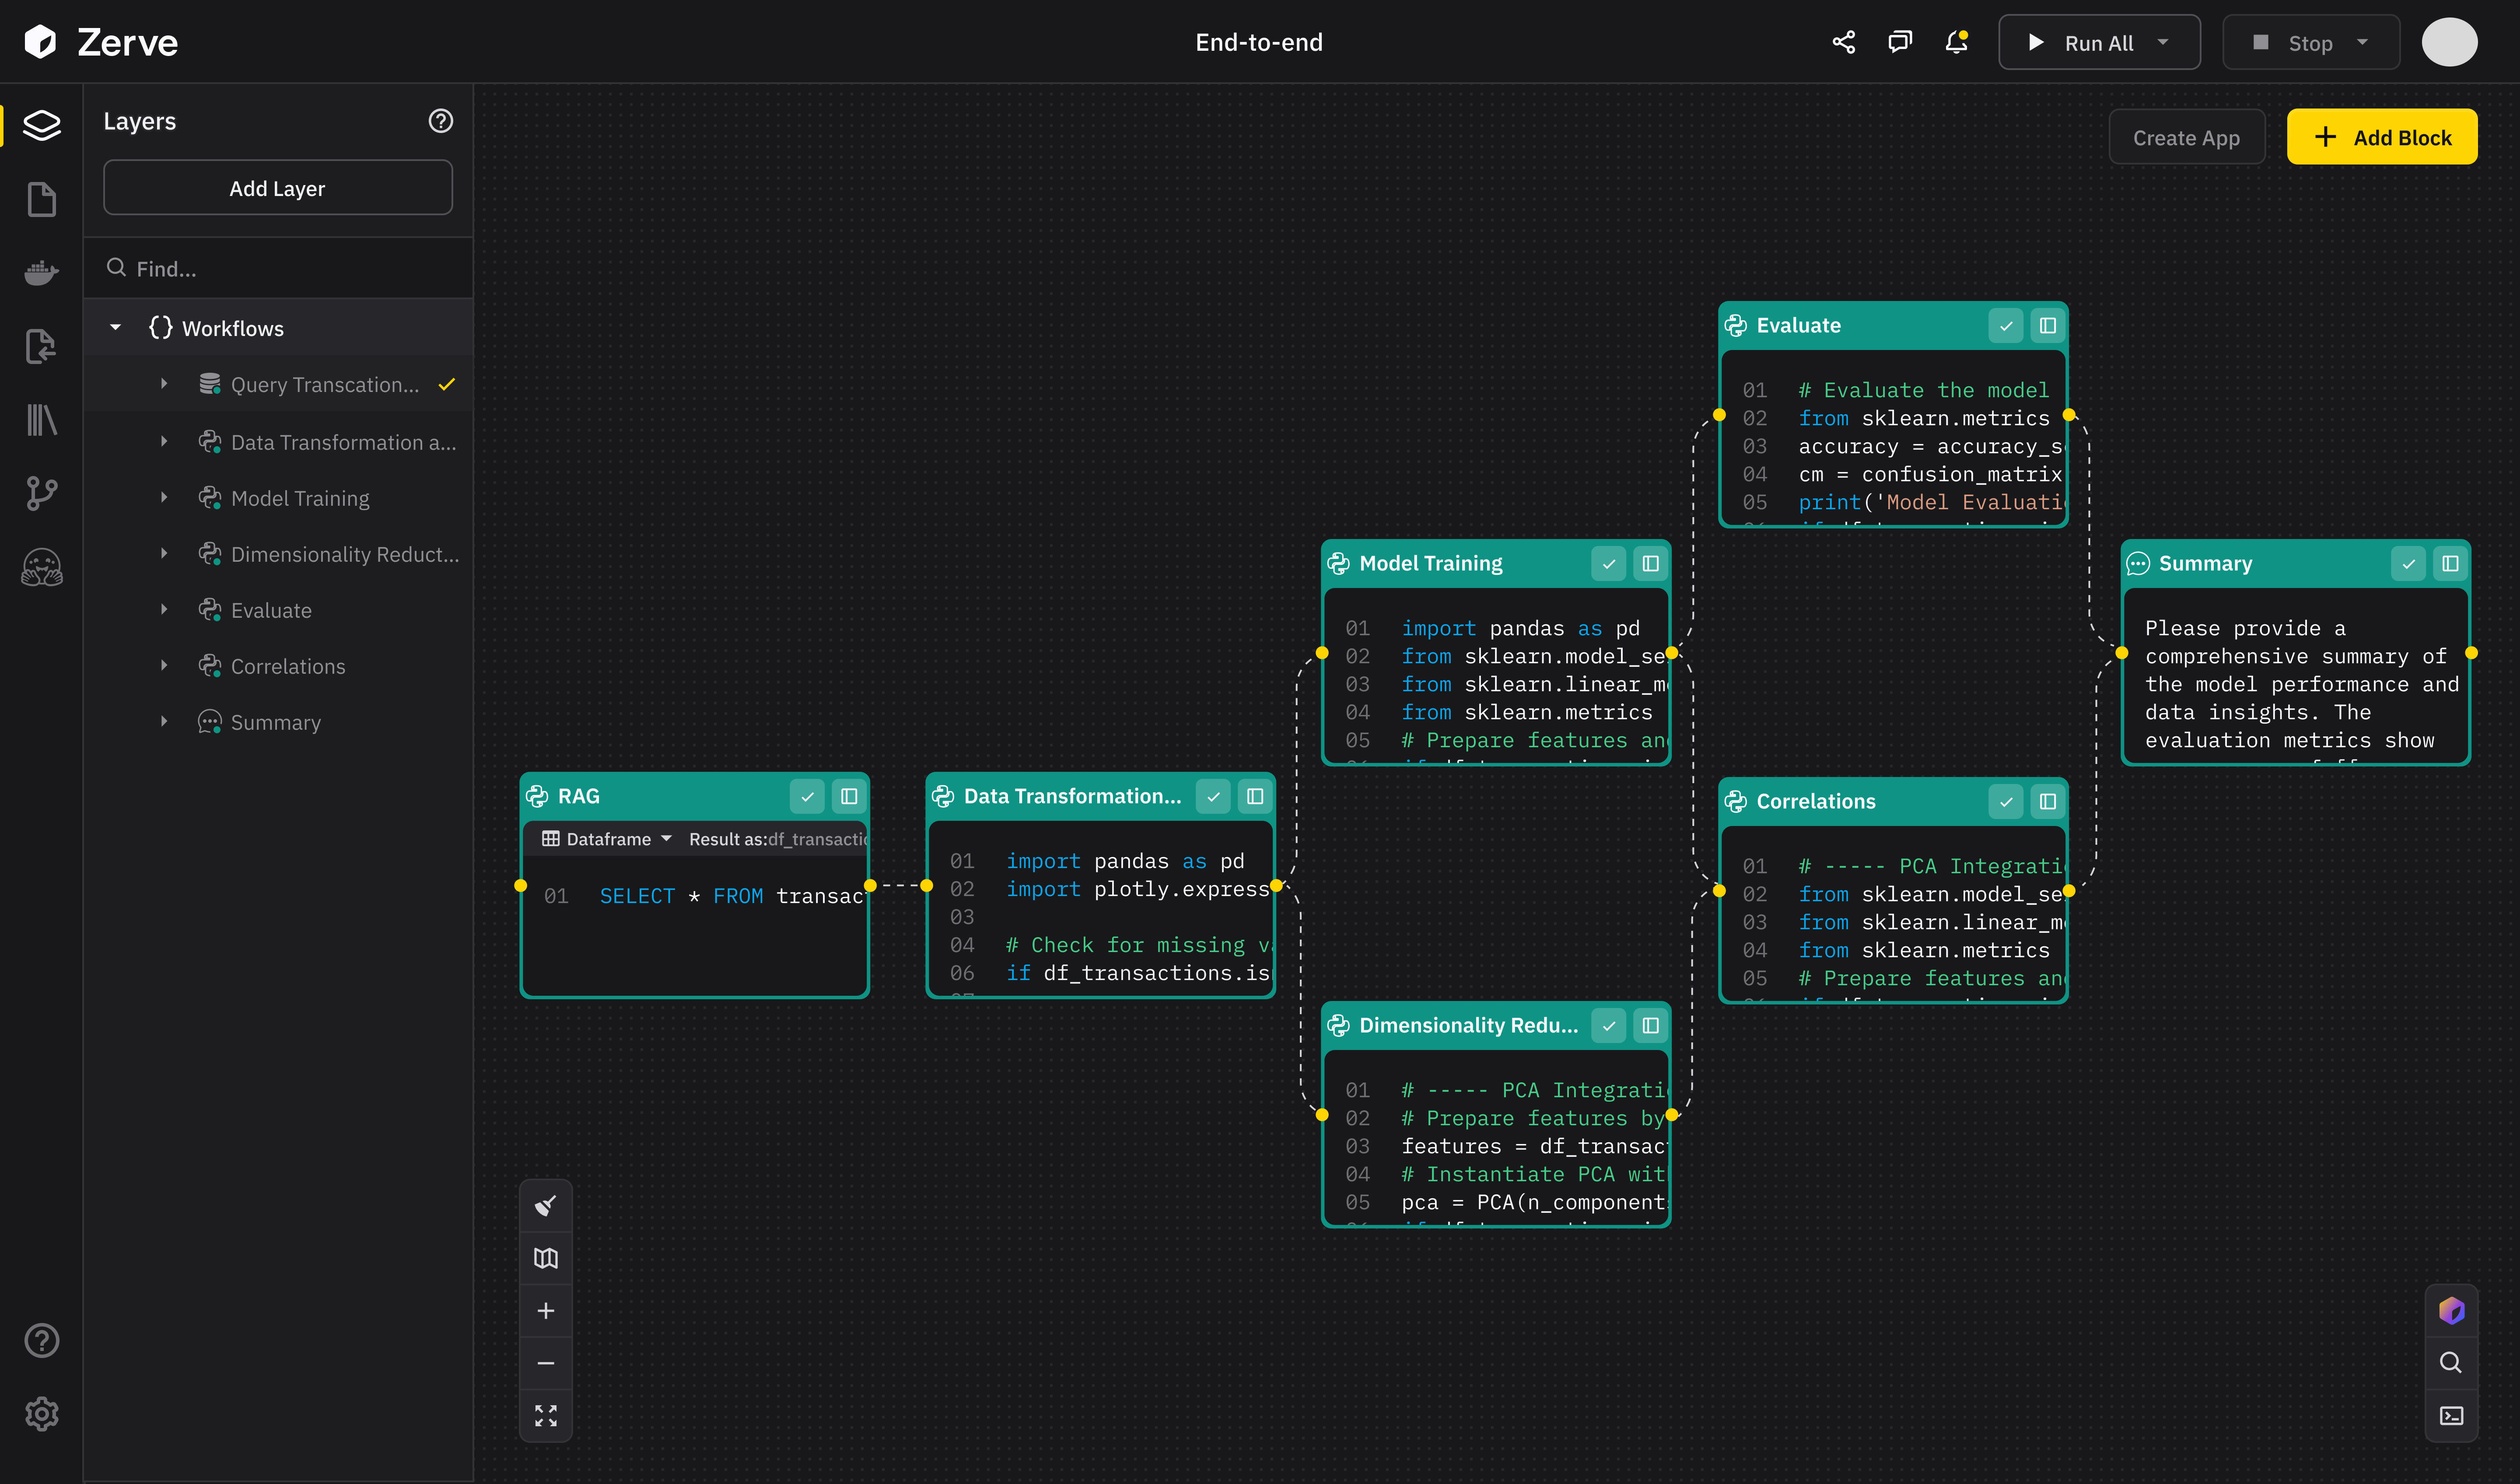
Step-by-Step Process to Install Meta Perception LM 8B Locally
For the purpose of this tutorial, we will use a GPU-powered Virtual Machine offered by NodeShift; however, you can replicate the same steps with any other cloud provider of your choice. NodeShift provides the most affordable Virtual Machines at a scale that meets GDPR, SOC2, and ISO27001 requirements.
Step 1: Access model from Hugging Face
Link: https://huggingface.co/facebook/Perception-LM-8B
You need to agree to share your contact information to access this model. Fill in all the mandatory details, such as your name and email, and then wait for approval from Hugging Face and Meta to gain access and use the model.


You will be granted access to this model within an hour, provided you have filled in all the details correctly.

Step 2: Sign Up and Set Up a NodeShift Cloud Account
Visit the NodeShift Platform and create an account. Once you’ve signed up, log into your account.
Follow the account setup process and provide the necessary details and information.

Step 3: Create a GPU Node (Virtual Machine)
GPU Nodes are NodeShift’s GPU Virtual Machines, on-demand resources equipped with diverse GPUs ranging from H100s to A100s. These GPU-powered VMs provide enhanced environmental control, allowing configuration adjustments for GPUs, CPUs, RAM, and Storage based on specific requirements.

Navigate to the menu on the left side. Select the GPU Nodes option, create a GPU Node in the Dashboard, click the Create GPU Node button, and create your first Virtual Machine deploy
Step 4: Select a Model, Region, and Storage
In the “GPU Nodes” tab, select a GPU Model and Storage according to your needs and the geographical region where you want to launch your model.


We will use 1 x RTXA6000 GPU for this tutorial to achieve the fastest performance. However, you can choose a more affordable GPU with less VRAM if that better suits your requirements.
Step 5: Select Authentication Method
There are two authentication methods available: Password and SSH Key. SSH keys are a more secure option. To create them, please refer to our official documentation.

Step 6: Choose an Image
Next, you will need to choose an image for your Virtual Machine. We will deploy Meta Perception LM on an NVIDIA Cuda Virtual Machine. This proprietary, closed-source parallel computing platform will allow you to install Meta Perception LM on your GPU Node.

After choosing the image, click the ‘Create’ button, and your Virtual Machine will be deployed.

Step 7: Virtual Machine Successfully Deployed
You will get visual confirmation that your node is up and running.

Step 8: Connect to GPUs using SSH
NodeShift GPUs can be connected to and controlled through a terminal using the SSH key provided during GPU creation.
Once your GPU Node deployment is successfully created and has reached the ‘RUNNING’ status, you can navigate to the page of your GPU Deployment Instance. Then, click the ‘Connect’ button in the top right corner.

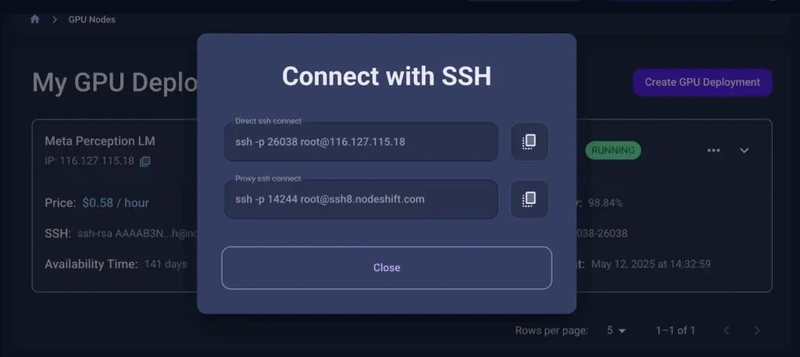
Now open your terminal and paste the proxy SSH IP or direct SSH IP.

Next, if you want to check the GPU details, run the command below:
nvidia-smi

Step 9: Check the Available Python version and Install the new version
Run the following commands to check the available Python version.
If you check the version of the python, system has Python 3.8.1 available by default. To install a higher version of Python, you’ll need to use the deadsnakes PPA.
Run the following commands to add the deadsnakes PPA:
sudo apt update
sudo apt install -y software-properties-common
sudo add-apt-repository -y ppa:deadsnakes/ppa
sudo apt update

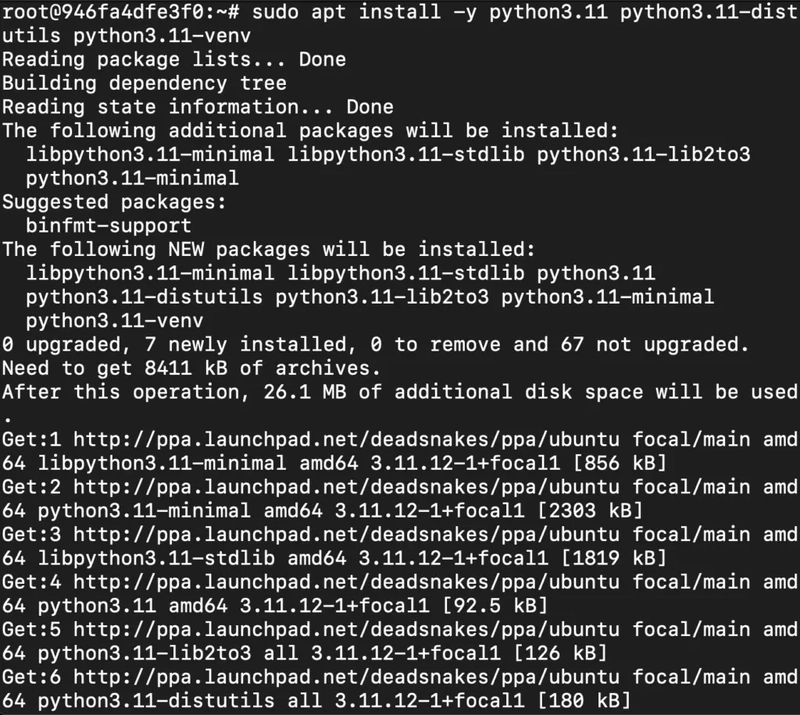
Step 10: Install Python 3.11
Now, run the following command to install Python 3.11 or another desired version:
sudo apt install -y python3.11 python3.11-distutils python3.11-venv
Step 11: Update the Default Python3 Version
Now, run the following command to link the new Python version as the default python3:
sudo update-alternatives --install /usr/bin/python3 python3 /usr/bin/python3.8 1
sudo update-alternatives --install /usr/bin/python3 python3 /usr/bin/python3.11 2
sudo update-alternatives --config python3
Then, run the following command to verify that the new Python version is active:
python3 --version

Step 12: Install and Update Pip
Run the following command to install and update the pip:
python3 -m ensurepip --upgrade

python3 -m pip install --upgrade pip
Then, run the following command to check the version of pip:
pip --version

Step 13: Create a Virtual Environment
Run the following command to create a virtual environment:
pip install virtualenv

virtualenv plm-env

source plm-env/bin/activate

Step 14: Clone the Repo
Run the following command to clone the repo:
git clone https://github.com/facebookresearch/perception_models.git

cd perception_models

Step 15: Install Dependencies
Run the following command to install PyTorch + xformers (CUDA 12.4):
pip install torch==2.5.1 torchvision==0.20.1 torchaudio==2.5.1 xformers --index-url https://download.pytorch.org/whl/cu124

Next, run the following command to install the ffmpeg and torchcodec:
conda install ffmpeg -c conda-forge -y

pip install torchcodec==0.1 --index-url=https://download.pytorch.org/whl/cu124

Then, run the following command to install omegaconf imageio einops opencv-python:
pip install omegaconf imageio einops opencv-python

Step 16: Install Python Package
Run the following command to install python package:
pip install -e .

Step 17: Install HuggingFace Hub
Run the following command to install the huggingface_hub:
pip install huggingface_hub
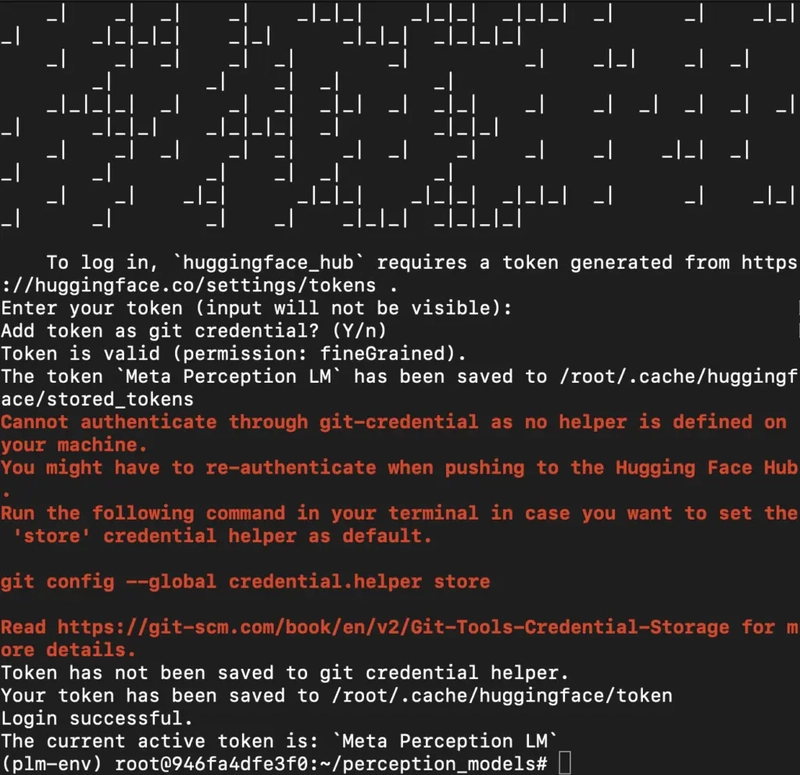
Step 18: Login Using Your Hugging Face API Token
Use the huggingface_hub cli to login directly in the terminal.
Run the following command to login in huggingface-cli:
huggingface-cli login
Then, enter the token and press the Enter key. Ensure you press Enter after entering the token so the input will not be visible.
After entering the token, you will see the following output:
Login Successful.
The current active token is (your_token_name).
Check the screenshot below for reference.

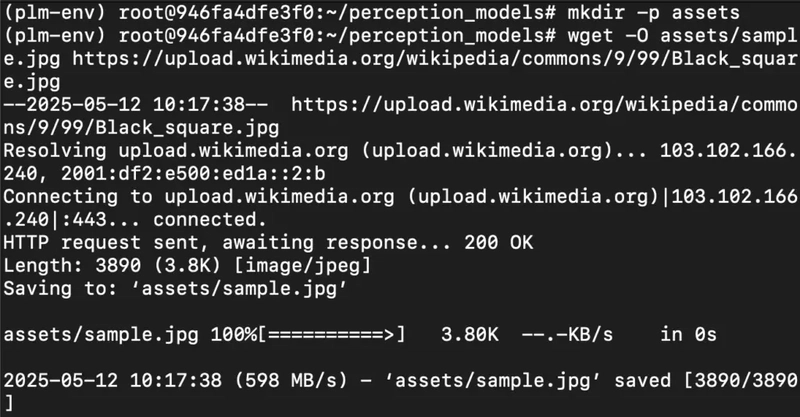
Step 19: Add a Sample Image
Run the following command to add a sample image:
mkdir -p assets

wget -O assets/sample.jpg https://upload.wikimedia.org/wikipedia/commons/9/99/Black_square.jpg
Or, upload your own image to the assets/ folder and rename it sample.jpg.
Step 20: Run the Model
Execute the following command to run the model:
PYTHONPATH=. python3 apps/plm/generate.py \
  --ckpt facebook/Perception-LM-8B \
  --media_type image \
  --media_path assets/sample.jpg \
  --question "What is happening in this image?"

Conclusion
Perception-LM-8B stands out as a practical and research-friendly model for deep visual understanding across both images and videos. With a transparent setup process and fully reproducible code, it brings state-of-the-art performance within reach of anyone working in the visual domain — from research labs to startups. Whether you’re identifying content in a single frame or interpreting complex sequences, this model delivers consistent, structured responses with clarity.
Setting it up on a GPU-powered VM is straightforward, and with the right configuration, you can get started in just a few minutes. From installation to execution, every step is designed to be accessible — no hidden dependencies or closed-source barriers. If you’re looking to explore or build on top of strong visual-language foundations, Perception-LM-8B is a solid place to begin.