


![[The AI Show Episode 143]: ChatGPT Revenue Surge, New AGI Timelines, Amazon’s AI Agent, Claude for Education, Model Context Protocol & LLMs Pass the Turing Test](https://www.marketingaiinstitute.com/hubfs/ep%20143%20cover.png)


![From drop-out to software architect with Jason Lengstorf [Podcast #167]](https://cdn.hashnode.com/res/hashnode/image/upload/v1743796461357/f3d19cd7-e6f5-4d7c-8bfc-eb974bc8da68.png?#)


.jpg?#)


_ArtemisDiana_Alamy.jpg?#)


 (1).webp?#)


-xl.jpg)


![Yes, the Gemini icon is now bigger and brighter on Android [U]](https://i0.wp.com/9to5google.com/wp-content/uploads/sites/4/2025/02/Gemini-on-Galaxy-S25.jpg?resize=1200%2C628&quality=82&strip=all&ssl=1)


![Apple Vision Pro 2 Allegedly in Production Ahead of 2025 Launch [Rumor]](https://www.iclarified.com/images/news/96965/96965/96965-640.jpg)


![New iOS 19 Leak Allegedly Reveals Updated Icons, Floating Tab Bar, More [Video]](https://www.iclarified.com/images/news/96958/96958/96958-640.jpg)


How to Design a Sierpinski Tetrahedron Using 3D CAD Software
How to Design a Sierpinski Tetrahedron Using 3D CAD Software Fractal geometry is a fascinating branch of mathematics that finds applications in art, design, and computer graphics. One of the most iconic fractal structures is the Sierpinski Tetrahedron, a recursive 3D shape made up of smaller tetrahedrons arranged in a self-replicating pattern. Using SelfCAD, a powerful and accessible 3D modeling tool, designers can create this intricate structure with precision and ease. This article will guide you through the step-by-step process of designing a Sierpinski Tetrahedron in SelfCAD, exploring techniques such as shape duplication, scaling, and positioning. By mastering this process, designers can gain a deeper understanding of fractal modeling while enhancing their 3D design skills. To access the interactive tutorial to this article, check out; https://www.selfcad.com/tutorials/t394kf3ds16s2yx48383n5166x2c6g4r6751 Once you’ve launched the editor; From the drawing category on the toolbar choose 3D sketch; From the tool panel choose circle; Set number of edges to 3, snap to grid vertices to true, Click on highlighted point to draw circle Click on highlighted point to draw circle Click ‘x’ to close 3D sketch From the tools category on the toolbar choose fill polygons Click to finalize fill polygons From the modify category on the toolbar choose edit details; Set part of geometry to vertex, Click on highlighted point to add vertex to object Click to finalize edit details Click to activate vertex selection; Click on highlighted region to select it; Click move on the toolbar; Set y to 69 Click ‘x’ to close transformation panel Click copy button to copy selected objects Click move on the toolbar; Set z to 86.6 Click copy button to copy selected objects; Set z to 43.3, x to 87.5 Click copy button to copy selected objects; Set y to 69, x to 37.5 Click on mesh 1(1), mesh 1(2), mesh 1 to select From the edit menu on the top toolbar click group Click copy button to copy selected objects; Set move mode to moveby, z to -173.2 Click copy button to copy selected objects; Set move mode to moveto, x to 200, z to -43.3 Click copy button to copy selected objects; Set y to 138, x to 100 Click ‘x’ to close transformation panel Click on group 1(2), group 1, group 1(1) to select. Click delete button to delete selected objects Click scale on the toolbar; Set keep proportion to true; y to 100 Click ‘x’ to close transformation panel Click move on the toolbar; Set y to 0. Click ‘x’ to close transformation panel Click copy button to copy selected objects Click move on the toolbar; Set x to 16.3, z to -106 Click copy button to copy selected objects; Set z to 19.4 Click copy button to copy selected objects; Set z to -43.3, y to 100, x to 52.6 Click ‘x’ to close transformation panel From the edit menu on the top toolbar click select all; then click group As you continue honing your design skills, remember that SelfCAD offers a wealth of resources to support your learning journey. To deepen your understanding and explore more advanced features, consider checking out the interactive tutorials (https://www.selfcad.com/tutorials) available on the SelfCAD website. The tutorials page provides a treasure trove of guides, tips, and tricks that cater to designers of all levels. More structured learning experience can also be accessed at the SelfCAD Academy (https://www.selfcad.com/academy/curriculum/), https://www.youtube.com/@3dmodeling101, and 3D Modeling 101 series (https://www.youtube.com/playlist?list=PL74nFNT8yS9DcE1UlUUdiR1wFGv9DDfTB). This comprehensive resource offers in-depth courses taught by industry experts, allowing you to master the intricacies of SelfCAD at your own pace
How to Design a Sierpinski Tetrahedron Using 3D CAD Software
Fractal geometry is a fascinating branch of mathematics that finds applications in art, design, and computer graphics. One of the most iconic fractal structures is the Sierpinski Tetrahedron, a recursive 3D shape made up of smaller tetrahedrons arranged in a self-replicating pattern. Using SelfCAD, a powerful and accessible 3D modeling tool, designers can create this intricate structure with precision and ease. This article will guide you through the step-by-step process of designing a Sierpinski Tetrahedron in SelfCAD, exploring techniques such as shape duplication, scaling, and positioning. By mastering this process, designers can gain a deeper understanding of fractal modeling while enhancing their 3D design skills.
To access the interactive tutorial to this article, check out; https://www.selfcad.com/tutorials/t394kf3ds16s2yx48383n5166x2c6g4r6751
Once you’ve launched the editor;
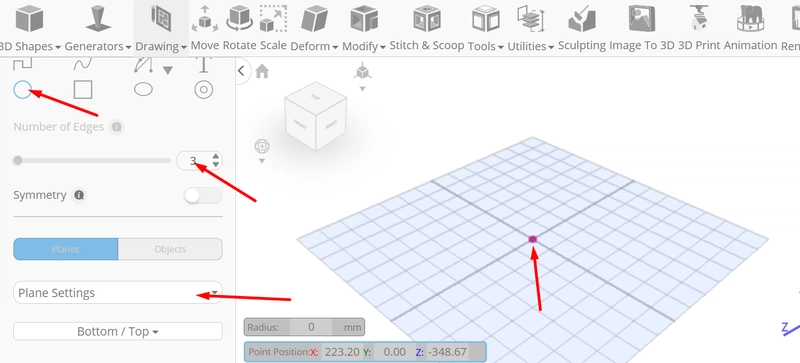
From the drawing category on the toolbar choose 3D sketch; From the tool panel choose circle; Set number of edges to 3, snap to grid vertices to true, Click on highlighted point to draw circle
Click on highlighted point to draw circle
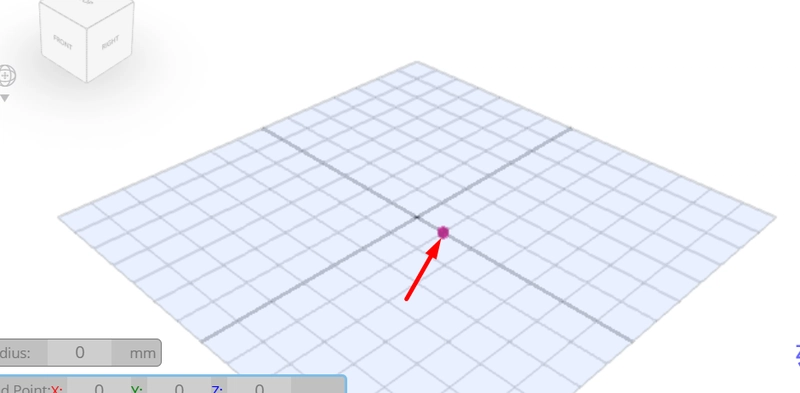
Click ‘x’ to close 3D sketch
From the tools category on the toolbar choose fill polygons
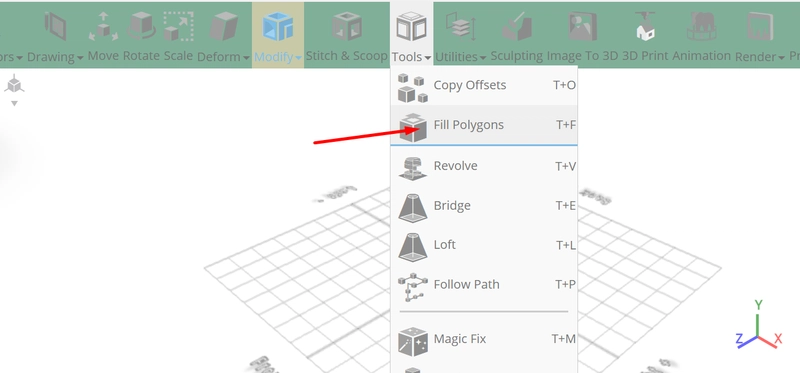
Click to finalize fill polygons
From the modify category on the toolbar choose edit details; Set part of geometry to vertex, Click on highlighted point to add vertex to object
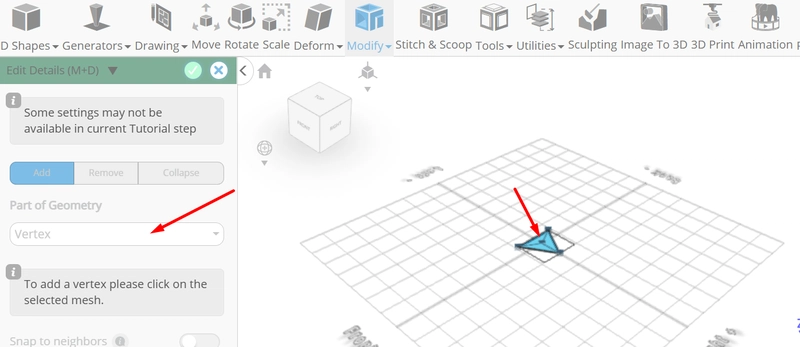
Click to finalize edit details
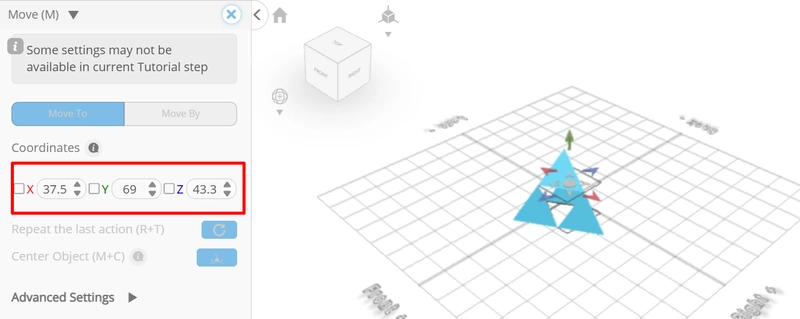
Click to activate vertex selection; Click on highlighted region to select it; Click move on the toolbar; Set y to 69
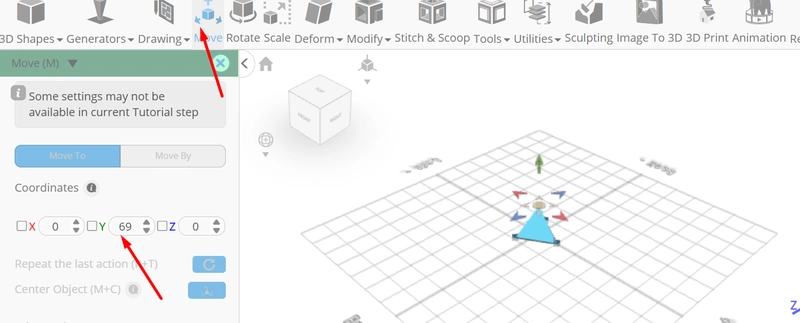
Click ‘x’ to close transformation panel
Click copy button to copy selected objects
Click move on the toolbar; Set z to 86.6
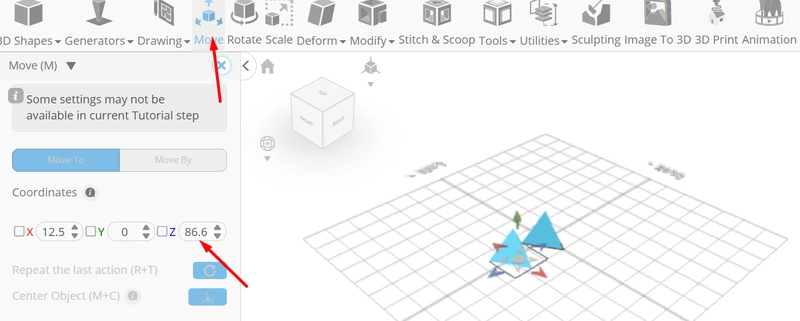
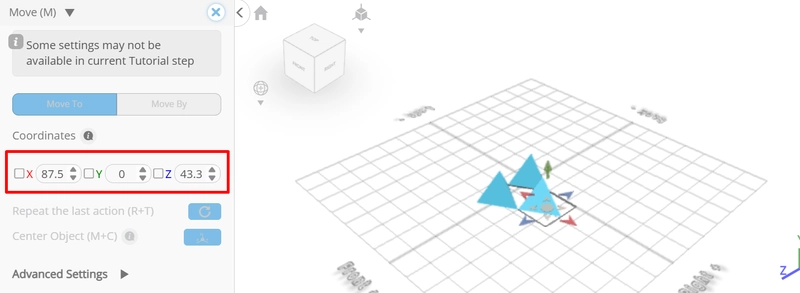
Click copy button to copy selected objects; Set z to 43.3, x to 87.5
Click copy button to copy selected objects; Set y to 69, x to 37.5
Click on mesh 1(1), mesh 1(2), mesh 1 to select
From the edit menu on the top toolbar click group
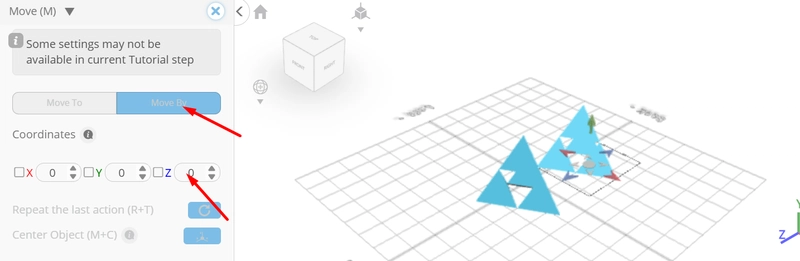
Click copy button to copy selected objects; Set move mode to moveby, z to -173.2
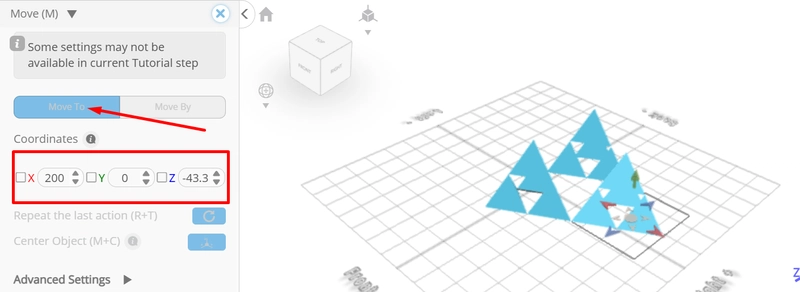
Click copy button to copy selected objects; Set move mode to moveto, x to 200, z to -43.3
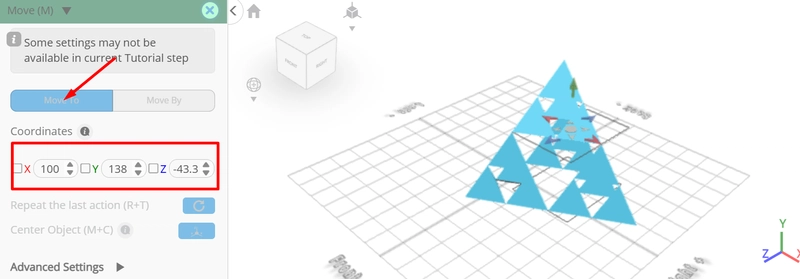
Click copy button to copy selected objects; Set y to 138, x to 100
Click ‘x’ to close transformation panel
Click on group 1(2), group 1, group 1(1) to select. Click delete button to delete selected objects
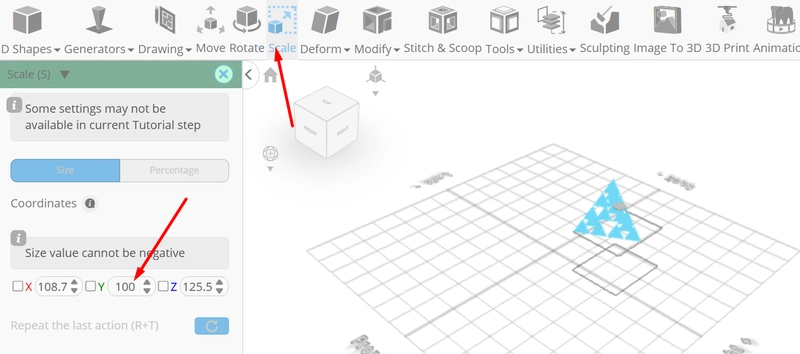
Click scale on the toolbar; Set keep proportion to true; y to 100
Click ‘x’ to close transformation panel
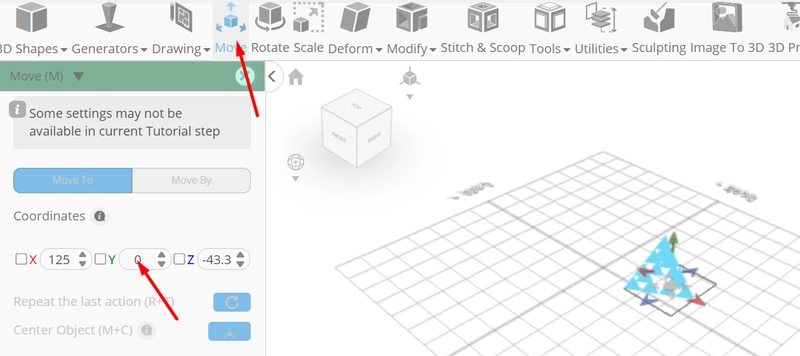
Click move on the toolbar; Set y to 0.
Click ‘x’ to close transformation panel
Click copy button to copy selected objects
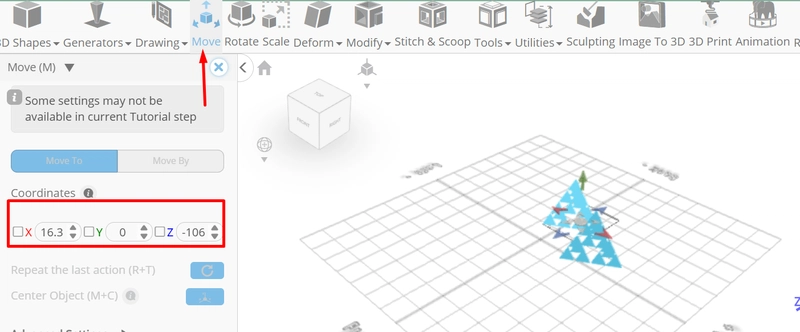
Click move on the toolbar; Set x to 16.3, z to -106
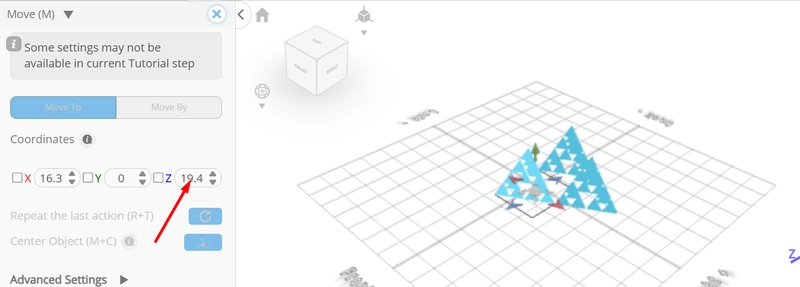
Click copy button to copy selected objects; Set z to 19.4
Click copy button to copy selected objects; Set z to -43.3, y to 100, x to 52.6
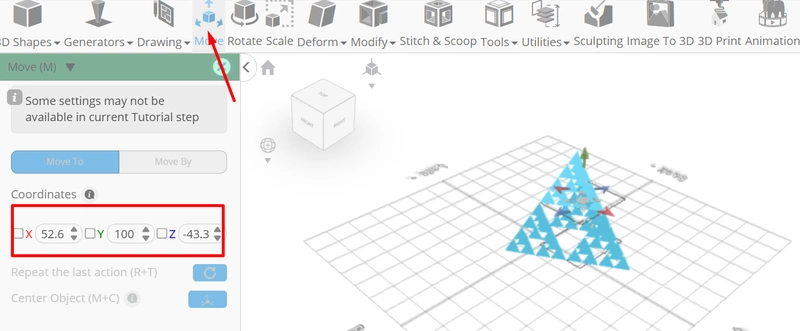
Click ‘x’ to close transformation panel
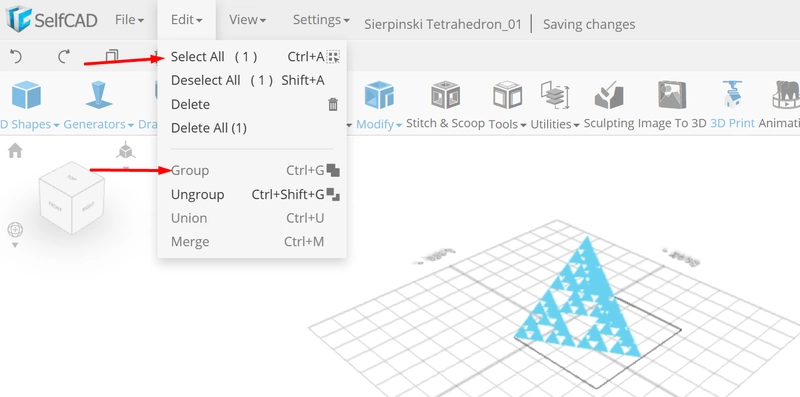
From the edit menu on the top toolbar click select all; then click group
As you continue honing your design skills, remember that SelfCAD offers a wealth of resources to support your learning journey. To deepen your understanding and explore more advanced features, consider checking out the interactive tutorials (https://www.selfcad.com/tutorials) available on the SelfCAD website. The tutorials page provides a treasure trove of guides, tips, and tricks that cater to designers of all levels.
More structured learning experience can also be accessed at the SelfCAD Academy (https://www.selfcad.com/academy/curriculum/), https://www.youtube.com/@3dmodeling101, and 3D Modeling 101 series (https://www.youtube.com/playlist?list=PL74nFNT8yS9DcE1UlUUdiR1wFGv9DDfTB). This comprehensive resource offers in-depth courses taught by industry experts, allowing you to master the intricacies of SelfCAD at your own pace