


![[The AI Show Episode 142]: ChatGPT’s New Image Generator, Studio Ghibli Craze and Backlash, Gemini 2.5, OpenAI Academy, 4o Updates, Vibe Marketing & xAI Acquires X](https://www.marketingaiinstitute.com/hubfs/ep%20142%20cover.png)


![From drop-out to software architect with Jason Lengstorf [Podcast #167]](https://cdn.hashnode.com/res/hashnode/image/upload/v1743796461357/f3d19cd7-e6f5-4d7c-8bfc-eb974bc8da68.png?#)


.png?#)


(1).jpg?width=1920&height=1920&fit=bounds&quality=80&format=jpg&auto=webp#)


_Christophe_Coat_Alamy.jpg?#)
.webp?#)
.webp?#)


![Apple Considers Delaying Smart Home Hub Until 2026 [Gurman]](https://www.iclarified.com/images/news/96946/96946/96946-640.jpg)
![iPhone 17 Pro Won't Feature Two-Toned Back [Gurman]](https://www.iclarified.com/images/news/96944/96944/96944-640.jpg)
![Tariffs Threaten Apple's $999 iPhone Price Point in the U.S. [Gurman]](https://www.iclarified.com/images/news/96943/96943/96943-640.jpg)


How to Connect a React App with MySQL Database
Are you looking to build a dynamic React application with a MySQL database backend? In this post, we’ll walk you through how to connect a React app with a MySQL database using PHP as the intermediary. We’ll cover the file structure, set up a simple registration form (Name, Email, Mobile Number, Address), and display all registered users in a styled table component. Whether you’re a beginner or an experienced developer, this guide will help you integrate React, PHP, and MySQL seamlessly. Why Connect React with MySQL? React is a powerful front-end library for building interactive UIs, while MySQL is a reliable relational database for storing structured data. By connecting them with PHP as the backend, you can create full-stack applications like user management systems, e-commerce platforms, or dashboards. Let’s dive into the process! Project Overview We’ll create a React app with: A Registration Form component to collect user data (Name, Email, Mobile Number, Address). A User List component to display all users in a table. A PHP backend to handle MySQL database operations. Styled components for clean, reusable CSS. File Structure Here’s the basic file structure for our project: my-react-mysql-app/ ├── backend/ # PHP backend files │ ├── config.php # Database connection │ ├── register.php # API to handle registration │ └── fetch_users.php # API to fetch all users ├── src/ # React app source │ ├── components/ # React components │ │ ├── RegisterForm.js # Registration form component │ │ └── UserList.js # User list table component │ ├── App.js # Main app component │ ├── index.js # React entry point │ └── styles/ # Styled components CSS └── package.json # Project dependencies Step 1: Set Up the MySQL Database Create a MySQL database and a users table to store registration data. CREATE DATABASE react_mysql_db; USE react_mysql_db; CREATE TABLE users ( id INT AUTO_INCREMENT PRIMARY KEY, name VARCHAR(100) NOT NULL, email VARCHAR(100) NOT NULL UNIQUE, mobile VARCHAR(15) NOT NULL, address TEXT NOT NULL ); Step 2: Build the PHP Backend backend/config.php (Database Connection) backend/register.php (Handle Registration) backend/fetch_users.php (Fetch All Users) Host this backendfolder on a server (e.g., XAMPP or a live server) to make the APIs accessible. Step 3: Build the React Front-End Install Dependencies Run the following in your React project folder: npx create-react-app my-react-mysql-app cd my-react-mysql-app npm install styled-components axios src/components/RegisterForm.js import React, { useState } from 'react'; import styled from 'styled-components'; import axios from 'axios'; const Form = styled.form` display: flex; flex-direction: column; max-width: 400px; margin: 20px auto; `; const Input = styled.input` padding: 10px; margin: 10px 0; border-radius: 5px; border: 1px solid #ccc; `; const Button = styled.button` padding: 10px; background-color: #007bff; color: white; border: none; border-radius: 5px; cursor: pointer; `; const RegisterForm = () => { const [formData, setFormData] = useState({ name: '', email: '', mobile: '', address: '' }); const handleChange = (e) => { setFormData({ ...formData, [e.target.name]: e.target.value }); }; const handleSubmit = async (e) => { e.preventDefault(); try { await axios.post('http://localhost/backend/register.php', formData); alert('User registered successfully!'); setFormData({ name: '', email: '', mobile: '', address: '' }); } catch (error) { console.error('Error:', error); } }; return ( Register ); }; export default RegisterForm; src/components/UserList.js import React, { useEffect, useState } from 'react'; import styled from 'styled-components'; import axios from 'axios'; const Table = styled.table` width: 80%; margin: 20px auto; border-collapse: collapse; `; const Th = styled.th` padding: 10px; background-color: #007bff; color: white; `; const Td = styled.td` padding: 10px; border: 1px solid #ccc; `; const UserList = () => { const [users, setUsers] = useState([]); useEffect(() => { const fetchUsers = async () => { try { const response = await axios.get('http://localhost/backend/fetch_users.php'); setUsers(response.data); } catch (error) { console.error('Error fetching users:', error); } }; fetchUsers(); }, []); return ( ID Name Email Mobile Address {users.map((user) => (
Are you looking to build a dynamic React application with a MySQL database backend? In this post, we’ll walk you through how to connect a React app with a MySQL database using PHP as the intermediary. We’ll cover the file structure, set up a simple registration form (Name, Email, Mobile Number, Address), and display all registered users in a styled table component. Whether you’re a beginner or an experienced developer, this guide will help you integrate React, PHP, and MySQL seamlessly.
Why Connect React with MySQL?
React is a powerful front-end library for building interactive UIs, while MySQL is a reliable relational database for storing structured data. By connecting them with PHP as the backend, you can create full-stack applications like user management systems, e-commerce platforms, or dashboards. Let’s dive into the process!
Project Overview
We’ll create a React app with:
- A Registration Form component to collect user data (
Name, Email, Mobile Number, Address). - A User List component to display all users in a table.
- A
PHPbackend to handleMySQLdatabase operations. -
Styled componentsfor clean, reusableCSS.
File Structure
Here’s the basic file structure for our project:
my-react-mysql-app/
├── backend/                # PHP backend files
│   ├── config.php         # Database connection
│   ├── register.php       # API to handle registration
│   └── fetch_users.php    # API to fetch all users
├── src/                   # React app source
│   ├── components/        # React components
│   │   ├── RegisterForm.js  # Registration form component
│   │   └── UserList.js      # User list table component
│   ├── App.js             # Main app component
│   ├── index.js           # React entry point
│   └── styles/            # Styled components CSS
└── package.json           # Project dependencies
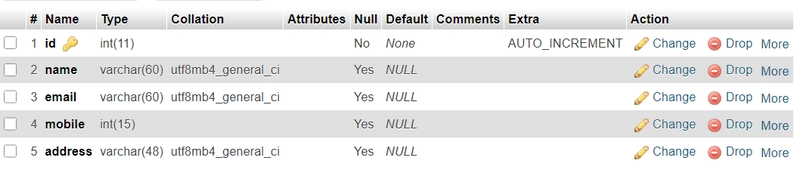
Step 1: Set Up the MySQL Database
Create a MySQL database and a users table to store registration data.
CREATE DATABASE react_mysql_db;
USE react_mysql_db;

CREATE TABLE users (
    id INT AUTO_INCREMENT PRIMARY KEY,
    name VARCHAR(100) NOT NULL,
    email VARCHAR(100) NOT NULL UNIQUE,
    mobile VARCHAR(15) NOT NULL,
    address TEXT NOT NULL
);
Step 2: Build the PHP Backend
backend/config.php (Database Connection)
$host = "localhost";
$dbname = "react_mysql_db";
$username = "root";
$password = "";

try {
    $conn = new PDO("mysql:host=$host;dbname=$dbname", $username, $password);
    $conn->setAttribute(PDO::ATTR_ERRMODE, PDO::ERRMODE_EXCEPTION);
} catch (PDOException $e) {
    echo "Connection failed: " . $e->getMessage();
}
?>
backend/register.php (Handle Registration)
header("Access-Control-Allow-Origin: *");
header("Content-Type: application/json");

include 'config.php';

$data = json_decode(file_get_contents("php://input"), true);

$name = $data['name'];
$email = $data['email'];
$mobile = $data['mobile'];
$address = $data['address'];

$sql = "INSERT INTO users (name, email, mobile, address) VALUES (:name, :email, :mobile, :address)";
$stmt = $conn->prepare($sql);
$stmt->execute(['name' => $name, 'email' => $email, 'mobile' => $mobile, 'address' => $address]);

echo json_encode(["message" => "User registered successfully"]);
?>
backend/fetch_users.php (Fetch All Users)
header("Access-Control-Allow-Origin: *");
header("Content-Type: application/json");

include 'config.php';

$sql = "SELECT * FROM users";
$stmt = $conn->prepare($sql);
$stmt->execute();
$users = $stmt->fetchAll(PDO::FETCH_ASSOC);

echo json_encode($users);
?>
Host this backendfolder on a server (e.g., XAMPP or a live server) to make the APIs accessible.
Step 3: Build the React Front-End
Install Dependencies
Run the following in your React project folder:
npx create-react-app my-react-mysql-app
cd my-react-mysql-app
npm install styled-components axios
src/components/RegisterForm.js
import React, { useState } from 'react';
import styled from 'styled-components';
import axios from 'axios';

const Form = styled.form`
  display: flex;
  flex-direction: column;
  max-width: 400px;
  margin: 20px auto;
`;

const Input = styled.input`
  padding: 10px;
  margin: 10px 0;
  border-radius: 5px;
  border: 1px solid #ccc;
`;

const Button = styled.button`
  padding: 10px;
  background-color: #007bff;
  color: white;
  border: none;
  border-radius: 5px;
  cursor: pointer;
`;

const RegisterForm = () => {
  const [formData, setFormData] = useState({ name: '', email: '', mobile: '', address: '' });

  const handleChange = (e) => {
    setFormData({ ...formData, [e.target.name]: e.target.value });
  };

  const handleSubmit = async (e) => {
    e.preventDefault();
    try {
      await axios.post('http://localhost/backend/register.php', formData);
      alert('User registered successfully!');
      setFormData({ name: '', email: '', mobile: '', address: '' });
    } catch (error) {
      console.error('Error:', error);
    }
  };

  return (
    <Form onSubmit={handleSubmit}>
      <Input
        type="text"
        name="name"
        placeholder="Name"
        value={formData.name}
        onChange={handleChange}
      />
      <Input
        type="email"
        name="email"
        placeholder="Email"
        value={formData.email}
        onChange={handleChange}
      />
      <Input
        type="text"
        name="mobile"
        placeholder="Mobile Number"
        value={formData.mobile}
        onChange={handleChange}
      />
      <Input
        type="text"
        name="address"
        placeholder="Address"
        value={formData.address}
        onChange={handleChange}
      />
      <Button type="submit">RegisterButton>
    Form>
  );
};

export default RegisterForm;
src/components/UserList.js
import React, { useEffect, useState } from 'react';
import styled from 'styled-components';
import axios from 'axios';

const Table = styled.table`
  width: 80%;
  margin: 20px auto;
  border-collapse: collapse;
`;

const Th = styled.th`
  padding: 10px;
  background-color: #007bff;
  color: white;
`;

const Td = styled.td`
  padding: 10px;
  border: 1px solid #ccc;
`;

const UserList = () => {
  const [users, setUsers] = useState([]);

  useEffect(() => {
    const fetchUsers = async () => {
      try {
        const response = await axios.get('http://localhost/backend/fetch_users.php');
        setUsers(response.data);
      } catch (error) {
        console.error('Error fetching users:', error);
      }
    };
    fetchUsers();
  }, []);

  return (
    <Table>
      <thead>
        <tr>
          <Th>IDTh>
          <Th>NameTh>
          <Th>EmailTh>
          <Th>MobileTh>
          <Th>AddressTh>
        tr>
      thead>
      <tbody>
        {users.map((user) => (
          <tr key={user.id}>
            <Td>{user.id}Td>
            <Td>{user.name}Td>
            <Td>{user.email}Td>
            <Td>{user.mobile}Td>
            <Td>{user.address}Td>
          tr>
        ))}
      tbody>
    Table>
  );
};

export default UserList;
src/App.js
import React from 'react';
import RegisterForm from './components/RegisterForm';
import UserList from './components/UserList';

function App() {
  return (
    <div>
      <h1>User Registration Apph1>
      <RegisterForm />
      <UserList />
    div>
  );
}

export default App;
Step 4: Run the Application
1.Start your PHP server (e.g., http://localhost/backend/).
2.Run the React app:
npm start
3.Open http://localhost:3000 in your browser.
Our Project Looks like This:
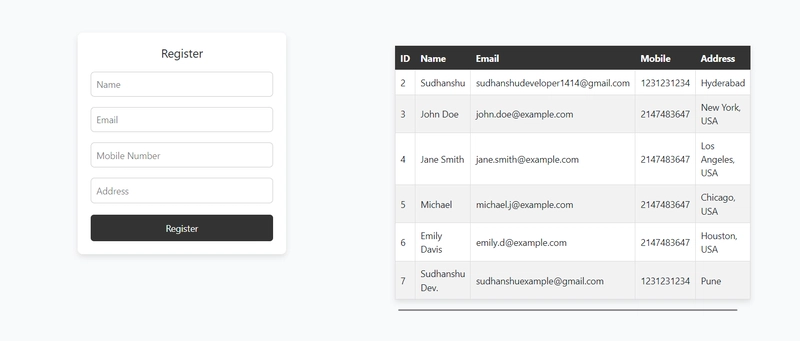
Project Sarcode: Sudhanshu Developer
Conclusion
In this guide, we’ve shown you how to connect a React app with a MySQL database using PHP. You’ve learned to:
- Set up a MySQL database and PHP APIs.
- Create a styled registration form in React.
- Fetch and display data in a table.
This is a simple yet scalable foundation for full-stack development. Want to extend it? Add features like user authentication, data validation, or editing/deleting users. Happy coding!