


![[The AI Show Episode 142]: ChatGPT’s New Image Generator, Studio Ghibli Craze and Backlash, Gemini 2.5, OpenAI Academy, 4o Updates, Vibe Marketing & xAI Acquires X](https://www.marketingaiinstitute.com/hubfs/ep%20142%20cover.png)


![From drop-out to software architect with Jason Lengstorf [Podcast #167]](https://cdn.hashnode.com/res/hashnode/image/upload/v1743796461357/f3d19cd7-e6f5-4d7c-8bfc-eb974bc8da68.png?#)


.png?#)


(1).jpg?width=1920&height=1920&fit=bounds&quality=80&format=jpg&auto=webp#)


_Christophe_Coat_Alamy.jpg?#)
.webp?#)
.webp?#)


![Apple Considers Delaying Smart Home Hub Until 2026 [Gurman]](https://www.iclarified.com/images/news/96946/96946/96946-640.jpg)
![iPhone 17 Pro Won't Feature Two-Toned Back [Gurman]](https://www.iclarified.com/images/news/96944/96944/96944-640.jpg)
![Tariffs Threaten Apple's $999 iPhone Price Point in the U.S. [Gurman]](https://www.iclarified.com/images/news/96943/96943/96943-640.jpg)


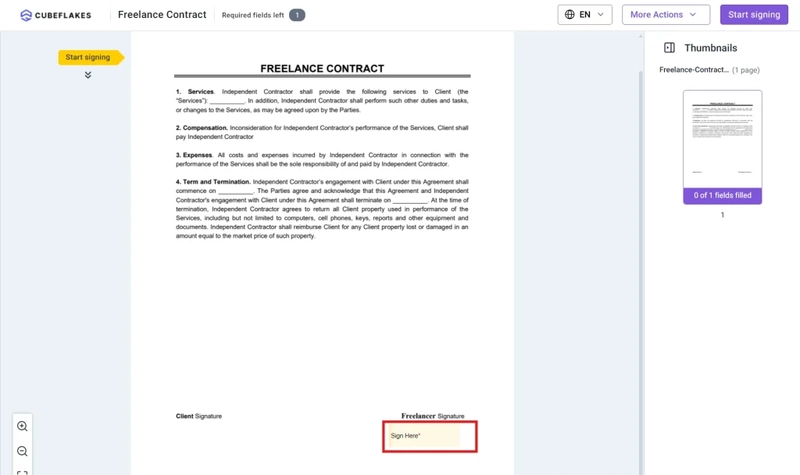
How to Build Scalable Document Signing by Integrating BoldSign with .NET Aspire
Cloud computing is becoming more and more central to the way modern businesses work, enabling organizations to innovate, scale, and operate efficiently. Thus, the need for robust, scalable, and high-performing solutions has never been greater. Knowing this, Microsoft has created Aspire—a cloud-ready stack for building observable, production-ready, distributed applications. In this blog, we’ll explore: What is .NET Aspire and what features does it have? How to integrate BoldSign with Aspire Let’s dive in! What is .NET Aspire? Distributed applications are programs where different parts run on different computers or servers connected through a network. These parts work together, making the system feel like one seamless application to the user. Aspire fits here perfectly, because it’s a stack of tools and components designed to simplify the development of resilient, observable, and maintainable distributed applications. An overview of .NET Aspire Aspire aims to enhance the development experience for building cloud-native applications in .NET. It’s designed to assist you with: Orchestration Integration Tooling Orchestration Orchestration refers to the process of coordinating and managing different components of distributed applications to ensure they work together efficiently. The relationship between the projects in the .NET Aspire Starter Application template. With orchestration, .NET Aspire allows applications to: Run and manage multiple services consistently, both locally and in the cloud. Coordinate microservices without requiring major code changes. Support deployments and service discovery, making it easy for services to find and interact with one another. Facilitate scaling and monitoring by integrating with tools such as OpenTelemetry for observability. One of the core benefits is that the local environment is the same as production. There’s no need for extra configuration or NuGet packages. You can have a smooth transition at any point. For more information, see orchestration overview. Integrations When we talk about integration here, we mean the process of connecting various components needed to build cloud-native applications. A Diagram representing hosting integrations Aspire offers ready-to-use templates, libraries, and configuration patterns for integration with popular services like: SQL Server RabbitMQ Containerized environments: Docker or Podman And not just that. There are also integrations for: Health checks Observability Dependency injection patterns For more information, see integration overview. Tooling Tooling offers developers a unified experience through Visual Studio and the .NET CLI, providing preconfigured project templates and the seamless integration of common components. Search for a new .NET Aspire project Tooling includes: Project Templates: Out-of-the-box templates for apps, APIs, and services, from minimal setups to starter applications, including ASP.NET Core and Blazor solutions. CLI Integration: Developers can create, list, and manage Aspire projects via .NET CLI commands, such as dotnet new aspire. Visual Studio Support: Aspire extends Visual Studio’s capabilities by enabling direct integration of Aspire components through a graphical interface. Containerized Development: Aspire encourages running projects inside containers, supporting tools like Docker and Podman. For more information, see the tooling overview. All that’s left now is to see how to implement the BoldSign service with Aspire. Let’s write some code! Prerequisites To follow along, you will need: .NET 8 Visual Studio 2022 or Rider (which is free for noncommercial use) Docker or Podman for container runtime Implementation In this example, we are going to have three applications: Frontend: Blazor web app Backend: Minimal API Aspire (Host and service defaults) Aspire offers various templates out of the box. If you already have the application up and running, and you just need orchestration and service management, you can use the standalone.NET Aspire App Hosttemplate. Or, to manage configuration that is reused across projects, go with the .NET Aspire Service Defaultstemplate. But if you are starting from scratch, you have the .NET Aspire Empty App and .NET Aspire Starter Application. You can learn more about templates here. For the sake of simplicity and blog length, I will choose a Starter application. And don’t worry; I will explain the code along the way. Create Aspire application I mentioned that you can use Visual Studio or Rider. For this demonstration, I will use Visual Studio 2022: Open Visual Studio and select .NET Aspire Starter App. Give the project a name and specify where you want to store it. Choose thetargeted framework (you can leave it as the latest version) and ensure that the Configure for HTT
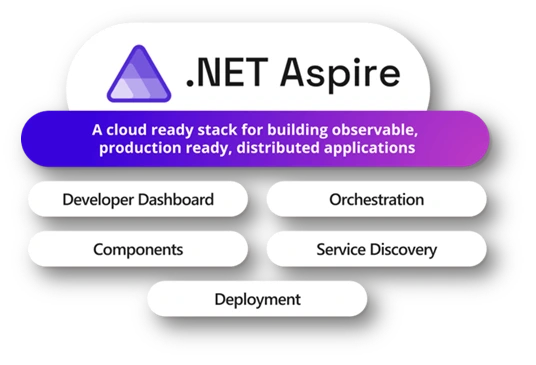
Cloud computing is becoming more and more central to the way modern businesses work, enabling organizations to innovate, scale, and operate efficiently. Thus, the need for robust, scalable, and high-performing solutions has never been greater. Knowing this, Microsoft has created Aspire—a cloud-ready stack for building observable, production-ready, distributed applications.
In this blog, we’ll explore:
- What is .NET Aspire and what features does it have?
- How to integrate BoldSign with Aspire
Let’s dive in!
What is .NET Aspire?
Distributed applications are programs where different parts run on different computers or servers connected through a network. These parts work together, making the system feel like one seamless application to the user.
Aspire fits here perfectly, because it’s a stack of tools and components designed to simplify the development of resilient, observable, and maintainable distributed applications.
An overview of .NET Aspire
Aspire aims to enhance the development experience for building cloud-native applications in .NET. It’s designed to assist you with:
- Orchestration
- Integration
- Tooling
Orchestration
Orchestration refers to the process of coordinating and managing different components of distributed applications to ensure they work together efficiently.
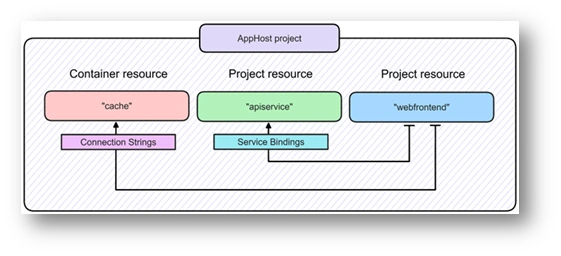
The relationship between the projects in the .NET Aspire Starter Application template.
With orchestration, .NET Aspire allows applications to:
- Run and manage multiple services consistently, both locally and in the cloud.
- Coordinate microservices without requiring major code changes.
- Support deployments and service discovery, making it easy for services to find and interact with one another.
- Facilitate scaling and monitoring by integrating with tools such as OpenTelemetry for observability.
One of the core benefits is that the local environment is the same as production. There’s no need for extra configuration or NuGet packages. You can have a smooth transition at any point.
For more information, see orchestration overview.
Integrations
When we talk about integration here, we mean the process of connecting various components needed to build cloud-native applications.
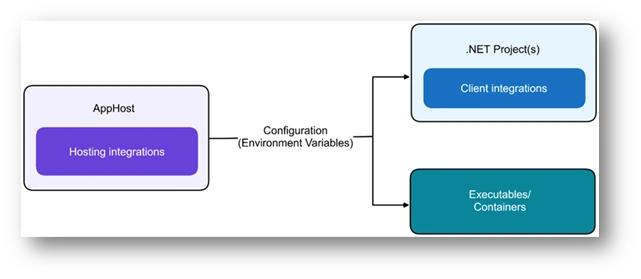
A Diagram representing hosting integrations
Aspire offers ready-to-use templates, libraries, and configuration patterns for integration with popular services like:
- SQL Server
- RabbitMQ
- Containerized environments: Docker or Podman
And not just that. There are also integrations for:
- Health checks
- Observability
- Dependency injection patterns
For more information, see integration overview.
Tooling
Tooling offers developers a unified experience through Visual Studio and the .NET CLI, providing preconfigured project templates and the seamless integration of common components.
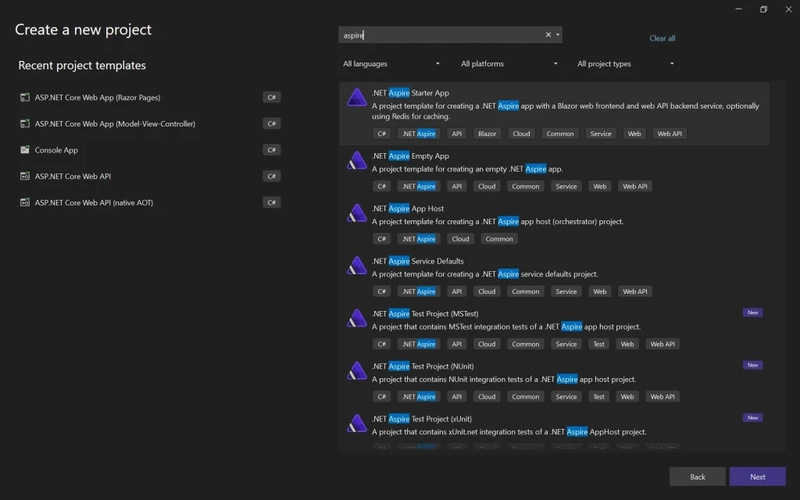
Search for a new .NET Aspire project
Tooling includes:
- Project Templates: Out-of-the-box templates for apps, APIs, and services, from minimal setups to starter applications, including ASP.NET Core and Blazor solutions.
- CLI Integration: Developers can create, list, and manage Aspire projects via .NET CLI commands, such as dotnet new aspire.
- Visual Studio Support: Aspire extends Visual Studio’s capabilities by enabling direct integration of Aspire components through a graphical interface.
- Containerized Development: Aspire encourages running projects inside containers, supporting tools like Docker and Podman.
For more information, see the tooling overview.
All that’s left now is to see how to implement the BoldSign service with Aspire.
Let’s write some code!
Prerequisites
To follow along, you will need:
- .NET 8
- Visual Studio 2022 or Rider (which is free for noncommercial use)
- Docker or Podman for container runtime
Implementation
In this example, we are going to have three applications:
- Frontend: Blazor web app
- Backend: Minimal API
- Aspire (Host and service defaults)
Aspire offers various templates out of the box. If you already have the application up and running, and you just need orchestration and service management, you can use the standalone.NET Aspire App Hosttemplate. Or, to manage configuration that is reused across projects, go with the .NET Aspire Service Defaultstemplate. But if you are starting from scratch, you have the .NET Aspire Empty App and .NET Aspire Starter Application.
You can learn more about templates here.
For the sake of simplicity and blog length, I will choose a Starter application. And don’t worry; I will explain the code along the way.
Create Aspire application
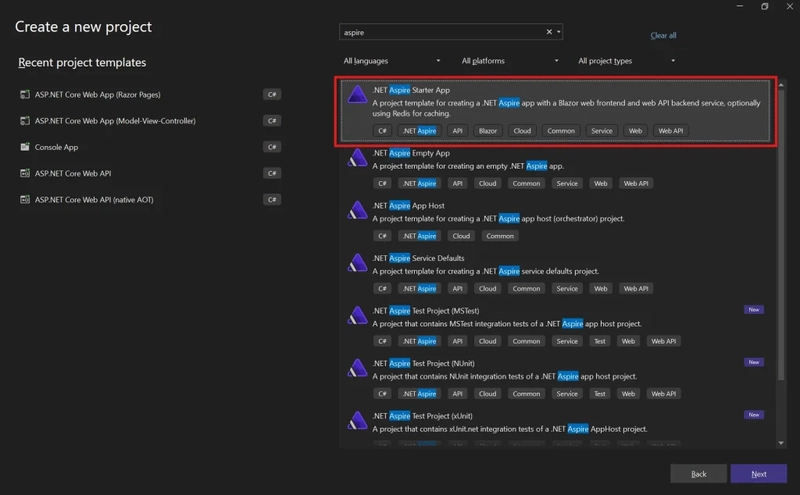
I mentioned that you can use Visual Studio or Rider. For this demonstration, I will use Visual Studio 2022:
- Open Visual Studio and select .NET Aspire Starter App.
- Give the project a name and specify where you want to store it.
- Choose thetargeted framework (you can leave it as the latest version) and ensure that the Configure for HTTPS is selected. You don’t need to enable the cache or testing for now.
Creating an .NET Aspire Starter App
After completing setup, you should see four projects in the solution:
- ApiService: Minimal API project.
- AppHost: Orchestrator project designed to connect and configure the different projects and services.
- ServiceDefaults: Shared project to manage configurations that are reused across the projects.
- Web: Blazor App project.
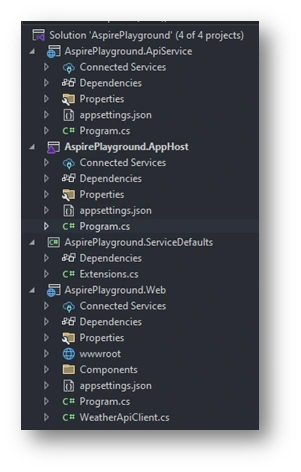
Project Solution Explorer with four projects
In Program.cs in the AppHost project, you will see how the frontend and backend parts are connected.
    var builder = DistributedApplication.CreateBuilder(args);
    var apiService = builder.AddProject<Projects.AspireApp1_ApiService>("apiservice");
    builder.AddProject<Projects.AspireApp1_Web>("webfrontend")
        WithExternalHttpEndpoints()
        WithReference(apiService)
        WaitFor(apiService);
    builder.Build().Run();
Before continuing, let’s demystify a few Aspire terms that I will use throughout the rest of the blog:
- App model: collection of resources that make up a distributed application.
- Resource: a dependent part of an application (project, container, executable, etc.).
- Reference: defines a connection between resources, expressed as a dependency using the WithReference API.
With that cleared up, let’s run the application. You should see a dashboard like this the following one.
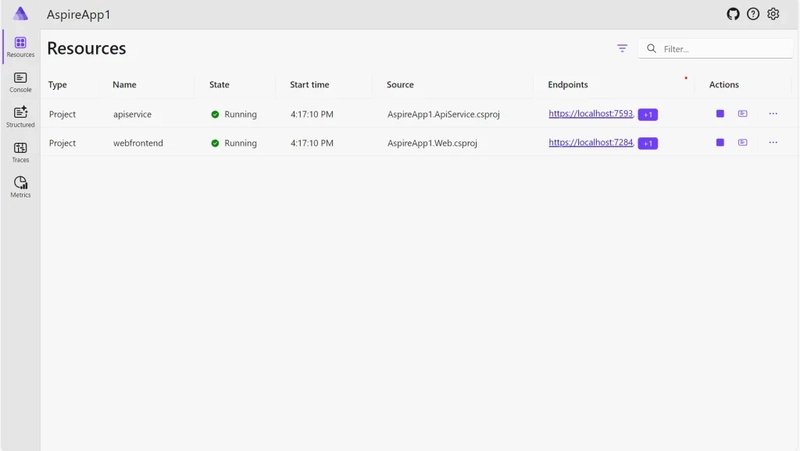
AspirePlayground Dashboard
To learn more about dashboard features, check dashboard overview.
Congratulations! You have run your first Aspire application!
Now let’s move to eSignature API implementation.
BoldSign eSignature API implementation
BoldSign is an e-signature platform and SDK offered by Syncfusion that enable users to sign documents digitally and allow developers to integrate e-signature functionalities into their applications using its APIs.

BoldSign By Syncfusion
When is BoldSign a good choice?
It’s not unusual anymore for companies to hire fully remote positions globally. But how do they manage signing employee contracts, NDAs, or policy acknowledgments?
One solution is to send paper documents via some worldwide shipping company, but we can agree that this is time- and money-consuming.
So, the better solution would be to use a digital signing program like BoldSign.
To learn why, check out the BoldSign website.
Implementation
For this example, I will use the eSignature API that easily embeds the entire eSignature process within any application.
Let’s start by creating an account and a sandbox:
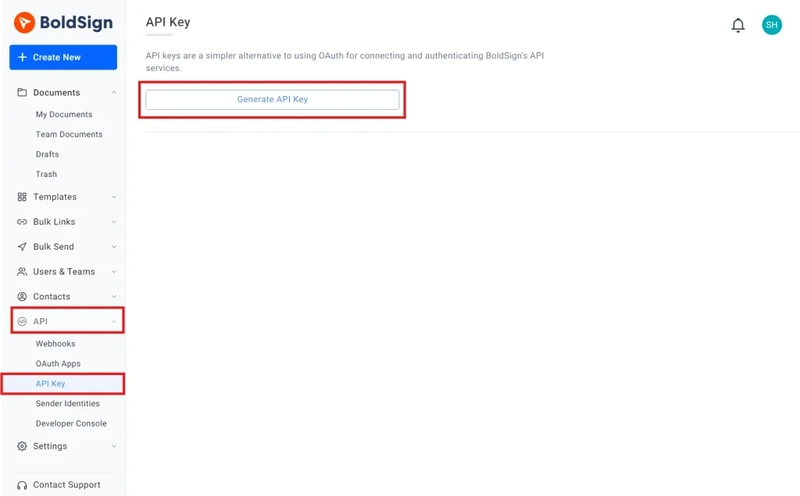
- Go to the BoldSign site and click Login.
- You can either log in with a Google account or to create a new (my preference is to go with Google).
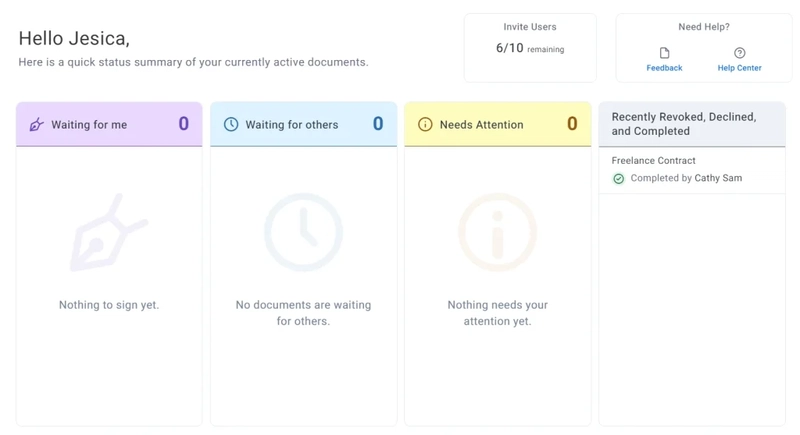
- Once you finish registration, you should see the following dashboard.
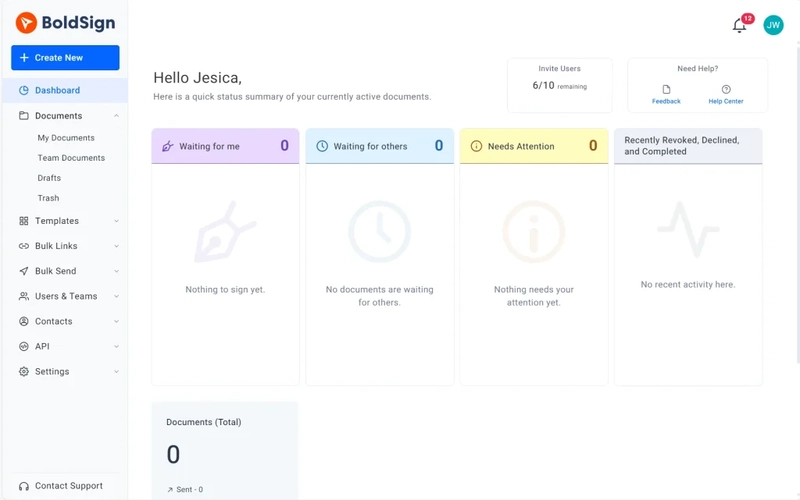 BoldSign Web Application Dashboard
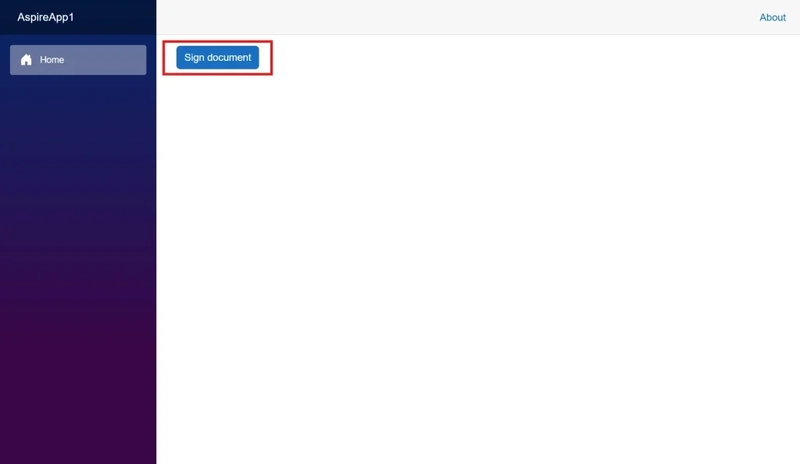
The next steps are to adjust the frontend and backend services.
In the frontend application, there will be a button that will invoke the endpoint on the backend and will display a signed document identifier.
Let’s start with the Blazor app.
- Go to the .Web project.
- Inside the Components folder, go to the Layout–NavMenu.razor and remove all navigation bar items except Home_._
     class="top-row ps-3 navbar navbar-dark">
        class="container-fluid">
             class="navbar-brand" href="">AspireApp1<a>