![[The AI Show Episode 143]: ChatGPT Revenue Surge, New AGI Timelines, Amazon’s AI Agent, Claude for Education, Model Context Protocol & LLMs Pass the Turing Test](https://www.marketingaiinstitute.com/hubfs/ep%20143%20cover.png)


![From drop-out to software architect with Jason Lengstorf [Podcast #167]](https://cdn.hashnode.com/res/hashnode/image/upload/v1743796461357/f3d19cd7-e6f5-4d7c-8bfc-eb974bc8da68.png?#)


.jpg?#)


_ArtemisDiana_Alamy.jpg?#)


 (1).webp?#)


-xl.jpg)


![Yes, the Gemini icon is now bigger and brighter on Android [U]](https://i0.wp.com/9to5google.com/wp-content/uploads/sites/4/2025/02/Gemini-on-Galaxy-S25.jpg?resize=1200%2C628&quality=82&strip=all&ssl=1)


![Apple Rushes Five Planes of iPhones to US Ahead of New Tariffs [Report]](https://www.iclarified.com/images/news/96967/96967/96967-640.jpg)
![Apple Vision Pro 2 Allegedly in Production Ahead of 2025 Launch [Rumor]](https://www.iclarified.com/images/news/96965/96965/96965-640.jpg)


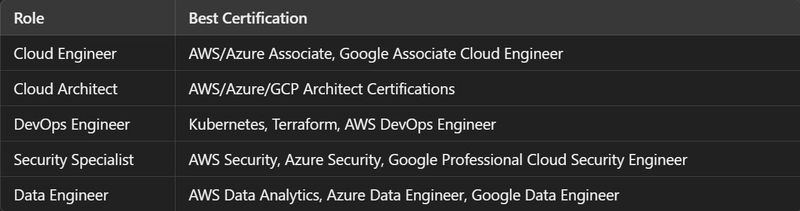
How To Add a Data Disk To A Virtual Machine In Azure: A Guide.
Hi there! Want to know how to add a data disk to a VM? This article shows how to attach a data disk to a Windows virtual machine (VM) by using the Azure portal. However, lets refresh our minds on what a vm is. What is a virtual machine? A virtual machine (VM) is a software-based representation of a physical computer. It can run programs and operating systems, store data, connect to networks, and perform other computing tasks. Don't know how to create a VM? Do not worry, there is an extensive article on that. Kindly click on How To Create A Virtual Machine and practice. Without further ado!!! lets head to the clouds to attach a disk!! Create a VM On the Virtual machine pane, in the settings section, select Disks. On the Disks pane, select Create and attach a new disk. Choose number of disk Choose type of disk Choose size of disk Choose disk name Initialize a new data disk The new disk has been created. Hold on!!! We still can't use it yet. To be able to use it, we need to: Connect to the VM by logging in to the VM Select the Windows Start menu inside the running VM and enter diskmgmt.msc in the search box. The Disk Management console opens. Disk Management recognizes that you have a new, uninitialized disk and the Initialize Disk window appears. Verify the new disk is selected and then select OK to initialize it. The new disk appears as unallocated. Right-click anywhere on the disk and select New simple volume. The New Simple Volume Wizard window opens. Proceed through the wizard, keeping all of the defaults, and when you're done select Finish. When the formatting is complete, select OK. Notice now, how the disk changes from allocated to healthy after formatting. And that my friends is how you add a data disk to a vm! I'm sure your cloud muscles are all stretched! lets relax...And I will see you in the next article. Don't forget to like, comment, ask question(s) and share.

Hi there! Want to know how to add a data disk to a VM? This article shows how to attach a data disk to a Windows virtual machine (VM) by using the Azure portal. However, lets refresh our minds on what a vm is.
What is a virtual machine?
A virtual machine (VM) is a software-based representation of a physical computer. It can run programs and operating systems, store data, connect to networks, and perform other computing tasks.
Don't know how to create a VM? Do not worry, there is an extensive article on that. Kindly click on How To Create A Virtual Machine and practice.
Without further ado!!! lets head to the clouds to attach a disk!!
- Create a VM
- On the Virtual machine pane, in the settings section, select Disks.

- On the Disks pane, select Create and attach a new disk.
- Choose number of disk
- Choose type of disk
- Choose size of disk
- Choose disk name

Initialize a new data disk
The new disk has been created. Hold on!!! We still can't use it yet. To be able to use it, we need to:
Connect to the VM by logging in to the VM

Select the Windows Start menu inside the running VM and enter diskmgmt.msc in the search box. The Disk Management console opens.

Disk Management recognizes that you have a new, uninitialized disk and the Initialize Disk window appears. Verify the new disk is selected and then select OK to initialize it.

- The new disk appears as unallocated.

- Right-click anywhere on the disk and select New simple volume.

- The New Simple Volume Wizard window opens. Proceed through the wizard, keeping all of the defaults, and when you're done select Finish.

- When the formatting is complete, select OK. Notice now, how the disk changes from allocated to healthy after formatting.


And that my friends is how you add a data disk to a vm! I'm sure your cloud muscles are all stretched! lets relax...And I will see you in the next article.
Don't forget to like, comment, ask question(s) and share.