Git Cherry-Pick
What is git cherry-pick? The git cherry-pick command allows you to select one or more specific commits from one branch and apply them to another without merging the entire history. It is especially useful for retrieving specific changes without affecting other parallel developments. When to Use git cherry-pick git cherry-pick is particularly useful in the following scenarios: Hotfixes: If a bug has been fixed in a development branch but also needs to be applied to the production branch, cherry-pick allows you to move only the necessary commit. Recovering changes: If commits were made to the wrong branch, rather than performing a full merge, cherry-pick allows you to move those changes to the correct branch. Selecting specific changes: In cases where you don’t want to merge an entire branch, but only some specific commits. How to Execute git cherry-pick In the Command Line Switch to the destination branch: git checkout destination-branch Obtain the commit hash: git log --oneline Execute git cherry-pick with the commit hash: git cherry-pick If you need to apply multiple commits, list them: git cherry-pick Or apply a range of commits: git cherry-pick ^.. If a conflict occurs, Git will request manual resolution before continuing. In Visual Studio Code Open the Source Control tab. Switch to the destination branch. In the integrated terminal, use git log to obtain the commit hash. Run the command git cherry-pick in the terminal. If a conflict occurs, Visual Studio Code will display a graphical interface to resolve it. Using git cherry-pick --no-commit If you want to apply changes without immediately committing, use: git cherry-pick --no-commit This is useful if you need to modify the files before committing the changes. Using git cherry-pick -x If you want to automatically add a reference to the original commit in the commit message of the cherry-picked commit, use: git cherry-pick -x This helps to track the origin of the change, which is especially useful in collaborative projects. Alternatives to git cherry-pick git rebase: This might be more useful if you need to reorganise commits within a branch. git merge: If you want to bring all changes from a branch without selecting individual commits. Resolving Errors and Conflicts Abort an ongoing cherry-pick: git cherry-pick --abort Continue after resolving a conflict: git cherry-pick --continue Revert a cherry-pick: git cherry-pick -n git reset Practical Example with Commits and Branches Suppose you have the following branch structure: (main) | |---o---o---o (feature-branch) | |---o---o---o (hotfix-branch) If you want to apply a specific commit from feature-branch to main, you can do it with: git checkout main git cherry-pick This will bring only that commit without merging the entire feature-branch. Best Practices Avoid overusing git cherry-pick: It can duplicate commits in the history. Document cherry-picks: In large teams, make sure to record cherry-picks to avoid confusion. Use git cherry-pick -x: This maintains the traceability of commits. Consider alternatives: Such as rebase or merge, depending on the case. Summary The cherry-pick feature in Git is a robust function that enables you to choose specific changes from one branch and add them to another branch without executing a complete merge process. This tool is handy for addressing issues in the live environment or transferring specific modifications between branches. However, it is crucial to exercise care when using this function to prevent any clashes or repetitions in the project history. Keep in mind that although git cherry-pick can be handy, it’s a good idea to explore other options like git rebase or git merge based on what you require and how your team operates.
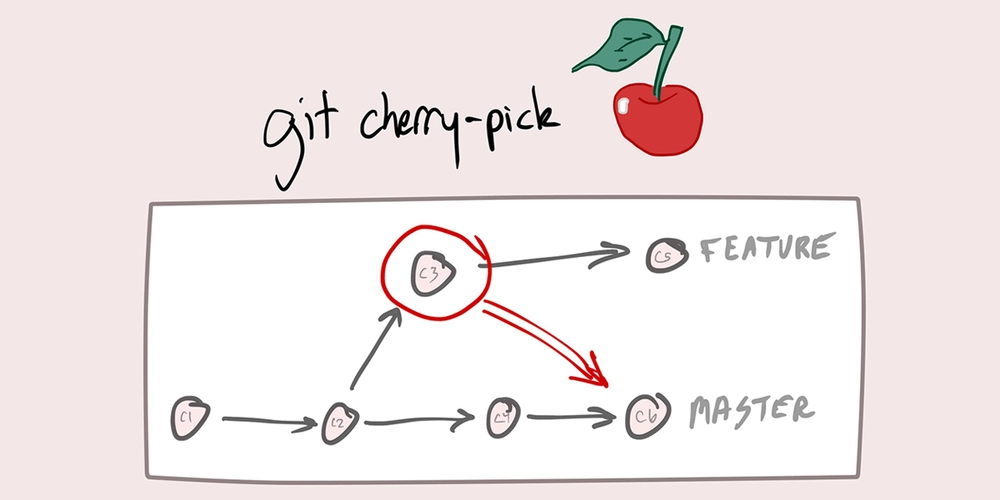
What is git cherry-pick?
The git cherry-pick command allows you to select one or more specific commits from one branch and apply them to another without merging the entire history. It is especially useful for retrieving specific changes without affecting other parallel developments.
When to Use git cherry-pick
git cherry-pick is particularly useful in the following scenarios:
-
Hotfixes: If a bug has been fixed in a development branch but also needs to be applied to the production branch,
cherry-pickallows you to move only the necessary commit. -
Recovering changes: If commits were made to the wrong branch, rather than performing a full merge,
cherry-pickallows you to move those changes to the correct branch. - Selecting specific changes: In cases where you don’t want to merge an entire branch, but only some specific commits.
How to Execute git cherry-pick
In the Command Line
- Switch to the destination branch:
git checkout destination-branch
- Obtain the commit hash:
git log --oneline
- Execute git cherry-pick with the commit hash:
git cherry-pick
If you need to apply multiple commits, list them:
git cherry-pick
Or apply a range of commits:
git cherry-pick ^..
If a conflict occurs, Git will request manual resolution before continuing.
In Visual Studio Code
- Open the Source Control tab.
- Switch to the destination branch.
- In the integrated terminal, use
git logto obtain the commit hash. - Run the command
git cherry-pickin the terminal. - If a conflict occurs, Visual Studio Code will display a graphical interface to resolve it.
Using git cherry-pick --no-commit
If you want to apply changes without immediately committing, use:
git cherry-pick --no-commit
This is useful if you need to modify the files before committing the changes.
Using git cherry-pick -x
If you want to automatically add a reference to the original commit in the commit message of the cherry-picked commit, use:
git cherry-pick -x
This helps to track the origin of the change, which is especially useful in collaborative projects.
Alternatives to git cherry-pick
-
git rebase: This might be more useful if you need to reorganise commits within a branch. -
git merge: If you want to bring all changes from a branch without selecting individual commits.
Resolving Errors and Conflicts
- Abort an ongoing cherry-pick:
git cherry-pick --abort
- Continue after resolving a conflict:
git cherry-pick --continue
- Revert a cherry-pick:
  git cherry-pick -n
  git reset
Practical Example with Commits and Branches
Suppose you have the following branch structure:
- (main) | |---o---o---o (feature-branch) | |---o---o---o (hotfix-branch)
If you want to apply a specific commit from feature-branch to main, you can do it with:
git checkout main
git cherry-pick
This will bring only that commit without merging the entire feature-branch.
Best Practices
- Avoid overusing
git cherry-pick: It can duplicate commits in the history. - Document cherry-picks: In large teams, make sure to record cherry-picks to avoid confusion.
- Use
git cherry-pick -x: This maintains the traceability of commits. - Consider alternatives: Such as
rebaseormerge, depending on the case.
Summary
The cherry-pick feature in Git is a robust function that enables you to choose specific changes from one branch and add them to another branch without executing a complete merge process. This tool is handy for addressing issues in the live environment or transferring specific modifications between branches. However, it is crucial to exercise care when using this function to prevent any clashes or repetitions in the project history. Keep in mind that although git cherry-pick can be handy, it’s a good idea to explore other options like git rebase or git merge based on what you require and how your team operates.


.jpg)
%20Abstract%20Background%20112024%20SOURCE%20Amazon.jpg)


![[The AI Show Episode 142]: ChatGPT’s New Image Generator, Studio Ghibli Craze and Backlash, Gemini 2.5, OpenAI Academy, 4o Updates, Vibe Marketing & xAI Acquires X](https://www.marketingaiinstitute.com/hubfs/ep%20142%20cover.png)




![From drop-out to software architect with Jason Lengstorf [Podcast #167]](https://cdn.hashnode.com/res/hashnode/image/upload/v1743796461357/f3d19cd7-e6f5-4d7c-8bfc-eb974bc8da68.png?#)


.png?#)


.jpg?#)


_Christophe_Coat_Alamy.jpg?#)






![Rapidus in Talks With Apple as It Accelerates Toward 2nm Chip Production [Report]](https://www.iclarified.com/images/news/96937/96937/96937-640.jpg)


