


![[The AI Show Episode 143]: ChatGPT Revenue Surge, New AGI Timelines, Amazon’s AI Agent, Claude for Education, Model Context Protocol & LLMs Pass the Turing Test](https://www.marketingaiinstitute.com/hubfs/ep%20143%20cover.png)


![From drop-out to software architect with Jason Lengstorf [Podcast #167]](https://cdn.hashnode.com/res/hashnode/image/upload/v1743796461357/f3d19cd7-e6f5-4d7c-8bfc-eb974bc8da68.png?#)


.jpg?#)


_ArtemisDiana_Alamy.jpg?#)


 (1).webp?#)


-xl.jpg)


![Yes, the Gemini icon is now bigger and brighter on Android [U]](https://i0.wp.com/9to5google.com/wp-content/uploads/sites/4/2025/02/Gemini-on-Galaxy-S25.jpg?resize=1200%2C628&quality=82&strip=all&ssl=1)


![Apple Rushes Five Planes of iPhones to US Ahead of New Tariffs [Report]](https://www.iclarified.com/images/news/96967/96967/96967-640.jpg)
![Apple Vision Pro 2 Allegedly in Production Ahead of 2025 Launch [Rumor]](https://www.iclarified.com/images/news/96965/96965/96965-640.jpg)


Getting Started with CAMEL-AI: Installation and First Steps
Hey, you! Ready to dive into the world of AI agents with CAMEL-AI? Whether you’re a seasoned developer or just dipping your toes into multi-agent systems, this guide’s got your back. Let’s walk through installing CAMEL-AI and taking your first steps—trust me, it’s easier than you think! What You’ll Need Before We Start First things first, let’s make sure you’re set up. Here’s the quick checklist: Python 3.8+: It’s the backbone of CAMEL-AI. Don’t have it? Grab it here. A Code Editor: VS Code, PyCharm, or even a simple text editor works. A Curious Mind: You’re already here, so I’d say you’re good! Got that? Awesome. Let’s roll. Step 1: Installing CAMEL-AI Alright, time to get CAMEL-AI on your machine. It’s open-source and lives on GitHub (check the repo), but we’ll keep it simple with pip. Open your terminal or command line and type: pip install camel-ai Hit enter, and boom—it’s downloading. If you run into hiccups (like a “pip not found” error), make sure your Python environment is set up right—try python -m ensurepip --upgrade first. Want the latest goodies? The official docs have you covered. Step 2: Verify It’s Working Let’s make sure everything’s in place. Run this quick command: python -c "import camel; print(camel.__version__)" If you see a version number pop up (like “0.1.0”), you’re golden. No errors? High-five! If something’s off, double-check your Python version or hop into the CAMEL-AI Discord for help—we’re a friendly bunch. Step 3: Your First Agent—Hello, World! Now for the fun part: let’s create a basic agent. Open your editor, make a new file (say, first_agent.py), and paste this: python from camel.agents import ChatAgent agent = ChatAgent(system_message="You are a friendly AI!") response = agent.chat("Say hello!") print(response) Save it, then run it in your terminal: python first_agent.py If all goes well, you’ll see something like “Hello!” pop up. That’s your first CAMEL-AI agent talking back! It’s simple, but it’s the start of something big—think of it as your AI sidekick. Why This Matters You’ve just unlocked the door to CAMEL-AI, a framework that’s all about scalable, collaborative AI agents (learn more). , and now you’re part of that wave. Whether you’re automating tasks or exploring scaling laws, this is your launchpad. Next Steps: Where to Go From Here Feeling pumped? Here’s what you can do next: Dig into the Docs: The Cookbooks have tutorials galore. Join the Community: Chat with us on Discord. Experiment: Tweak that agent—maybe make it tell jokes instead! So, what’s your plan? Gonna build a team of agents or just play around? Either way, CAMEL-AI is here to make it happen. Let’s keep the momentum going—see you in the next step!
Hey, you! Ready to dive into the world of AI agents with CAMEL-AI? Whether you’re a seasoned developer or just dipping your toes into multi-agent systems, this guide’s got your back. Let’s walk through installing CAMEL-AI and taking your first steps—trust me, it’s easier than you think!
What You’ll Need Before We Start
First things first, let’s make sure you’re set up. Here’s the quick checklist:
Python 3.8+: It’s the backbone of CAMEL-AI. Don’t have it? Grab it here.
A Code Editor: VS Code, PyCharm, or even a simple text editor works.
A Curious Mind: You’re already here, so I’d say you’re good!
Got that? Awesome. Let’s roll.
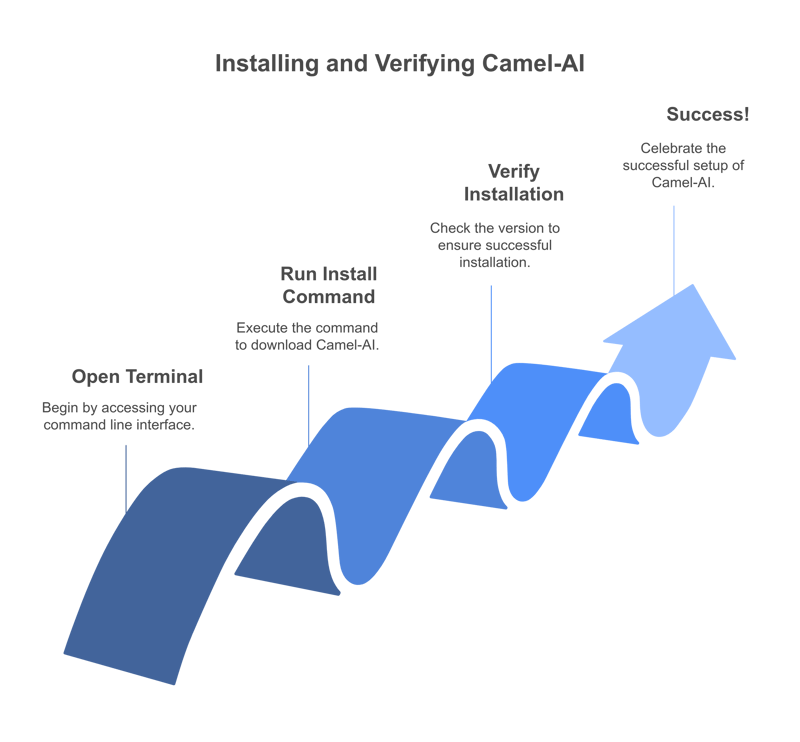
Step 1: Installing CAMEL-AI
Alright, time to get CAMEL-AI on your machine. It’s open-source and lives on GitHub (check the repo), but we’ll keep it simple with pip. Open your terminal or command line and type:
pip install camel-ai
Hit enter, and boom—it’s downloading. If you run into hiccups (like a “pip not found” error), make sure your Python environment is set up right—try python -m ensurepip --upgrade first. Want the latest goodies? The official docs have you covered.
Step 2: Verify It’s Working
Let’s make sure everything’s in place. Run this quick command:
python -c "import camel; print(camel.__version__)"
If you see a version number pop up (like “0.1.0”), you’re golden. No errors? High-five! If something’s off, double-check your Python version or hop into the CAMEL-AI Discord for help—we’re a friendly bunch.
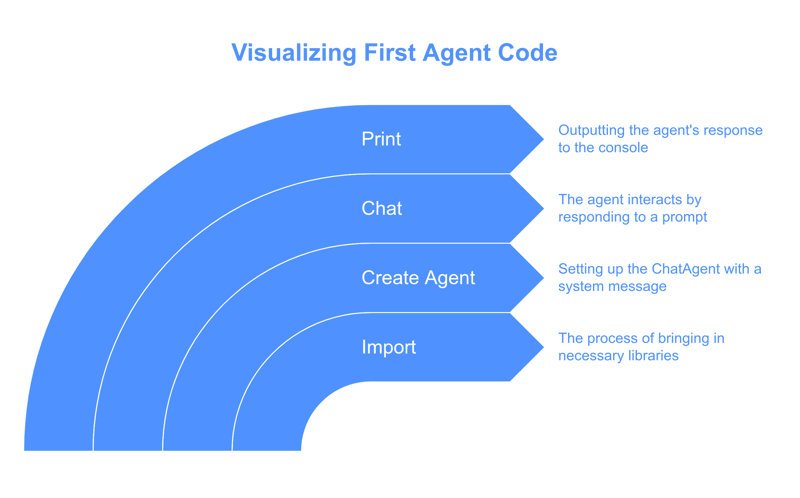
Step 3: Your First Agent—Hello, World!
Now for the fun part: let’s create a basic agent. Open your editor, make a new file (say, first_agent.py), and paste this:
python
from camel.agents import ChatAgent

agent = ChatAgent(system_message="You are a friendly AI!")
response = agent.chat("Say hello!")
print(response)
Save it, then run it in your terminal:
python first_agent.py
If all goes well, you’ll see something like “Hello!” pop up. That’s your first CAMEL-AI agent talking back! It’s simple, but it’s the start of something big—think of it as your AI sidekick.
Why This Matters
You’ve just unlocked the door to CAMEL-AI, a framework that’s all about scalable, collaborative AI agents (learn more). , and now you’re part of that wave. Whether you’re automating tasks or exploring scaling laws, this is your launchpad.
Next Steps: Where to Go From Here
Feeling pumped? Here’s what you can do next:
Dig into the Docs: The Cookbooks have tutorials galore.
Join the Community: Chat with us on Discord.
Experiment: Tweak that agent—maybe make it tell jokes instead!
So, what’s your plan? Gonna build a team of agents or just play around? Either way, CAMEL-AI is here to make it happen. Let’s keep the momentum going—see you in the next step!