


![[The AI Show Episode 144]: ChatGPT’s New Memory, Shopify CEO’s Leaked “AI First” Memo, Google Cloud Next Releases, o3 and o4-mini Coming Soon & Llama 4’s Rocky Launch](https://www.marketingaiinstitute.com/hubfs/ep%20144%20cover.png)


.jpg?width=1920&height=1920&fit=bounds&quality=70&format=jpg&auto=webp#)


_Olekcii_Mach_Alamy.jpg?width=1280&auto=webp&quality=80&disable=upscale#)


![Apple Drops New Immersive Adventure Episode for Vision Pro: 'Hill Climb' [Video]](https://www.iclarified.com/images/news/97133/97133/97133-640.jpg)

![Most iPhones Sold in the U.S. Will Be Made in India by 2026 [Report]](https://www.iclarified.com/images/news/97130/97130/97130-640.jpg)
![Apple to Shift Robotics Unit From AI Division to Hardware Engineering [Report]](https://www.iclarified.com/images/news/97128/97128/97128-640.jpg)


Dockerizing a Python Machine Learning Model
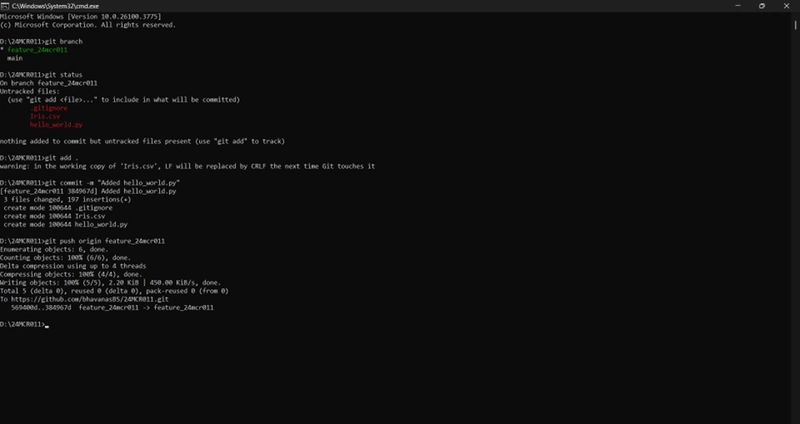
In this blog, I’ll walk you through how to create a Python model using the Iris dataset, train it, and then Dockerize it for deployment. Dockerizing a model ensures portability and easy deployment, so let’s get started. Step 1: Training the Model First, we will load the Iris dataset and train a simple logistic regression model. We’ll use libraries like pandas, scikit-learn, and joblib to do this. Here’s the Python code: from pandas import read_csv from sklearn.linear_model import LogisticRegression from sklearn.model_selection import train_test_split import joblib # Load the dataset filename = "Iris.csv" data = read_csv(filename) # Prepare the features and target array = data.values X = array[:, 1:5] # Features Y = array[:, 5] # Target # Split the data into training and testing sets X_train, X_test, Y_train, Y_test = train_test_split(X, Y, test_size=0.33, random_state=7) # Train the logistic regression model model = LogisticRegression(max_iter=200) model.fit(X_train, Y_train) # Evaluate the model accuracy = model.score(X_test, Y_test) print(f"Model Accuracy: {accuracy * 100:.2f}%") # Save the trained model joblib.dump(model, "logistic_model.pkl") This script: Loads the Iris dataset. Splits it into features (X) and target (Y). Trains a logistic regression model. Saves the model using joblib for later use. Step 2: Dockerizing the Model Now, we’ll create a Docker container to deploy the model. Docker helps us package our Python environment, ensuring consistency no matter where we run the model. 1. Creating the Dockerfile A Dockerfile defines how to build our Docker image. Here’s the Dockerfile that sets up our Python environment and installs the required libraries: # Use a Python base image FROM python:3.8-slim # Set the working directory WORKDIR /app # Copy the local files into the container COPY . /app # Install dependencies RUN pip install --no-cache-dir -r requirements.txt # Expose the port EXPOSE 5000 # Command to run the model CMD ["python", "predict.py"] This Dockerfile: Uses a lightweight Python image. Sets up the working directory and copies files. Installs dependencies using pip. Exposes port 5000 for the Flask API (explained next). 2. Creating the requirements.txt The requirements.txt file contains the libraries needed for the model and the Flask app: pandas scikit-learn joblib flask This file tells Docker which libraries to install in the container. Step 3: Flask API for Prediction Now, we need a Flask API to serve our trained model and handle predictions. Create a predict.py file: import joblib import pandas as pd from flask import Flask, request, jsonify app = Flask(__name__) # Load the model model = joblib.load("logistic_model.pkl") @app.route("/predict", methods=["POST"]) def predict(): # Get the data from the request data = request.get_json(force=True) df = pd.DataFrame(data) # Make predictions predictions = model.predict(df) # Return the predictions return jsonify(predictions.tolist()) if __name__ == "__main__": app.run(debug=True, host="0.0.0.0") In this API: We load the saved model using joblib. The predict endpoint accepts POST requests, takes the input data, and returns predictions from the model. Step 4: Building and Running the Docker Image Let’s build the Docker image and run the container. Build the Docker image: docker build -t iris-model . Run the Docker container: docker run -p 5000:5000 iris-model Now, the model API is up and running on localhost:5000. Step 5: Pushing the Docker Image to Docker Hub To share your model, push the Docker image to Docker Hub. Here’s how: Login to Docker Hub: docker login Tag the Docker image: docker tag iris-model /iris-model:latest Push the image: docker push /iris-model:latest This makes your model accessible to anyone with Docker, ready to be deployed anywhere! Conclusion You’ve just learned how to: Train a machine learning model on the Iris dataset. Dockerize the model and its environment. Deploy the model using a Flask API. Push the Docker image to Docker Hub for easy sharing. This process ensures that your model is portable and ready for deployment. Docker makes it easy to scale and manage models in production.
In this blog, I’ll walk you through how to create a Python model using the Iris dataset, train it, and then Dockerize it for deployment. Dockerizing a model ensures portability and easy deployment, so let’s get started.
Step 1: Training the Model
First, we will load the Iris dataset and train a simple logistic regression model. We’ll use libraries like pandas, scikit-learn, and joblib to do this.
Here’s the Python code:
from pandas import read_csv
from sklearn.linear_model import LogisticRegression
from sklearn.model_selection import train_test_split
import joblib

# Load the dataset
filename = "Iris.csv"
data = read_csv(filename)

# Prepare the features and target
array = data.values
X = array[:, 1:5]  # Features
Y = array[:, 5]    # Target

# Split the data into training and testing sets
X_train, X_test, Y_train, Y_test = train_test_split(X, Y, test_size=0.33, random_state=7)

# Train the logistic regression model
model = LogisticRegression(max_iter=200)
model.fit(X_train, Y_train)

# Evaluate the model
accuracy = model.score(X_test, Y_test)
print(f"Model Accuracy: {accuracy * 100:.2f}%")

# Save the trained model
joblib.dump(model, "logistic_model.pkl")
This script:
- Loads the Iris dataset.
- Splits it into features (X) and target (Y).
- Trains a logistic regression model.
- Saves the model using joblib for later use.
Step 2: Dockerizing the Model
Now, we’ll create a Docker container to deploy the model. Docker helps us package our Python environment, ensuring consistency no matter where we run the model.
1. Creating the Dockerfile
A Dockerfile defines how to build our Docker image. Here’s the Dockerfile that sets up our Python environment and installs the required libraries:
# Use a Python base image
FROM python:3.8-slim

# Set the working directory
WORKDIR /app

# Copy the local files into the container
COPY . /app

# Install dependencies
RUN pip install --no-cache-dir -r requirements.txt

# Expose the port
EXPOSE 5000

# Command to run the model
CMD ["python", "predict.py"]
This Dockerfile:
- Uses a lightweight Python image.
- Sets up the working directory and copies files.
- Installs dependencies using pip.
- Exposes port 5000 for the Flask API (explained next).
2. Creating the requirements.txt
The requirements.txt file contains the libraries needed for the model and the Flask app:
pandas
scikit-learn
joblib
flask
This file tells Docker which libraries to install in the container.
Step 3: Flask API for Prediction
Now, we need a Flask API to serve our trained model and handle predictions. Create a predict.py file:
import joblib
import pandas as pd
from flask import Flask, request, jsonify

app = Flask(__name__)

# Load the model
model = joblib.load("logistic_model.pkl")

@app.route("/predict", methods=["POST"])
def predict():
    # Get the data from the request
    data = request.get_json(force=True)
    df = pd.DataFrame(data)

    # Make predictions
    predictions = model.predict(df)

    # Return the predictions
    return jsonify(predictions.tolist())

if __name__ == "__main__":
    app.run(debug=True, host="0.0.0.0")
In this API:
- We load the saved model using joblib.
- The predict endpoint accepts POST requests, takes the input data, and returns predictions from the model.
Step 4: Building and Running the Docker Image
Let’s build the Docker image and run the container.
Build the Docker image:
docker build -t iris-model .
Run the Docker container:
docker run -p 5000:5000 iris-model
Now, the model API is up and running on localhost:5000.
Step 5: Pushing the Docker Image to Docker Hub
To share your model, push the Docker image to Docker Hub. Here’s how:
- Login to Docker Hub:
docker login
- Tag the Docker image:
docker tag iris-model /iris-model:latest
- Push the image:
docker push /iris-model:latest
This makes your model accessible to anyone with Docker, ready to be deployed anywhere!
Conclusion
You’ve just learned how to:
- Train a machine learning model on the Iris dataset.
- Dockerize the model and its environment.
- Deploy the model using a Flask API.
- Push the Docker image to Docker Hub for easy sharing.
This process ensures that your model is portable and ready for deployment. Docker makes it easy to scale and manage models in production.