


![[The AI Show Episode 144]: ChatGPT’s New Memory, Shopify CEO’s Leaked “AI First” Memo, Google Cloud Next Releases, o3 and o4-mini Coming Soon & Llama 4’s Rocky Launch](https://www.marketingaiinstitute.com/hubfs/ep%20144%20cover.png)


.jpg?width=1920&height=1920&fit=bounds&quality=70&format=jpg&auto=webp#)


_Olekcii_Mach_Alamy.jpg?width=1280&auto=webp&quality=80&disable=upscale#)


![Most iPhones Sold in the U.S. Will Be Made in India by 2026 [Report]](https://www.iclarified.com/images/news/97130/97130/97130-640.jpg)
![Apple to Shift Robotics Unit From AI Division to Hardware Engineering [Report]](https://www.iclarified.com/images/news/97128/97128/97128-640.jpg)


Dockerize a Python ML Model
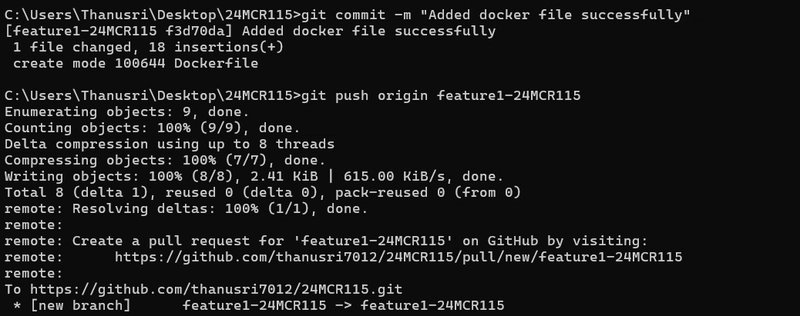
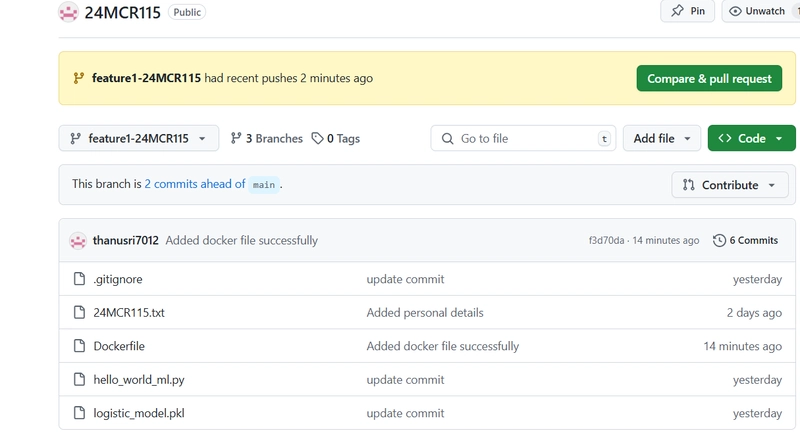
DOCKER COMMANDS 1.Check Docker version : docker --version Can check the docker version. 2.Create a Dockerfile in your project : 3.Docker Login : docker login Enter the login id and password 4.Build Docker image : docker build -t thanusri7012/24mcr115:latest . 5.List Docker images : docker images 6.Push Docker image to DockerHub : docker push thanusri7012/24mcr115 7.Open Docker Desktop to view images and containers : 8.Run the Docker container : 9.Verify the Docker image and running container in Docker Desktop (GUI) PUSH THE DOCKERFILE INTO GITHUB : # Step 1: Create and switch to a new feature branch from 'main' git checkout main -b feature1-24MCR115 This creates a new branch called feature1-24MCR115 and switches to it. Always create a new branch for a feature to keep main clean. # Step 2: Check branches git branch This lists all local branches. The * indicates your current branch. # Step 3: Check current file changes git status This shows: You're on branch feature1-24MCR115 You have untracked files: Dockerfile, some images (d1.jpg, d2.jpg, etc.), and a .webp file These are not staged yet. # Step 4: Add all files to staging area git add . This adds all untracked and modified files in the current directory recursively to staging. It's shorthand for git add for each file. ✅ Git Commit & Push Workflow Step 1: Committing the Changes git commit -m "Added docker file successfully" This command commits the staged changes with a message describing the update. Output: [feature1–24MCR115 f3d70da] Added docker file successfully Indicates a successful commit with the commit hash. Shows that Dockerfile was created and 18 lines were added. Step 2: Pushing the Feature Branch to Remote git push origin feature1–24MCR115 This pushes your local branch feature1–24MCR115 to the remote repository. Output: Git compresses and uploads your commits. Confirms successful push:

DOCKER COMMANDS
1.Check Docker version :
docker --version
Can check the docker version.
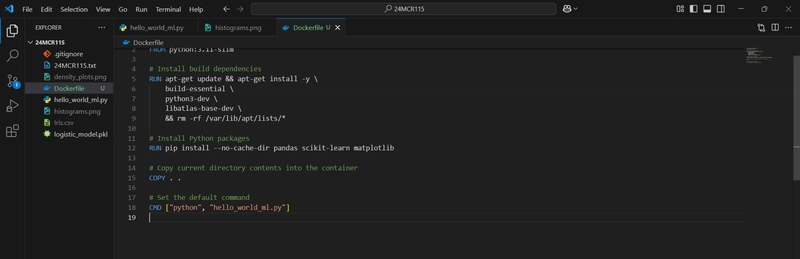
2.Create a Dockerfile in your project :
3.Docker Login :
docker login
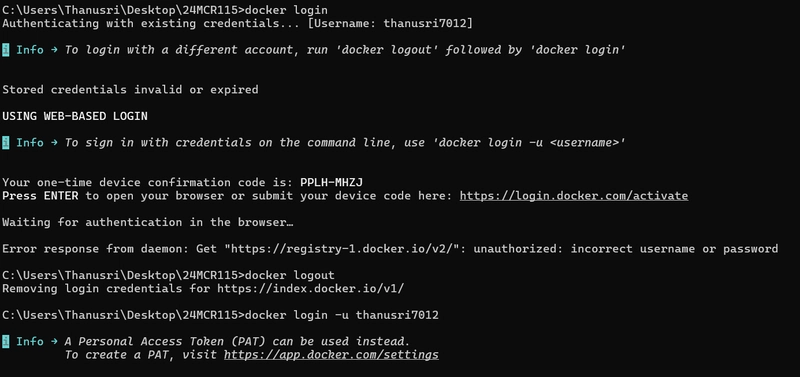
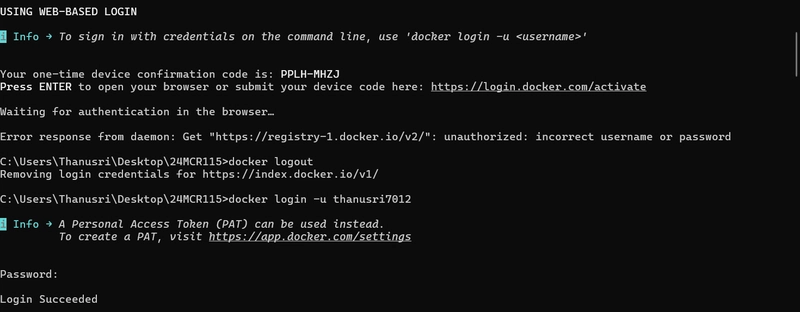
Enter the login id and password
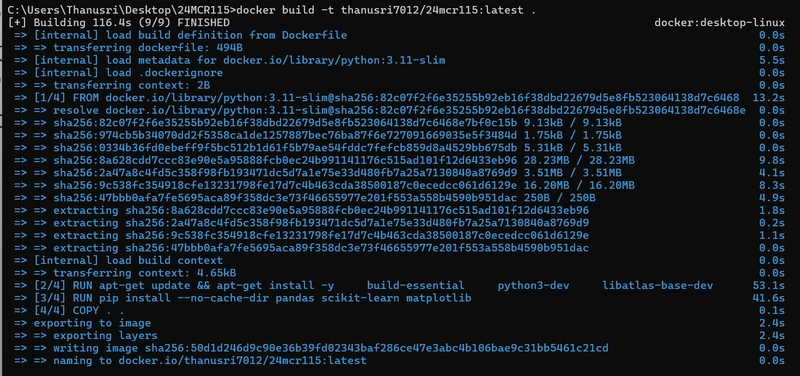
4.Build Docker image :
docker build -t thanusri7012/24mcr115:latest .
5.List Docker images :
docker images

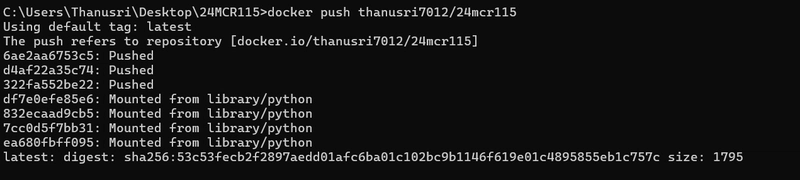
6.Push Docker image to DockerHub :
docker push thanusri7012/24mcr115
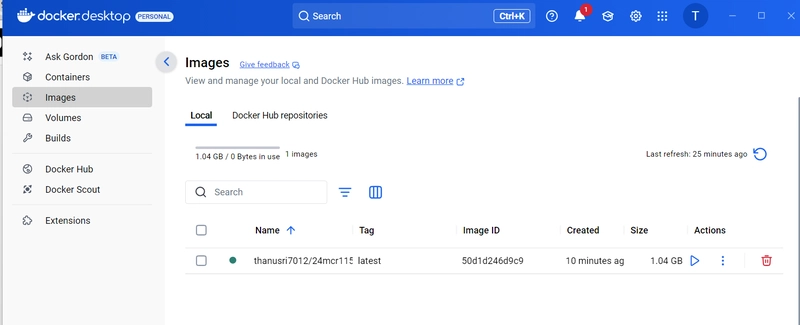
7.Open Docker Desktop to view images and containers :
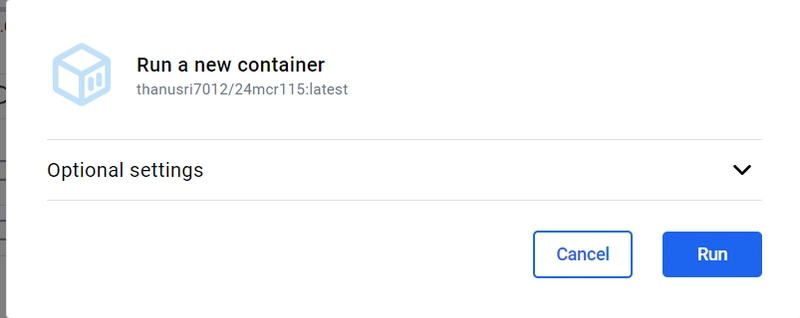
8.Run the Docker container :
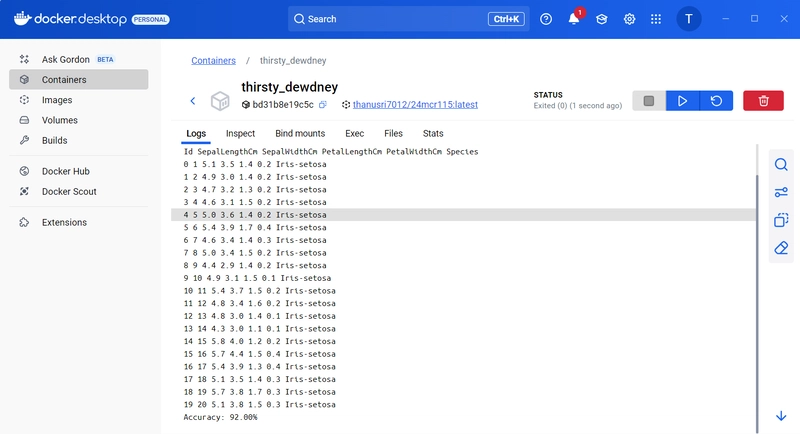
9.Verify the Docker image and running container in Docker Desktop (GUI)
PUSH THE DOCKERFILE INTO GITHUB :
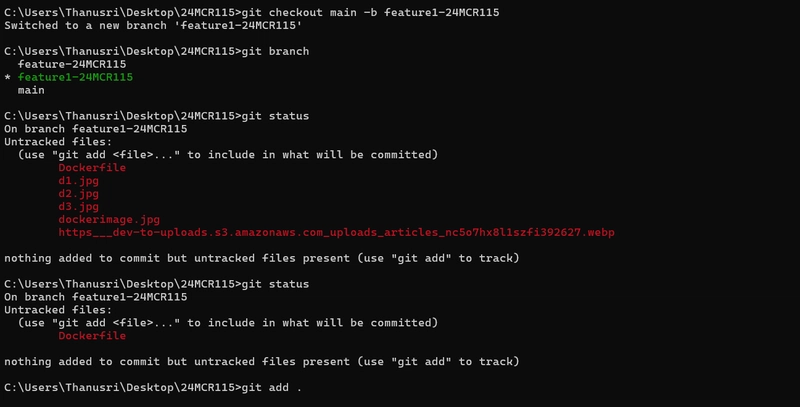
# Step 1: Create and switch to a new feature branch from 'main'
git checkout main -b feature1-24MCR115
- This creates a new branch called feature1-24MCR115 and switches to it. Always create a new branch for a feature to keep main clean.
# Step 2: Check branches
git branch
- This lists all local branches. The * indicates your current branch.
# Step 3: Check current file changes
git status
- This shows:
- You're on branch feature1-24MCR115
- You have untracked files: Dockerfile, some images (d1.jpg, d2.jpg, etc.), and a .webp file
- These are not staged yet.
# Step 4: Add all files to staging area
git add .
- This adds all untracked and modified files in the current directory recursively to staging. It's shorthand for git add for each file.
✅ Git Commit & Push Workflow
Step 1: Committing the Changes
git commit -m "Added docker file successfully"
- This command commits the staged changes with a message describing the update.
Output:
[feature1–24MCR115 f3d70da] Added docker file successfully
Indicates a successful commit with the commit hash.
Shows that Dockerfile was created and 18 lines were added.
Step 2: Pushing the Feature Branch to Remote
git push origin feature1–24MCR115
- This pushes your local branch feature1–24MCR115 to the remote repository.
Output:
Git compresses and uploads your commits.
Confirms successful push: