


![[The AI Show Episode 144]: ChatGPT’s New Memory, Shopify CEO’s Leaked “AI First” Memo, Google Cloud Next Releases, o3 and o4-mini Coming Soon & Llama 4’s Rocky Launch](https://www.marketingaiinstitute.com/hubfs/ep%20144%20cover.png)


![From fast food worker to cybersecurity engineer with Tae'lur Alexis [Podcast #169]](https://cdn.hashnode.com/res/hashnode/image/upload/v1745242807605/8a6cf71c-144f-4c91-9532-62d7c92c0f65.png?#)


![BPMN-procesmodellering [closed]](https://i.sstatic.net/l7l8q49F.png)


.jpg?#)
.jpg?#)


![CarPlay app with web browser for streaming video hits App Store [U]](https://i0.wp.com/9to5mac.com/wp-content/uploads/sites/6/2024/11/carplay-apple.jpeg?resize=1200%2C628&quality=82&strip=all&ssl=1)

![What’s new in Android’s April 2025 Google System Updates [U: 4/21]](https://i0.wp.com/9to5google.com/wp-content/uploads/sites/4/2025/01/google-play-services-3.jpg?resize=1200%2C628&quality=82&strip=all&ssl=1)


![Apple Releases iOS 18.5 Beta 3 and iPadOS 18.5 Beta 3 [Download]](https://www.iclarified.com/images/news/97076/97076/97076-640.jpg)
![Apple Seeds visionOS 2.5 Beta 3 to Developers [Download]](https://www.iclarified.com/images/news/97077/97077/97077-640.jpg)
![Apple Seeds tvOS 18.5 Beta 3 to Developers [Download]](https://www.iclarified.com/images/news/97078/97078/97078-640.jpg)
![Apple Seeds watchOS 11.5 Beta 3 to Developers [Download]](https://www.iclarified.com/images/news/97079/97079/97079-640.jpg)


Discussing Best Practices for iOS App Development
Developing a high-quality iOS app requires not only coding skills but also smart decisions in UI design, coding style, version control, and tooling. Below are five best practices for iOS development, each explained in detail with real-world insights and examples. These tips are geared toward developers aiming to streamline their iOS workflow, covering both Swift and Objective-C, and aligning with Apple’s latest guidelines. 1. Use Native UI Components Instead of Image-based Elements Apple’s SF Symbols provide a vast library of scalable, design-consistent icons that developers can use instead of custom image assets. Leverage system UI elements for consistency Apple’s Human Interface Guidelines (HIG) encourage using system-provided controls and icons wherever possible. Native UI components (like UIButton, UILabel, etc.) automatically adapt to platform updates and accessibility settings, ensuring a consistent look and feel across apps. For example, rather than slicing images for a custom toolbar, you might use UIToolbar with SF Symbols icons. This approach maintains design consistency with iOS – users find your app intuitive because it behaves like other iOS apps. Improve performance and scalability with vector or code-drawn graphics Image-based UI elements (PNG/JPG assets) can bloat app size and require multiple resolutions (@1x, @2x, @3x) for different screens. In contrast, drawing UI shapes in code (using Core Graphics or SwiftUI shapes) or using vector PDFs/SF Symbols scales to any resolution without extra files. Using Core Graphics (or tools like PaintCode that generate drawing code) makes apps “future proof and so much more flexible than importing assets,” reducing bundle size and effortlessly handling new screen scales. For instance, if you draw a custom button background in code, you can easily change its color or size via parameters instead of redrawing and importing new images for each change. Consider performance trade-offs While native drawing and vector graphics save space and adapt easily, they do consume CPU at runtime. Complex drawings (e.g. heavy shadows or intricate bezier paths) can impact performance if done on the main thread. Apple’s devices are powerful, but it’s wise to profile if custom drawing causes any lag. If you must draw complex imagery, you can render off-screen or cache the drawn result to reuse it. Conversely, static images might be better for extremely detailed visuals or those drawn once. A good rule of thumb is: use Core Graphics or vector images for simple, frequently scaled visuals, and use bitmap images for highly complex artwork. Keep your custom drawing simple and you’ll rarely worry about performance, but don’t spend weeks coding an image that you could include as an asset. Ultimately, choose the method that ensures a smooth UI: many successful apps combine approaches (system controls, SF Symbols, and the occasional optimized image) to achieve a slick, consistent interface. Real-world example: A mobile dating app found that replacing dozens of PNG icons with SF Symbols not only cut the app’s download size by 20%, but also made it trivial to adopt Dark Mode — the icons automatically adapted to the new color scheme. The developers also redrew simple shapes (like a circular avatar placeholder) with Core Graphics. This yielded crisper visuals on all device sizes and reduced memory usage. They reserved image assets only for complex illustrations. The result was a more scalable design system that met Apple’s aesthetic guidelines and performed well on devices old and new. 2. Follow Consistent Coding Style (Swift & Objective-C) Clean, consistent code style is essential for collaboration and maintainability. Both Swift and Objective-C have style conventions you should follow: Naming conventions: Use descriptive, camelCase names. In Swift, names of types (classes, structs, enums, etc.) should be UpperCamelCase, while methods, properties, and variables use lowerCamelCase For Objective-C, Apple’s Cocoa coding guidelines likewise recommend descriptive names with no abbreviations, using camelCase for methods and variables (e.g. - (void)loadData not - (void)ldDt) Objective-C method names tend to be longer but very clear — e.g. -[NSString stringByAppendingString:] explicitly describes what it does. Following these conventions makes your code feel “at home” in the ecosystem. Apple’s own frameworks demonstrate this readability, and your classes should do the same. (For instance, a method in Objective-C that returns an object’s size should just be named for what it returns, like - (CGSize)windowSize, not - (CGSize)getWindowSize – Cocoa historically avoids the get prefix for getters Objective-C specifics: Ensure uniqueness of names by using prefixes. Older Apple guidelines mandated that Objective-C class names be globally unique across an app Apple reserves two-letter prefi
Developing a high-quality iOS app requires not only coding skills but also smart decisions in UI design, coding style, version control, and tooling. Below are five best practices for iOS development, each explained in detail with real-world insights and examples. These tips are geared toward developers aiming to streamline their iOS workflow, covering both Swift and Objective-C, and aligning with Apple’s latest guidelines.
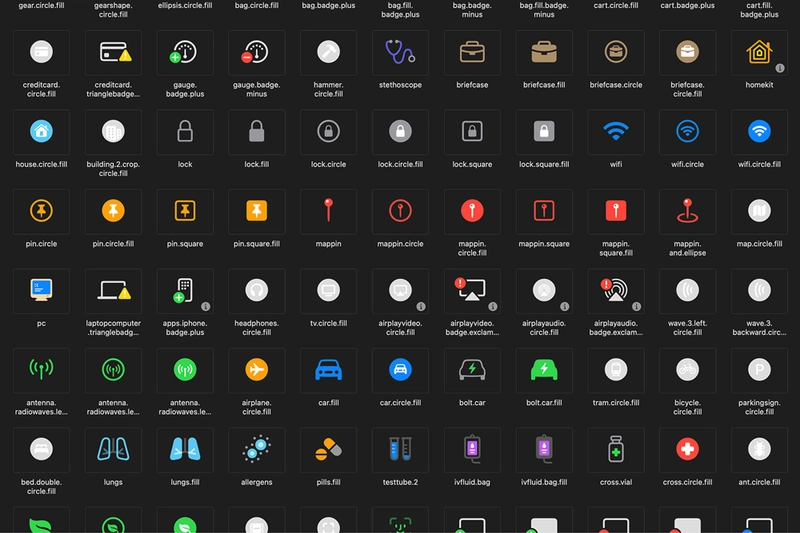
1. Use Native UI Components Instead of Image-based Elements
Apple’s SF Symbols provide a vast library of scalable, design-consistent icons that developers can use instead of custom image assets.
Leverage system UI elements for consistency
Apple’s Human Interface Guidelines (HIG) encourage using system-provided controls and icons wherever possible.
Native UI components (like UIButton, UILabel, etc.) automatically adapt to platform updates and accessibility settings, ensuring a consistent look and feel across apps. For example, rather than slicing images for a custom toolbar, you might use UIToolbar with SF Symbols icons. This approach maintains design consistency with iOS – users find your app intuitive because it behaves like other iOS apps.
Improve performance and scalability with vector or code-drawn graphics
Image-based UI elements (PNG/JPG assets) can bloat app size and require multiple resolutions (@1x, @2x, @3x) for different screens. In contrast, drawing UI shapes in code (using Core Graphics or SwiftUI shapes) or using vector PDFs/SF Symbols scales to any resolution without extra files. Using Core Graphics (or tools like PaintCode that generate drawing code) makes apps “future proof and so much more flexible than importing assets,” reducing bundle size and effortlessly handling new screen scales.
For instance, if you draw a custom button background in code, you can easily change its color or size via parameters instead of redrawing and importing new images for each change.
Consider performance trade-offs
While native drawing and vector graphics save space and adapt easily, they do consume CPU at runtime. Complex drawings (e.g. heavy shadows or intricate bezier paths) can impact performance if done on the main thread.
Apple’s devices are powerful, but it’s wise to profile if custom drawing causes any lag. If you must draw complex imagery, you can render off-screen or cache the drawn result to reuse it.
Conversely, static images might be better for extremely detailed visuals or those drawn once. A good rule of thumb is: use Core Graphics or vector images for simple, frequently scaled visuals, and use bitmap images for highly complex artwork. Keep your custom drawing simple and you’ll rarely worry about performance, but don’t spend weeks coding an image that you could include as an asset.
Ultimately, choose the method that ensures a smooth UI: many successful apps combine approaches (system controls, SF Symbols, and the occasional optimized image) to achieve a slick, consistent interface.
Real-world example:
A mobile dating app found that replacing dozens of PNG icons with SF Symbols not only cut the app’s download size by 20%, but also made it trivial to adopt Dark Mode — the icons automatically adapted to the new color scheme. The developers also redrew simple shapes (like a circular avatar placeholder) with Core Graphics. This yielded crisper visuals on all device sizes and reduced memory usage. They reserved image assets only for complex illustrations. The result was a more scalable design system that met Apple’s aesthetic guidelines and performed well on devices old and new.
2. Follow Consistent Coding Style (Swift & Objective-C)
Clean, consistent code style is essential for collaboration and maintainability. Both Swift and Objective-C have style conventions you should follow:
Naming conventions:
- Use descriptive, camelCase names. In Swift, names of types (classes, structs, enums, etc.) should be
UpperCamelCase, while methods, properties, and variables uselowerCamelCase - For Objective-C, Apple’s Cocoa coding guidelines likewise recommend descriptive names with no abbreviations, using camelCase for methods and variables (e.g. -
(void)loadDatanot -(void)ldDt) - Objective-C method names tend to be longer but very clear — e.g.
-[NSString stringByAppendingString:]explicitly describes what it does. Following these conventions makes your code feel “at home” in the ecosystem. Apple’s own frameworks demonstrate this readability, and your classes should do the same. (For instance, a method in Objective-C that returns an object’s size should just be named for what it returns, like- (CGSize)windowSize, not- (CGSize)getWindowSize– Cocoa historically avoids thegetprefix for getters
Objective-C specifics:
- Ensure uniqueness of names by using prefixes. Older Apple guidelines mandated that Objective-C class names be globally unique across an app
- Apple reserves two-letter prefixes like
NSorUIfor system frameworks, so use a custom three-letter prefix for your classes (e.g.ACMEButtonfor a class in Acme Corp’s app). This avoids naming collisions and is still good practice in mixed-codebases. - Also, in Objective-C code, prefer property dot-syntax for access (
self.titleLabel.text) instead of direct ivar access, and group methods logically (using#pragma mark- or// MARK:comments to organize your file by functionality). - Consistent formatting—such as 4-space indentation, braces on the same line, and spacing around operators—makes code easier to read. Many teams adopt the Apple default style that Xcode templates use, to avoid bikeshedding on formatting.
Swift specifics:
- Swift’s syntax is concise, but clarity is key. Follow the official Swift API Design Guidelines which emphasize clarity over brevity. For example, use meaningful parameter names and function names that read like English phrases at call sites. Avoid unnecessary words that repeat type information (the guideline “omit needless words” is well-known in Swift) — e.g. prefer
addSubview(_ view: UIView)overaddSubviewToView(_ view: UIView)since the context is clear. - Use Swift’s language features for clarity: Optionals to indicate the absence of values (instead of sentinel values), guard statements to exit early and reduce nesting, and extensions to organize code by functionality.
- Consistent indentation (typically 4 spaces in Xcode) and line wrapping improve readability; linters can enforce a maximum line length so code doesn’t become hard to read.
- Also, document your code with Markdown-style comments (
///) for public APIs – this not only helps others understand it, but writing the docs can clarify your own design thinking. - Use a linter and style guide: Adopting a style guide (such as Google’s or the Ray Wenderlich/Kodeco Swift style guide) and using tools to enforce it can drastically improve consistency. For Swift, tools like SwiftLint can automatically flag style violations (e.g. incorrect naming, spacing, brace position) and even autocorrect some issues. In a community poll of iOS developers, using a code linter was highlighted as a top best practice for maintainable code. Set up these linters to run on each build or as part of your CI pipeline, so code that doesn’t match your agreed style is caught early. In Objective-C, there are linters like OCLint, but even just using Xcode’s static analyzer and enabling warnings for style issues helps (e.g. warn on missing braces or unused variables).
Real-world example:
A startup with a mixed Swift/ObjC codebase decided to standardize their coding style. They introduced a style guide (based on Apple’s guidelines and community best practices) and added SwiftLint to the project. At first, dozens of minor issues were flagged — naming inconsistencies, long lines, etc. The team fixed these and from then on, any new code had to pass the linter. The payoff was immediate: code reviews focused less on nitpicks, and new developers could read the codebase more easily since everything followed a consistent pattern. In one instance, the linter caught a subtle bug — an if/else missing braces — that could have led to a crash. By following a coherent style, the team’s productivity improved and the code became self-documenting to a greater degree. As Apple’s own documentation notes, following Cocoa conventions makes your code more readable and “consistent” for any Objective-C developers who join your project. – this holds true for Swift as well.
3. Implement Robust Code Versioning and Management
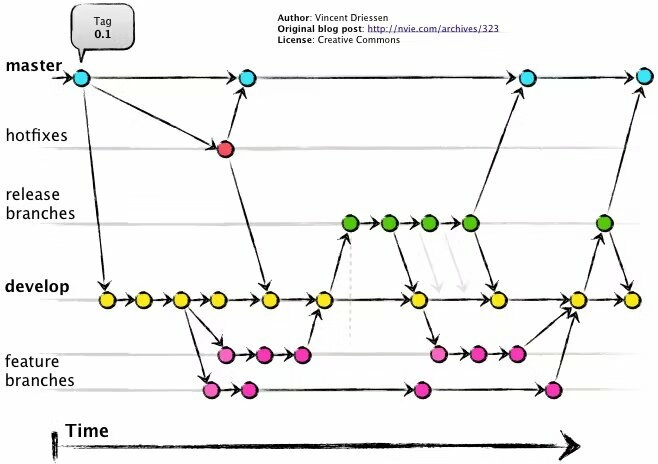
An example Git branching model (based on GitFlow) where work is done in feature branches (pink), merged into a develop branch (yellow), tested in a release branch (green), and then released to main/master (blue). This strategy helps manage complex codebases and parallel work.
Using version control effectively is crucial for team-based iOS development. Almost all iOS teams use Git (with services like GitHub or GitLab) to manage code. Here are best practices to keep your codebase organized and scalable:
Use a branching strategy:
Don’t commit all work directly to main (or master). Instead, adopt a branching model that suits your team’s workflow. A popular choice is Feature Branching, where each new feature or bugfix is developed in its own branch, then merged into a mainline (e.g. a develop branch) via a pull request
This encapsulation means the main branch is always stable and deployable, and feature work can happen in parallel without interference. For example, if two developers are working on separate features, each works in their own branch. The main branch remains clean, and when a feature is ready, it’s merged in — often after a code review. This practice, combined with continuous integration (CI), ensures that “the main branch should never contain broken code”, aligning with the goal of always having a shippable product. Another common model is GitFlow, which extends feature branching by having long-lived branches for releases and hotfixes. In GitFlow, you might have a develop branch where all features merge, then when preparing a release, create a release branch to finalize it, and finally merge that into main (and tag it) for production. Hotfixes for urgent bugs go into a hotfix branch off main and then back-merge to develop. This may be more than needed for small teams, but larger projects benefit from the structured approach. Choose between a simpler trunk-based approach (everyone merges to one branch frequently) or GitFlow-style with multiple branches based on your release cadence. The key is to define your process clearly so that everyone knows where to commit and how code gets promoted to production.
Leverage Pull Requests and code reviews:
Treat all significant code changes as opportunities for peer review. On GitHub, open a Pull Request (PR) when you want to merge a feature branch. This creates a space for teammates to review code, discuss improvements, and ensure quality before the code integrates. It’s considered best practice to keep pull requests small and focused — GitHub’s own docs note that small PRs are easier and faster to review and less likely to introduce bugs. For example, instead of one PR that “Adds user profile screen and updates login logic and fixes a bug in payments,” break those into separate PRs if possible. Each PR should ideally address one issue or feature. This granularity makes it simpler to rollback specific changes if needed, and reviewers can thoroughly understand the change. Always write a clear PR description describing what and why (not just how). Reference any relevant Jira tickets or requirements. In the context of iOS, a PR might also include screenshots of a UI change or mention how to test the new feature. By making review a habit, you catch issues early — maybe another developer spots a scenario you didn’t handle or suggests a more Swift-idiomatic API usage. Code review is as much a learning tool as a quality filter: team members share knowledge and align on best practices through the review process.
Maintain a clean commit history:
Encourage commits that are logically organized. Squash trivial fix-up commits before merging, so the main branch history stays readable (e.g. a single commit “Implement search bar feature” instead of ten micro-commits like “fix typo” or “update comment”). Use descriptive commit messages. For example, “Fix crash on empty login field” is much better than “fix bug.” This will help when tracking changes or debugging issues later using git blame or examining release logs. Tag important points in history, such as release versions (e.g. v1.0.3) so you can easily check out the code for that release if a hotfix is needed.
Manage a large codebase with modularization:
As an app grows, it’s wise to break it into modules or frameworks. Consider using Xcode workspace with multiple frameworks, or Swift Package Manager to modularize features. This enforces separation of concerns and can speed up compile times by isolating code. For example, you might have a Networking module, a UIComponents module, etc. Large companies like Uber or Facebook structure their iOS projects into dozens of pods or Swift packages to allow teams to work independently. Modular codebases are easier to navigate (you know where to look for certain functionality) and can even enable reusing modules across apps. Just be sure to version your modules and manage dependencies (CocoaPods, Carthage, or SwiftPM) so that integration is smooth.
Real-world example:
A mid-sized development team adopted GitFlow for their iOS app. They had a develop branch where all ongoing development happened, a main branch representing the live App Store version, and used feature branches for each ticket. When it came time for an App Store release, they branched off develop to a release/x.y branch, stabilized it (testing, bug fixes), then merged to main and tagged a version. This strategy allowed them to support emergency hotfixes: if a critical bug was found in production, a hotfix branch off main was created to fix it and merge back into both main (for immediate App Store update) and develop (so the fix wasn’t lost). The overhead of managing a few extra branches paid off – they could easily parallelize work (developers weren’t tripping over each other’s code) and the risk of shipping unfinished features was minimized. In one instance, a feature turned out to need more time and missed the release cutoff; because it was in a separate branch, they simply didn’t merge it from develop into the release branch, allowing them to release on schedule and integrate that feature in the next cycle. The team also enforced that all PRs required at least one approval and a passing CI build, ensuring code quality and reducing integration problems. Over time, they noticed fewer regressions in production and faster onboarding of new devs (since the branching strategy made it clear how work progresses). This kind of organized version control process is a hallmark of scalable iOS teams.
4. Adopt Best Tooling and Workflow Practices (CI/CD, Automation)
Modern iOS development is more than just writing code — it involves using powerful tools to automate testing, building, and deployment. Embracing these tools and workflows will save your team time and catch issues early:
Use Xcode’s capabilities:
Xcode is the primary IDE for iOS. Make sure you’re taking full advantage of it. Enable warnings and static analysis (Product → Analyze) to catch potential bugs like memory leaks or unused variables. Treat warnings as errors to keep the codebase tidy. Use Schemes and Configurations to manage debug vs release builds (e.g. enabling more logging in debug). Xcode also has UI testing and unit testing built in — you can record UI tests or write XCTest cases to verify functionality. Integrating these tests into your workflow (run them regularly) prevents regressions. Also, familiarize yourself with Instruments (included with Xcode) for profiling performance and memory; for example, use the Time Profiler to find slow functions or the Allocations instrument to catch memory issues. These aren’t daily tools, but when you need to optimize, they are indispensable. Keep Xcode updated to the latest stable version — Apple often improves build times and introduces new static checks in updates (and you’ll need the latest Xcode to support the latest iOS SDKs and device OS versions your app runs on).
Continuous Integration (CI):
Set up a CI system to automatically build and test your app whenever code is merged. With solutions like GitHub Actions, Jenkins, Bitrise, CircleCI, or the new Xcode Cloud, you can have a Mac build server run your project’s tests on each pull request or on each push to certain branches. CI is extremely valuable: it ensures that a change that compiles and passes tests on one developer’s machine also works in a clean environment. For iOS projects, a CI pipeline typically checks out the code, installs dependencies (e.g. CocoaPods or Swift Package Manager), builds the app, and runs the test suite. You can also have CI generate an .ipa and even deploy to TestFlight automatically. This helps catch bugs early and maintain code quality — as one iOS blog succinctly put it, CI means “automatically building our app, running unit tests, and even deploying to TestFlight… all triggered by a simple git push.” This practice lets you “catch bugs early, ensure code quality, and save time on manual testing”. For example, if someone introduces a unit test failure, the CI server will flag it immediately, before the code gets to production. Over time, developers learn to rely on the CI feedback and trust that if CI is green, the app is in a good state. It also frees developers from doing repetitive build/test tasks — the robot takes care of it.
Fastlane and deployment automation:
Fastlane is a popular toolkit to automate App Store distribution and other tasks. You can script actions like incrementing build numbers, taking screenshots, code signing, and uploading to TestFlight/App Store Connect. Instead of manually performing archive exports and altool uploads in Xcode, a Fastlane script (Fastfile) can do it with one command. For example, you might have a lane fastlane beta that builds the app, runs tests, and uploads to TestFlight for QA to verify. Fastlane integrates well with CI – it can generate reports and output that CI can use. Using Fastlane, one team reduced the App Store release prep time from an hour of manual clicking to a single 5-minute automated job. It also reduces human error (no more forgetting to set the correct version or upload the wrong build — the script does it consistently). Apple’s own command-line tools (like xcodebuild and altool) underlie these processes, but Fastlane provides a nice layer on top. Additionally, consider automating certificate and provisioning profile management with Fastlane’s Match or Auto Signing – this makes setting up new machines or CI easier, since codesigning stuff is centralized.
Continuous Delivery (CD):
Beyond integration, consider automating the deployment pipeline. For example, whenever a commit is tagged with a release version, you could have your CI trigger a Fastlane lane to submit the build to App Store review. Some companies even automate releasing to the App Store once tests pass, though many prefer a manual gate for final publishing. Still, being able to get a build into testers’ hands with minimal effort is huge. Tools like GitHub Actions make it easy to define workflows in YAML that run on every push or on schedule. You might run nightly builds that compile the app at midnight and run a suite of UI snapshot tests — if any UI changes unexpectedly, the team is alerted by morning.
Other helpful tools:
Incorporate static code analysis and security scans. For example, run SwiftLint (for style) and perhaps SwiftFormat (to auto-format code) in the CI pipeline so the codebase stays clean. Use dependency managers wisely — Swift Package Manager is now the preferred way (built into Xcode) for adding libraries; it simplifies versioning of dependencies. Monitor your app’s health with tools like Crashlytics or the built-in Apple Crash Reports — while not part of development workflow, having crash monitoring in place is a best practice once your app is live, so you can quickly catch and fix issues. Also, keep an eye on Apple’s guidelines for new tooling: for instance, Xcode introduced Test Plans to run tests with different configs, and Apple now offers Xcode Cloud (a CI service integrated into Xcode). Depending on your needs, these might streamline your workflow further (Xcode Cloud can run tests on multiple simulators in parallel, etc., without you maintaining a server).
Real-world example:
Consider a company that ships an iOS app used by millions. They implemented a CI/CD pipeline using GitHub Actions and Fastlane. Every time code is merged into the develop branch, GitHub Actions kicks off a workflow: it lints the code, builds the app, runs the unit and UI tests on a Mac cloud runner, and then uses Fastlane to deploy a fresh build to Firebase App Distribution for internal testers. This happens several times a day. Thanks to this automation, the team catches integration problems immediately – if a developer forgot to include a file or if two merged features conflict, the CI build fails and they fix it the same day. Every two weeks, when they’re ready to release, a release manager triggers the “release” lane in Fastlane, which bumps the version number, builds the app, and pushes it to TestFlight for App Store review. What used to be a frantic day of manual work is now a calm, scripted process. Because of continuous testing, their app’s crash rate in production dropped significantly – they were running tests on edge cases that used to be overlooked. One specific scenario: a memory leak in a view controller was detected by an automated UI test running under Instruments on the CI; they were able to fix it long before shipping, whereas previously it might have gone unnoticed until users complained. The investment in CI/CD tooling paid off with faster iterations, fewer production issues, and a happier development team that can focus on coding new features rather than fiddling with releases.
5. Using Observables Instead of Callbacks
Observables vs Callbacks: Conceptual Overview
In traditional imperative code, a callback (often a completion handler or delegate method) is a function invoked when an asynchronous operation finishes or an event occurs. This approach can lead to deeply nested logic when multiple asynchronous steps are chained, making the code hard to follow and maintain. By contrast, an observable (in the context of reactive programming) represents a stream of values or events over time. Instead of the caller passing in a function to be called later, the caller subscribes to an observable sequence and reacts whenever the sequence produces a new value or a completion. In other words, reactive programming revolves around streams of data that emit values over time. Developers define declarative pipelines that automatically react to data updates, rather than manually updating values in callbacks. This leads to applications that are more responsive and easier to test because the flow of data is handled by the framework.
An observable stream can emit several “next” values (ongoing results) and then eventually emit a completion event or an error event. It won’t emit further values after completing or erroring. For example, a network request might publish a result (or error) when it finishes, or a UI text field observable might emit a new value on each text change. In a callback-based style, you might handle these cases with separate success and failure callbacks, but with an observable, they are part of one unified stream of events. A Combine publisher in Swift, for instance, can send multiple values and then either one completion or one error to signal that the stream has ended. This design means the subscriber handles all outcomes (data or errors) in the same flow, simplifying the logic and avoiding the need for multiple callback parameters for success and failure.
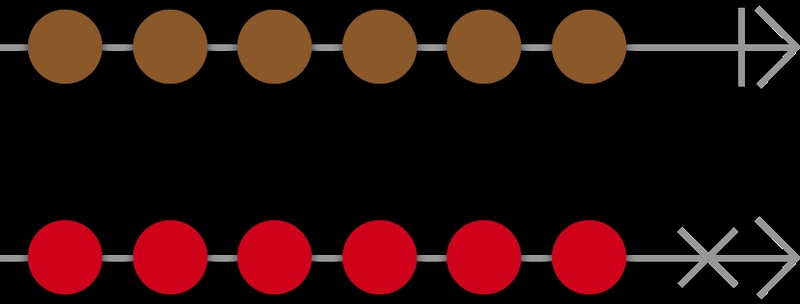
Getting started with Combine — Marble diagrams visualize how an observable emits values over time and then finishes. Each circle (or “marble”) represents a data value being emitted in sequence. The top timeline shows a stream of values (brown marbles) ending in a completion (vertical line), while the bottom timeline shows a stream that ends with an error (×) instead of a normal completion.
Key Differences: Observables vs Callbacks
- Readability: Code written with observables (reactive streams) is often more linear and easier to follow than code using nested callbacks. Reactive frameworks allow chaining asynchronous operations, avoiding the notorious “pyramid of doom” or callback hell. For example, a callback approach that needs to perform several asynchronous steps will end up nesting callbacks inside callbacks, making the flow hard to read, whereas an observable pipeline can list these steps sequentially with operators. In fact, Combine code is frequently more readable and concise than traditional callback-based code, since it lets developers chain operations and eliminate deeply nested closures. One illustration is a multi-step process: in the callback style each subsequent step is invoked within the previous step’s completion closure (indenting the code further at each step), but in the observable style each step is a transformation in a sequence. The result is that the reactive code reads from top to bottom, describing whathappens to the data, which is easier to understand and maintain.
- Reusability and Composition: Observables encourage a more modular design. Because streams are a first-class concept, you can easily pass them around or combine them, promoting code reusability. For instance, you might create a publisher (observable stream) that emits app-wide notifications or data updates, and multiple parts of the app can subscribe to the same stream without reinventing that logic. Apple’s Combine and libraries like RxSwift provide many operators to merge, filter, or transform streams, making it straightforward to compose complex behaviors from simpler pieces. This modularity means developers can build reusable components for handling common async tasks. Combine’s design, for example, encourages separating an asynchronous workflow into small publishers that can be re-used across the codebase. In contrast, with callbacks one often ends up writing similar completion-handling code in multiple places (or needs to refactor it into separate functions manually), since the callback logic is tightly coupled to the context in which it’s used. With observables, you can also add or remove steps in the pipeline with minimal code changes — the next section of the stream just connects to the previous one — improving extensibility.
-
Error Handling: Observables integrate error propagation into the same flow as data propagation, leading to more consistent and centralized error handling. In a callback approach, error handling is typically ad-hoc — for example, you might have to check an error object inside each callback or use a separate failure callback. This can lead to repetitive code and the risk of overlooking errors. By contrast, in the observable model, an error event travels through the stream just like a data event, and subscribers can handle it in one place. Frameworks like Combine provide robust operators for error handling (e.g.
catchfor recovering from errors,retryfor retrying a failed operation, etc.), improving the reliability of asynchronous code. For instance, you could attach a recovery operator to a network request publisher so that if it fails, it automatically attempts a refreshed authentication and retries — all in the same declarative pipeline. This approach is more elegant than having to propagate errors through multiple nested callback layers. Each observable sequence defines its error handling strategy up front, which makes the code easier to reason about. (In a callback scenario, each callback must implement its own error-handling logic, which often leads to repetitive code and potential inconsistencies.) - Code Complexity and Maintenance: Using observables can significantly reduce the “plumbing” code needed to manage asynchronous interactions, which in turn lowers overall complexity. Reactive streams provide a higher-level abstraction for common async patterns, so developers write what should happen with the data, not how to orchestrate the callbacks. This often results in fewer lines of code for the same functionality. Moreover, the declarative style makes the intent clearer. As one analysis put it, a reactive streams approach “cleans up the mess of callbacks and callback hell and provides a natural approach of modifying/transforming types using a rich set of operators”. In practice, this means you can often replace a tangle of dispatch queues, state flags, and nested closures with a fluent sequence of stream operations. The code becomes easier to maintain because each piece of logic (filtering, mapping, error-handling, etc.) is isolated in its operator, and adding new functionality (or diagnosing issues) doesn’t require untangling a web of callbacks. Overall, observables offer a more structured paradigm for async code, which tends to scale better in larger codebases.
Observables in Swift (Combine and RxSwift)
Swift developers have first-class support for observables through Apple’s Combine framework and popular third-party libraries like RxSwift. Combine was introduced by Apple in iOS 13 (WWDC 2019) as a native reactive framework, providing a declarative Swift API for processing values over time. In essence, Combine is Apple’s 1st-party answer to reactive programming, intended as an alternative to frameworks like RxSwift and ReactiveCocoa. It operates on a publisher-subscriber model: a Publisher produces values (or completion/error events) over time, and a Subscriber listens to receive those values. This is conceptually similar to an Observable and Observer in RxSwift. Combine comes with a multitude of built-in publishers and operators. For example, URLSession in the Foundation framework provides a dataTaskPublisher that wraps an asynchronous network call into a publisher, and UI frameworks integrate with Combine via property wrappers like @Published (used in SwiftUI) to automatically publish state changes. A Combine pipeline might look like a chain of operations: you create a publisher (say, a network request publisher), then apply operators like map or filter to transform the output, handle errors with catch, and finally attach a subscriber (with .sink { ... }) to consume the results on completion. All of this is done in a fluent syntax that clearly delineates the data flow. Apple notes that adopting Combine for asynchronous code improves consistency and readability across your app, because everything from network responses to user input events can be handled with the same unified approach.
Meanwhile, RxSwift (based on the ReactiveX API standards) emerged earlier and has been widely adopted in the iOS community for reactive programming. RxSwift is a powerful library that provides the Observable type, along with a rich set of operators to combine and transform streams. It allows developers to work with asynchronous events in a LINQ-style (or functional) way. One of RxSwift’s biggest strengths is its mature ecosystem, including RxCocoa — a companion library that provides reactive extensions for UIKit components (like observing text fields, taps, notifications, etc. with Observables). Using RxCocoa, for instance, you can bind the text property of a UITextField to an observable stream or observe touch events as observables, which greatly simplifies UI synchronization code. RxSwift and Combine share many concepts (Observable/Publisher, operators like map, flatMap, etc.), though their syntax and implementation details differ. One practical difference is that RxSwift works on multiple platforms (it can be used on iOS, macOS, Linux, etc.), whereas Combine is Apple-only – however, Combine’s tight integration with Apple frameworks often means less boilerplate in SwiftUI or UIKit. Both frameworks enable a declarative style of handling data flows. You subscribe to an observable sequence and declare what to do with values, rather than writing imperative callback handlers.
From a developer’s perspective, learning Combine or RxSwift has a similar payoff: you gain the ability to reason about asynchronous events as sequences. Both frameworks eliminate the need for explicit callback management and shared mutable state in many cases. In fact, the publisher-subscriber pattern used by Combine and RxSwift “eliminates the need for callbacks and explicit state management, significantly improving code clarity.”
This means that instead of scattering update code across various delegate methods and completion closures, you can consolidate logic into a reactive pipeline. For intermediate iOS developers and teams, leveraging these tools leads to code that is often more consistent and easier to extend. Whether you choose Combine (for a pure Swift, Apple-supported solution) or RxSwift (with its cross-platform flexibility and extensive community extensions), the core idea is the same: observables let you write asynchronous code that is easier to read, compose, and maintain than the equivalent callback-based code.
Observables in Objective-C (KVO and ReactiveCocoa)
Observables aren’t limited to Swift. In the Objective-C world, developers have long used patterns that align with the observer paradigm. The most fundamental is Key-Value Observing (KVO) — a mechanism provided by Cocoa to observe changes to properties. With KVO, one object can register as an observer of another object’s property and get notified (via a callback method) when that property’s value changes. This is essentially an observable pattern baked into Objective-C, albeit with a more cumbersome API (involving context pointers and manually removing observers). For example, you might observe a status property and implement observeValueForKeyPath:ofObject:change:context: to update the UI whenever the status changes. KVO in Objective-C allows you to react to changes, but doing it in pure Objective-C requires a lot of boilerplate and care (you must deregister observers to avoid crashes, etc.). Apple has recognized the benefits of a more modern approach here: in fact, Combine provides a Publisher API for KVO, meaning you can convert KVO notifications into Combine streams. Apple’s documentation notes that by converting KVO callbacks into Combine publishers, you can make your code more elegant and maintainable. This effectively brings a unified observable style to older APIs — instead of implementing the delegate/callback for KVO manually, you subscribe to a publisher that emits changes, benefiting from Combine’s syntax and operators. Even without Combine, some Objective-C APIs started adopting block-based observation (for instance, UIView has methods to animate and then call a completion block, and NSNotificationCenter provides a way to add observers with blocks). These were precursors to a more reactive style, but they still operate on the callback principle under the hood.
For a more comprehensive reactive approach in Objective-C, many developers turned to ReactiveCocoa, an influential library that introduced Functional Reactive Programming to Cocoa development. The Objective-C portion of ReactiveCocoa is now known as ReactiveObjC, and it provides APIs for composing and transforming streams of values (called signals) in Objective-C. With ReactiveCocoa, you could create signals that represent things like “text changed” or “network response received” and then subscribe to those signals. This allowed Obj-C developers to move away from spaghetti code with delegate callbacks and notifications, toward a model where you bind UI and data updates in a declarative fashion. ReactiveCocoa essentially offers an analog of Combine/RxSwift for Objective-C. For example, rather than using a repeating NSTimer and a callback to update a label with the current time, ReactiveCocoa would let you create a signal that emits the current time every second and bind that to the text property of a UILabel. “For example, a text field can be bound to the latest time, even as it changes, instead of using additional code that watches the clock and updates the text field every second. It works much like KVO, but with blocks instead of overriding -observeValueForKeyPath:.”
This quote from the ReactiveObjC documentation illustrates how observables in Obj-C can replace verbose boilerplate with a succinct binding. Under the hood, ReactiveCocoa’s RACSignal and RACObserver abstractions manage the subscriptions and send next/error/completed events to your blocks. While using ReactiveCocoa required adopting a somewhat different coding style (and learning its APIs), it was a well-supported alternative for companies that wanted a more reactive, event-driven architecture before Swift Combine existed.
It’s worth noting that Combine itself is written in Swift and isn’t directly usable in pure Objective-C classes. However, Objective-C code can still take advantage of reactive patterns by bridging to Swift (for instance, an Obj-C class can call into a Swift wrapper that uses Combine), or by using ReactiveObjC in pure Obj-C components. Many modern iOS projects that still have significant Objective-C portions choose to introduce Swift and Combine for new development while maintaining Objective-C reactive code with KVO or ReactiveObjC for legacy parts. The key takeaway is that the observable pattern is language-agnostic: whether you use Combine in Swift or KVO/ReactiveCocoa in Objective-C, the paradigm shift from imperative callbacks to declarative streams yields more0 maintainable and responsive code.
Real-World Scenario: Best Practices in Action
To see how these best practices come together, let’s walk through a scenario of a hypothetical company “AppCo” and how they improved their iOS development workflow:
Scenario: AppCo is building a complex iOS app that includes social features, real-time updates, and multimedia content. Initially, their development process was ad-hoc: different coding styles, no consistent branching strategy, and manual deployments. This led to bugs slipping through, inconsistent UI, and stressful releases. They decided to revamp their approach using the practices outlined above.
1. UI/Design:
The design team provided lots of custom icons and graphical elements. The developers reviewed each and identified which could be replaced with native components or SF Symbols. They ended up using SF Symbols for common icons (like camera, settings, etc.) and UIKit controls with tint colors to match branding. For a custom-styled button, they wrote a subclass that drew the gradient background with Core Graphics instead of exporting dozens of PNGs. According to Apple’s guidelines, they kept interactions standard (using UIKit elements ensured things like VoiceOver support were automatic). When a designer proposed an image-based toggle, they opted for UISwitch with custom colors to retain the native feel. The result was a UI that loaded faster (fewer image resources) and stayed consistent after iOS updates. In fact, when Apple introduced Dark Mode, AppCo’s app handled it with minimal changes because so many elements were using system-provided assets that automatically adapted.
2. Coding style:
The team agreed on a single style guide for both Swift and Objective-C parts of the app. For Swift, they followed the API Design Guidelines for naming and clarity, and in Objective-C, they adhered to Cocoa conventions (including prefixing their classes with APC for AppCo). They enabled SwiftLint in the project. At first, some longtime Objective-C developers were skeptical about “style rules,” but they soon appreciated the uniformity. Code reviews stopped commenting on spacing or naming issues – the linter handled those. Instead, reviews could focus on logic and architecture. Six months later, when AppCo hired new developers, those newcomers ramped up quickly: they found the codebase easy to read and the established patterns (like // MARK: - Networking to separate networking code in each file, etc.) intuitive. The lead iOS developer remarked that following these conventions “made our code feel as polished as Apple’s frameworks,” which was exactly the intention.
3. Version control & teamwork:
AppCo adopted a feature-branch workflow on GitHub. They created a develop branch for ongoing work and protected the main branch (which reflected what was in App Store). Each Jira ticket corresponded to a Git branch (named like feature/profile-screen or bugfix/crash-on-login). Developers got into the habit of opening pull requests early, even as “draft” PRs, so others could give feedback. They also used GitHub’s code owners feature to auto-request reviews from the relevant team members (e.g., tagging a senior dev for any changes in the core data model). One example of their branching paying off: a planned feature for video uploads was found to cause performance issues on older phones. It was slated for the upcoming release, but since it lived on its own branch, they simply didn’t merge it and postponed it to a later version – without having to rush out a removal or hide incomplete code. Meanwhile, they were able to ship other ready features. This kind of agility in managing the codebase kept their release train on schedule. They also regularly deleted merged branches and used labels on PRs (like “UI”, “Backend”, “Hotfix”) to organize the workflow – over time their repository stayed tidy despite hundreds of branches having been created and merged.
4. Tooling & automation:
AppCo set up Jenkins on a Mac mini to run CI, since this was before GitHub Actions for macOS was widely available. Every commit to any branch kicked off a build and test run. They configured Jenkins to use Fastlane for consistency. For instance, the Fastlane test lane would handle pod install, build, and run xcodebuild test with code coverage. If tests failed, Jenkins marked the build unstable and notified the team on Slack. They also set up a nightly job to run a heavier UI test suite (that wasn’t run on every commit due to time). This caught a memory leak in their feed view controller early on. For deployment, when ready to release, they’d push a tag like 1.5.0 to GitHub; Jenkins watched for new tags and triggered a Fastlane release lane. That lane would build the app with the App Store configuration and upload the binary to App Store Connect, then post in Slack “AppCo 1.5.0 build uploaded for review.” This removed the error-prone manual steps and allowed anyone on the team (not just the original “release manager”) to cut a release with confidence. During one release, Apple changed a requirement for screenshot sizes – their Fastlane script failed the upload and alerted them with a clear error. Within an hour, they updated their screenshot generation and the CI reran the upload successfully. Without this automation, they might have discovered the issue much later or scrambled at the last minute.
5. Reactive architecture with observables:
As the app matured and more features were added, the team noticed their networking and UI update logic was becoming hard to follow — especially as more asynchronous flows were chained together. Originally, they used completion handlers and delegation extensively, but the nesting made error handling messy and UI state difficult to manage.
They decided to adopt Combine for new Swift features and gradually refactor existing logic, especially for networking and form handling. For example, fetching a list of articles and loading related metadata used to involve multiple nested callbacks. Using Combine, they converted this flow into a clean publisher pipeline using flatMap, map, and catch. The result was code that read top-down and handled errors in one place, improving readability and reducing bugs.
On the UI side, they used @Published and Combine bindings to keep UI components like search bars, text fields, and segmented controls in sync with their view models. A great win came from a reactive validation pipeline for a multi-field signup form. Previously, each field had a delegate, and the logic to enable the submit button was scattered across several handlers. With Combine, they created publishers for each text field’s value, combined them using combineLatest, and mapped the result to a Boolean to control the button’s isEnabled state. This reduced the logic from 40+ lines of imperative code down to one declarative stream.
For legacy Objective-C modules, they introduced ReactiveObjC for observing property changes and async actions more declaratively. For instance, rather than tracking KVO manually on a status property and ensuring observers were removed, they used RACObserve to bind values directly to UI updates with less boilerplate and fewer lifecycle issues.
This shift to observables didn’t just make the code cleaner — it also helped onboarding. New developers found reactive code easier to trace, since the data flow was explicit and centralized. The team also caught several edge-case bugs early by handling errors explicitly in the Combine pipelines, something that was previously inconsistent with scattered callback-based handling.
Outcome:
After implementing these practices, AppCo’s development process became smoother and more predictable. UI consistency improved user ratings (users commented that the app “feels at home on iPhone” due to using familiar native components). Code consistency reduced bugs — for example, they eliminated several crashes caused by inconsistent nil-handling once everyone adopted Swift’s optional best practices uniformly. The versioning strategy meant no more “it works on my machine” surprises; everything was tested in a controlled environment before release. Deployments became routine rather than nerve-wracking. AppCo’s story mirrors what many professional iOS teams experience: by investing in best practices and tooling, they achieved a faster development cycle and a more robust, scalable app. These kinds of real-world results underscore why following best practices isn’t just dogma — it tangibly improves software quality and team efficiency.
Conclusion
By choosing native UI elements over images, adhering to clean code style, managing your codebase with Git best practices, and automating your workflow with modern tools, you set your iOS team up for success. Apple’s latest guidelines and the experience of countless developers point toward these practices as essential for scaling up an app without sacrificing quality. An intermediate developer or a company can start with these principles and adapt them to their needs — the payoff will be seen in more maintainable code, happier developers, and apps that delight users. Remember, the goal of best practices is to reduce friction: developers can then focus on innovation, confident that the fundamentals of the project are solid. Whether you’re building the next big social app or an enterprise solution, these iOS development best practices will help ensure your app is performant, consistent, and a joy to use and maintain.
Resources:
- https://developer.apple.com/design/human-interface-guidelines/getting-started
- https://stackoverflow.com/questions/35369300/ios-which-is-the-better-option-to-put-images-core-graphicspaintcode-app-vs#:~:text=Although,%20seeing%20as%20iOS%20hardware,complicated%20drawings%20on%20faster%20devices
- https://www.atlassian.com/git/tutorials/comparing-workflows#:~:text=Feature%20Branching%20is%20a%20logical,advantage%20for%20continuous%20integration%20environments
- https://www.runway.team/blog/choosing-the-right-branching-strategy-for-mobile-development
- https://docs.github.com/en/pull-requests/collaborating-with-pull-requests/getting-started/helping-others-review-your-changes
- https://www.avanderlee.com/swift/combine
- https://developer.apple.com/documentation/combine/using-combine-for-your-app-s-asynchronous-code
- https://developer.apple.com/documentation/combine/performing-key-value-observing-with-combine
- https://github.com/ReactiveCocoa/ReactiveObjC#:~:text=ReactiveObjC%20,and%20transforming%20streams%20of%20values