![[The AI Show Episode 142]: ChatGPT’s New Image Generator, Studio Ghibli Craze and Backlash, Gemini 2.5, OpenAI Academy, 4o Updates, Vibe Marketing & xAI Acquires X](https://www.marketingaiinstitute.com/hubfs/ep%20142%20cover.png)


![From drop-out to software architect with Jason Lengstorf [Podcast #167]](https://cdn.hashnode.com/res/hashnode/image/upload/v1743796461357/f3d19cd7-e6f5-4d7c-8bfc-eb974bc8da68.png?#)


.png?#)


_Christophe_Coat_Alamy.jpg?#)
 (1).webp?#)


![iPhone 17 Pro Won't Feature Two-Toned Back [Gurman]](https://www.iclarified.com/images/news/96944/96944/96944-640.jpg)
![Tariffs Threaten Apple's $999 iPhone Price Point in the U.S. [Gurman]](https://www.iclarified.com/images/news/96943/96943/96943-640.jpg)


Build Your Own Lightweight Containers Without Docker
Introduction: Application Isolation In the world of modern software development, containerization has become a game-changer. But what if I told you that you could create your own custom application environments directly within Linux without relying on Docker? Welcome to the world of manual containerization – a powerful technique that gives you easy control over your application's entire ecosystem. Imagine having the ability to spin up an isolated application environment with precise resource limitations, network configurations and system constraints while all using native Linux tools. This isn't just theoretical; it's a practical approach to creating lightweight, secure and highly customizable application containers that run directly on your Linux machine. Why Self-Containerization Matters Traditional containerization solutions like Docker are powerful but they can be heavyweight and complex. Sometimes running your application directly on Linux is a simpler and more efficient choice—so why not? After all, Docker itself is just a container running a mini OS, which adds extra overhead. This is where self-containerization using Linux namespaces and control groups (cgroups) comes in, offering several distinct advantages: Complete Resource Control: Precisely limit CPU, memory, network, and disk usage for each application Minimal Overhead: Run containers with virtually no performance penalty Deep System Understanding: Learn how containers actually work under the hood Flexibility: Create custom isolation environments tailored to your exact requirements Learning Opportunity: Gain insights into Linux internals and system-level programming, I mean why not? just challenge yourself! Prerequisites For this tutorial, you'll need: A cloud VM or local machine running Ubuntu 22.04.2 LTS Root or sudo access Basic understanding of Linux command-line operations Bash scripting knowledge (helpful but not mandatory) Container Architecture Diagram Here's a simple diagram description you can use (convert to an image using any drawing tool): ┌─────────────────────────────────────────────────────────────────┐ │ Host System │ │ │ │ ┌───────────────────────────────────────────────────────────┐ │ │ │ Container Namespace │ │ │ │ │ │ │ │ ┌─────────────────────────────────────────────────────┐ │ │ │ │ │ Chroot Environment │ │ │ │ │ │ │ │ │ │ │ │ ┌────────────┐ ┌──────────────────────────┐ │ │ │ │ │ │ │ Non-root │ │ Python Web Application │ │ │ │ │ │ │ │ User │ │ (Port 8000) │ │ │ │ │ │ │ └────────────┘ └──────────────────────────┘ │ │ │ │ │ │ │ │ │ │ │ │ Resource Limits (Cgroups) │ │ │ │ │ │ Memory: 256MB, CPU Weight: 50 │ │ │ │ │ └─────────────────────────────────────────────────────┘ │ │ │ │ │ │ │ │ Network: veth1-new (192.168.200.2) │ │ │ └───────────────────────────────────────────────────────────┘ │ │ │ │ Network: veth0-new (192.168.200.1) │ │ │ │ Port Forwarding: 80 → 192.168.200.2:8000 # note internal IP │ │ │ └─────────────────────────────────────────────────────────────────┘ │ │ Internet ▼ Public Access (Your VM Public IP) Tutorial Roadmap 1) Environment Setup Preparing your Linux system Installing necessary tools and dependencies 2) Root Filesystem Creation Building a minimal filesystem for your container Configuring basic system components 3) Resource Limitation with Cgroups Understanding control groups Setting CPU, memory, and I/O constraints 4) Sample Application Deployment Creating a demo application Verifying container configuration 5) Container Initialization Launching your isolated application environment Networking and namespace configuration Step 1: Environment Setup First, let's prepare our system with the necessary tools: # Update system packages sudo apt update sudo apt upgrade -y # Install required tools sudo apt install -y util-linux debootstrap iptables iproute2 cgroup-tools net-tools curl Step 2: Root Filesystem Creation Create a minimal root filesystem for our container: Distribution Choice: We're using Ubuntu 20.04 LTS (focal) for its sta

Introduction: Application Isolation
In the world of modern software development, containerization has become a game-changer. But what if I told you that you could create your own custom application environments directly within Linux without relying on Docker? Welcome to the world of manual containerization – a powerful technique that gives you easy control over your application's entire ecosystem.
Imagine having the ability to spin up an isolated application environment with precise resource limitations, network configurations and system constraints while all using native Linux tools. This isn't just theoretical; it's a practical approach to creating lightweight, secure and highly customizable application containers that run directly on your Linux machine.
Why Self-Containerization Matters
Traditional containerization solutions like Docker are powerful but they can be heavyweight and complex. Sometimes running your application directly on Linux is a simpler and more efficient choice—so why not? After all, Docker itself is just a container running a mini OS, which adds extra overhead.
This is where self-containerization using Linux namespaces and control groups (cgroups) comes in, offering several distinct advantages:
- Complete Resource Control: Precisely limit CPU, memory, network, and disk usage for each application
- Minimal Overhead: Run containers with virtually no performance penalty
- Deep System Understanding: Learn how containers actually work under the hood
- Flexibility: Create custom isolation environments tailored to your exact requirements
- Learning Opportunity: Gain insights into Linux internals and system-level programming, I mean why not? just challenge yourself!
Prerequisites
For this tutorial, you'll need:
- A cloud VM or local machine running Ubuntu 22.04.2 LTS
- Root or sudo access
- Basic understanding of Linux command-line operations
- Bash scripting knowledge (helpful but not mandatory)
Container Architecture Diagram
Here's a simple diagram description you can use (convert to an image using any drawing tool):
┌─────────────────────────────────────────────────────────────────┐
│                          Host System                            │
│                                                                 │
│  ┌───────────────────────────────────────────────────────────┐  │
│  │                   Container Namespace                     │  │
│  │                                                           │  │
│  │  ┌─────────────────────────────────────────────────────┐  │  │
│  │  │              Chroot Environment                     │  │  │
│  │  │                                                     │  │  │
│  │  │  ┌────────────┐    ┌──────────────────────────┐     │  │  │
│  │  │  │ Non-root   │    │ Python Web Application   │     │  │  │
│  │  │  │   User     │    │      (Port 8000)         │     │  │  │
│  │  │  └────────────┘    └──────────────────────────┘     │  │  │
│  │  │                                                     │  │  │
│  │  │              Resource Limits (Cgroups)              │  │  │
│  │  │         Memory: 256MB, CPU Weight: 50               │  │  │
│  │  └─────────────────────────────────────────────────────┘  │  │
│  │                                                           │  │
│  │  Network: veth1-new (192.168.200.2)                       │  │
│  └───────────────────────────────────────────────────────────┘  │
│                                                                 │
│  Network: veth0-new (192.168.200.1)                             │
│                                                                 │
│  Port Forwarding: 80 → 192.168.200.2:8000 # note internal IP    │                 │                                                                 │
└─────────────────────────────────────────────────────────────────┘
         │
         │ Internet
         ▼
    Public Access
   (Your VM Public IP)
Tutorial Roadmap
1) Environment Setup
- Preparing your Linux system
- Installing necessary tools and dependencies
2) Root Filesystem Creation
- Building a minimal filesystem for your container
- Configuring basic system components
3) Resource Limitation with Cgroups
- Understanding control groups
- Setting CPU, memory, and I/O constraints
4) Sample Application Deployment
- Creating a demo application
- Verifying container configuration
5) Container Initialization
- Launching your isolated application environment
- Networking and namespace configuration
Step 1: Environment Setup
First, let's prepare our system with the necessary tools:
# Update system packages
sudo apt update
sudo apt upgrade -y

# Install required tools
sudo apt install -y util-linux debootstrap iptables iproute2 cgroup-tools net-tools curl
Step 2: Root Filesystem Creation
Create a minimal root filesystem for our container:
Distribution Choice: We're using Ubuntu 20.04 LTS (focal) for its stability and long-term support. While not the absolute latest, it provides a balance between up-to-date packages and system reliability. For the most recent LTS, consider using jammy (Ubuntu 22.04) in the debootstrap command.
# Create project directory
mkdir -p ~/container-forge/rootfs

# Create minimal Ubuntu filesystem
sudo debootstrap --variant=minbase focal ~/container-forge/rootfs

# Create necessary directories
sudo mkdir -p ~/container-forge/rootfs/{proc,sys,dev,tmp,run,home,opt}

# Set hostname
echo "containerforge" | sudo tee ~/container-forge/rootfs/etc/hostname

# Install basic packages
sudo chroot ~/container-forge/rootfs apt update
sudo chroot ~/container-forge/rootfs apt install -y python3 net-tools iputils-ping iproute2 curl

# Create non-root user
sudo chroot ~/container-forge/rootfs useradd -m container_user
Step 3: Resource Limitation with Cgroups
Set up resource limits using cgroups:
Note on Cgroup Versions: Linux has two major cgroup versions - v1 and v2. While v2 is the newer standard, some distributions still use v1 or provide mixed support. Before running these commands, check your system's cgroup version using mount | grep cgroup to ensure compatibility.
# Create cgroup directory
sudo mkdir -p /sys/fs/cgroup/containerforge

# Set memory limit (256MB)
echo "268435456" | sudo tee /sys/fs/cgroup/containerforge/memory.max

# Set CPU weight (50 out of 100)
echo "50" | sudo tee /sys/fs/cgroup/containerforge/cpu.weight

# Enable controllers
echo "+memory +cpu" | sudo tee /sys/fs/cgroup/containerforge/cgroup.subtree_control
Step 4: Sample Application Deployment
Create a simple Python web application:
# Create application directory
sudo mkdir -p ~/container-forge/rootfs/opt/python-app

# Create Python web application
cat << EOF | sudo tee ~/container-forge/rootfs/opt/python-app/app.py
#!/usr/bin/env python3
from http.server import HTTPServer, BaseHTTPRequestHandler

class SimpleHTTPRequestHandler(BaseHTTPRequestHandler):
    def do_GET(self):
        self.send_response(200)
        self.send_header('Content-type', 'text/html')
        self.end_headers()
        self.wfile.write(b'Hello World this is Muad from Python app!')

httpd = HTTPServer(('0.0.0.0', 8000), SimpleHTTPRequestHandler)
print("Server started at http://0.0.0.0:8000")
httpd.serve_forever()
EOF

# Make the application executable
sudo chmod +x ~/container-forge/rootfs/opt/python-app/app.py
Step 5: Container Initialization
Set up networking and launch the container:
NB: the ROOTFS path (/home/ubuntu/container-forge/rootfs) ADD your specific username.
NB: # Ensure port 80 is open (if using a cloud VM)

sudo ufw allow 80/tcp  # For Ubuntu's firewall
# Create network namespace
sudo ip netns add container-net-new

# Create virtual ethernet pair
sudo ip link add veth0-new type veth peer name veth1-new

# Move veth1-new to container namespace
sudo ip link set veth1-new netns container-net-new

# Configure host end
sudo ip addr add 192.168.200.1/24 dev veth0-new
sudo ip link set veth0-new up

# Configure container end
sudo ip netns exec container-net-new ip addr add 192.168.200.2/24 dev veth1-new
sudo ip netns exec container-net-new ip link set veth1-new up
sudo ip netns exec container-net-new ip link set lo up

# Enable IP forwarding
sudo sysctl -w net.ipv4.ip_forward=1

# Set up NAT for outbound connections
sudo iptables -t nat -A POSTROUTING -s 192.168.200.0/24 -j MASQUERADE

# Add default route in container
sudo ip netns exec container-net-new ip route add default via 192.168.200.1

# Run the containerized application
ROOTFS="/home/gradific/container-forge/rootfs"
sudo ip netns exec container-net-new \
  sudo chroot $ROOTFS su - container_user -c "cd /opt/python-app && python3 app.py"
Deployment and Monitoring
To make your container accessible from the internet:
# Stop Nginx if it's running
sudo systemctl kill nginx

# Set up port forwarding
sudo iptables -t nat -A PREROUTING -p tcp --dport 80 -j DNAT --to-destination 192.168.200.2:8000
sudo iptables -A FORWARD -p tcp -d 192.168.200.2 --dport 8000 -j ACCEPT
Now your application is accessible at:
http://
Results
Environment Setup
Screenshot of successful installation of required tools
Example command: dpkg -l | grep -E 'debootstrap|util-linux|iptables|iproute2|cgroup-tools':
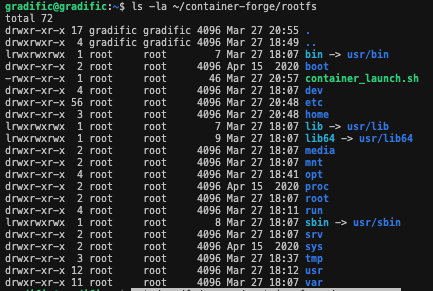
Root Filesystem Creation
Screenshot of the filesystem structure: ls -la ~/container-forge/rootfs:
Resource Limits
Screenshot of cgroup setup: cat /sys/fs/cgroup/containerforge/memory.max:
![]()
Screenshot of CPU limits: cat /sys/fs/cgroup/containerforge/cpu.weight:
![]()
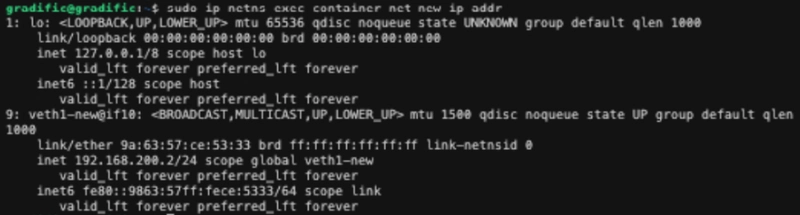
Network Configuration
Screenshot of network namespace: ip netns list:

Screenshot of container interfaces: sudo ip netns exec container-net-new ip addr:
Screenshot of host interfaces: ip addr | grep veth0-new:

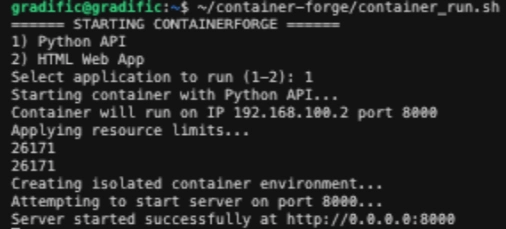
Container Running
Screenshot of Python server running:
Screenshot of accessing via curl: curl http://192.168.200.2:8000:
![]()
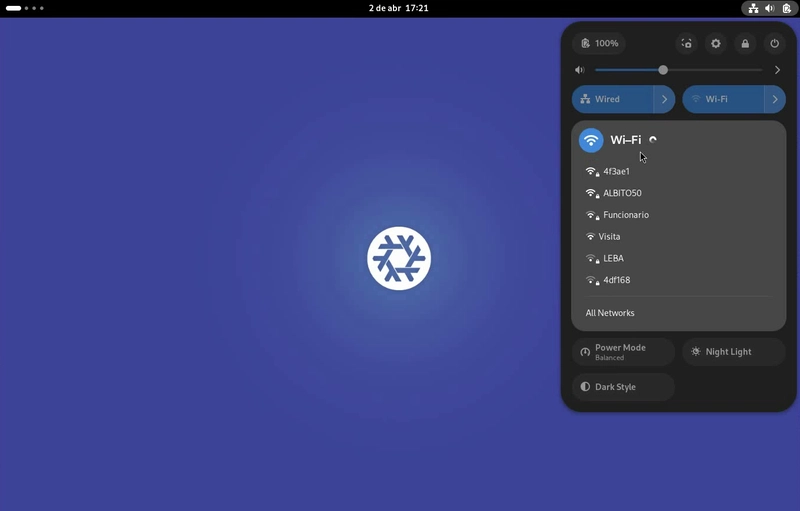
Public Access
Browser screenshot showing the page:

Cleanup Script
Cleanup Note: After completing this exercise, use the provided cleanup script to remove container resources and restore your system to its original state:
To create and use the cleanup script:
- Create the script:
nano ~/container-cleanup.sh
- Then add the script text below:
#!/bin/bash

# Clean up network namespace
sudo ip netns delete container-net-new

# Remove iptables rules
sudo iptables -t nat -D PREROUTING -p tcp --dport 80 -j DNAT --to-destination 192.168.200.2:8000
sudo iptables -D FORWARD -p tcp -d 192.168.200.2 --dport 8000 -j ACCEPT
sudo iptables -t nat -D POSTROUTING -s 192.168.200.0/24 -j MASQUERADE

# Remove cgroup
sudo rmdir /sys/fs/cgroup/containerforge
- Save the file:
Press Ctrl + X
Press Y
Press Enter
- Make the script executable:
chmod +x ~/container-cleanup.sh
- Run the script
~/container-cleanup.sh
Challenges and Learnings
Let's be real – containerization isn't always smooth sailing. I'll share my personal challenges, including:
Managing cgroup inconsistencies
Cgroup Configuration:
- Different Linux distributions use different cgroup versions
Namespace configuration hurdles
Network Isolation:
- Setting up proper network namespaces and routing
Common denied access in container creation
Filesystem Permissions:
- Ensuring proper access rights in the chroot environment
Troubleshooting techniques
Resource Limits:
- Verifying that cgroup limits were actually being enforced
Security Considerations
When manually creating containers be mindful of:
- Limiting root access within the container
- Implementing strict network isolation
- Regularly updating base system packages
- Using non-root users for application execution
- Configuring minimal necessary permissions
Pro Tip: Always treat containers as potential attack surfaces and apply the principle of least privilege.
Pro Tips