Deploying a Web App with Nginx, MySQL, and AWS: A Step-by-Step Guide
Introduction Imagine you’ve built an amazing web application, but now comes the crucial part—deployment. You need a scalable, high-performance, and reliable way to serve your users. This is where Nginx, MySQL, and AWS come into play. In this guide, we’ll walk you through deploying a web app using Nginx as a reverse proxy, MySQL as the database, and AWS as the cloud provider. Whether you’re a beginner or an advanced DevOps engineer, this guide will help you set up a robust deployment pipeline. Table of Contents Prerequisites Setting Up AWS EC2 Instance Installing and Configuring Nginx Setting Up MySQL Database Deploying the Web Application Configuring Domain and SSL Troubleshooting Common Issues Real-World Use Cases & Comparisons Resources & Further Reading 1. Prerequisites Before we begin, make sure you have: An AWS account Basic knowledge of Linux commands A web application ready for deployment A registered domain (optional but recommended) 2. Setting Up an AWS EC2 Instance Step 1: Launch an EC2 Instance Log into your AWS account and navigate to EC2. Click Launch Instance and choose an Amazon Linux or Ubuntu AMI. Select an instance type (t2.micro for free-tier users). Configure security groups to allow HTTP (80), HTTPS (443), and SSH (22) access. Launch and connect using SSH: ssh -i your-key.pem ec2-user@your-ec2-public-ip 3. Installing and Configuring Nginx Step 1: Install Nginx sudo apt update && sudo apt install nginx -y sudo systemctl start nginx sudo systemctl enable nginx Step 2: Configure Nginx as a Reverse Proxy Open the Nginx config file: sudo nano /etc/nginx/sites-available/default Update the file with: server { listen 80; server_name your-domain.com; location / { proxy_pass http://localhost:3000; # Change port based on your app proxy_set_header Host $host; proxy_set_header X-Real-IP $remote_addr; } } Restart Nginx: sudo systemctl restart nginx 4. Setting Up MySQL Database sudo apt install mysql-server -y sudo mysql_secure_installation Creating a Database and User CREATE DATABASE webapp_db; CREATE USER 'webapp_user'@'localhost' IDENTIFIED BY 'yourpassword'; GRANT ALL PRIVILEGES ON webapp_db.* TO 'webapp_user'@'localhost'; FLUSH PRIVILEGES; 5. Deploying the Web Application Cloning the App and Running It git clone https://github.com/your-repo/webapp.git cd webapp npm install # or pip install -r requirements.txt ohup npm start & 6. Configuring Domain and SSL with Certbot sudo apt install certbot python3-certbot-nginx -y sudo certbot --nginx -d your-domain.com 7. Troubleshooting Common Issues | Issue | Solution | |--------|----------| | Nginx not starting | Check logs: sudo journalctl -xe | | MySQL connection error | Verify credentials and user grants | | Web app not running | Check app logs: cat nohup.out | 8. Real-World Use Cases & Comparisons How Companies Use This Setup Startups: Deploy scalable applications quickly E-commerce: Handle high traffic efficiently SAAS Products: Secure, optimized database and web server setup Comparison: Docker vs Virtual Machines | Feature | Docker | Virtual Machines | |---------|--------|-----------------| | Performance | Faster | Slower | | Resource Usage | Low | High | | Isolation | Limited | Full | 9. Resources & Further Reading AWS EC2 Documentation Nginx Configuration Guide MySQL Official Docs What do you think? Comment below! Subscribe for more DevOps insights and follow us on LinkedIn!

Introduction
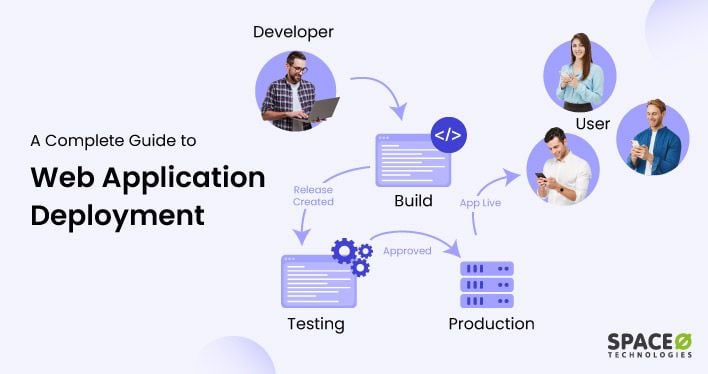
Imagine you’ve built an amazing web application, but now comes the crucial part—deployment. You need a scalable, high-performance, and reliable way to serve your users. This is where Nginx, MySQL, and AWS come into play.
In this guide, we’ll walk you through deploying a web app using Nginx as a reverse proxy, MySQL as the database, and AWS as the cloud provider. Whether you’re a beginner or an advanced DevOps engineer, this guide will help you set up a robust deployment pipeline.
Table of Contents
- Prerequisites
- Setting Up AWS EC2 Instance
- Installing and Configuring Nginx
- Setting Up MySQL Database
- Deploying the Web Application
- Configuring Domain and SSL
- Troubleshooting Common Issues
- Real-World Use Cases & Comparisons
- Resources & Further Reading
1. Prerequisites
Before we begin, make sure you have:
- An AWS account
- Basic knowledge of Linux commands
- A web application ready for deployment
- A registered domain (optional but recommended)
2. Setting Up an AWS EC2 Instance
Step 1: Launch an EC2 Instance
- Log into your AWS account and navigate to EC2.
- Click Launch Instance and choose an Amazon Linux or Ubuntu AMI.
- Select an instance type (t2.micro for free-tier users).
- Configure security groups to allow HTTP (80), HTTPS (443), and SSH (22) access.
- Launch and connect using SSH:
ssh -i your-key.pem ec2-user@your-ec2-public-ip
3. Installing and Configuring Nginx
Step 1: Install Nginx
sudo apt update && sudo apt install nginx -y
sudo systemctl start nginx
sudo systemctl enable nginx
Step 2: Configure Nginx as a Reverse Proxy
- Open the Nginx config file:
sudo nano /etc/nginx/sites-available/default
- Update the file with:
   server {
       listen 80;
       server_name your-domain.com;
       location / {
           proxy_pass http://localhost:3000; # Change port based on your app
           proxy_set_header Host $host;
           proxy_set_header X-Real-IP $remote_addr;
       }
   }
- Restart Nginx:
sudo systemctl restart nginx
4. Setting Up MySQL Database
sudo apt install mysql-server -y
sudo mysql_secure_installation
Creating a Database and User
CREATE DATABASE webapp_db;
CREATE USER 'webapp_user'@'localhost' IDENTIFIED BY 'yourpassword';
GRANT ALL PRIVILEGES ON webapp_db.* TO 'webapp_user'@'localhost';
FLUSH PRIVILEGES;
5. Deploying the Web Application
Cloning the App and Running It
git clone https://github.com/your-repo/webapp.git
cd webapp
npm install # or pip install -r requirements.txt
ohup npm start &
6. Configuring Domain and SSL with Certbot
sudo apt install certbot python3-certbot-nginx -y
sudo certbot --nginx -d your-domain.com
7. Troubleshooting Common Issues
| Issue | Solution |
|--------|----------|
| Nginx not starting | Check logs: sudo journalctl -xe |
| MySQL connection error | Verify credentials and user grants |
| Web app not running | Check app logs: cat nohup.out |
8. Real-World Use Cases & Comparisons
How Companies Use This Setup
- Startups: Deploy scalable applications quickly
- E-commerce: Handle high traffic efficiently
- SAAS Products: Secure, optimized database and web server setup
Comparison: Docker vs Virtual Machines
| Feature | Docker | Virtual Machines |
|---------|--------|-----------------|
| Performance | Faster | Slower |
| Resource Usage | Low | High |
| Isolation | Limited | Full |
9. Resources & Further Reading
What do you think? Comment below!
Subscribe for more DevOps insights and follow us on LinkedIn!


![[The AI Show Episode 142]: ChatGPT’s New Image Generator, Studio Ghibli Craze and Backlash, Gemini 2.5, OpenAI Academy, 4o Updates, Vibe Marketing & xAI Acquires X](https://www.marketingaiinstitute.com/hubfs/ep%20142%20cover.png)




![[DEALS] The Premium Learn to Code Certification Bundle (97% off) & Other Deals Up To 98% Off – Offers End Soon!](https://www.javacodegeeks.com/wp-content/uploads/2012/12/jcg-logo.jpg)


![From drop-out to software architect with Jason Lengstorf [Podcast #167]](https://cdn.hashnode.com/res/hashnode/image/upload/v1743796461357/f3d19cd7-e6f5-4d7c-8bfc-eb974bc8da68.png?#)


.png?#)


.jpg?#)


_Christophe_Coat_Alamy.jpg?#)
 (1).webp?#)





![Rapidus in Talks With Apple as It Accelerates Toward 2nm Chip Production [Report]](https://www.iclarified.com/images/news/96937/96937/96937-640.jpg)


