


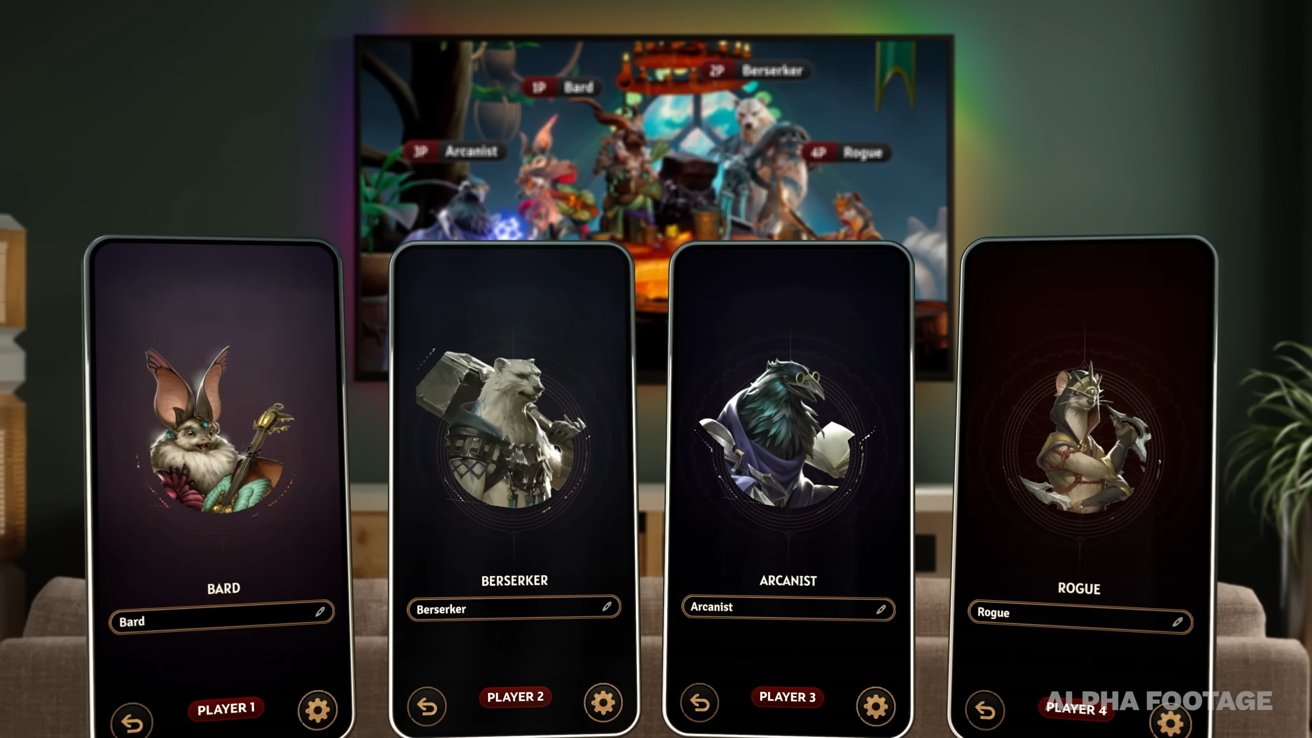
![[The AI Show Episode 144]: ChatGPT’s New Memory, Shopify CEO’s Leaked “AI First” Memo, Google Cloud Next Releases, o3 and o4-mini Coming Soon & Llama 4’s Rocky Launch](https://www.marketingaiinstitute.com/hubfs/ep%20144%20cover.png)


![API design for precomputation cache [closed]](https://cdn.sstatic.net/Sites/softwareengineering/Img/apple-touch-icon@2.png?v=1ef7363febba)


_NicoElNino_Alamy.png?width=1280&auto=webp&quality=80&disable=upscale#)
_Olekcii_Mach_Alamy.jpg?width=1280&auto=webp&quality=80&disable=upscale#)


![Apple appealing $570M EU fine, White House says it won’t be tolerated [U]](https://i0.wp.com/9to5mac.com/wp-content/uploads/sites/6/2025/04/Apple-says-570M-EU-fine-is-unfair-White-House-says-it-wont-be-tolerated.jpg?resize=1200%2C628&quality=82&strip=all&ssl=1)


![At Least Three iPhone 17 Models to Feature 12GB RAM [Kuo]](https://www.iclarified.com/images/news/97122/97122/97122-640.jpg)

![Dummy Models Showcase 'Unbelievably' Thin iPhone 17 Air Design [Images]](https://www.iclarified.com/images/news/97114/97114/97114-640.jpg)


Deploy a Django Rest Api on AWS EC2 using Docker, NGINX, Gunicorn and GitHub Action.
Django, a high-level Python web framework, is a popular choice for building RESTful APIs. Once your Django Rest API has been developed and tested, deploying it becomes a crucial step in making it accessible to users. In this blog post, we’ll guide you through the process of deploying a Django Rest API on AWS EC2 using Docker for containerization, NGINX as a reverse proxy and GitHub Actions for automated deployment. And, we’ll take a closer look at each step, explain the concepts, provide code snippets and show you exactly what you need to do. Let’s get to the heart of the matter! Prerequisites Before diving into this blog, you need a solid foundation in several technologies and concepts in order to ensure efficient implementation. Such as: Django: a high-level Python web framework. Django REST framework: is a powerful and flexible toolkit for building Web APIs. NGINX: A basic knowledge of NGINX as a web server and reverse proxy will be necessary to set up the server environment. AWS Account: Create an AWS account and set up an EC2 instance. Docker: Install Docker on your local machine for building and running containers. GitHub Repository: Host your Django project on a GitHub repository. Keep in mind that these requirements are essential, but that you don’t have to be an expert in every field. You can learn and develop your expertise as you go along. Moreover, official documentation online tutorials and communities can provide invaluable support as you learn. Note that you can folk the source code at this the following repo: Try it yourself. Create a New Project Open your terminal and navigate to the directory where you want to create the project, for the purpose of this tutorial we’ll create a directory with a name django-tutorial or you can name it anything depending on your project name. This folder is considered as the root directory for our application which contains all folders and files structures. Then, we will change our directory into the django-tutorial folder and all other parts of configuration files or folders will be in this folder. > mkdir django-tutorial > cd django-tutorial 1. Creating the Rest API First of all, we need to install Django and Django Rest Framework, so make sure you already have Python installed on your machine. create a virtual environment: Inside the django-tutorial folder, to create and activate a new virtual environment runs the following command : python3 -m venv .venv source .venv/bin/activate Set up Django project We’ll be using pip, which is the package installer for Python, to install the required dependencies. Run the following commands: django-tutorial$ pip install Django django-tutorial$ pip install djangorestframework django-tutorial$ pip install gunicorn django-tutorial$ pip install django-cors-headers Now let’s create a Django project and name it store django-tutorial$ django-admin startproject store Create a Django app: django-tutorial$ cd store django-tutorial$ python manage.py startapp book Define a book model In the book/models.py, define the book model from django.db import models class Book(models.Model): title = models.CharField(max_length=200) author = models.CharField(max_length=100) publication_date = models.DateField() description = models.TextField() Create a serializer for the Book model Inside book directory, let’s create a file named serializers.py to define the BookSerializer. from rest_framework import serializers from .models import Books class BookSerializer (serializers.ModelSerializer): class Meta: model = Books fields = '__all__' Define a Views model In the book/views.py , let’s define the BookViewSet model, which will handle the API requests from rest_framework import viewsets from .models import Books from .serializers import BookSerializer class BookViewSet(viewsets.ModelViewSet): queryset = Books.objects.all() serializer_class = BookSerializer Define a URL routing In the core/urls.py, let’s add the route url for the application from django.urls import include, path from rest_framework.routers import DefaultRouter from books.views import BookViewSet router = DefaultRouter() router.register(r'book', BookViewSet) urlpatterns = [ path('admin/', admin.site.urls), path('', include(router.urls)), ] After that, let's update core/settings.py : INSTALLED_APPS = [ ... 'rest_framework', 'corsheaders', 'gunicorn', ... 'book', ] Also let’s add the Corsheaders middlewares here: MIDDLEWARE = [ ..... "corsheaders.middleware.CorsMiddleware", "django.middleware.common.CommonMiddleware", .... ] Test REST API locally First all, let make the migrations to create the database table python manage.py makemigrations python manage.py migrate Start the Django development server: py
Django, a high-level Python web framework, is a popular choice for building RESTful APIs. Once your Django Rest API has been developed and tested, deploying it becomes a crucial step in making it accessible to users.
In this blog post, we’ll guide you through the process of deploying a Django Rest API on AWS EC2 using Docker for containerization, NGINX as a reverse proxy and GitHub Actions for automated deployment.
And, we’ll take a closer look at each step, explain the concepts, provide code snippets and show you exactly what you need to do. Let’s get to the heart of the matter!
Prerequisites
Before diving into this blog, you need a solid foundation in several technologies and concepts in order to ensure efficient implementation. Such as:
- Django: a high-level Python web framework.
- Django REST framework: is a powerful and flexible toolkit for building Web APIs.
- NGINX: A basic knowledge of NGINX as a web server and reverse proxy will be necessary to set up the server environment.
- AWS Account: Create an AWS account and set up an EC2 instance.
- Docker: Install Docker on your local machine for building and running containers.
- GitHub Repository: Host your Django project on a GitHub repository.
Keep in mind that these requirements are essential, but that you don’t have to be an expert in every field. You can learn and develop your expertise as you go along. Moreover, official documentation online tutorials and communities can provide invaluable support as you learn.
Note that you can folk the source code at this the following repo: Try it yourself.
Create a New Project
Open your terminal and navigate to the directory where you want to create the project, for the purpose of this tutorial we’ll create a directory with a name django-tutorial or you can name it anything depending on your project name. This folder is considered as the root directory for our application which contains all folders and files structures.
Then, we will change our directory into the django-tutorial folder and all other parts of configuration files or folders will be in this folder.
 > mkdir django-tutorial
 > cd django-tutorial
1. Creating the Rest API
First of all, we need to install Django and Django Rest Framework, so make sure you already have Python installed on your machine.
create a virtual environment:
Inside the django-tutorial folder, to create and activate a new virtual environment runs the following command :
python3 -m venv .venv
source .venv/bin/activate
Set up Django project
We’ll be using pip, which is the package installer for Python, to install the required dependencies. Run the following commands:
django-tutorial$ pip install Django
django-tutorial$ pip install djangorestframework
django-tutorial$ pip install gunicorn
django-tutorial$ pip install django-cors-headers
Now let’s create a Django project and name it store
django-tutorial$ django-admin startproject store
Create a Django app:
django-tutorial$ cd store
django-tutorial$ python manage.py startapp book
Define a book model
In the book/models.py, define the book model
from django.db import models

class Book(models.Model):
    title = models.CharField(max_length=200)
    author = models.CharField(max_length=100)
    publication_date = models.DateField()
    description = models.TextField()
Create a serializer for the Book model
Inside book directory, let’s create a file named serializers.py to define the BookSerializer.
from rest_framework import serializers
from .models import Books

class BookSerializer (serializers.ModelSerializer):
  class Meta:
      model = Books
      fields = '__all__'
Define a Views model
In the book/views.py , let’s define the BookViewSet model, which will handle the API requests
from rest_framework import viewsets
from .models import Books
from .serializers import BookSerializer

class BookViewSet(viewsets.ModelViewSet):
    queryset = Books.objects.all()
    serializer_class = BookSerializer
Define a URL routing
In the core/urls.py, let’s add the route url for the application
from django.urls import include, path
from rest_framework.routers import DefaultRouter
from books.views import BookViewSet

router = DefaultRouter()
router.register(r'book', BookViewSet)

urlpatterns = [
    path('admin/', admin.site.urls),
    path('', include(router.urls)),
]
After that, let's update core/settings.py :
INSTALLED_APPS = [
    ...
    'rest_framework',
    'corsheaders',
    'gunicorn',
    ...
    'book',
]
Also let’s add the Corsheaders middlewares here:
MIDDLEWARE = [
    .....
    "corsheaders.middleware.CorsMiddleware",
    "django.middleware.common.CommonMiddleware",
    ....
]
Test REST API locally
First all, let make the migrations to create the database table
python manage.py makemigrations
python manage.py migrate
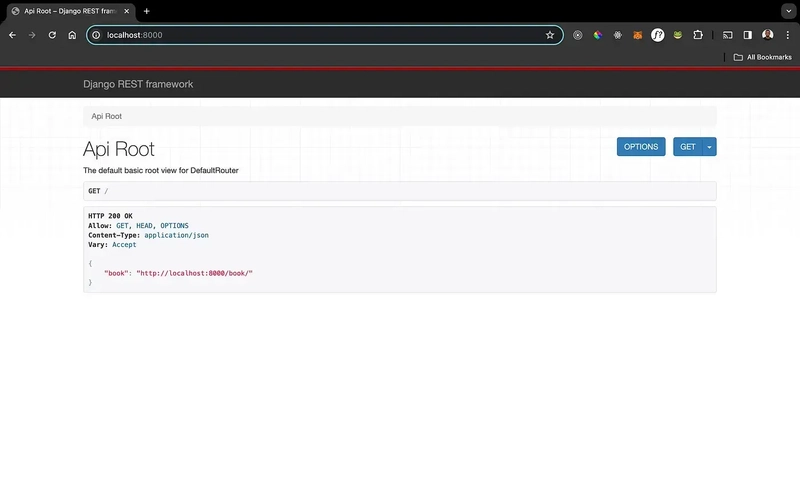
Start the Django development server:
python manage.py runserver
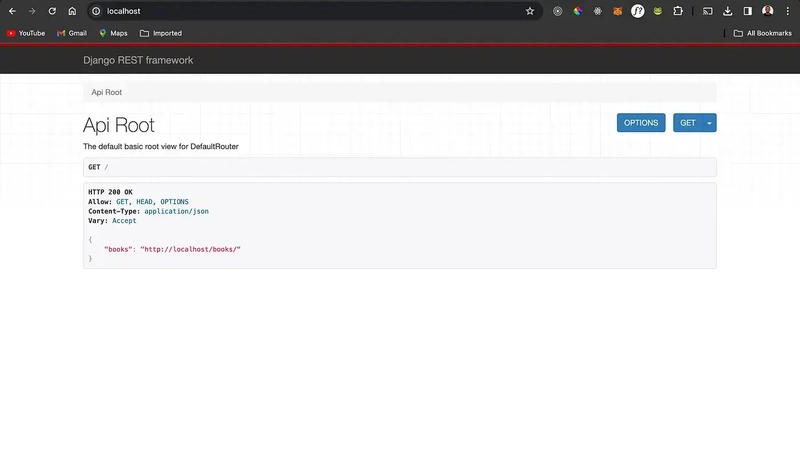
And should able to access the REST API at the http://localhost:8000 or http://127.0.0.1:8000
Before diving into the next section, let’s create requirements.txt file in the root directory which contains a list of all the installed packages in your Python environment, along with their corresponding versions, to generate the requirements file using:
pip freeze > requirements.txt
2. Add Docker to the Rest API
Docker provides a standardized way to package and distribute applications, making it easier to deploy and manage across different environments. In this section, we’ll containerize our Django application using Docker.
If you haven’t already, install Docker on your machine by following the instructions for your operating system: https://docs.docker.com/get-docker/
Create a Dockerfile:
In your Django project’s store directory(in the same directory where manage.py is located ), create a file named Dockerfile. This file defines the instructions to build your Docker image.
# Pull the image from Dockerhub
FROM python:alpine3.19

WORKDIR /store

# set up python environment variables

ENV PYTHONDOWNWRITEBYTECODE 1
ENV PYTHONNUNBUFFER 1

# update and  install dependencies
RUN pip install --upgrade pip
COPY ./requirements.txt /api/requirements.txt
RUN pip install -r /api/requirements.txt

# copy project
COPY . .

# Expose the port server is running on
EXPOSE 8000
Since in this project will have more than one container , then we ‘ll need to use docker-compose
Create a Docker-compose file:
Allows you to define and run multiple Docker containers as a single service, making it easier to manage complex applications.
If you haven’t already, you’ll need to install Docker Compose.
Follow the installation instructions for your operating system: https://docs.docker.com/compose/install
In your project’s root directory as django-tutorial, create a file named docker-compose.yml.
version: '3'
services:
  bookApi:
    build:
      context: ./store
      dockerfile: Dockerfile
    command: python manage.py runserver
    ports:
      - "8000:8000"
This defines only one service bookapi but a bit later more will be added.
Run the Django app using Docker:
So in order to test it, just go in your terminal, navigate to the directory containing the docker-compose.yml file.
docker-compose up
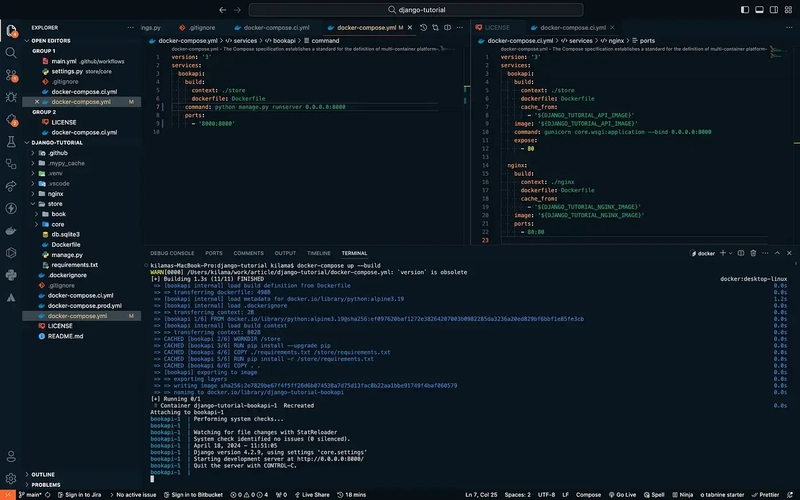
You can access your django app at http://localhost:8000. Kill the task in the terminal where docker-compose up is running in order to stop the. To remove the containers and their associated resources:
docker-compose down --rmi all
Adding a Gunicorn:
The Gunicorn “Green Unicorn” is a Python Web Server Gateway Interface HTTP server.
So, let updating the docker-compose file for the api service to start with gunicorn as web server gateway
version: '3'
services:
  api:
    build:
      context: ./store
      dockerfile: Dockerfile
    command: gunicorn core.wsgi:application --bind 0.0.0.0:8000
3. Adding NGINX:
NGINX is a web server for content and application delivery and can also be used as a reverse-proxy which improve performance and manage routing in production environments.
In the root of your project directory, create a Nginx directory named nginx then create a configuration file named nginx.conf . So inside nginx.conf file adds the following configuration:
# nginx.conf
upstream api_upstream {
   server api:8000;
  }
server {
   listen 80;
   server_name localhost;
   #server_name can add your domain or Ip address for your server in the production
   client_max_body_size 200M;
   location / {
      proxy_set_header X-Url-Scheme $scheme;
      proxy_set_header X-Forwarded-For $proxy_add_x_forwarded_for;
      proxy_set_header Host $http_host;
      proxy_redirect off;
      proxy_pass http://api_upstream;
     }
 }
in the same directory as your Nginx, create a Dockerfile which defines how to build a custom Nginx Docker Image:
# Use an official Nginx image as the base image
FROM nginx:latest
# Remove any existing config files
RUN rm /etc/nginx/conf.d/*
# Copy the custom Nginx configuration
COPY nginx.conf /etc/nginx/conf.d/
# Expose port 80 for Nginx
EXPOSE 80
Before testing in development, let’s update our docker-compose file by adding the Nginx service:
version: '3'
services:
  api:
    build:
      context: ./store
      dockerfile: Dockerfile
      command: gunicorn core.wsgi:application --bind 0.0.0.0:8000
    volumes:
      - static_volume:/store/staticfiles/
      - media_volume:/store/mediafiles/
    expose:
      - 80
  nginx:
    build:
      context: ./nginx
      dockerfile: Dockerfile
    ports:
      - 80:80
    volumes:
      - static_volume:/store/staticfiles/
      - media_volume:/store/mediafiles/
volumes:
  static_volume:
  media_volume:
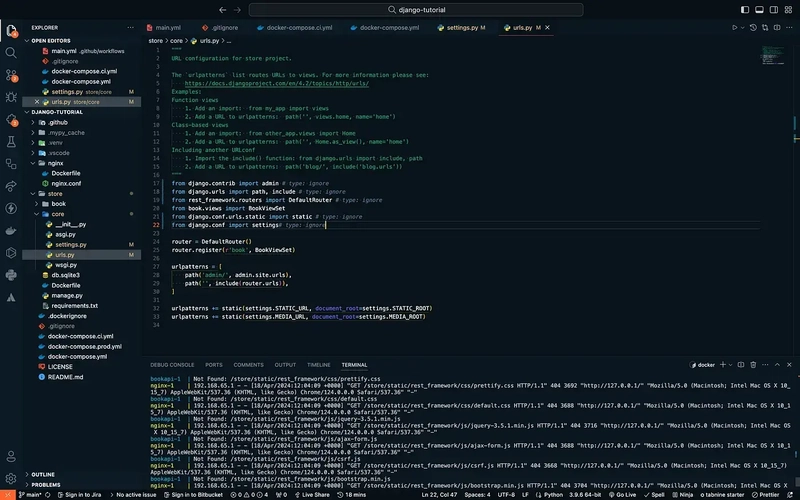
Let updating core/settings.py and core/urls.py with STATIC_ROOT to ensure that all static files are gathered and ready to be served by the web server.
core/settings.py
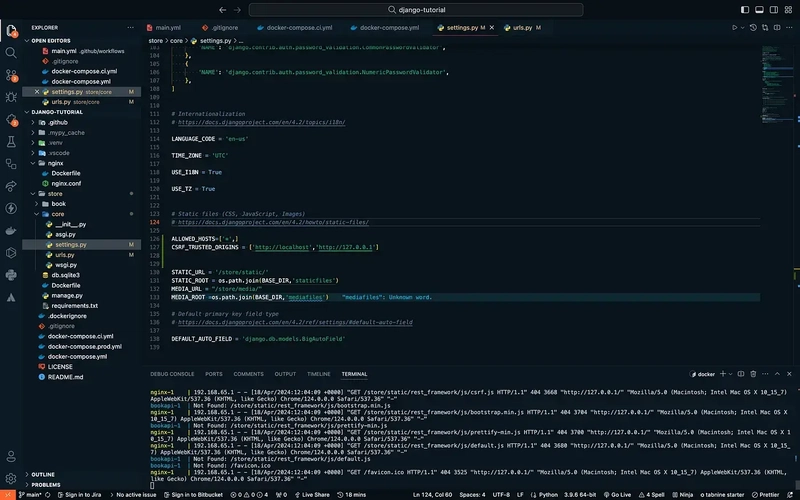
and core/urls.py
For the purpose of testing if everything works, we’ll open a terminal and navigate to your root directory. Run the following command:
docker-compose up
Then let’s testing at http://localhost:80 or http://127.0.0.1:80
To remove the container and its associated resources, run:
docker-compose rm
Then, let’s create docker-compose.ci and docker-compose.prod files for the production and workflow purpose in the root directory of the project
docker-compose.ci
version: '3'
services:
  bookapi:
    build:
      context: ./store
      dockerfile: Dockerfile
      cache_from:
        - '${DJANGO_TUTORIAL_API_IMAGE}'
    image: '${DJANGO_TUTORIAL_API_IMAGE}'
    command: gunicorn core.wsgi:application --bind 0.0.0.0:8000
    expose:
      - 80
  nginx:
    build:
     context: ./nginx
     dockerfile: Dockerfile
    cache_from:
          - '${DJANGO_TUTORIAL_NGINX_IMAGE}'
      image: '${DJANGO_TUTORIAL_NGINX_IMAGE}'
    ports:
      - 80:80
docker-compose.prod
version: '3'
services:
  bookapi:
    container_name: 'django-api'
    image: '${DJANGO_TUTORIAL_API_IMAGE}'
    command: gunicorn core.wsgi:application --bind 0.0.0.0:8000
    volumes:
      - static_volume:/store/staticfiles/
      - media_volume:/store/mediafiles/
    expose:
      - 80
  nginx:
      container_name: 'nginx'
      image: '${DJANGO_TUTORIAL_NGINX_IMAGE}'
      ports:
        - 80:80
      volumes:
        - static_volume:/store/staticfiles/
        - media_volume:/store/mediafiles/
 volumes:
    static_volume:
    media_volume:
So for this tutorial will use Github packages for hosting the images.
A package hosting service provided by GitHub. It allows you to publish, share, and manage software packages directly within your GitHub repositories.
4. AWS Setup
Let’s start by setting up an EC2 instance to deploy our application. To do this, and you’ll need to open an AWS account (if you don’t already have one).
If you don’t know how to set up AWS EC2 , please visit this link which will guide you through how to : launch EC2
Once we’ve finished configuring AWS EC2 and the instance is up and running, we can install Docker on it..
So connect via SSH into the instance using your Key Pair as :
$ ssh -i your-key-pair.pem ec2-user@

#example
# ssh -i ~./ssh/django-tutorial.perm ec2-user@51.20.75.55
After accessing the instance, start by updating the server package and installing the latest version of Docker and Docker-compose:
[ec2-user]$ sudo yum update -y
[ec2-user]$ sudo yum install -y docker
[ec2-user]$ sudo service docker start
[ec2-user]$ sudo curl -L https://github.com/docker/compose/releases/latest/download/docker-compose-$(uname -s)-$(uname -m) -o /usr/local/bin/docker-compose
[ec2-user]$ sudo chmod +x /usr/local/bin/docker-compose

[ec2-user]$ docker --version
Docker version 20.10.23, build 7155243

[ec2-user]$ docker-compose --version
Docker Compose version v2.18.1
Add the ec2-user to the docker group so that you can use it without running the Docker command with sudo :
[ec2-user]$ sudo usermod -a -G docker ec2-user
Next, let’s generate the SSH KEY
[ec2-user]$ ssh-keygen -t rsa
Please! save the Key without setting any password
Next, copy the public key into the authorized_keys file and set the appropriate authorizations.:
[ec2-user]$ cat ~/.ssh/id_rsa.pub
# Copy this public key into ~/.ssh/authorized_keys
[ec2-user]$ vi ~/.ssh/authorized_keys
# After adding the public key into authorized_key then exits  from vi text editor
# Then add these commands are used to change the permissions of these files
[ec2-user]$ chmod 600 ~/.ssh/authorized_keys
[ec2-user]$ chmod 600 ~/.ssh/id_rsa
Now, copy the contents of the private key
[ec2-user]$ cat ~/.ssh/id_rsa

# Copy the private key somewhere for later use
4. Automating Deployment with GitHub Actions to AWS EC2
Github provide continuous integration and continuous deployment (CI / CD) platform.
Since our workflow will use GitHub’s core features (GitHub packages), GitHub requires you to create an access token, which will be used as a GitHub user ID for all your interactions.
Go to the Personal access tokens area in the Developer settings of your GitHub profile and click Generate new token.
Adding GitHub Actions directory
To configure GitHub Actions, start by adding a new directory called .github to the root of your project, then within this directory, add another directory called workflows . Now to configure the workflow, which is a set of one or more jobs, create a new file in the workflows directory called main.yml . You can also run the following command in your root directory.
mkdir .github && cd .github
mkdir workflows && cd workflows
touch main.yml
You can only fork the complete main.yml on this link :
main.yml
Notes about the secrets
secrets.PERSONAL_ACCESS_TOKENsecrets.NAMESPACEsecrets.PRIVATE_KEYsecret.AWS_EC2_IP_ADDRESSsecrets.AWS_HOST_USER
All of the secrets need to be set in your repository’s secrets (Settings > Secrets) and use your Github username or your organization name as your NAMESPACE and your personal access token as PERSONAL_ACCESS_TOKEN .
Once you are done, commit and push your code to the Github to trigger the workflow to run, so now you should see the images in the Github Packages.
Workflow successfully finished :
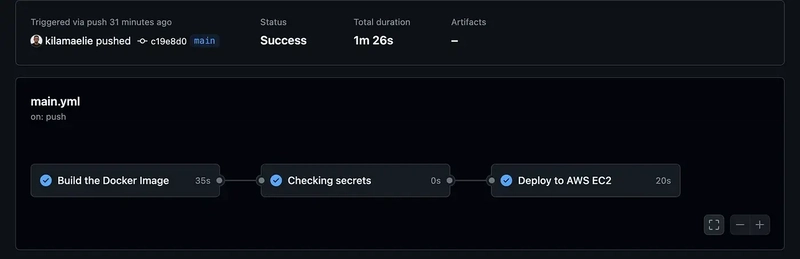
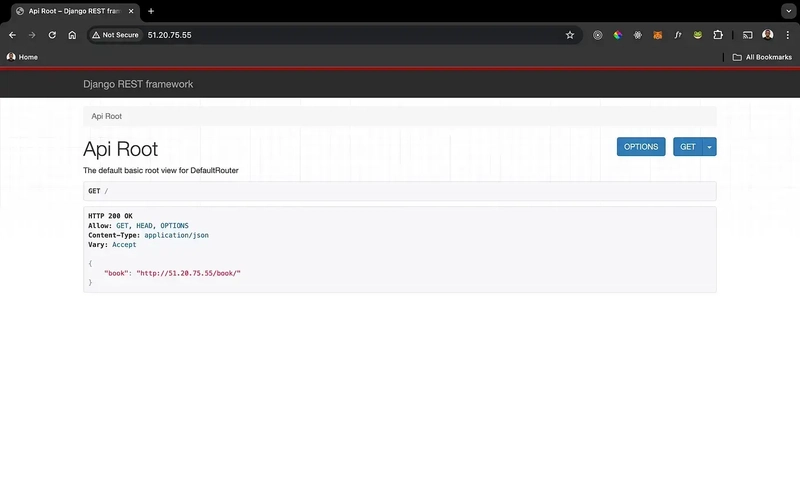
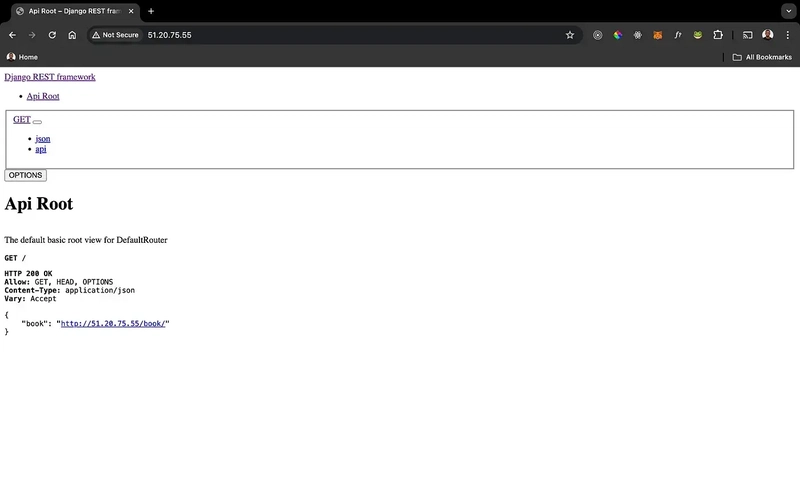
Once all our jobs have been executed, navigate to the IP of your instance, and you should see the django-tutorial application running :
Let’s add the
collectstaticfiles to the RestApi to solve the problem ofSTATIC_ROOTby ssh into AWS EC2 with the key pair created early then run:
#bookapi as service into the docker-compose.prod file
[ec2-user@ip-172-31-21-196 ~]$ docker-compose -f docker-compose.prod.yml exec bookapi sh
# it'll open the django sh

/store # python manage.py collectstatic --no-input --clear

160 static files copied to '/store/staticfiles'.
/store # exit

[ec2-user@ip-172-31-21-196 ~]$
Then just reload the IP of your instance