


![[The AI Show Episode 144]: ChatGPT’s New Memory, Shopify CEO’s Leaked “AI First” Memo, Google Cloud Next Releases, o3 and o4-mini Coming Soon & Llama 4’s Rocky Launch](https://www.marketingaiinstitute.com/hubfs/ep%20144%20cover.png)


![Blue Archive tier list [April 2025]](https://media.pocketgamer.com/artwork/na-33404-1636469504/blue-archive-screenshot-2.jpg?#)


.png?#)
.jpg?#)


.png?width=1920&height=1920&fit=bounds&quality=70&format=jpg&auto=webp#)


.png?#)
.webp?#)


![Global security vulnerability database gets 11 more months of funding [u]](https://photos5.appleinsider.com/gallery/63338-131616-62453-129471-61060-125967-51013-100774-49862-97722-Malware-Image-xl-xl-xl-(1)-xl-xl.jpg)


![Apple Releases tvOS 18.4.1 for Apple TV [Download]](https://www.iclarified.com/images/news/97047/97047/97047-640.jpg)
![Apple Releases macOS Sequoia 15.4.1 [Download]](https://www.iclarified.com/images/news/97049/97049/97049-640.jpg)
![Apple Releases iOS 18.4.1 and iPadOS 18.4.1 [Download]](https://www.iclarified.com/images/news/97043/97043/97043-640.jpg)


Cloud Resume Challenge: How I Broke, Fixed, and Grew Through a Real Azure Project
Introduction Standing at the foot of the Cloud Resume Challenge, I felt a mix of excitement and dread. I was comfortable discussing cloud concepts in theory, yet I had no real project to show for it. This gap between knowledge and experience was gnawing at me. It echoed the ancient Greek proverb pathemata mathemata – meaning “learning through suffering/experience.” In other words, the best way to learn is by doing, even if it means struggling. Embracing that wisdom, I decided to conquer my doubts and take action. What followed was a challenging yet exhilarating journey through a 16-step cloud project that would test my technical skills, resilience, and problem-solving like never before. Thanks to Jan F. Lammering and the amazing HR team of Oraylis (Sonja Kühle-BogenschneiderView Sonja Kühle-Bogenschneider’s profile , Anne Müller-Kemler, Georgia Thume) for inspiring me to expound my knowledge and skills with Azure and the related technologies. Related Links: My website - https://www.dineshpalli.com, please leave your valuable feedback in the comments section below. GitHub Repo (Feel free to clone, would be amazing if you could tag me) - https://github.com/dineshpalli/cloudresumechallenge-azure What is the Cloud Resume Challenge? The Cloud Resume Challenge is a rigorous multi-step project originally created by cloud architect Forrest Brazeal. It’s designed as a bridge between attaining cloud certifications and landing a cloud job, helping you go from “certified to hired” in a practical way (The Cloud Resume Challenge). The challenge consists of 16 steps (yes, 16!) that cover both front-end and back-end development, cloud services, infrastructure as code, CI/CD, and more. Forrest deliberately doesn’t hand-hold participants through these steps – the expectation is that you figure things out yourself and learn through the struggle (Cloud Resume Challenge by Forrest Brazeal). This trial-by-fire approach is intentional because solving problems on your own is one of the best ways to gain meaningful cloud engineering experience. In fact, many people with years of IT experience have taken on this challenge to sharpen their skills (Cloud Resume Challenge by Forrest Brazeal), which speaks to its value and difficulty. Here’s a quick rundown of the 16 steps in the Azure edition of the Cloud Resume Challenge: Certification: Start by earning a foundational Azure cert (I have not yet acquired an azure certification). HTML: Write your resume in HTML. CSS: Style the resume with CSS to make it presentable. Static Website: Host your resume as a static website (in Azure, that means using an Azure Storage account’s static website feature). HTTPS: Implement HTTPS for your site (e.g. via Azure Front Door or CDN to get SSL). DNS: Set up a custom domain name for your website. JavaScript: Add interactivity – in this case, a JavaScript snippet to fetch and display a visitor counter. Database: Create a database to store the visitor count (Azure Cosmos DB in the Azure challenge). API: Develop an API endpoint that the JavaScript can call to get/update the count (using Azure Functions). Python: Write the API code in Python (the Azure Function’s runtime). Tests: Write tests for your code (unit tests for the Python function, and maybe simple frontend tests). Infrastructure as Code: Define your infrastructure in code (using a tool like Terraform or Azure Bicep) instead of clicking in the portal. Source Control: Use source control (GitHub) to manage your code and IaC scripts. CI/CD (Back End): Set up a CI/CD pipeline to automate deployment of your back-end (the Azure Function and related infrastructure). CI/CD (Front End): Set up a CI/CD pipeline to automate deployment of your front-end (the static website). Blog Post: Write a blog (or LinkedIn article!) about your journey and lessons learned. Architecture of the Cloud Resume Challenge on Azure. The static resume site is hosted on Azure Storage and exposed to the web via a content delivery network service (Azure Front Door or CDN) for global, secure access. An Azure Function app provides a Python API for the visitor counter, with data persisted in an Azure Cosmos DB database. All components (storage, function, database, networking) are defined as code and deployed through CI/CD pipelines. As you can see, the challenge is an end-to-end project touching almost every aspect of cloud and web development: front-end design, back-end APIs, databases, networking, authentication, automation, and more. It’s intense. No tutorials, no courses, just dragging myself through dirt? So, I finished cloud resume challenge in MS Azure - the turnkey github repo can be found here - feel free to fork / clone / star the repo. I knew I would hit roadblocks in each of these areas – and indeed I did. But with each obstacle came an opportunity to learn and grow. There were severael moments across the challenge where i had to show myself that I am with it or on it, which
Introduction
Standing at the foot of the Cloud Resume Challenge, I felt a mix of excitement and dread. I was comfortable discussing cloud concepts in theory, yet I had no real project to show for it. This gap between knowledge and experience was gnawing at me. It echoed the ancient Greek proverb pathemata mathemata – meaning “learning through suffering/experience.” In other words, the best way to learn is by doing, even if it means struggling. Embracing that wisdom, I decided to conquer my doubts and take action. What followed was a challenging yet exhilarating journey through a 16-step cloud project that would test my technical skills, resilience, and problem-solving like never before.
Thanks to Jan F. Lammering and the amazing HR team of Oraylis (Sonja Kühle-BogenschneiderView Sonja Kühle-Bogenschneider’s profile , Anne Müller-Kemler, Georgia Thume)
for inspiring me to expound my knowledge and skills with Azure and the related technologies.
Related Links:
My website - https://www.dineshpalli.com, please leave your valuable feedback in the comments section below.
GitHub Repo (Feel free to clone, would be amazing if you could tag me) - https://github.com/dineshpalli/cloudresumechallenge-azure
What is the Cloud Resume Challenge?
The Cloud Resume Challenge is a rigorous multi-step project originally created by cloud architect Forrest Brazeal. It’s designed as a bridge between attaining cloud certifications and landing a cloud job, helping you go from “certified to hired” in a practical way (The Cloud Resume Challenge). The challenge consists of 16 steps (yes, 16!) that cover both front-end and back-end development, cloud services, infrastructure as code, CI/CD, and more. Forrest deliberately doesn’t hand-hold participants through these steps – the expectation is that you figure things out yourself and learn through the struggle (Cloud Resume Challenge by Forrest Brazeal). This trial-by-fire approach is intentional because solving problems on your own is one of the best ways to gain meaningful cloud engineering experience. In fact, many people with years of IT experience have taken on this challenge to sharpen their skills (Cloud Resume Challenge by Forrest Brazeal), which speaks to its value and difficulty.
Here’s a quick rundown of the 16 steps in the Azure edition of the Cloud Resume Challenge:
- Certification: Start by earning a foundational Azure cert (I have not yet acquired an azure certification).
- HTML: Write your resume in HTML.
- CSS: Style the resume with CSS to make it presentable.
- Static Website: Host your resume as a static website (in Azure, that means using an Azure Storage account’s static website feature).
- HTTPS: Implement HTTPS for your site (e.g. via Azure Front Door or CDN to get SSL).
- DNS: Set up a custom domain name for your website.
- JavaScript: Add interactivity – in this case, a JavaScript snippet to fetch and display a visitor counter.
- Database: Create a database to store the visitor count (Azure Cosmos DB in the Azure challenge).
- API: Develop an API endpoint that the JavaScript can call to get/update the count (using Azure Functions).
- Python: Write the API code in Python (the Azure Function’s runtime).
- Tests: Write tests for your code (unit tests for the Python function, and maybe simple frontend tests).
- Infrastructure as Code: Define your infrastructure in code (using a tool like Terraform or Azure Bicep) instead of clicking in the portal.
- Source Control: Use source control (GitHub) to manage your code and IaC scripts.
- CI/CD (Back End): Set up a CI/CD pipeline to automate deployment of your back-end (the Azure Function and related infrastructure).
- CI/CD (Front End): Set up a CI/CD pipeline to automate deployment of your front-end (the static website).
- Blog Post: Write a blog (or LinkedIn article!) about your journey and lessons learned.
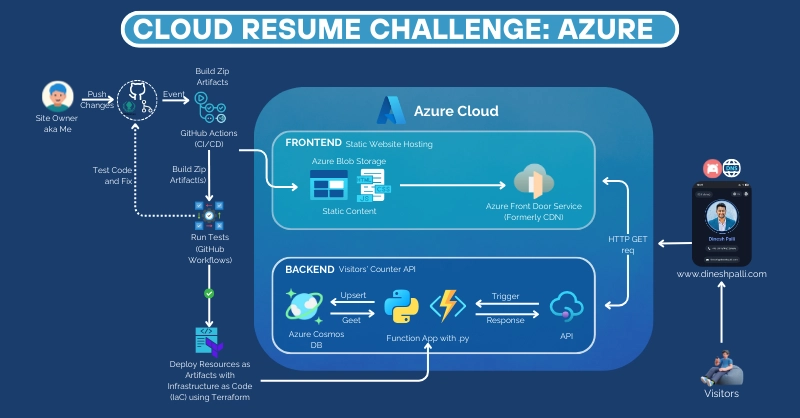
Architecture of the Cloud Resume Challenge on Azure. The static resume site is hosted on Azure Storage and exposed to the web via a content delivery network service (Azure Front Door or CDN) for global, secure access. An Azure Function app provides a Python API for the visitor counter, with data persisted in an Azure Cosmos DB database. All components (storage, function, database, networking) are defined as code and deployed through CI/CD pipelines.
As you can see, the challenge is an end-to-end project touching almost every aspect of cloud and web development: front-end design, back-end APIs, databases, networking, authentication, automation, and more. It’s intense. No tutorials, no courses, just dragging myself through dirt? So, I finished cloud resume challenge in MS Azure - the turnkey github repo can be found here - feel free to fork / clone / star the repo. I knew I would hit roadblocks in each of these areas – and indeed I did. But with each obstacle came an opportunity to learn and grow. There were severael moments across the challenge where i had to show myself that I am with it or on it, which helped me learn a lot and not give up at the slightest sight of challenge / discomfort. This made me imbue a lot of learning and experience like, figure out where something broke, what broke, why it broke and then devising plans to how to fix the broken things, doing 'smoke-tests' and fixtures.
Forrest Brazeal, the challenge's creator, acknowledges that it will require:
- Multiple long evenings of work
- Extensive research
- Significant self-learning
I spent the the long hours of work at the end of November, December and beginning of January, doing step 2 and gaining the third. In the next sections, I’ll walk through the major challenges I faced in each step of CRC and what I learned from overcoming them.
The Challenges Faced and Lessons Learned
1. Domain Name Registration & Setup
Challenge: One of the first tasks was to get a custom domain for my resume website. This seemingly simple step turned into a quest of its own. Which domain registrar to choose? How to ensure DNS would be reliable? I was new to buying domains and worried about getting scammed or stuck with poor service. After some research and community recommendations, I chose Porkbun as my registrar. Why Porkbun? Two big reasons stood out: (1) Transparent, affordable pricing – they show first-year and renewal prices clearly with no hidden fees, so I knew exactly what I’d pay (Reddit Post Link). (2) Robust DNS management – Porkbun’s interface for DNS records is very user-friendly and powerful, which is crucial when configuring custom records for Azure (Reddit Post Link). Additionally, Porkbun provides free WHOIS privacy and had great reviews for reliability.
Purchasing the domain was the easy part. The real struggle came when hooking it up to my Azure resources. I had to create DNS records that point my new domain to the Azure static site (via Azure Front Door (Formerly CDN)). This involved adding CNAME records for the subdomain (www) and an A record or alias for the root/apex domain. Initially, I wasn’t sure which records were needed – should I use an A record pointing to an IP? Or a CNAME to some azure domain? I learned that Azure Front Door provides a profile URL (like yourfrontdoor.azurefd.net) which you map via a CNAME. For the root domain, I ended up using an ALIAS or ANAME record (since CNAME at root isn’t allowed by DNS standards). It took some trial and error, and DNS changes take time to propagate, so I spent quite a few anxious hours waiting to see if my site would resolve on my domain. Seeing “DNS_PROBE_FINISHED_NXDOMAIN” errors during that wait was nerve-wracking! Eventually, the DNS setup clicked, and my domain began pointing to my Azure front end.
Lesson learned: Choosing a good registrar makes life easier, but you still need patience (DNS changes can take hours). I also got a crash course in DNS record types and discovered the importance of documentation – Porkbun’s and Azure’s docs became bedtime reading. Most importantly, I overcame the fear of “breaking something” with DNS. Now, managing domains feels much less enigmatic.
2. Understanding DNS
Challenge: While setting up the domain, I realized I had a knowledge gap in DNS (Domain Name System) itself. I knew the concept in abstract – DNS translates domain names to IP addresses – but I’d never configured DNS settings manually for a custom domain. Why did I need a CNAME vs an A record? What’s TTL? I decided to pause and educate myself on DNS fundamentals so I wouldn’t be just guessing.
I learned that DNS is essentially the phonebook of the Internet – it maps human-friendly names (like myresume.com) to the numeric IP addresses that computers use (What is DNS? by Cloudflare). When someone types my domain, a DNS query is made behind the scenes to find the matching IP or address for the server where my site is hosted. I also learned about authoritative name servers (which hold the DNS records for my domain) and recursive resolvers (the “DNS librarians” that fetch the answer) (video, What is DNS? by Cloudflare). This helped me appreciate why sometimes I’d get different results during propagation – DNS servers around the world take time to update.
In practice, for my resume site I set up the following DNS records:
-
A recordformyresume.com-> Points to Azure Front Door’s anycast IP (provided by Azure when verifying the domain). -
CNAME recordforwww.myresume.com-> Points to the Front Door hostname (e.g.,myresume.azurefd.net).
Understanding these settings was empowering. Instead of blindly following a tutorial, I knew why these records were needed. I even troubleshot a mistake where I’d misconfigured the CNAME – browsers were showing a security certificate error because the domain wasn’t properly recognized by Front Door. Fixing that required me to verify the custom domain within Azure Front Door (by adding a specific verification ID as a TXT record). It was a lot of back-and-forth, but eventually I got the DNS configuration stable.
Lesson learned: DNS is crucial in any cloud project with custom domains, and you can’t treat it as a black box. By investing time in learning how DNS works (the hierarchy, record types, propagation), I became much more confident in setting up and troubleshooting domain issues. This foundational knowledge paid off later when I had to diagnose why HTTPS wasn’t working (spoiler: it was a DNS misconfiguration on my part!). The key takeaway: when in doubt, go back to fundamentals – understanding the basics will illuminate the path forward.
3. Azure Subscription & Resource Management
Challenge: Next up was working in the Azure cloud environment itself – creating resources and managing them. I signed up for an Azure account (I already had one from my certification prep) and created a dedicated Resource Group to contain everything for this project. Even with some Azure knowledge, I felt overwhelmed when I started enumerating all the services I needed: a Storage Account for the static site, a Cosmos DB instance, an Azure Function app, an Azure Front Door profile for CDN/HTTPS, etc. The Azure Portal has so many options that it’s easy to feel lost. I was also conscious that some services might incur costs. I had to plan carefully to stay within free tiers (Azure Cosmos DB has a free tier of 400 RU/s, Azure Functions consumption plan is essentially pay-per-use, and Azure Front Door has a minimal cost for low traffic).
Setting up Azure Storage Static Website was straightforward: you enable “Static website” on a Storage Account and upload your HTML/CSS files to the special $web container. But enabling HTTPS on a custom domain was not straightforward. Azure Storage static sites don’t natively support custom domain HTTPS, so Azure’s documentation recommends putting a CDN or Front Door in front (Stack Overflow Link). I opted for Azure Front Door (Classic) because it provides a managed SSL certificate for custom domains and also offers global caching and routing features. Azure Front Door required me to add my custom domain to its frontend hosts, which in turn required the DNS mapping we discussed earlier. I stumbled here with validation – Front Door wouldn’t accept my domain until I created a TXT record it provided for verification. It felt like a chicken-and-egg at first: to add domain in Front Door I need DNS, and for DNS to work I need Front Door’s endpoint. The solution was to follow Azure’s sequence precisely: verify domain ownership via TXT record, add the domain to Front Door, then update the CNAME/A records. Once done, Front Door provisioned an SSL cert for my domain automatically (Stack Overflow Link) (a process that took ~20 minutes). Seeing the green lock icon next to my URL was a moment of triumph.
Managing Azure resources also taught me about keeping things organized. I named resources with a consistent prefix, set tags for project name, and noted down in a README what each resource was for. At one point, I hit a snag where deployments were failing because I reached the limit of one free Front Door (the classic SKU allowed only one using free tier). I had to delete and recreate Front Door to tweak settings, which was a pain to do manually (this foreshadowed the need for Infrastructure as Code, which I implemented later). I also nearly forgot to turn on the “Always On” setting for my Azure Function (to prevent cold start latency), but caught it during testing.
Lesson learned: Planning and resource management in Azure is critical. Before jumping in, outline the architecture and identify the Azure services you’ll use. This helps in creating resources in a logical order and avoiding surprises (like service limits or prerequisite dependencies). I learned to navigate the Azure Portal more efficiently, but also realized the value of automation – clicking around is fine for initial exploration, but IaC would save me from repetitive manual setup when I inevitably had to rebuild or modify resources. Additionally, I gained experience with Azure Front Door and how it integrates with other services (DNS, Storage), which is a valuable skill on its own.
4. Frontend Development (HTML, CSS, Dark Mode)
Challenge: Concurrently with the cloud setup, I had to build the frontend of my resume website. This involved writing the resume content in HTML, styling it with CSS, and making it functional and nice-looking. I’m not a front-end developer by trade, so initially I had imposter syndrome: “Is my HTML/CSS good enough? Does it look professional?” My first version of the site was very basic – just text on a white background. It worked, but it didn’t wow. I struggled with CSS to create a pleasant design. Rather than reinvent the wheel, I found a simple open-source HTML/CSS template as a starting point and tailored it to my needs (changed the color scheme, fonts, and layout to match my style). This saved me a ton of time and frankly resulted in a better-looking site.
One fun addition I decided on was Dark Mode. Many modern websites offer a dark theme, and I wanted to show that I pay attention to UX details. I implemented this using CSS media queries for the prefers-color-scheme, as well as a JavaScript toggle button. This was a small rabbit hole of its own – ensuring that icons and images looked good on both dark and light backgrounds, and that my text remained readable. After a bit of tweaking, I got a nicely togglable dark mode working purely with CSS classes and a few lines of JavaScript to remember the user’s preference.
Another challenge was making the site responsive. I ensured the layout used relative units and flexbox, so it would display properly on mobile phones, tablets, etc. Testing on my own phone revealed some font sizes were too large and a section of text was overflowing the screen. I adjusted the CSS and learned how to use responsive meta tags and viewports properly.
While working on the frontend, I also embedded the code for the visitor counter display. At this point, I hadn’t built the back-end yet, but I knew I’d be calling an API to get a visitor count. So I wrote a small in the HTML and a
