


![[The AI Show Episode 144]: ChatGPT’s New Memory, Shopify CEO’s Leaked “AI First” Memo, Google Cloud Next Releases, o3 and o4-mini Coming Soon & Llama 4’s Rocky Launch](https://www.marketingaiinstitute.com/hubfs/ep%20144%20cover.png)


-Classic-Nintendo-GameCube-games-are-coming-to-Nintendo-Switch-2!-00-00-13.png?width=1920&height=1920&fit=bounds&quality=70&format=jpg&auto=webp#)


_Olekcii_Mach_Alamy.jpg?width=1280&auto=webp&quality=80&disable=upscale#)


![M4 MacBook Air Drops to New All-Time Low of $912 [Deal]](https://www.iclarified.com/images/news/97108/97108/97108-640.jpg)
![New iPhone 17 Dummy Models Surface in Black and White [Images]](https://www.iclarified.com/images/news/97106/97106/97106-640.jpg)


Building an Efficient Virtualized Table with TanStack Virtual and React Query with ShadCN
When displaying large datasets in a table, performance and smooth scrolling become critical challenges. That's where TanStack Virtual (formerly known as react-virtual) and React Query come into play. In this guide, we'll walk through building a virtualized table that fetches paginated data and provides a seamless user experience. Step 1: Fetching Paginated Data with React Query First, we need to fetch our data efficiently using React Query. We'll define a query that retrieves companies' data based on pagination. const { data, isLoading, error, isFetching } = useQuery({ queryKey: ["companies", searchParameters.toString(), itemsPerPage], queryFn: () => fetchCompanies( currentPage.toString(), itemsPerPage.toString(), ), }); queryKey ensures proper caching and refetching when parameters change. queryFn is the function that actually fetches the data. make a queryFn for fetching data Step 2: Implementing a "Load More" Pagination Instead of traditional pagination, we'll use a "Load More" approach that increases the number of items fetched. const handleLoadMore = () => { setItemsPerPage((previous) => previous + PAGE_INCREMENT); }; This makes it feel like an infinite scroll experience without dealing with page numbers manually. Step 3: Setting Up Virtualization with TanStack Virtual Next, we use TanStack Virtual to render only the visible rows, dramatically improving performance. const virtualizer = useVirtualizer({ count: data?.companies.length || 0, estimateSize: () => 40, // Average row height getScrollElement: () => scrollContainerRef.current, }); const virtualRows = virtualizer.getVirtualItems(); const visibleCompanies = virtualRows .map((virtualRow) => data?.companies[virtualRow.index]) .filter(Boolean); Here: count is the total number of companies we fetched. estimateSize gives the virtualizer a rough idea of row height. getScrollElement provides the scrollable container. Step 4: Defining Table Columns Now, let's define the table columns with appropriate headers and cell renderers. const tableColumns: ColumnDef[] = [ { accessorKey: "name", header: () => Company Name, cell: ({ row }) => {row.original?.name}, }, { accessorKey: "phone", header: () => Phone Number, cell: ({ row }) => {row.original?.phone}, }, { accessorKey: "email", header: () => Email, cell: ({ row }) => {row.original?.email}, }, { accessorKey: "location", header: () => Location, cell: ({ row }) => {row.original?.address.state}, }, { accessorKey: "products", header: () => Products, cell: ({ row }) => ( {row.original?.productsCount} ), }, { accessorKey: "actions", header: () => Actions, cell: () => ( Details ), }, ]; Step 5: Handling Loading and Error States Before rendering the table, we need to handle loading, error, or empty states gracefully. if (isLoading) return ; if (error) return Error loading data; if (!data) return No data available; Step 6: Rendering the Virtualized Table Here comes the main part: rendering the virtualized list inside a scrollable container. Here’s what happens: We create a scrollable container (overflow-auto) with a fixed height. The total container height (getTotalSize()) matches the total rows' size. Only the visible portion (translateY) moves according to the current scroll. Step 7: Adding a Load More Button At the bottom, we add a "Load More" button to fetch more data dynamically. = data.totalCount)} > {isFetching ? "Loading..." : "Load More"} By combining React Query for efficient data fetching and TanStack Virtual for rendering optimization, we've built a fast, scalable, and user-friendly table even for large datasets. Key Takeaways: Virtualization avoids rendering all rows at once, saving memory and improving performance. Pagination with a "Load More" button makes loading large lists intuitive. Loading and error handling ensures a smooth user experience. Here is the ShadCN table Component //custom table "use client"; import { ColumnDef, flexRender, getCoreRowModel, useReactTable, } from "@tanstack/react-table"; import { Table, TableBody, TableCell, TableHead, TableHeader, TableRow, } from "@/components/ui/table"; interface DataTableProps { columns: ColumnDef[]; data: TData[]; } export function CustomTable({ columns, data, }: DataTableProps) { const table = useReactTable({ data, columns, getCoreRowModel: getCoreRowModel(), }); return ( {table.getHeaderGroups().map((headerGroup) => ( {headerGroup.headers.map((header) => ( {header.isPlaceholder ? null : flexRender( header.column.colu
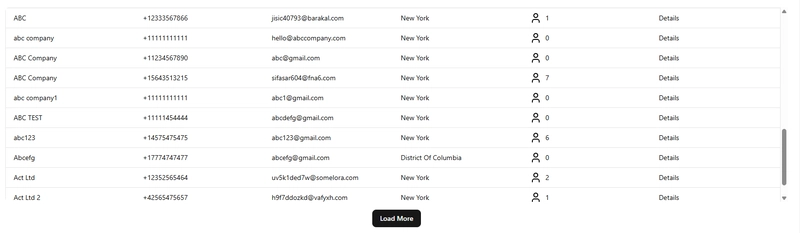
When displaying large datasets in a table, performance and smooth scrolling become critical challenges. That's where TanStack Virtual (formerly known as react-virtual) and React Query come into play. In this guide, we'll walk through building a virtualized table that fetches paginated data and provides a seamless user experience.
Step 1: Fetching Paginated Data with React Query
First, we need to fetch our data efficiently using React Query. We'll define a query that retrieves companies' data based on pagination.
const { data, isLoading, error, isFetching } = useQuery<CompanyResponse>({
  queryKey: ["companies", searchParameters.toString(), itemsPerPage],
  queryFn: () =>
    fetchCompanies(
      currentPage.toString(),
      itemsPerPage.toString(),
    ),
});
- queryKey ensures proper caching and refetching when parameters change.
- queryFn is the function that actually fetches the data.
- make a queryFn for fetching data
Step 2: Implementing a "Load More" Pagination
Instead of traditional pagination, we'll use a "Load More" approach that increases the number of items fetched.
const handleLoadMore = () => {
  setItemsPerPage((previous) => previous + PAGE_INCREMENT);
};
This makes it feel like an infinite scroll experience without dealing with page numbers manually.
Step 3: Setting Up Virtualization with TanStack Virtual
Next, we use TanStack Virtual to render only the visible rows, dramatically improving performance.
const virtualizer = useVirtualizer({
  count: data?.companies.length || 0,
  estimateSize: () => 40, // Average row height
  getScrollElement: () => scrollContainerRef.current,
});

const virtualRows = virtualizer.getVirtualItems();
const visibleCompanies = virtualRows
  .map((virtualRow) => data?.companies[virtualRow.index])
  .filter(Boolean);
Here:
- count is the total number of companies we fetched.
- estimateSize gives the virtualizer a rough idea of row height.
- getScrollElement provides the scrollable container.
Step 4: Defining Table Columns
Now, let's define the table columns with appropriate headers and cell renderers.
const tableColumns: ColumnDef<Company | undefined>[] = [
  {
    accessorKey: "name",
    header: () => <div>Company Namediv>,
    cell: ({ row }) => <div>{row.original?.name}div>,
  },
  {
    accessorKey: "phone",
    header: () => <div>Phone Numberdiv>,
    cell: ({ row }) => <div>{row.original?.phone}div>,
  },
  {
    accessorKey: "email",
    header: () => <div>Emaildiv>,
    cell: ({ row }) => <div>{row.original?.email}div>,
  },
  {
    accessorKey: "location",
    header: () => <div>Locationdiv>,
    cell: ({ row }) => <div>{row.original?.address.state}div>,
  },
  {
    accessorKey: "products",
    header: () => <div>Productsdiv>,
    cell: ({ row }) => (
      <div className="flex items-center gap-2">
        <UserIcon /> {row.original?.productsCount}
      div>
    ),
  },
  {
    accessorKey: "actions",
    header: () => <div>Actionsdiv>,
    cell: () => (
      <div className="flex gap-2">
        <button>Detailsbutton>
      div>
    ),
  },
];
Step 5: Handling Loading and Error States
Before rendering the table, we need to handle loading, error, or empty states gracefully.
if (isLoading) return <LoadingSkeleton />;
if (error) return <div>Error loading datadiv>;
if (!data) return <div>No data availablediv>;
Step 6: Rendering the Virtualized Table
Here comes the main part: rendering the virtualized list inside a scrollable container.
<section>
  <div
    ref={scrollContainerRef}
    className="relative h-[400px] overflow-auto rounded-md"
  >
    <div
      style={{
        height: virtualizer.getTotalSize(),
        position: "relative",
      }}
    >
      <div
        style={{
          position: "absolute",
          top: 0,
          left: 0,
          width: "100%",
          transform: `translateY(${virtualRows[0]?.start ?? 0}px)`,
        }}
      >
        <CustomTable columns={tableColumns} data={visibleCompanies} />
      div>
    div>
  div>
section>
Here’s what happens:
- We create a scrollable container (overflow-auto) with a fixed height.
- The total container height (getTotalSize()) matches the total rows' size.
- Only the visible portion (translateY) moves according to the current scroll.
Step 7: Adding a Load More Button
At the bottom, we add a "Load More" button to fetch more data dynamically.
<section className="flex justify-center mt-4">
  <Button
    onClick={handleLoadMore}
    disabled={isFetching || (data && data.companies.length >= data.totalCount)}
  >
    {isFetching ? "Loading..." : "Load More"}
  Button>
section>
By combining React Query for efficient data fetching and TanStack Virtual for rendering optimization, we've built a fast, scalable, and user-friendly table even for large datasets.
Key Takeaways:
- Virtualization avoids rendering all rows at once, saving memory and improving performance.
- Pagination with a "Load More" button makes loading large lists intuitive.
- Loading and error handling ensures a smooth user experience.
Here is the ShadCN table Component
//custom table
"use client";

import {
  ColumnDef,
  flexRender,
  getCoreRowModel,
  useReactTable,
} from "@tanstack/react-table";

import {
  Table,
  TableBody,
  TableCell,
  TableHead,
  TableHeader,
  TableRow,
} from "@/components/ui/table";

interface DataTableProps<TData, TValue> {
  columns: ColumnDef<TData, TValue>[];
  data: TData[];
}

export function CustomTable<TData, TValue>({
  columns,
  data,
}: DataTableProps<TData, TValue>) {
  const table = useReactTable({
    data,
    columns,
    getCoreRowModel: getCoreRowModel(),
  });

  return (
    <div className="rounded-md border overflow-x-auto">
      <Table className="min-w-full table-fixed">
        <TableHeader className="bg-muted text-muted-foreground">
          {table.getHeaderGroups().map((headerGroup) => (
            <TableRow key={headerGroup.id}>
              {headerGroup.headers.map((header) => (
                <TableHead
                  key={header.id}
                  className="whitespace-nowrap px-4 py-2 text-left"
                  style={{ width: "150px" }} //