![[The AI Show Episode 142]: ChatGPT’s New Image Generator, Studio Ghibli Craze and Backlash, Gemini 2.5, OpenAI Academy, 4o Updates, Vibe Marketing & xAI Acquires X](https://www.marketingaiinstitute.com/hubfs/ep%20142%20cover.png)


![From drop-out to software architect with Jason Lengstorf [Podcast #167]](https://cdn.hashnode.com/res/hashnode/image/upload/v1743796461357/f3d19cd7-e6f5-4d7c-8bfc-eb974bc8da68.png?#)


.png?#)


.webp?#)


_Christophe_Coat_Alamy.jpg?#)
 (1).webp?#)


![Apple Considers Delaying Smart Home Hub Until 2026 [Gurman]](https://www.iclarified.com/images/news/96946/96946/96946-640.jpg)
![iPhone 17 Pro Won't Feature Two-Toned Back [Gurman]](https://www.iclarified.com/images/news/96944/96944/96944-640.jpg)
![Tariffs Threaten Apple's $999 iPhone Price Point in the U.S. [Gurman]](https://www.iclarified.com/images/news/96943/96943/96943-640.jpg)


An Introduction to AWS Virtual Private Cloud
What is a Virtual Private Cloud (VPC)? A Virtual Private Cloud (VPC) is an isolated network within a cloud environment that allows you to securely manage and control your resources. It provides a dedicated, logically separated space for applications, ensuring enhanced security, scalability, and efficient network traffic management. What are Subnets? Subnets are subdivisions of a VPC, each assigned a specific range of IP addresses. They help segment the network to improve organization, security, and performance by isolating workloads based on functionality, access requirements, or geographic location. Subnets can be public (accessible from the internet) or private (restricted to internal communication within the VPC). How to Set Up Your VPC To create a VPC, log in to the AWS Management Console and configure it as shown below: In the example above, we’ve named our VPC "demo-vpc" and assigned it a CIDR range of 10.0.0.0/16. Understanding CIDR (Classless Inter-Domain Routing) CIDR notation defines the IP address range for your VPC. In this case: The CIDR block 10.0.0.0/16 means that the first two octets (10.0) represent the network ID, which remains unchanged. The last two octets (.0.0) represent the host ID, which can be modified to allocate IP addresses within the VPC. Common private IP ranges include: 10.0.0.0/8 172.16.0.0/12 192.168.0.0/16 In AWS, CIDR notation follows the IP address/mask format, where the mask determines the number of available host addresses in the network. Creating Public and Private Subnets Best practice is to create both public and private subnets in different Availability Zones for high availability. However, for simplicity, we will create both in a single Availability Zone. Public Subnet Configuration Private Subnet Configuration To launch resources in your VPC, you must have at least one subnet configured. AWS automatically creates a default subnet when launching an EC2 instance unless specified otherwise. Deploying EC2 Instances Now, let's create two EC2 instances: one in the public subnet and the other in the private subnet. Choose a free-tier eligible instance type and use the following configurations. Public EC2 Instance Configuration Select the demo-vpc and assign the instance to the public subnet. However, trying to connect to it will fail because the subnet is not yet configured for external access. Configuring Internet Access To enable internet access, we need to configure: Internet Gateway Public Route Table Creating a Public Route Table A routing table is created by default when a VPC is created, but we need a separate one for external traffic. Creating and Attaching an Internet Gateway AWS allows only one Internet Gateway per VPC. Create and attach it to the demo-vpc. Updating the Public Route Table Edit the public route table to add the Internet Gateway as a default route for external traffic (0.0.0.0/0). Assigning the Public Subnet to the Route Table Associate the public subnet with the public route table to finalize external access configuration. At this point, the error disappears, and you can now SSH into your EC2 instance. Configuring a Private EC2 Instance Since the two instances are in the same VPC, you can connect from the public EC2 instance to the private EC2 instance. However, the private instance cannot access the internet for updates. To resolve this, we will: Create a Private Route Table Set Up a NAT Gateway in the Public Subnet Creating a NAT Gateway A NAT Gateway allows the private instance to access the internet while preventing inbound connections. Configuring the Private Route Table Update the private route table to route traffic through the NAT Gateway. Testing Private Instance Internet Access Transfer the .pem file to the public instance and SSH into the private instance. scp -i "key_pair.pem" key_pair.pem ubuntu@:/home/ubuntu/ Once transferred, update file permissions: chmod 400 key_pair.pem Now, SSH into the private instance: ssh -i "key_pair.pem" ubuntu@ Verifying Internet Connectivity Run the following command on the private instance to check internet access: sudo apt update If successful, the output should confirm package updates. Conclusion Congratulations!
What is a Virtual Private Cloud (VPC)?
A Virtual Private Cloud (VPC) is an isolated network within a cloud environment that allows you to securely manage and control your resources. It provides a dedicated, logically separated space for applications, ensuring enhanced security, scalability, and efficient network traffic management.
What are Subnets?
Subnets are subdivisions of a VPC, each assigned a specific range of IP addresses. They help segment the network to improve organization, security, and performance by isolating workloads based on functionality, access requirements, or geographic location. Subnets can be public (accessible from the internet) or private (restricted to internal communication within the VPC).
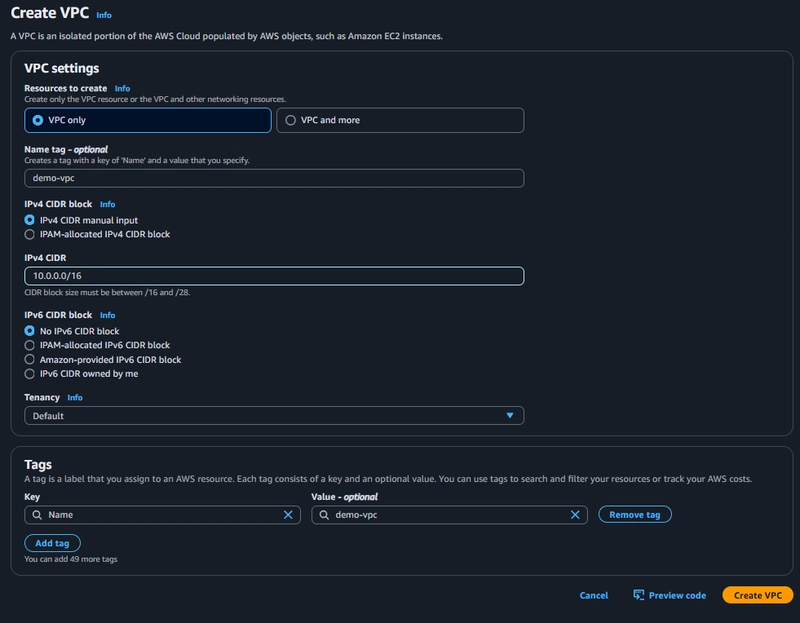
How to Set Up Your VPC
To create a VPC, log in to the AWS Management Console and configure it as shown below:
In the example above, we’ve named our VPC "demo-vpc" and assigned it a CIDR range of 10.0.0.0/16.
Understanding CIDR (Classless Inter-Domain Routing)
CIDR notation defines the IP address range for your VPC. In this case:
- The CIDR block 10.0.0.0/16 means that the first two octets (10.0) represent the network ID, which remains unchanged.
- The last two octets (.0.0) represent the host ID, which can be modified to allocate IP addresses within the VPC.
Common private IP ranges include:
- 10.0.0.0/8
- 172.16.0.0/12
- 192.168.0.0/16
In AWS, CIDR notation follows the IP address/mask format, where the mask determines the number of available host addresses in the network.
Creating Public and Private Subnets
Best practice is to create both public and private subnets in different Availability Zones for high availability. However, for simplicity, we will create both in a single Availability Zone.
Public Subnet Configuration

Private Subnet Configuration
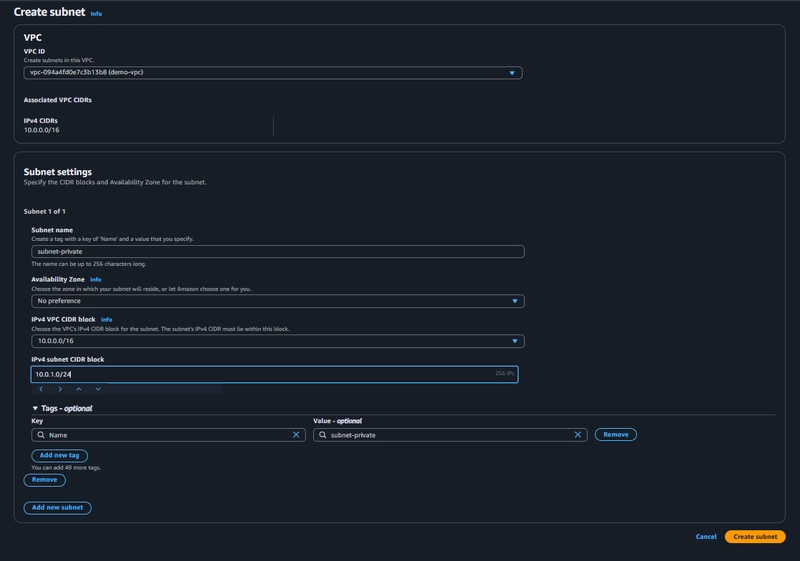
To launch resources in your VPC, you must have at least one subnet configured. AWS automatically creates a default subnet when launching an EC2 instance unless specified otherwise.
Deploying EC2 Instances
Now, let's create two EC2 instances: one in the public subnet and the other in the private subnet. Choose a free-tier eligible instance type and use the following configurations.
Public EC2 Instance Configuration
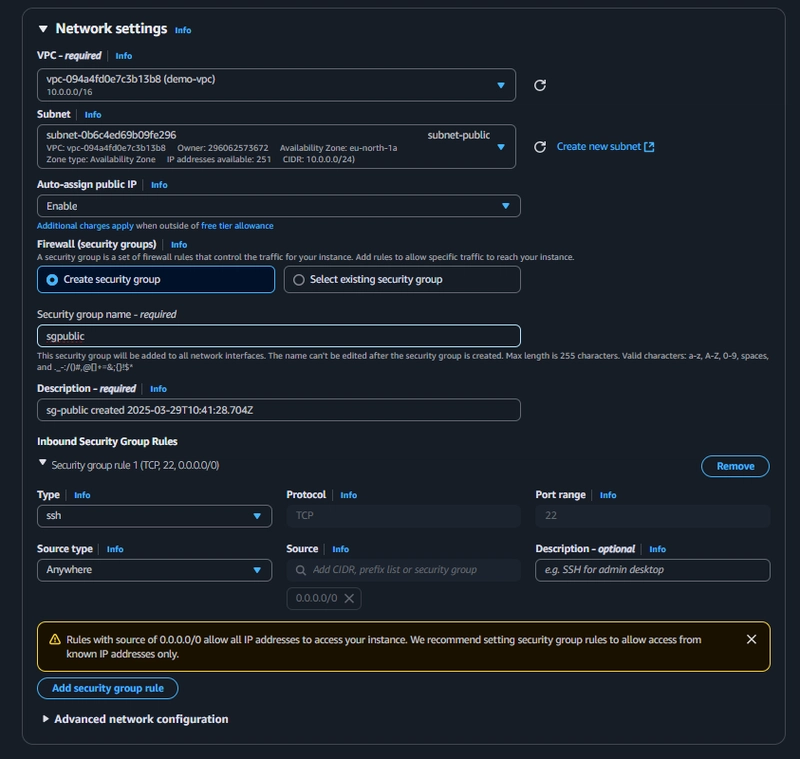
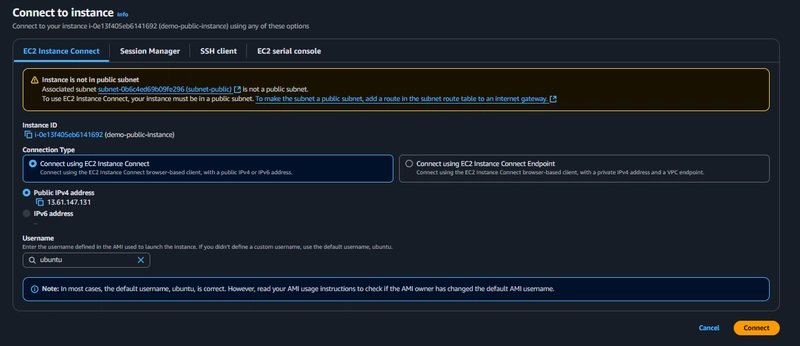
Select the demo-vpc and assign the instance to the public subnet. However, trying to connect to it will fail because the subnet is not yet configured for external access.
Configuring Internet Access
To enable internet access, we need to configure:
- Internet Gateway
- Public Route Table
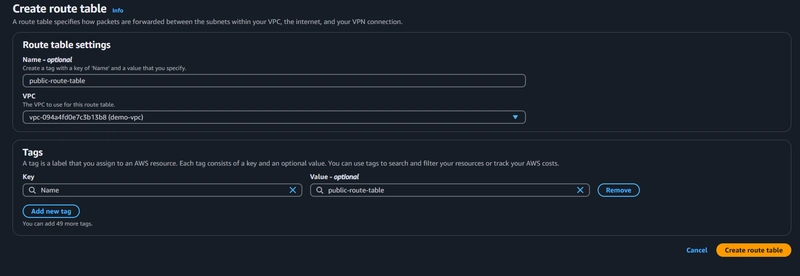
Creating a Public Route Table
A routing table is created by default when a VPC is created, but we need a separate one for external traffic.
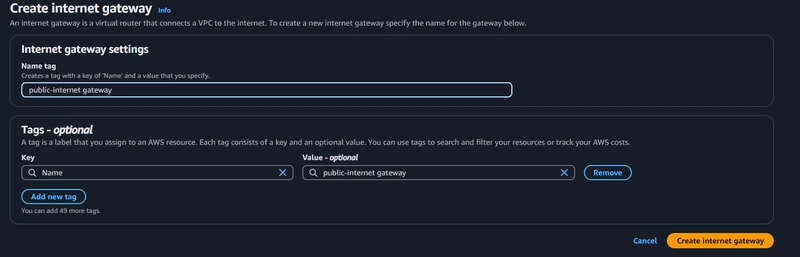
Creating and Attaching an Internet Gateway
AWS allows only one Internet Gateway per VPC. Create and attach it to the demo-vpc.
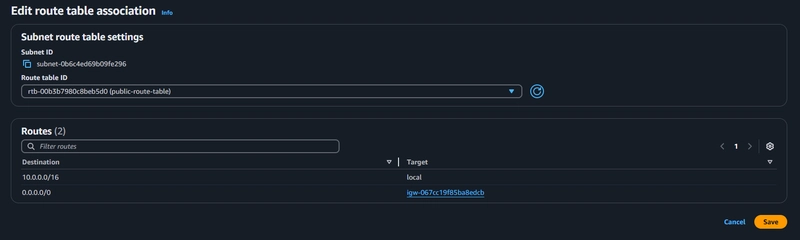
Updating the Public Route Table
Edit the public route table to add the Internet Gateway as a default route for external traffic (0.0.0.0/0).

Assigning the Public Subnet to the Route Table
Associate the public subnet with the public route table to finalize external access configuration.
At this point, the error disappears, and you can now SSH into your EC2 instance.

Configuring a Private EC2 Instance
Since the two instances are in the same VPC, you can connect from the public EC2 instance to the private EC2 instance. However, the private instance cannot access the internet for updates. To resolve this, we will:
- Create a Private Route Table
- Set Up a NAT Gateway in the Public Subnet
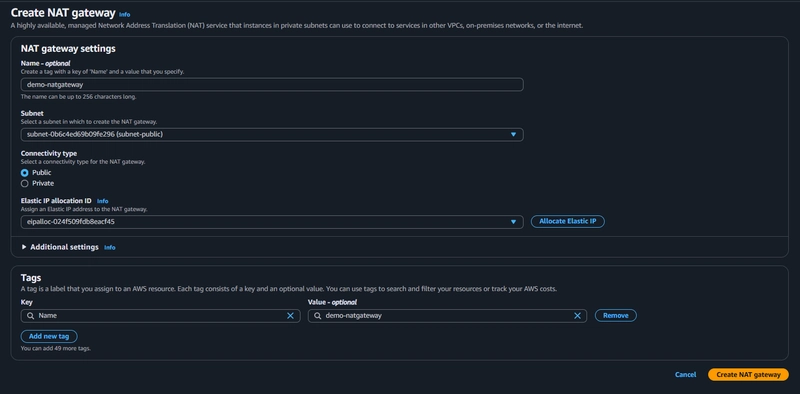
Creating a NAT Gateway
A NAT Gateway allows the private instance to access the internet while preventing inbound connections.
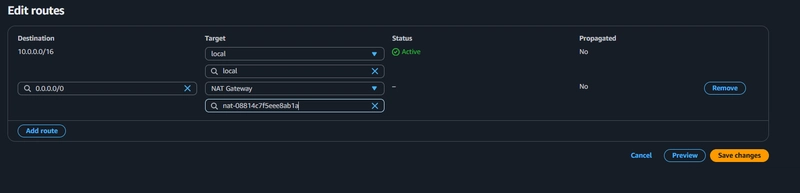
Configuring the Private Route Table
Update the private route table to route traffic through the NAT Gateway.
Testing Private Instance Internet Access
Transfer the .pem file to the public instance and SSH into the private instance.
scp -i "key_pair.pem" key_pair.pem ubuntu@:/home/ubuntu/
Once transferred, update file permissions:
chmod 400 key_pair.pem
Now, SSH into the private instance:
ssh -i "key_pair.pem" ubuntu@
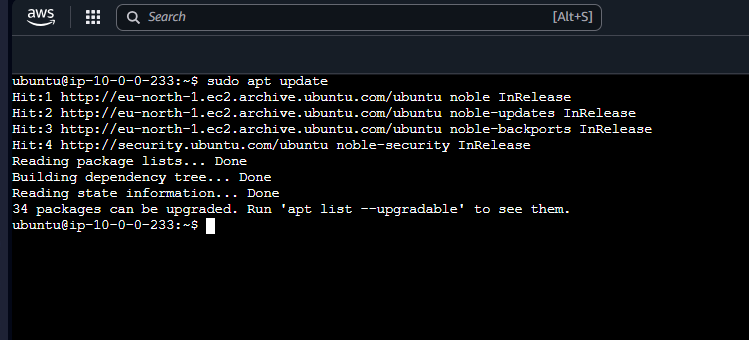
Verifying Internet Connectivity
Run the following command on the private instance to check internet access:
sudo apt update
If successful, the output should confirm package updates.
Conclusion
Congratulations!