![[The AI Show Episode 142]: ChatGPT’s New Image Generator, Studio Ghibli Craze and Backlash, Gemini 2.5, OpenAI Academy, 4o Updates, Vibe Marketing & xAI Acquires X](https://www.marketingaiinstitute.com/hubfs/ep%20142%20cover.png)


![From drop-out to software architect with Jason Lengstorf [Podcast #167]](https://cdn.hashnode.com/res/hashnode/image/upload/v1743796461357/f3d19cd7-e6f5-4d7c-8bfc-eb974bc8da68.png?#)


.png?#)


_Christophe_Coat_Alamy.jpg?#)
.webp?#)
 (1).webp?#)


![Apple Considers Delaying Smart Home Hub Until 2026 [Gurman]](https://www.iclarified.com/images/news/96946/96946/96946-640.jpg)
![iPhone 17 Pro Won't Feature Two-Toned Back [Gurman]](https://www.iclarified.com/images/news/96944/96944/96944-640.jpg)
![Tariffs Threaten Apple's $999 iPhone Price Point in the U.S. [Gurman]](https://www.iclarified.com/images/news/96943/96943/96943-640.jpg)


【电机控制器】ESP32-C3芯片——PWM、ADC
【电机控制器】ESP32-C3芯片——PWM @TOC 前言 使用工具: 1.编译器——Arduino 2.ESP32-C3最小核心板 提示:以下是本篇文章正文内容,下面案例可供参考 一、原理图 1.串口烧录 2.MCU主控和晶振 3.TYPEC-USB 4.LDO 5-3.3 5.按键 6.LED 7.FLASH 8.PWM 二、软件例程——呼吸灯 1.PWM呼吸灯 /* Fade This example shows how to fade an LED on pin 9 using the analogWrite() function. The analogWrite() function uses PWM, so if you want to change the pin you're using, be sure to use another PWM capable pin. On most Arduino, the PWM pins are identified with a "~" sign, like ~3, ~5, ~6, ~9, ~10 and ~11. This example code is in the public domain. https://www.arduino.cc/en/Tutorial/BuiltInExamples/Fade */ int led = 12; // the PWM pin the LED is attached to int brightness = 0; // how bright the LED is int fadeAmount = 5; // how many points to fade the LED by // the setup routine runs once when you press reset: void setup() { // declare pin 9 to be an output: pinMode(led, OUTPUT); } // the loop routine runs over and over again forever: void loop() { // set the brightness of pin 9: analogWrite(led, brightness); // change the brightness for next time through the loop: brightness = brightness + fadeAmount; // reverse the direction of the fading at the ends of the fade: if (brightness = 255) { fadeAmount = -fadeAmount; } // wait for 30 milliseconds to see the dimming effect delay(30); } 2.ADC采样 void setup() { // initialize serial communication at 115200 bits per second: Serial.begin(115200); //set the resolution to 12 bits (0-4096) analogReadResolution(12); } void loop() { // read the analog / millivolts value for pin 2: int analogValue = analogRead(1); int analogVolts = analogReadMilliVolts(2); // print out the values you read: Serial.printf("ADC analog value = %d\n",analogValue); Serial.printf("ADC millivolts value = %d\n",analogVolts); delay(100); // delay in between reads for clear read from serial } 三、实验结果 四、参考资料 ESP32C3-CORE开发板 【esp32c3配置arduino IDE教程】 解决Arduino IDE无法安装esp32的问题 2024年12月23日更新 总结 本文仅仅简单介绍了【电机控制器】ESP32-C3芯片——PWM,评论区欢迎讨论。

【电机控制器】ESP32-C3芯片——PWM
@TOC
前言
使用工具:
1.编译器——Arduino
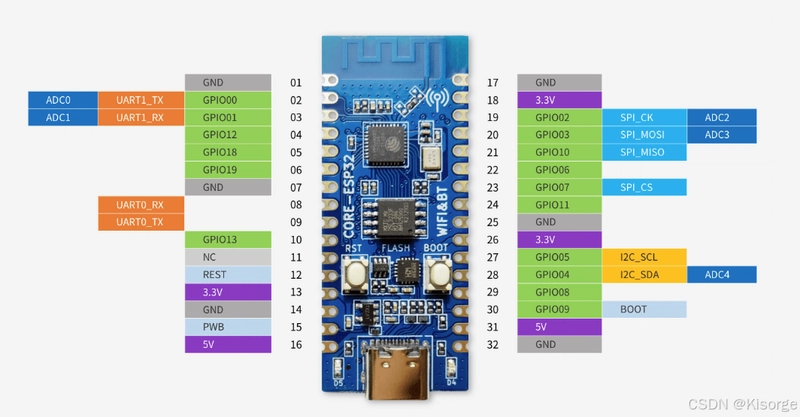
2.ESP32-C3最小核心板
提示:以下是本篇文章正文内容,下面案例可供参考
一、原理图
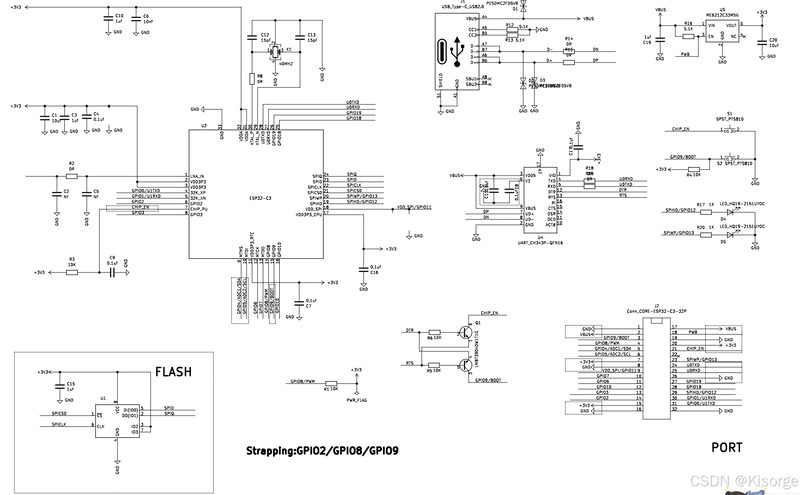
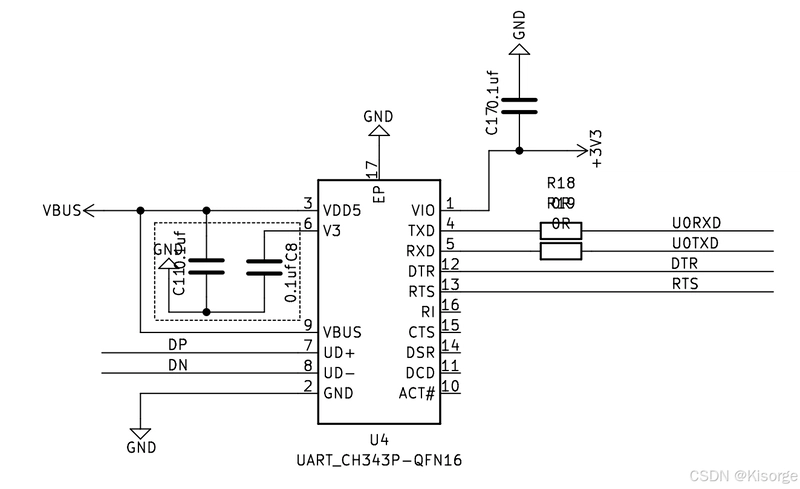
1.串口烧录
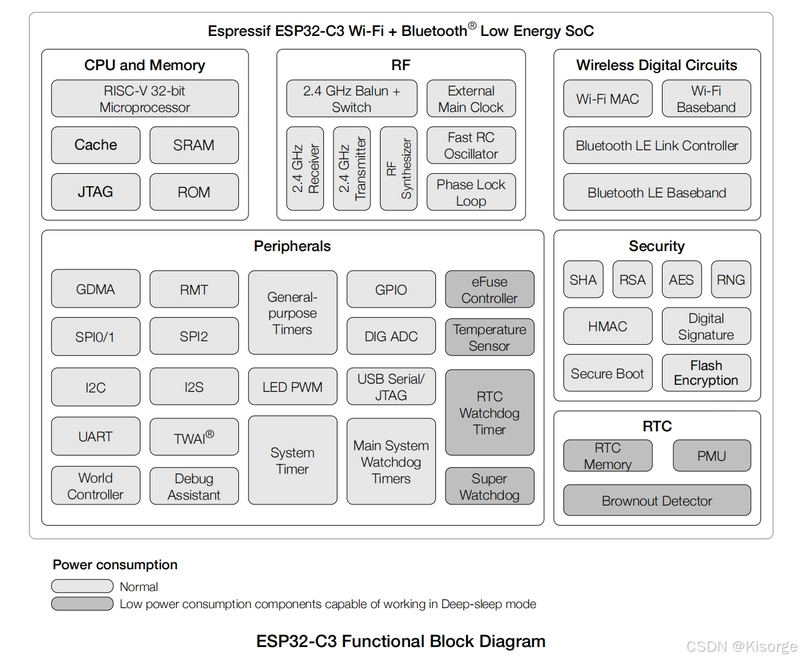
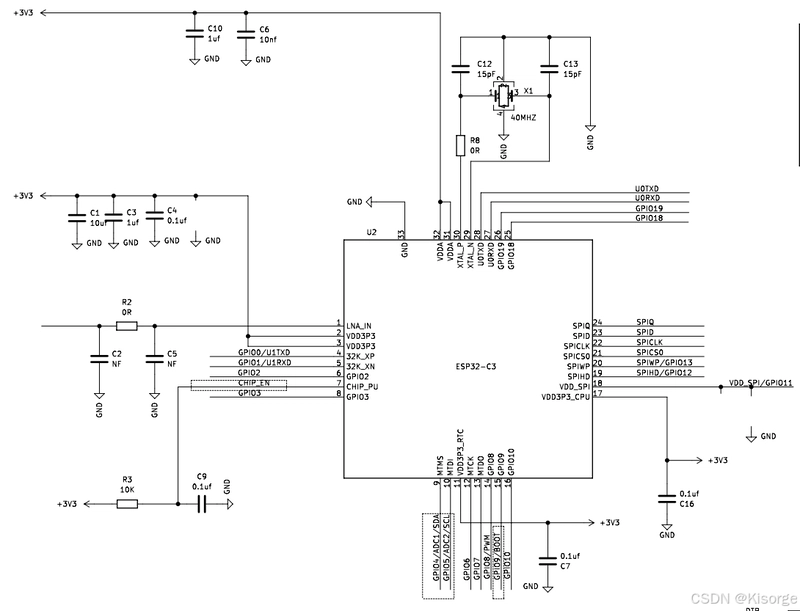
2.MCU主控和晶振
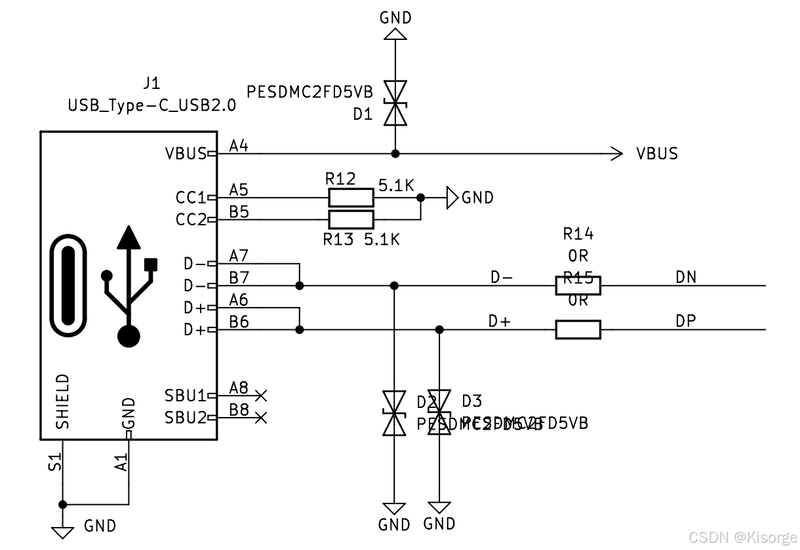
3.TYPEC-USB
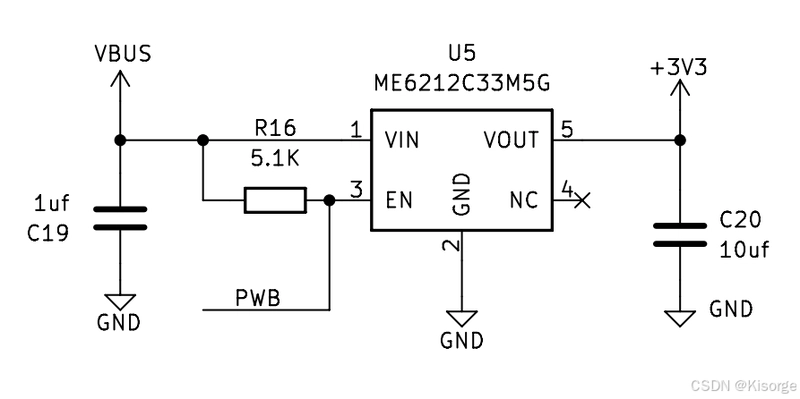
4.LDO 5-3.3
5.按键

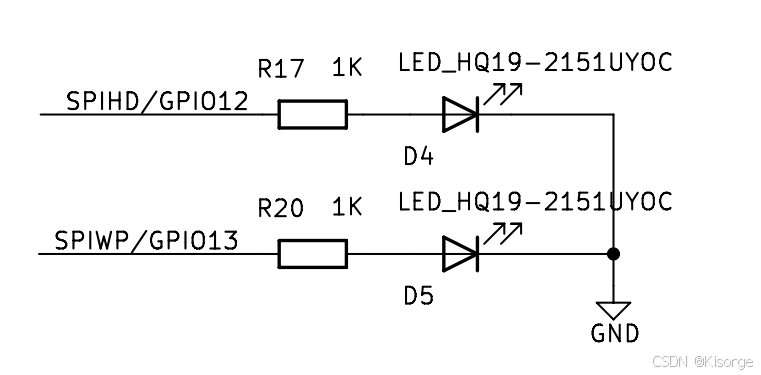
6.LED
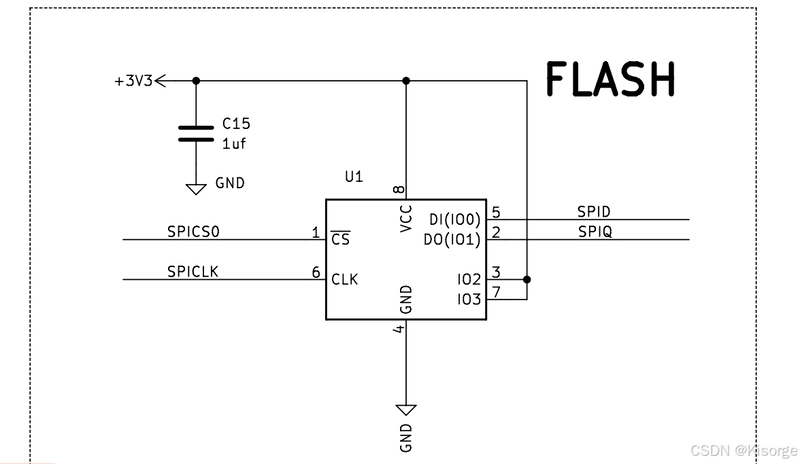
7.FLASH
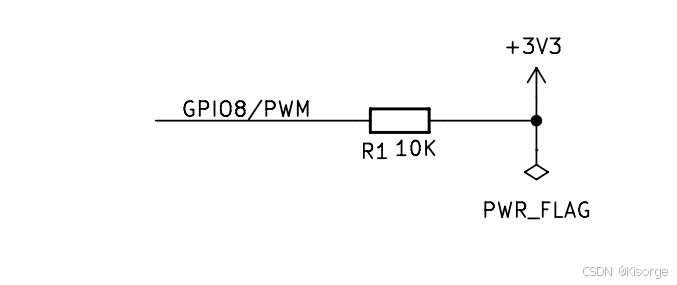
8.PWM
二、软件例程——呼吸灯
1.PWM呼吸灯
/*
  Fade

  This example shows how to fade an LED on pin 9 using the analogWrite()
  function.

  The analogWrite() function uses PWM, so if you want to change the pin you're
  using, be sure to use another PWM capable pin. On most Arduino, the PWM pins
  are identified with a "~" sign, like ~3, ~5, ~6, ~9, ~10 and ~11.

  This example code is in the public domain.

  https://www.arduino.cc/en/Tutorial/BuiltInExamples/Fade
*/

int led = 12;         // the PWM pin the LED is attached to
int brightness = 0;  // how bright the LED is
int fadeAmount = 5;  // how many points to fade the LED by

// the setup routine runs once when you press reset:
void setup() {
  // declare pin 9 to be an output:
  pinMode(led, OUTPUT);
}

// the loop routine runs over and over again forever:
void loop() {
  // set the brightness of pin 9:
  analogWrite(led, brightness);

  // change the brightness for next time through the loop:
  brightness = brightness + fadeAmount;

  // reverse the direction of the fading at the ends of the fade:
  if (brightness <= 0 || brightness >= 255) {
    fadeAmount = -fadeAmount;
  }
  // wait for 30 milliseconds to see the dimming effect
  delay(30);
}
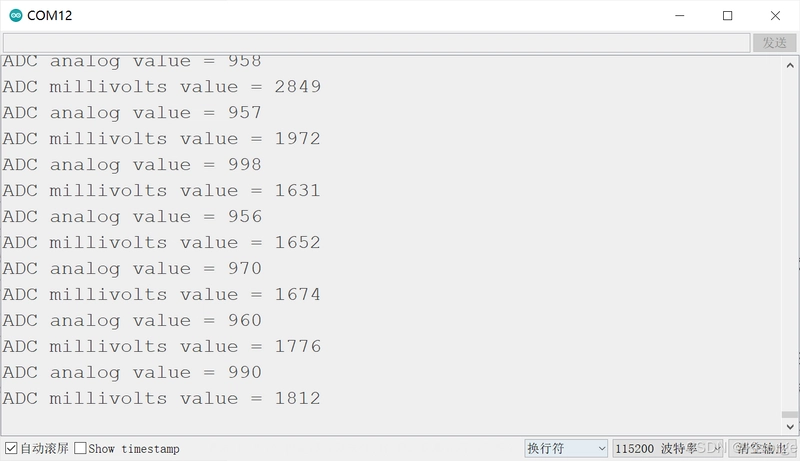
2.ADC采样
void setup() {
  // initialize serial communication at 115200 bits per second:
  Serial.begin(115200);

  //set the resolution to 12 bits (0-4096)
  analogReadResolution(12);
}

void loop() {
  // read the analog / millivolts value for pin 2:
  int analogValue = analogRead(1);
  int analogVolts = analogReadMilliVolts(2);

  // print out the values you read:
  Serial.printf("ADC analog value = %d\n",analogValue);
  Serial.printf("ADC millivolts value = %d\n",analogVolts);

  delay(100);  // delay in between reads for clear read from serial
}
三、实验结果
四、参考资料
ESP32C3-CORE开发板
【esp32c3配置arduino IDE教程】
解决Arduino IDE无法安装esp32的问题 2024年12月23日更新
总结
本文仅仅简单介绍了【电机控制器】ESP32-C3芯片——PWM,评论区欢迎讨论。