


![[The AI Show Episode 144]: ChatGPT’s New Memory, Shopify CEO’s Leaked “AI First” Memo, Google Cloud Next Releases, o3 and o4-mini Coming Soon & Llama 4’s Rocky Launch](https://www.marketingaiinstitute.com/hubfs/ep%20144%20cover.png)


![Is this too much for a modular monolith system? [closed]](https://i.sstatic.net/pYL1nsfg.png)


_Andreas_Prott_Alamy.jpg?width=1280&auto=webp&quality=80&disable=upscale#)


![What features do you get with Gemini Advanced? [April 2025]](https://i0.wp.com/9to5google.com/wp-content/uploads/sites/4/2024/02/gemini-advanced-cover.jpg?resize=1200%2C628&quality=82&strip=all&ssl=1)


![Apple Shares Official Trailer for 'Long Way Home' Starring Ewan McGregor and Charley Boorman [Video]](https://www.iclarified.com/images/news/97069/97069/97069-640.jpg)
![Apple Watch Series 10 Back On Sale for $299! [Lowest Price Ever]](https://www.iclarified.com/images/news/96657/96657/96657-640.jpg)
![EU Postpones Apple App Store Fines Amid Tariff Negotiations [Report]](https://www.iclarified.com/images/news/97068/97068/97068-640.jpg)
![Apple Slips to Fifth in China's Smartphone Market with 9% Decline [Report]](https://www.iclarified.com/images/news/97065/97065/97065-640.jpg)


WYSIWYG editor in LiveView with embedded images that are uploaded to S3 bucket
In this tutorial, you will learn how to create WYSIWYG editor with image insertion (+ auto upload to S3) in LiveView, store + show the content preserving styling. My setup: Elixir 1.18.1 Erlang OTP 27 Phoenix 1.18.0-rc LiveView 1.0.9 TLDR: We are going to create a JS hook that uses Quill.js as WYSIWYG editor; convert quill.js HTML to Markdown, decode base64 images from editor, upload the binary to S3, then replace base64 image with S3 link, then save it to the DB. To show markdown on a page, we are going to convert markdown to HTML and inject it into our page with Mdex and Phoenix.HTML.raw(), then style it all with tailwind typography plugin First, let’s create a Blogs context. By running: mix phx.gen.context Blogs Blog blogs title:string content:text meta:map Now, let’s create a LiveView page for creating a blog post. Here is what our HTML will look like. It is just a basic .form with an input field for title only and also a div with “WYSIWYG_editor” hook. Let’s set up WYSIWYG editor on a hook. Go to /assets folder add quill.js (wysiwyg editor) and turndown (html to markdown converter). npm I quill turndown Now, let’s set up WYSIWYG editor: Then, add snow theme css to root.html.heex Now, our /blogs/new page looks like this: To validate content inside of editor, we will have to send changes to the LiveView and validate in the LiveView with Ecto.Changeset. To do that, we are going to add # in the hook editor.on("text-change", () => { view.pushEvent("content-text-change", { content: editor.getText() }); }); Event handler in LV: def handle_event("content-text-change", %{"content" => content}, socket) do params = socket.assigns.form.source.params |> Map.put("content", content) changeset = Blog.changeset(%Blog{}, params) socket = socket |> assign(form: to_form(changeset, action: :validate)) {:noreply, socket} end Handling errors happens with this hack function that is a clone of translate_error/1 from core_components (I tried to do directly use translate_error() but it did not work, idk why) Now, let’s talk about how we are going to link LV form with the hook. When user submits a form, we are handling it in LV and sending a signal for the hook, hook prepares the content and sends it back to LV, then, we are going to extract + upload + replace any submitted images, then try to save the submitted blog. LV (on form submission) — ‘form_submitted’ —> HOOK HOOK (convert HTML to markdown) —‘editor_content_markdown’—> LV LV (handle the submission, extract images if any, create a blog post, then redirect to blogs show page) Below is the sample of submitting to a blog post with an image. As you can see, the image comes base64 encoded from quill. What does extract_base64_images do? It takes in the submitted content from the editor, and regex matches any images that are embedded, decodes the image into binary, uploads the binary to S3, gets the S3 link, and substitutes base64 encoded image with a link for the image in S3 bucket. It also returns some logs on files. Here is what create blog post looks like after we extract + upload + update the submitted post Now that we have content stored as markdown in our db, how are we going to present it to users with styling? First, we have to convert markdown into html. We can do that with mdex package. Then, we have to inject the html into the page. To handle styling, we can use tailwind and its typography plugin. (Of course, you can do it yourself, create ‘md’ class to a container of the blog post, then manually write css rules for each element that comes of markdown, like `md > h1 {text….}; md > h2 {…}, but tailwind got us covered) I discovered that Phoenix 1.8-rc does not come with typography plugin pre-installed, so we are going to install it on our own (can devs do that without cursor these days? Elixir devs surely can) Go to /assets folder and run the command below: npm install -D @tailwindcss/typography Then, go to your css/app.css file and add this line: @plugin "@tailwindcss/typography”; Then, we add prose as a class to a container containing the decoded markdown and finally arrive at: Which beautifully shows the user submitted posts with the styling from WYSIWYG editor: Repo with working demo is available here: https://github.com/azyzz228/wysiwyg-editor-liveview. Note that I am using DigitalOcean S3 bucket with can which is why in my dev.exs and runtime.exs, ex_aws config has custom host Note: Unordered lists are handled weirdly by Quill. Instead of having and s inside, they have , which is why unordered lists are shown as ordered ones. It is an easy fix on JS side before converting to markdown with turndown, we gotta find ol nodes that have li-s with certain class name, then change ol to ul. but I was lazy to fix it here, sorry
In this tutorial, you will learn how to create WYSIWYG editor with image insertion (+ auto upload to S3) in LiveView, store + show the content preserving styling.
My setup:
Elixir 1.18.1
Erlang OTP 27
Phoenix 1.18.0-rc
LiveView 1.0.9
TLDR:
We are going to create a JS hook that uses Quill.js as WYSIWYG editor; convert quill.js HTML to Markdown, decode base64 images from editor, upload the binary to S3, then replace base64 image with S3 link, then save it to the DB. To show markdown on a page, we are going to convert markdown to HTML and inject it into our page with Mdex and Phoenix.HTML.raw(), then style it all with tailwind typography plugin
First, let’s create a Blogs context. By running:
mix phx.gen.context Blogs Blog blogs title:string content:text meta:map
Now, let’s create a LiveView page for creating a blog post.
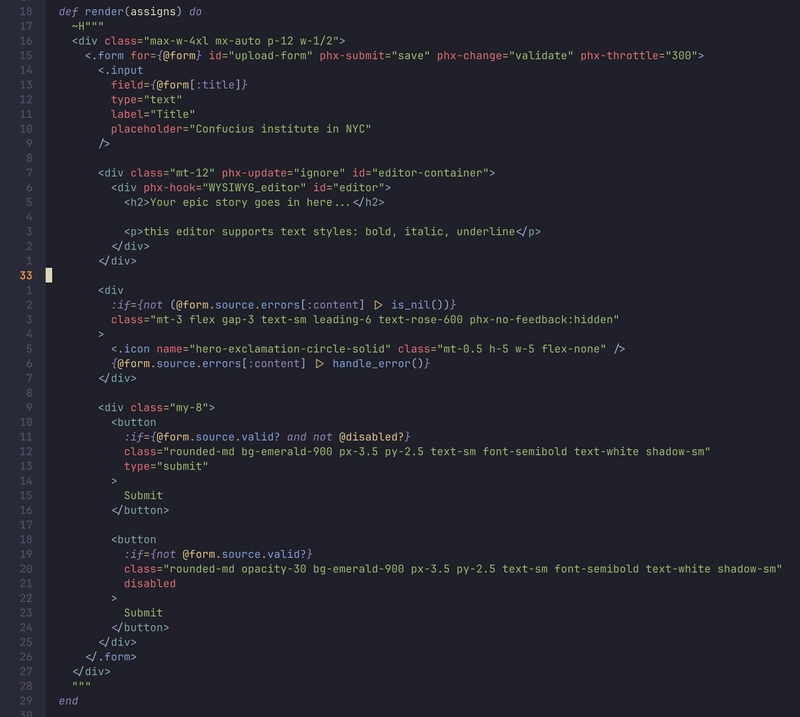
Here is what our HTML will look like. It is just a basic .form with an input field for title only and also a div with “WYSIWYG_editor” hook.
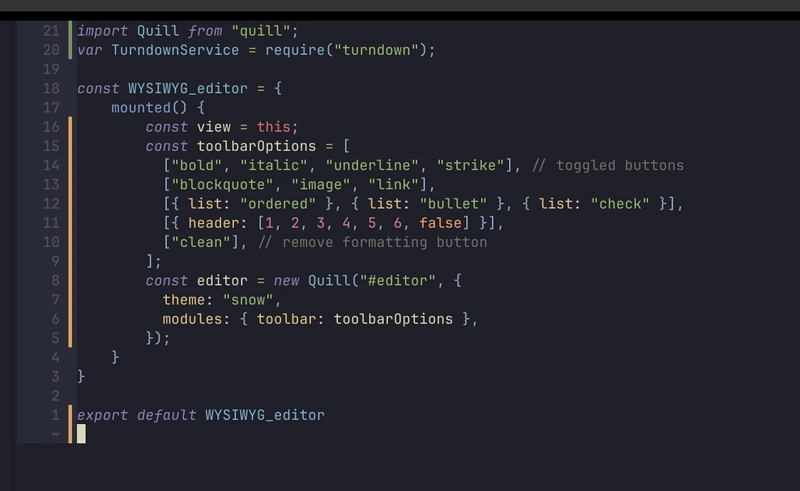
Let’s set up WYSIWYG editor on a hook.
Go to /assets folder add quill.js (wysiwyg editor) and turndown (html to markdown converter).
npm I quill turndown
Now, let’s set up WYSIWYG editor:
Then, add snow theme css to root.html.heex
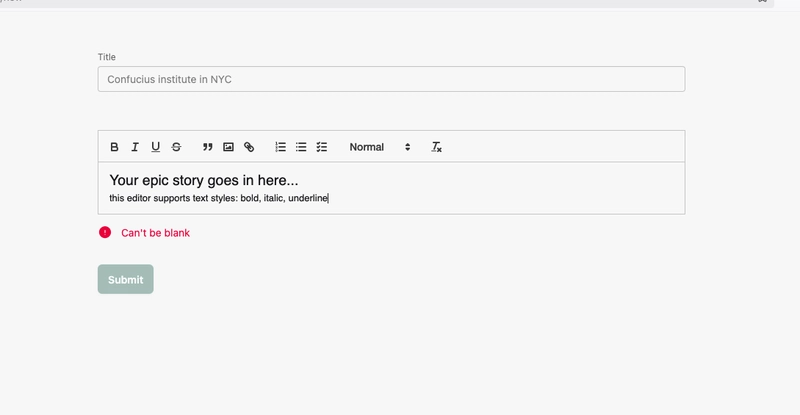
Now, our /blogs/new page looks like this:
To validate content inside of editor, we will have to send changes to the LiveView and validate in the LiveView with Ecto.Changeset. To do that, we are going to add
# in the hook
        editor.on("text-change", () => {
          view.pushEvent("content-text-change", { content: editor.getText() });
        });
Event handler in LV:
  def handle_event("content-text-change", %{"content" => content}, socket) do
    params =
      socket.assigns.form.source.params
      |> Map.put("content", content)

    changeset = Blog.changeset(%Blog{}, params)

    socket =
      socket
      |> assign(form: to_form(changeset, action: :validate))

    {:noreply, socket}
  end
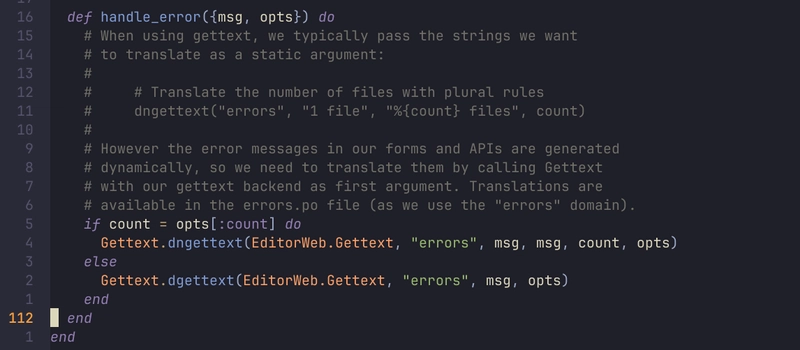
Handling errors happens with this hack function that is a clone of translate_error/1 from core_components (I tried to do directly use translate_error() but it did not work, idk why)
Now, let’s talk about how we are going to link LV form with the hook. When user submits a form, we are handling it in LV and sending a signal for the hook, hook prepares the content and sends it back to LV, then, we are going to extract + upload + replace any submitted images, then try to save the submitted blog.
LV (on form submission) — ‘form_submitted’ —> HOOK
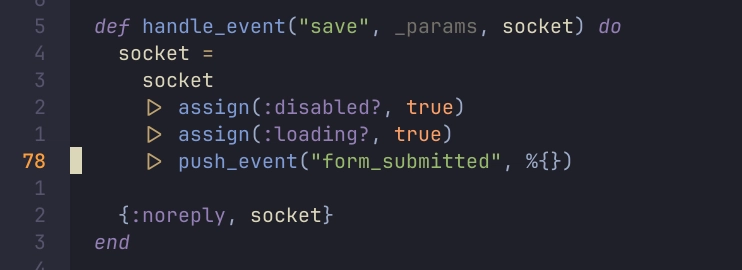
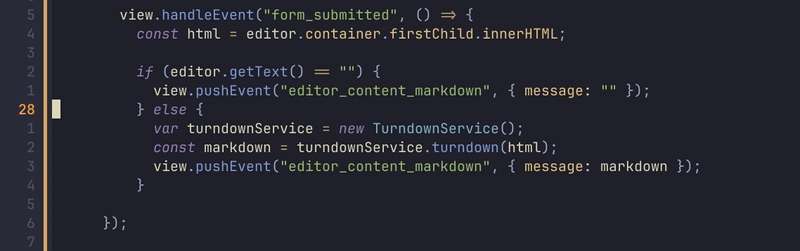
HOOK (convert HTML to markdown) —‘editor_content_markdown’—> LV
LV (handle the submission, extract images if any, create a blog post, then redirect to blogs show page)
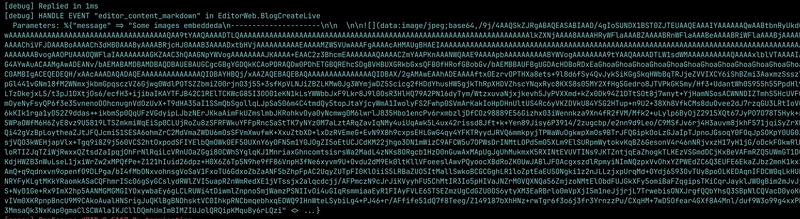
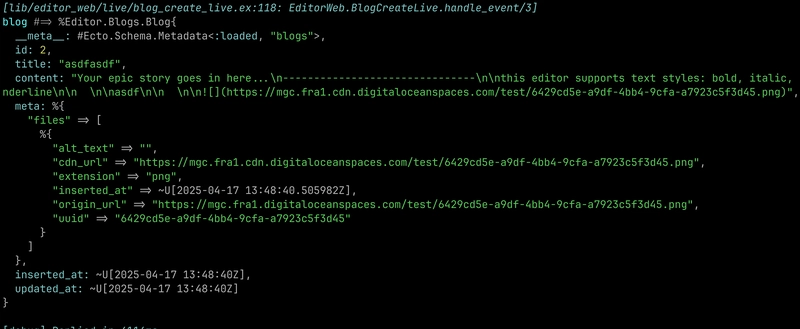
Below is the sample of submitting to a blog post with an image. As you can see, the image comes base64 encoded from quill.
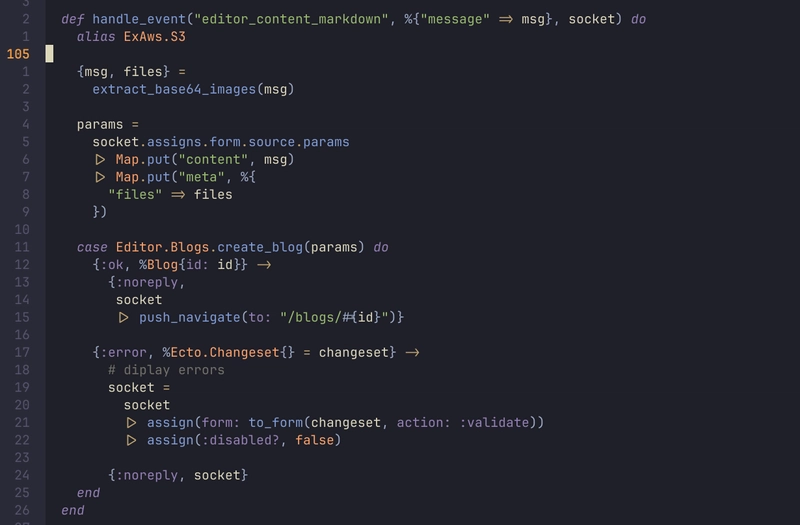
What does extract_base64_images do?
It takes in the submitted content from the editor, and regex matches any images that are embedded, decodes the image into binary, uploads the binary to S3, gets the S3 link, and substitutes base64 encoded image with a link for the image in S3 bucket. It also returns some logs on files.

Here is what create blog post looks like after we extract + upload + update the submitted post
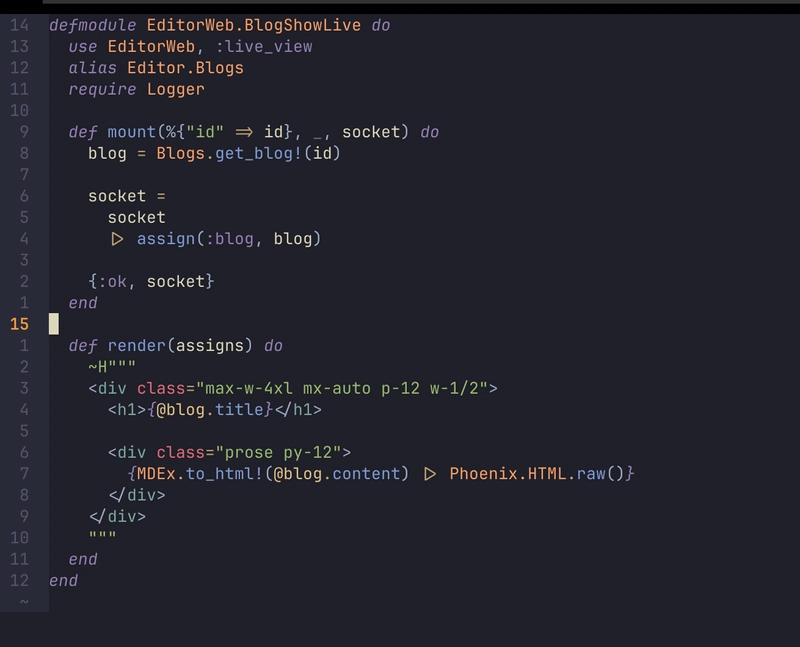
Now that we have content stored as markdown in our db, how are we going to present it to users with styling?
First, we have to convert markdown into html. We can do that with mdex package.
Then, we have to inject the html into the page.
To handle styling, we can use tailwind and its typography plugin. (Of course, you can do it yourself, create ‘md’ class to a container of the blog post, then manually write css rules for each element that comes of markdown, like `md > h1 {text….}; md > h2 {…}, but tailwind got us covered)
I discovered that Phoenix 1.8-rc does not come with typography plugin pre-installed, so we are going to install it on our own (can devs do that without cursor these days? Elixir devs surely can)
Go to /assets folder and run the command below:
npm install -D @tailwindcss/typography
Then, go to your css/app.css file and add this line:
@plugin "@tailwindcss/typography”;
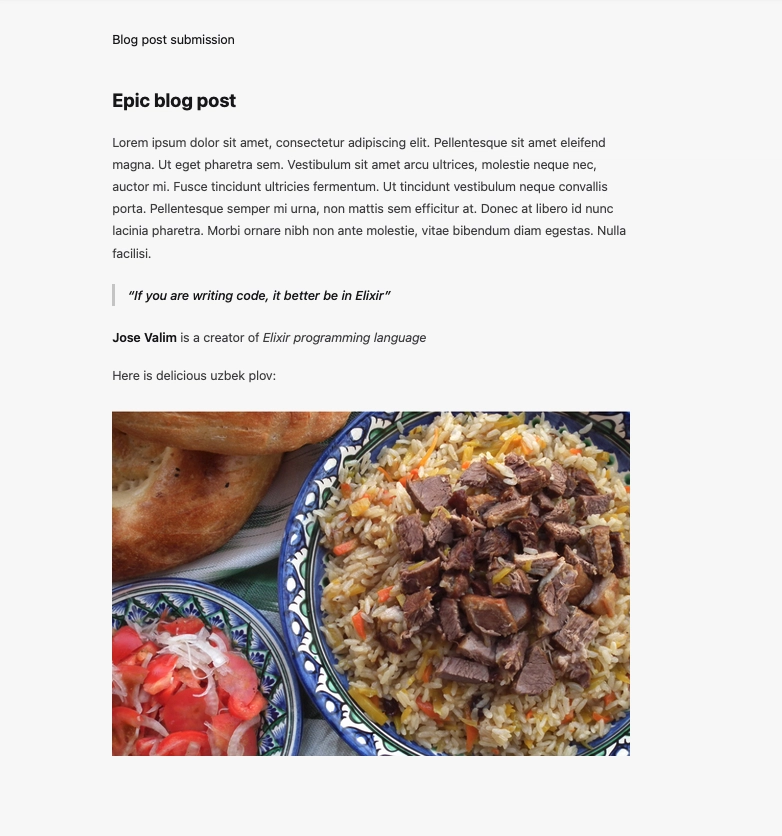
Then, we add prose as a class to a container containing the decoded markdown and finally arrive at:
Which beautifully shows the user submitted posts with the styling from WYSIWYG editor:
Repo with working demo is available here: https://github.com/azyzz228/wysiwyg-editor-liveview. Note that I am using DigitalOcean S3 bucket with can which is why in my dev.exs and runtime.exs, ex_aws config has custom host
Note:
Unordered lists are handled weirdly by Quill. Instead of having s inside, they have