


![[The AI Show Episode 144]: ChatGPT’s New Memory, Shopify CEO’s Leaked “AI First” Memo, Google Cloud Next Releases, o3 and o4-mini Coming Soon & Llama 4’s Rocky Launch](https://www.marketingaiinstitute.com/hubfs/ep%20144%20cover.png)


![From fast food worker to cybersecurity engineer with Tae'lur Alexis [Podcast #169]](https://cdn.hashnode.com/res/hashnode/image/upload/v1745242807605/8a6cf71c-144f-4c91-9532-62d7c92c0f65.png?#)


![BPMN-procesmodellering [closed]](https://i.sstatic.net/l7l8q49F.png)


.jpg?#)
.jpg?#)


.webp?#)


![CarPlay app with web browser for streaming video hits App Store [U]](https://i0.wp.com/9to5mac.com/wp-content/uploads/sites/6/2024/11/carplay-apple.jpeg?resize=1200%2C628&quality=82&strip=all&ssl=1)


![What’s new in Android’s April 2025 Google System Updates [U: 4/21]](https://i0.wp.com/9to5google.com/wp-content/uploads/sites/4/2025/01/google-play-services-3.jpg?resize=1200%2C628&quality=82&strip=all&ssl=1)


![Apple Releases iOS 18.5 Beta 3 and iPadOS 18.5 Beta 3 [Download]](https://www.iclarified.com/images/news/97076/97076/97076-640.jpg)
![Apple Seeds visionOS 2.5 Beta 3 to Developers [Download]](https://www.iclarified.com/images/news/97077/97077/97077-640.jpg)
![Apple Seeds tvOS 18.5 Beta 3 to Developers [Download]](https://www.iclarified.com/images/news/97078/97078/97078-640.jpg)
![Apple Seeds watchOS 11.5 Beta 3 to Developers [Download]](https://www.iclarified.com/images/news/97079/97079/97079-640.jpg)


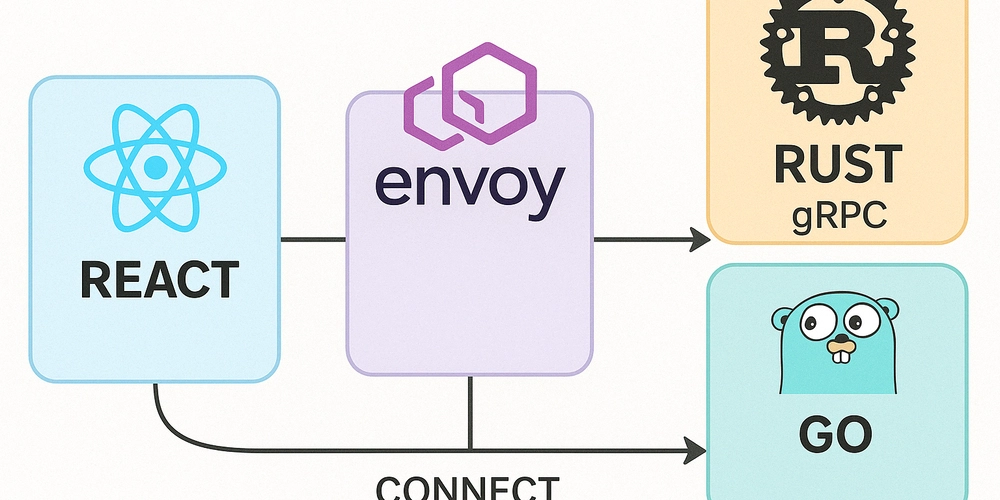
Using gRPC in React the Modern Way: From gRPC-web to Connect
Recently, I've been exploring how to use gRPC in React projects to interact with the backend. I searched for many articles online, but was surprised to find that there wasn't a single one that clearly explained it from scratch. So, I did some simple exploration and implemented a basic personnel CRUD service using React + Rust + Go. Complete code: https://github.com/Arichy/react-rust-go-rpc. Please note that although this article introduces multiple solutions, the frontend in the code repository uses the @bufbuild + @connect suite, not grpc-web or protobuf-ts. 1. Distinguishing Concepts Before diving into the main content, there are a few easily confused concepts that need clarification: Feature Protobuf RPC gRPC gRPC-web Connect Definition Protocol Buffers, a structured data serialization format developed by Google Remote Procedure Call, a general concept A high-performance RPC framework developed by Google, based on HTTP/2 and Protocol Buffers A browser-side implementation of gRPC, allowing the frontend to directly communicate with gRPC services A more modern RPC framework focusing on developer experience, compatible with gRPC Creator Google General concept, no single creator Google Google Buf company Transport Protocol N/A (serialization format only) Various HTTP/2 HTTP/1.1 or HTTP/2 (requires proxy) HTTP/1.1 or HTTP/2 Serialization Binary, efficient and compact Various Protocol Buffers Protocol Buffers Protocol Buffers or JSON Browser Support Supported via JS libraries Not directly supported Not directly supported Supported via special client Native support, no proxy needed Code Generation Uses compilers like protoc to generate multi-language code Depends on implementation Complex, requires protoc Complex, requires protoc and plugins Simplified, uses buf toolchain Use Case Efficient data exchange, cross-language systems Distributed system communication Microservice communication, backend services Browser → Server communication Full-stack applications, cross-platform Developer Experience Requires extra compilation steps Basic Feature-rich but complex configuration Complex configuration, requires proxy Simplified configuration, excellent DX (The above table was generated by Github Copilot) In summary: Protobuf is a data format, commonly using binary serialization. RPC is a communication concept. gRPC is a framework that implements RPC, using Protobuf as the data format. gRPC-web is the browser-side implementation of gRPC, but since browsers don't support HTTP/2 directly for this purpose, a proxy service is needed to convert HTTP/1.1 to HTTP/2. Connect is a newer RPC framework, compatible with gRPC, but more modern, and also has its own Connect communication protocol. 2. Tech Stack + Structure Frontend: React + TypeScript + Vite + gRPC related libraries (this is quite confusing, will be explained below). gRPC Backend: Rust + tonic (a Rust implementation of gRPC). Connect Backend: Go + connect. Protobuf files. envoy + Docker (Docker is optional, used because I don't want to install envoy locally). Directory Structure (some common files omitted): . ├── frontend/ (generated by vite, regular files omitted) │ ├── src/ │ │ ├── gen/ │ │ └── grpc.ts │ ├── package.json │ ├── vite.config.ts │ ├── buf.gen.yaml │ └── tsconfig.json ├── rust-grpc-backend/ (a simple Rust gRPC server, regular files omitted) │ ├── src/ │ ├── build.rs │ └── Cargo.toml ├── go-connect-backend/ (a simple Go connect server, regular files omitted) │ ├── gen/ (generated by `buf generate`) │ ├── buf.yaml │ ├── buf.gen.yaml │ └── main.go ├── proto/ │ └── person.proto ├── envoy.yaml └── docker-compose.yml envoy First, you need to know that gRPC is based on HTTP/2. Although modern browsers support HTTP/2, JavaScript's fetch API cannot directly control the underlying capabilities of HTTP/2 like streams and header frames. This prevents gRPC from being used natively in the browser. For example, gRPC has specific frame format requirements for HTTP/2, but the fetch API doesn't provide such capabilities. Therefore, we need a proxy service to convert the HTTP/1.1 requests sent by the browser into HTTP/2 requests. Currently, a popular proxy service is envoy (don't worry, only basic usage is needed, it's okay if you don't understand this). Create an envoy.yaml file in the root directory with the following content: admin: access_log_path: /tmp/admin_access.log address: socket_address: { address: 0.0.0.0, port_value: 9901 } static_resources: listeners: - name: listener_0 address: socket_address: { address: 0.0.0.0, port_value: 8080 } # Address where frontend requests are sent filter_chains: - filters: - name: envoy.filters.network.http_connection_manager typed_config: '@type': type.googleapis.com/envoy.extensions.filters.network.http_connection_manager.v3.HttpConne
Recently, I've been exploring how to use gRPC in React projects to interact with the backend. I searched for many articles online, but was surprised to find that there wasn't a single one that clearly explained it from scratch. So, I did some simple exploration and implemented a basic personnel CRUD service using React + Rust + Go.
Complete code: https://github.com/Arichy/react-rust-go-rpc. Please note that although this article introduces multiple solutions, the frontend in the code repository uses the @bufbuild + @connect suite, not grpc-web or protobuf-ts.
1. Distinguishing Concepts
Before diving into the main content, there are a few easily confused concepts that need clarification:
| Feature | Protobuf | RPC | gRPC | gRPC-web | Connect |
|---|---|---|---|---|---|
| Definition | Protocol Buffers, a structured data serialization format developed by Google | Remote Procedure Call, a general concept | A high-performance RPC framework developed by Google, based on HTTP/2 and Protocol Buffers | A browser-side implementation of gRPC, allowing the frontend to directly communicate with gRPC services | A more modern RPC framework focusing on developer experience, compatible with gRPC |
| Creator | General concept, no single creator | Buf company | |||
| Transport Protocol | N/A (serialization format only) | Various | HTTP/2 | HTTP/1.1 or HTTP/2 (requires proxy) | HTTP/1.1 or HTTP/2 |
| Serialization | Binary, efficient and compact | Various | Protocol Buffers | Protocol Buffers | Protocol Buffers or JSON |
| Browser Support | Supported via JS libraries | Not directly supported | Not directly supported | Supported via special client | Native support, no proxy needed |
| Code Generation | Uses compilers like protoc to generate multi-language code | Depends on implementation | Complex, requires protoc | Complex, requires protoc and plugins | Simplified, uses buf toolchain |
| Use Case | Efficient data exchange, cross-language systems | Distributed system communication | Microservice communication, backend services | Browser → Server communication | Full-stack applications, cross-platform |
| Developer Experience | Requires extra compilation steps | Basic | Feature-rich but complex configuration | Complex configuration, requires proxy | Simplified configuration, excellent DX |
(The above table was generated by Github Copilot)
In summary:
- Protobuf is a data format, commonly using binary serialization.
- RPC is a communication concept.
- gRPC is a framework that implements RPC, using Protobuf as the data format.
- gRPC-web is the browser-side implementation of gRPC, but since browsers don't support HTTP/2 directly for this purpose, a proxy service is needed to convert HTTP/1.1 to HTTP/2.
- Connect is a newer RPC framework, compatible with gRPC, but more modern, and also has its own Connect communication protocol.
2. Tech Stack + Structure
- Frontend: React + TypeScript + Vite + gRPC related libraries (this is quite confusing, will be explained below).
- gRPC Backend: Rust + tonic (a Rust implementation of gRPC).
- Connect Backend: Go + connect.
- Protobuf files.
- envoy + Docker (Docker is optional, used because I don't want to install envoy locally).
Directory Structure (some common files omitted):
.
├── frontend/ (generated by vite, regular files omitted)
│   ├── src/
│   │   ├── gen/
│   │   └── grpc.ts
│   ├── package.json
│   ├── vite.config.ts
│   ├── buf.gen.yaml
│   └── tsconfig.json
├── rust-grpc-backend/ (a simple Rust gRPC server, regular files omitted)
│   ├── src/
│   ├── build.rs
│   └── Cargo.toml
├── go-connect-backend/ (a simple Go connect server, regular files omitted)
│   ├── gen/ (generated by `buf generate`)
│   ├── buf.yaml
│   ├── buf.gen.yaml
│   └── main.go
├── proto/
│   └── person.proto
├── envoy.yaml
└── docker-compose.yml
envoy
First, you need to know that gRPC is based on HTTP/2. Although modern browsers support HTTP/2, JavaScript's fetch API cannot directly control the underlying capabilities of HTTP/2 like streams and header frames. This prevents gRPC from being used natively in the browser. For example, gRPC has specific frame format requirements for HTTP/2, but the fetch API doesn't provide such capabilities. Therefore, we need a proxy service to convert the HTTP/1.1 requests sent by the browser into HTTP/2 requests. Currently, a popular proxy service is envoy (don't worry, only basic usage is needed, it's okay if you don't understand this).
Create an envoy.yaml file in the root directory with the following content:
admin:
  access_log_path: /tmp/admin_access.log
  address:
    socket_address: { address: 0.0.0.0, port_value: 9901 }

static_resources:
  listeners:
    - name: listener_0
      address:
        socket_address: { address: 0.0.0.0, port_value: 8080 } # Address where frontend requests are sent
      filter_chains:
        - filters:
            - name: envoy.filters.network.http_connection_manager
              typed_config:
                '@type': type.googleapis.com/envoy.extensions.filters.network.http_connection_manager.v3.HttpConnectionManager
                codec_type: auto
                stat_prefix: ingress_http
                route_config:
                  name: local_route
                  virtual_hosts:
                    - name: local_service
                      domains: ['*']
                      routes:
                        - match: { prefix: '/' }
                          route:
                            cluster: person_service
                            timeout: 0s
                            max_stream_duration:
                              grpc_timeout_header_max: 0s
                      cors:
                        allow_origin_string_match:
                          - prefix: '*'
                        allow_methods: GET, PUT, DELETE, POST, OPTIONS
                        allow_headers: keep-alive,user-agent,cache-control,content-type,content-transfer-encoding,x-accept-content-transfer-encoding,x-accept-response-streaming,x-user-agent,x-grpc-web,grpc-timeout
                        max_age: '1728000'
                        expose_headers: grpc-status,grpc-message
                http_filters:
                  - name: envoy.filters.http.grpc_web
                    typed_config:
                      '@type': type.googleapis.com/envoy.extensions.filters.http.grpc_web.v3.GrpcWeb
                  - name: envoy.filters.http.cors
                    typed_config:
                      '@type': type.googleapis.com/envoy.extensions.filters.http.cors.v3.Cors
                  - name: envoy.filters.http.router
                    typed_config:
                      '@type': type.googleapis.com/envoy.extensions.filters.http.router.v3.Router
  clusters:
    - name: person_service
      connect_timeout: 0.25s
      type: logical_dns
      http2_protocol_options: {}
      lb_policy: round_robin
      load_assignment:
        cluster_name: person_service
        endpoints:
          - lb_endpoints:
              - endpoint:
                  address:
                    socket_address:
                      # address: backend # Use this if running backend + envoy with docker-compose
                      address: host.docker.internal # Use this if only running envoy with Docker
                      port_value: 50051 # backend's grpc server port
It's okay if you don't understand it; I don't either. This isn't the main point; just pay attention to the two ports and one address commented above. Once created, you can run it using docker-compose. Below is a simple docker-compose.yml file:
services:
  # Envoy proxy for gRPC-Web support
  envoy:
    image: envoyproxy/envoy:v1.33-latest
    ports:
      - '8080:8080'
    volumes:
      - ./envoy.yaml:/etc/envoy/envoy.yaml # Mount envoy.yaml into the container
Now you can run envoy using docker-compose up. This command will run envoy and map port 8080 to the host machine's port 8080, waiting to forward gRPC-web requests from the frontend to the Rust gRPC server on port 50051.
3. Handling Proto Files + gRPC Communication
Here we use proto/person.proto as an example, defining basic CRUD operations (this file was written for me by Copilot; it returns a paginated result when Listing People, but the pagination logic isn't implemented, just to demonstrate proto file definition):
syntax = "proto3";

package person;

// The Person message represents an individual person in our system
message Person {
  string id = 1;
  string name = 2;
  string email = 3;
  int32 age = 4;
}

// Request message for creating a new person
message CreatePersonRequest {
  Person person = 1;
}

// Response message for creating a new person
message CreatePersonResponse {
  Person person = 1;
}

// Request message for retrieving a person by ID
message GetPersonRequest {
  string id = 1;
}

// Response message for getting a person
message GetPersonResponse {
  Person person = 1;
}

// Request message for updating a person
message UpdatePersonRequest {
  Person person = 1;
}

// Response message for updating a person
message UpdatePersonResponse {
  Person person = 1;
}

// Request message for deleting a person
message DeletePersonRequest {
  string id = 1;
}

// Response message for deleting a person
message DeletePersonResponse {
  bool success = 1;
}

// Request message for listing people
message ListPeopleRequest {
  // Optional pagination fields
  int32 page_size = 1;
  int32 page_token = 2;
}

// Response message for listing people
message ListPeopleResponse {
  repeated Person people = 1;
  int32 next_page_token = 2;
}

// The PersonService provides CRUD operations for managing people
service PersonService {
  // Create a new person
  rpc CreatePerson (CreatePersonRequest) returns (CreatePersonResponse);

  // Get a person by ID
  rpc GetPerson (GetPersonRequest) returns (GetPersonResponse);

  // Update an existing person
  rpc UpdatePerson (UpdatePersonRequest) returns (UpdatePersonResponse);

  // Delete a person by ID
  rpc DeletePerson (DeletePersonRequest) returns (DeletePersonResponse);

  // List all people with optional pagination
  rpc ListPeople (ListPeopleRequest) returns (ListPeopleResponse);
}
3.1 Rust Side
On the Rust side, we need to use tonic to generate gRPC-related code. This part is not the focus and is quite simple, so I won't elaborate; you can check the documentation yourself. Essentially, you write a build.rs file, and tonic-build will automatically compile the proto file into Rust code, which we can then use in our Rust code.
3.2 Frontend
This part is the main focus of this article and the most troublesome. When I was looking through the documentation, I got confused by a bunch of libraries and spent a long time figuring out what each library does. This is mainly because gRPC JS can be used not only in the browser but also in Node.js, so many libraries are targeted at Node.js, but we need the browser-side ones. Therefore, you need to install many libraries; some are purely for the JS language itself, platform-independent, while others provide browser support.
Official Implementation
TL;DR: Using the official implementation is not recommended. The libraries are confusing, the build command is disgusting, and it only supports CommonJS, not ES modules.
The official gRPC-web implementation is grpc-web. You first need to install a compiler:
brew install protobuf
This command installs protobuf, used via protoc in the command line. It's a compiler we need to compile proto files into code for other languages. However, since protobuf officially only supports C++, C#, Dart, Go, Java, Kotlin, Python, and not JS, we need to install a plugin to generate JS code. This plugin is protoc-gen-js, which can be installed via npm. The official documentation tutorial suggests global installation, but I personally prefer local installation within the project.
A project using the official implementation should have the following libraries in its package.json:
{
  "dependencies": {
    "grpc-web": "Provides the ability for the browser to communicate with the gRPC server, focusing on communication capability",
    "google-protobuf": "Provides the JavaScript implementation of protobuf, focusing on protobuf serialization and deserialization capabilities"
  },
  "devDependencies": {
    "protoc-gen-js": "The plugin mentioned above, invoked by protoc, used to compile proto files into JS code, focusing on compilation capability",
    "protoc-gen-grpc-web": "Another plugin, invoked by protoc, generates grpc-web related client code"
  }
}
Then run a script to compile the proto file into JS code:
{
  "scripts": {
    "gen-proto": "rm -rf src/generated && mkdir -p src/generated && protoc -I=../proto --js_out=import_style=commonjs,binary:src/generated --grpc-web_out=import_style=commonjs,mode=grpcwebtext:src/generated ../proto/*.proto"
  }
}
Honestly, just seeing this compilation command makes my eyes glaze over. I'll try to explain what it does. Ignoring the first two parts that delete the existing directory and create a new one, let's look at the protoc command:
-
-I=../proto: indicates where to find the proto files. Since thispackage.jsonis in thefrontenddirectory, it's the parent directory../proto. -
--js_out=import_style=commonjs,binary:src/generated: thejs_outis passed to theprotoc-gen-jsplugin, explained in detail below. -
../proto/\*.protoare the proto files to be compiled, also direct parameters passed toprotoc.
The format of --js_out looks overly complicated: --js_out=[OPTIONS:]output_dir, where OPTIONS are comma-separated options, and output_dir is the output directory. Here, OPTIONS has two options:
-
import_style=commonjsspecifies that the generated JS code uses CommonJS modules. This option is optional; if not specified, the default is commonjs. -
binaryindicates that the generated JS code should support binary serialization and deserialization of messages.
src/generated is the path for the generated JS code.
Then there's the --grpc-web_out parameter, which has the same format as --js_out, so I won't repeat the details.
Running this command will generate two files under src/generated:
-
person_pb.js: This file contains JS code generated byprotoc-gen-js, including message types defined in the proto file and serialization/deserialization logic. -
person_grpc_web_pb.js: This file contains JS code generated byprotoc-gen-grpc-web, including the gRPC client code, which is what we need to call to send requests.
Unfortunately, the JS code generated by protoc-gen-js only supports CommonJS, not ESM, and uses the exports variable.
goog.object.extend(exports, proto.person);
I couldn't find a way to successfully bundle the generated code with Vite, so I don't recommend using the official implementation.
protobuf-ts
protobuf-ts is a third-party implementation. This solution only requires installing two libraries:
{
  "dependencies": {
    "@protobuf-ts/grpcweb-transport": "gRPC runtime library"
  },
  "devDependencies": {
    "@protobuf-ts/plugin": "protoc compiler plugin, used to compile proto files into TS code"
  }
}
Then modify the compilation command:
{
  "scripts": {
    "gen-proto": "rm -rf src/generated && mkdir -p src/generated && protoc -I=../proto --ts_out=src/generated ../proto/*.proto"
  }
}
As you can see, this solution still relies on the protoc command, but doesn't require installing the protoc-gen-js and protoc-gen-grpc-web plugins. You only need to install the @protobuf-ts/plugin plugin, and the command is much simpler. This plugin is called by protoc to compile proto files into TS code. The advantage of this solution is that the generated TS code uses ESM modules and can be used directly in Vite.
Then update frontend/src/grpc.ts:
import { GrpcWebFetchTransport } from '@protobuf-ts/grpcweb-transport';
import { PersonServiceClient } from './generated/person.client';

const apiUrl = 'http://localhost:8080';

const transport = new GrpcWebFetchTransport({
  baseUrl: apiUrl,
});
export const personClient = new PersonServiceClient(transport);
Now you can happily use it in React (here integrated with react-query):
import { personClient } from './grpc';

// in component
const peopleQueryKey = ['people'];

// READ
const { data: people } = useQuery({
  queryKey: peopleQueryKey,
  queryFn: async () => {
    const response = await personClient.listPeople({ pageSize: 1, pageToken: 1 });
    return response.response.people;
  },
});

// CREATE
const handleAddPerson = async (person: Person) => {
  try {
    await personClient.createPerson(CreatePersonRequest.create({ person })); // option 1: using create method
    queryClient.invalidateQueries({ queryKey: peopleQueryKey });
    setSelectedPerson(null);
  } catch (err) {
    console.error('Error adding person:', err);
  }
};

// UPDATE
const handleUpdatePerson = async (person: Person) => {
  try {
    await personClient.updatePerson({ person }); // option 2: directly pass params
    queryClient.invalidateQueries({ queryKey: peopleQueryKey });

    setSelectedPerson(null);
  } catch (err) {
    console.error('Error updating person:', err);
  }
};
Next, run everything one by one:
-
docker-composeup to run envoy. - Enter
rust-grpc-backend, runcargo runto start the Rust gRPC server. - Enter
frontend, runyarn devto start the frontend. 4. Open your browser and visit http://localhost:5173 (Vite's default port).
bufbuild + connect Solution
This is another more systematic and modern third-party solution, requiring the installation of the following libraries:
{
  "dependencies": {
    "@bufbuild/protobuf": "Core library for protobuf, provides runtime support",
    "@connectrpc/connect": "Core library for connect, provides platform-independent connect runtime support",
    "@connectrpc/connect-web": "Connect's gRPC-web plugin, used to provide gRPC-web communication capability in the frontend",
    "@connectrpc/connect-query": "Optional, provides react-query support, although you can use react-query without installing this"
  },
  "devDependencies": {
    "@bufbuild/buf": "Proto file compiler",
    "@bufbuild/protoc-gen-es": "Compiler plugin, generates ES code"
  }
}
The reason for having two namespaces, bufbuild and connect, is that they serve different purposes. @bufbuild libraries handle proto files and the protobuf format, while @connect libraries handle the connect/gRPC protocol.
Using this solution frees you from the complex protoc command, replacing it with the buf command. This command requires creating a buf.yaml file in the frontend directory with the following content:
version: v2 # migration from v1 guide: https://github.com/connectrpc/connect-es/blob/main/MIGRATING.md
inputs:
  - directory: ../proto

clean: true
plugins:
  - local: protoc-gen-es # This plugin is called by buf, used to compile proto files into TS code
    opt: target=ts # Indicates we want to generate TS code
    out: src/gen # Directory where generated code is stored
    include_imports: true
Then add a command in package.json:
{
  "scripts": {
    "gen-proto": "buf generate"
  }
}
Running this command will generate a file under src/gen: src/gen/person_pb.ts. Then update the frontend/src/grpc.ts file:
import { createClient, Transport } from '@connectrpc/connect';
import { createGrpcWebTransport } from '@connectrpc/connect-web';

import { PersonService } from './gen/person_pb'; // Adjusted import path based on buf.gen.yaml

const apiUrl = 'http://localhost:8080'; // Envoy proxy address

// Use gRPC-web transport as the Rust backend uses gRPC
export const transport: Transport = createGrpcWebTransport({
  baseUrl: apiUrl,
});

// Create the client using the generated service definition and the transport
export const personClient = createClient(PersonService, transport);
The @connectrpc/connect-web library also has a method createConnectTransport, which creates a transport that uses the Connect protocol to communicate with the backend instead of the gRPC-web protocol. However, this requires the backend to use a Connect implementation, not a gRPC implementation. Currently, Connect officially supports Go, Node.js, Swift, Kotlin, Dart, but not yet Rust. So here, we can only use the gRPC-web protocol. But Connect implementations are generally more modern than gRPC implementations, so if the backend supports Connect, consider using the `createConnectTransport
4. Go connect server
As mentioned at the beginning of the article, Connect is a newer RPC framework, compatible with gRPC, but more modern, and also has its own Connect communication protocol. Let's explore how to implement a Connect server using Go. Here we use connect-go. After installing the necessary tools according to the tutorial, create a new Go project directory named go-connect-server in the project root, and execute the following inside it:
Step 1: go mod init example.com/go-connect-server Initialize the Go project with the package name example.com/go-connect-server.
Step 2: buf config init, which will generate a buf.yaml file; you can ignore its contents.
Step 3: Create a buf.gen.yaml file with the following content: (there is something wrong with the markdown)
`
version: v2
inputs:
- directory: ../proto
clean: true
plugins:
- local: protoc-gen-go # Compiles proto files into Go code out: gen opt: paths=source_relative
- local: protoc-gen-connect-go # Generates Connect protocol >related code out: gen opt: paths=source_relative `
Step 4: Very importantly, modify the person.proto file by adding the following line
option go_package = "example.com/go-connect-backend/gen;person";
go_package defines the package name where the generated Go code for this proto file resides. example.com/go-connect-backend is the Go project's module path, gen is the directory where the generated Go code files are located, and person is the package name.
Step 5: Execute buf generate. This will generate a person.pb.go file in the go-connect-backend/gen directory, containing the Go code compiled from the proto file, including message types and serialization/deserialization logic. It will also generate a person.connect.go file in the go-connect-backend/gen/personconnect directory, which handles Connect protocol communication.
Then, follow the tutorial to write a basic service, paying attention to potentially handling CORS. After the service starts, the frontend can use the createConnectTransport method to communicate with the backend using the Connect protocol. Connect uses HTTP/1.1 (though it also supports HTTP/2) + JSON (or Protobuf) as the transport protocol, and works in the browser without needing an additional proxy service, allowing the frontend to directly request the backend.
5. Summary
This article introduced how to use gRPC in a React project to interact with a backend gRPC server, using envoy as a proxy, and also briefly explored a Go Connect server. Here are some key takeaways:
- Distinguish between Protobuf and gRPC. The former is a data format, the latter a communication protocol, which is why you need to install a bunch of packages, as different packages handle different parts.
- gRPC is based on HTTP/2, but browser JS lacks the ability to control the underlying capabilities of HTTP/2, so a proxy service is needed to convert HTTP/1.1 to HTTP/2. Envoy is a popular choice.
- The official grpc-web implementation is relatively old. It's recommended to use popular third-party solutions like protobuf-ts or Connect.
- Connect is a newer RPC framework, compatible with gRPC, but more modern, and also has its own Connect communication protocol. If the backend has a Connect implementation, consider using the
createConnectTransportmethod, which eliminates the need for a proxy service like envoy; you can directly request the service.
6. Fun facts
- I personally have a strong aversion to cluttering my hard drive and dislike leaving files scattered across the filesystem, which eventually fills up the disk. Therefore, I minimize global command installations as much as possible, which is why I use Docker to run envoy instead of installing and running envoy globally.
- In the frontend, we installed @bufbuild/buf and @bufbuild/protoc-gen-es. These libraries are installed into node_modules and run via npm scripts. Some tutorials might suggest global installation; you can decide based on personal preference.
- Since Go doesn't have a mechanism like npm scripts, several Go tools have to be installed globally using go install. Here, we installed grpcurl, buf, protoc-gen-go, and protoc-gen-connect-go. If you've already installed grpcurl via brew, you don't need to install it again with Go. We installed buf globally here; actually, the @bufbuild/buf installed in the frontend is a wrapper around this buf. @bufbuild/buf fetches the buf binary into node_modules and then calls it itself.