This Is Why You Should Use Cloudflare Workers
Cloudflare Workers are serverless edge-computing providers that allow users to create or augment existing serverless applications. It uses the V8 engine under the hood, the same engine used by Node.js and Chromium. These Workers are deployed all around the globe to process data closer to your users, yielding faster responses and improving processing speed. Building large-scale applications requires rigorous infrastructure and server management. Cloudflare Workers eliminate this burden by deploying and managing your code. They handle issues related to downtimes due to heavy traffic and have low latency, which improves your application's performance. By the end of this article, you will understand the benefits of Cloudflare Workers and how they differ from other serverless platforms like AWS Lambda. You will also learn about Neon's serverless capabilities, the benefits of using Neon database, and how you can use Neon with Cloudflare Workers to build your application. Why use Cloudflare Workers Large applications with millions of users worldwide require complex data processing. Usually, the necessary servers for storing and processing data are in more than one physical location worldwide. To ensure the application runs smoothly, large applications require complex procedures such as configurations, database maintenance, and automation, which lead to additional costs and resources. If you are looking to build scalable applications, some of the benefits of using Cloudflare Workers over other serverless providers are: Minimal Latency: Because Cloudflare Workers deploy your code across its global network, there is less distance between your data and your users’ devices. As a result, your application loads and processes faster. Scalability: As your application scales, handling client requests and managing your servers becomes tedious. Cloudflare Workers solve this issue by storing and processing your code, minimizing downtime, and ensuring your application remains accessible. Cost: Cloudflare Workers are cost-effective as you only have to pay for the resources (e.g., CPU time, requests) you use. This pricing structure helps you save costs. Flexibility: Cloudflare Workers give you control over writing logic that can handle your HTTP requests and responses. In the next section, you will see how Cloudflare Workers compares to AWS Lambda, another serverless provider. Cloudflare Workers vs. AWS Lambda@Edge AWS Lambda@Edge is a feature in AWS Lambda that supports running serverless functions at Amazon CloudFront edge locations, bringing computation closer to the user. It is optimized for CDN-based workloads and supports request and response modification, content customization, security features, and smart routing—all without the need for infrastructure management. However, Cloudflare Workers stand out in certain areas. If you are contemplating which one to use, here’s how they compare: Feature Cloudflare Workers AWS Lambda@edge Latency Distributed across wider areas, making it much faster. Runs in AWS's global edge locations, tied to CloudFront. Edge Computing Designed for edge computing, optimized for API gateways, content localization, and personalization. Optimized for CDN-based workloads within Amazon CloudFront, enabling request and response modifications, content personalization, and security enhancements at the edge. Deployment Easier setup with abstracted complexities, better documentation, and deployment tools. Requires deploying via AWS Lambda with CloudFront triggers, involving IAM roles and permissions. Cold Starts Faster cold starts due to small functions and edge capabilities. Generally slower cold starts, but mitigated by CloudFront caching and optimizations. Integration Easily integrates with services like Neon serverless database. Best suited for AWS services like Amazon S3, DynamoDB, and Cognito; optimized for CloudFront workloads. Code Size Limit 5MB total package size 1MB per function (after compression), with a max of 50MB uncompressed including dependencies. Next, let’s explore the benefits of integrating Cloudflare Workers with Neon, how it transforms everything, and how it can make life easier. You'll understand how to integrate your Cloudflare Worker with Neon in a snap and also see how to build a serverless web app in an instant. Benefits of Integrating Cloudflare Workers with Neon Serverless Database Neon serverless database is a fully managed open-source Postgres database that decouples the storage and compute components, enabling it to dynamically scale up during high activities and down during idle periods. Neon comes with a serverless driver that makes it super easy to connect Neon to your Cloudflare Workers. Other reasons why you should consider integrating your Cloudflare Workers with Neon serverless database are: Low Latency: Cloudflare Workers run on the edge, which means they are close to the user and have low lat

Cloudflare Workers are serverless edge-computing providers that allow users to create or augment existing serverless applications. It uses the V8 engine under the hood, the same engine used by Node.js and Chromium. These Workers are deployed all around the globe to process data closer to your users, yielding faster responses and improving processing speed.
Building large-scale applications requires rigorous infrastructure and server management. Cloudflare Workers eliminate this burden by deploying and managing your code. They handle issues related to downtimes due to heavy traffic and have low latency, which improves your application's performance.
By the end of this article, you will understand the benefits of Cloudflare Workers and how they differ from other serverless platforms like AWS Lambda. You will also learn about Neon's serverless capabilities, the benefits of using Neon database, and how you can use Neon with Cloudflare Workers to build your application.
Why use Cloudflare Workers
Large applications with millions of users worldwide require complex data processing. Usually, the necessary servers for storing and processing data are in more than one physical location worldwide. To ensure the application runs smoothly, large applications require complex procedures such as configurations, database maintenance, and automation, which lead to additional costs and resources.
If you are looking to build scalable applications, some of the benefits of using Cloudflare Workers over other serverless providers are:
- Minimal Latency: Because Cloudflare Workers deploy your code across its global network, there is less distance between your data and your users’ devices. As a result, your application loads and processes faster.
- Scalability: As your application scales, handling client requests and managing your servers becomes tedious. Cloudflare Workers solve this issue by storing and processing your code, minimizing downtime, and ensuring your application remains accessible.
- Cost: Cloudflare Workers are cost-effective as you only have to pay for the resources (e.g., CPU time, requests) you use. This pricing structure helps you save costs.
- Flexibility: Cloudflare Workers give you control over writing logic that can handle your HTTP requests and responses.
In the next section, you will see how Cloudflare Workers compares to AWS Lambda, another serverless provider.
Cloudflare Workers vs. AWS Lambda@Edge
AWS Lambda@Edge is a feature in AWS Lambda that supports running serverless functions at Amazon CloudFront edge locations, bringing computation closer to the user. It is optimized for CDN-based workloads and supports request and response modification, content customization, security features, and smart routing—all without the need for infrastructure management.
However, Cloudflare Workers stand out in certain areas. If you are contemplating which one to use, here’s how they compare:
| Feature | Cloudflare Workers | AWS Lambda@edge |
|---|---|---|
| Latency | Distributed across wider areas, making it much faster. | Runs in AWS's global edge locations, tied to CloudFront. |
| Edge Computing | Designed for edge computing, optimized for API gateways, content localization, and personalization. | Optimized for CDN-based workloads within Amazon CloudFront, enabling request and response modifications, content personalization, and security enhancements at the edge. |
| Deployment | Easier setup with abstracted complexities, better documentation, and deployment tools. | Requires deploying via AWS Lambda with CloudFront triggers, involving IAM roles and permissions. |
| Cold Starts | Faster cold starts due to small functions and edge capabilities. | Generally slower cold starts, but mitigated by CloudFront caching and optimizations. |
| Integration | Easily integrates with services like Neon serverless database. | Best suited for AWS services like Amazon S3, DynamoDB, and Cognito; optimized for CloudFront workloads. |
| Code Size Limit | 5MB total package size | 1MB per function (after compression), with a max of 50MB uncompressed including dependencies. |
Next, let’s explore the benefits of integrating Cloudflare Workers with Neon, how it transforms everything, and how it can make life easier. You'll understand how to integrate your Cloudflare Worker with Neon in a snap and also see how to build a serverless web app in an instant.
Benefits of Integrating Cloudflare Workers with Neon Serverless Database
Neon serverless database is a fully managed open-source Postgres database that decouples the storage and compute components, enabling it to dynamically scale up during high activities and down during idle periods. Neon comes with a serverless driver that makes it super easy to connect Neon to your Cloudflare Workers.
Other reasons why you should consider integrating your Cloudflare Workers with Neon serverless database are:
- Low Latency: Cloudflare Workers run on the edge, which means they are close to the user and have low latency. Because Neon’s read replicas and autoscaling capabilities enable efficient fetching of all data, the database queries remain fast for users anywhere, improving the overall app performance.
- Cost Efficiency: Both Cloudflare Workers and Neon adjust to workload spikes based on your application's demand, which requires zero infrastructure management. They use a pay-as-you-go model and suspend idle instances to help lower costs. You only pay for what you use.
- Simplified Deployment: You don’t need to worry about provisioning or managing servers, as both Cloudflare Workers and Neon are fully serverless.
- Security: Cloudflare Workers ship with built-in security features such as DDoS protection, request filtering, and firewalls. On the database side, Neon enables secure access with end-to-end encryption (TLS) and row-level security, simplifying enforcing access control. ## Building a Serverless Web App Using Cloudflare Workers and Neon
Neon serverless databases can be integrated with Cloudflare Workers to process data. Neon provides you with a serverless driver that you can use to connect to your database and then create access data from your database in Cloudflare Workers. Neon’s serverless driver is optimized for edge environments, enabling SQL queries over HTTP or WebSockets. This makes it ideal for Cloudflare Workers, which run in a lightweight, distributed manner without persistent connections.
This section demonstrates how to use the Neon serverless database with Cloudflare Workers to build a serverless web application. This application is a simple Next.js application that fetches brief details about African countries.
Prerequisites
To follow through this tutorial, you need the following:
- A Cloudflare account - create a Cloudflare account
- A Neon account - create a Neon account
- Familiarity with Next.js and TypeScript
- Node installed
How The Application Works
The Cloudflare Worker serverless function is created and contains code that accepts and processes requests from the Next.js application. This function serves as your backend code, fetching data from your Neon serverless Postgres database and returning a JSON version of the data as the response. You can then render the response data in your application.
Step *****1: Project Setup and Installations*
Follow the steps below to set up and install the necessary packages for the application:
-
Clone the project from GitHub. On the terminal, paste the following code:
git clone https://github.com/Dalu46/my-workers.git && cd my-workers
Open the project in your code editor (preferably VSCode).
Create your first worker by running the following command in the integrated terminal:
npm create cloudflare@latest
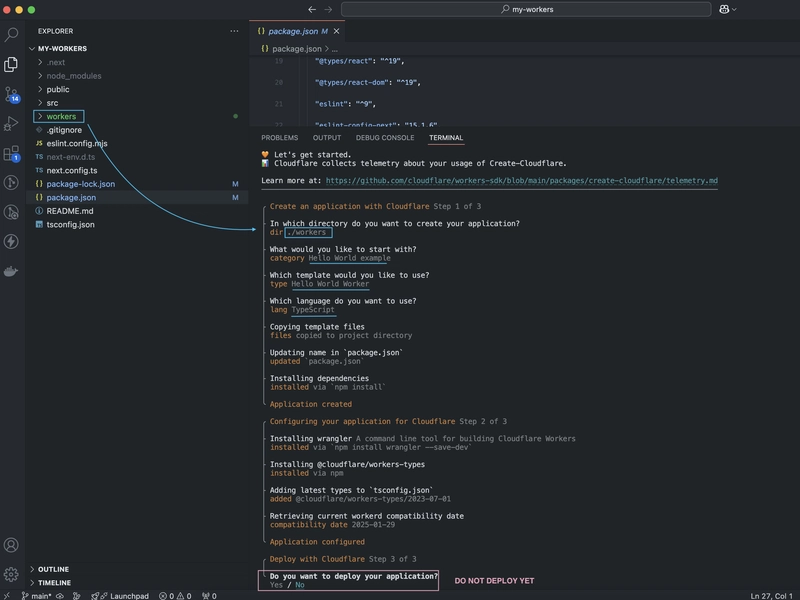
This will attempt to install cloudflare-client-cli (also known as C3 in Cloudflare docs) and wrangler with the following prompts in the image below. Type “./workers” for the first question. This will be the name of your Cloudflare Worker and the folder created when the installation is completed. Select the Hello World example option, click enter, then select the TypeScript option and click enter.
Finally, select No for the last question about deploying your application. You will deploy your application after adding your serverless function code.
Step 2: Create your Neon Serverless Database
Follow the steps below to create a Neon database for the application:
- Log in to your Neon account.
- Create a new project and a new database, neon-db.
- On the left dashboard menu, click on the SQL Editor to add queries to create a new table.
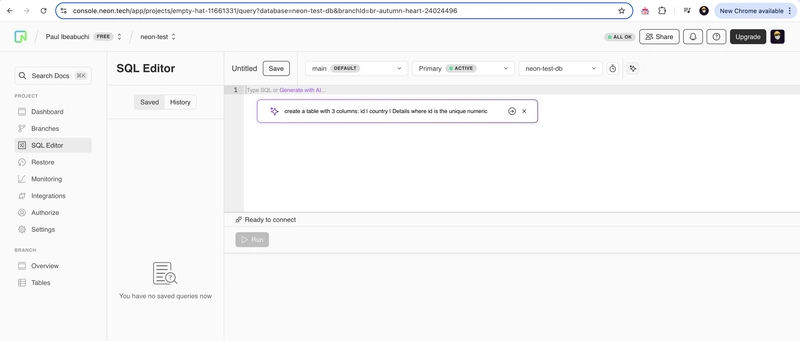
Using Neon’s AI feature, you can generate a simple table using this prompt; you can generate the SQL command from your Neon Console:
“create a table with 3 columns: id | country | Details where id is the unique numeric identifier, country is a string type, and details is a string type. Populate the table with 10 unique fields. Each field has a unique ID, a name of an African country, and a 2-paragraph sentence of that African country”
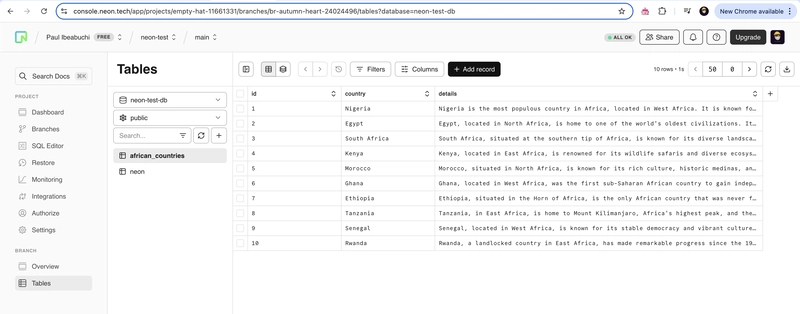
This will generate a PostgreSQL query command, and after it is done, click the Run button to create the table. The table would have 3 columns: the id, country, and details columns, and it should look like this:
Step 3: Connect your Cloudflare Worker to your Neon Serverless Database
Your database is ready. You can now connect your serverless function to it by following the steps below:
Click the Connect button to retrieve your database URL from your Neon dashboard. This URL should look like this:
postgresql://username:FzB6q0lQTTOF@ep-lively-union-42160037-pooler.us-east-2.aws.neon.tech/neon-test-db?sslmode=requireOpen the
wrangler.jsonfile in the./workersfolder. Add yourDATABASE_URLto the variable object to enable your Worker access and connect to your database:
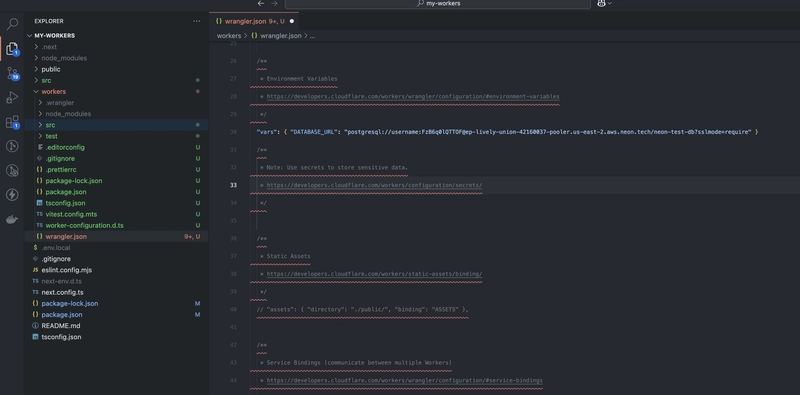
Open your VSCode integrated terminal, run the following command to navigate to the Workers directory, and generate your DATABASE_URL variable type in the worker-configuration.d.ts file.
cd workers && npm run cf-typegen
-
Install the @neondatabase/serverless package (this package connects to your Neon serverless database).
npm install @neondatabase/serverless
-
Open the
index.tsfile in the pathworkers/src/index.ts. This file is your Cloudflare Worker (a.k.a. serverless function). It contains the logic to connect to and fetch your database records from the Neon serverless database and return a JSON response of your database data.Replace the default content in the
index.tsfile with the following:
/**
* Welcome to Cloudflare Workers! This is your first worker.
*
* - Run `npm run dev` in your terminal to start a development server
* - Open a browser tab at Step 4: Deploy your Cloudflare Worker
You’re ready to deploy your serverless function to your Cloudflare account. Follow the steps below to deploy your Cloudflare Worker:
- Run the following command:
npx wrangler deploy
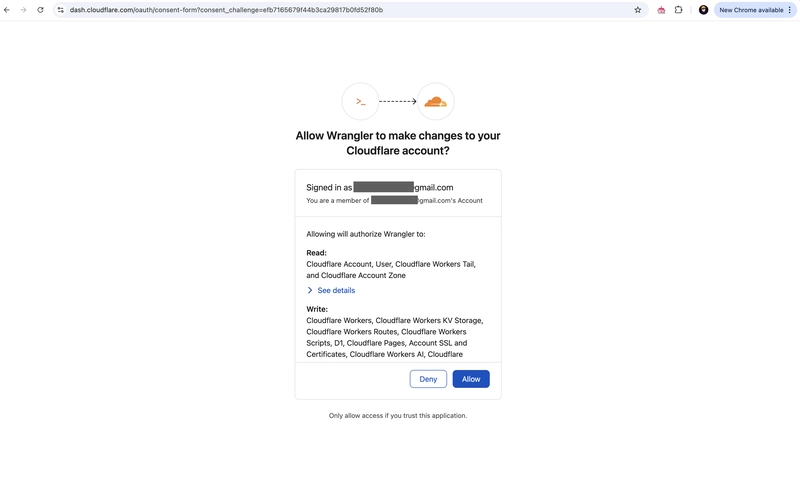
This will open a new browser window where you must authenticate and authorize using your Cloudflare account. The page will require you to log in if you're not already. Otherwise, click the Allow button to authorize. You should see something like this:
- Close the browser tab and retrieve your serverless function URL from your terminal.
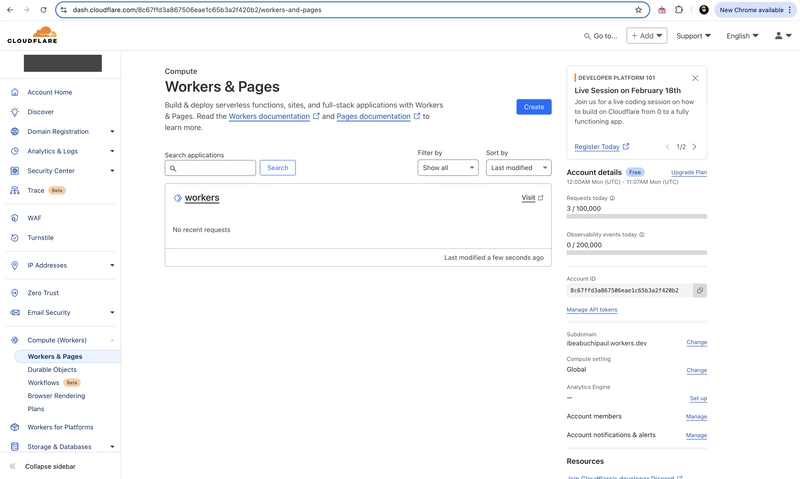
You can also see your new serverless function (Cloudflare Worker) deployed to your Cloudflare account. Click on workers to view details of your deployed Cloudflare Worker.
- Once you have retrieved your serverless function URL, you can send an HTTP request using the
fetch()method. The data returned in the response is then used to build the application. In thesrc/app/details/[id]/page.tsxfile, replace the URL with your serverless function URL.
    'use client'
    import { useEffect, useState } from "react";
    import { useParams, useRouter } from "next/navigation"
    import styles from "../../page.module.css";
    interface AfricanCountry {
      id: number,
      country: string,
      details: string
    }
    function Details() {
        const [countries, setCountries] = useState<AfricanCountry[]>([]);
        const [isLoading, setIsLoading] = useState<boolean>(true);
        const URL = "https://workers.your_url.workers.dev"; // serverless function URL
        const params = useParams();
        const countryData = countries.find(({id}) => id === Number(params.id));

        const router = useRouter();
        const handleRedirect = () => router.push('/');

        useEffect(() => {
            // fetch countries data from our neon db using our serverless function URL
            (async () => {
                try {
                    setIsLoading(true);
                    const data = await fetch(URL);
                    const _countries = await data.json();
                    setCountries(_countries);
                } catch(error) {
                    alert('Unable to fetch data');
                    if (error instanceof Error) reportError(error.message);
                } finally {
                    setIsLoading(false);
                }
            })();
        }, [])
        return (
            <div className={styles.page}>
                {isLoading
                ? <>
                    <span className={styles.loader}></span>
                    <p>Fetching details from Neon DB</p>
                </>
                : <>
                    <h1 className={styles.header}>{ countryData?.country }</h1>
                    <p className={styles.description}>{ countryData?.details }</p>
                </>
                }
                {
                    (!countries.length && !isLoading) && <p>No data found</p>
                }
                <button className={styles.btn} type="button" onClick={handleRedirect}>BACK</button>
            </div>
        )
    }
    export default Details;
- To preview the application, run
npm run dev. You should be able to try it out at localhost:3000.
This is the final application preview:
Final Thoughts
Cloudflare Workers bring the power of edge computing to serverless development with speed, scalability, and efficiency. When used with serverless databases like Neon, you can build incredibly responsive yet cost-effective apps without managing any infrastructure. Whether building real-time apps, handling API calls, or serving dynamic content, this combination offers performance and agility to scale faster.
Looking to learn more? Look at this Neon tutorial about building web applications using a Neon serverless database with Cloudflare Workers. You can also harness and explore other concepts covered by Cloudflare Workers, such as edge computing, security, and deployments, while keeping in mind the challenges of edge computing, including resource constraints, network reliability issues, security risks, and management complexities.


![[The AI Show Episode 142]: ChatGPT’s New Image Generator, Studio Ghibli Craze and Backlash, Gemini 2.5, OpenAI Academy, 4o Updates, Vibe Marketing & xAI Acquires X](https://www.marketingaiinstitute.com/hubfs/ep%20142%20cover.png)





![[FREE EBOOKS] The Kubernetes Bible, The Ultimate Linux Shell Scripting Guide & Four More Best Selling Titles](https://www.javacodegeeks.com/wp-content/uploads/2012/12/jcg-logo.jpg)


![From drop-out to software architect with Jason Lengstorf [Podcast #167]](https://cdn.hashnode.com/res/hashnode/image/upload/v1743796461357/f3d19cd7-e6f5-4d7c-8bfc-eb974bc8da68.png?#)


.png?#)


.jpg?#)


_Christophe_Coat_Alamy.jpg?#)






![Rapidus in Talks With Apple as It Accelerates Toward 2nm Chip Production [Report]](https://www.iclarified.com/images/news/96937/96937/96937-640.jpg)


