


![[The AI Show Episode 143]: ChatGPT Revenue Surge, New AGI Timelines, Amazon’s AI Agent, Claude for Education, Model Context Protocol & LLMs Pass the Turing Test](https://www.marketingaiinstitute.com/hubfs/ep%20143%20cover.png)


![Building Telegram Mini App based on existing frontend app [closed]](https://cdn.sstatic.net/Sites/softwareengineering/Img/apple-touch-icon@2.png?v=1ef7363febba)


 CISO’s Core Focus.webp?#)


![Hostinger Horizons lets you effortlessly turn ideas into web apps without coding [10% off]](https://i0.wp.com/9to5mac.com/wp-content/uploads/sites/6/2025/04/IMG_1551.png?resize=1200%2C628&quality=82&strip=all&ssl=1)


![This new Google TV streaming dongle looks just like a Chromecast [Gallery]](https://i0.wp.com/9to5google.com/wp-content/uploads/sites/4/2025/04/thomson-cast-150-google-tv-1.jpg?resize=1200%2C628&quality=82&strip=all&ssl=1)


![iPadOS 19 May Introduce Menu Bar, iOS 19 to Support External Displays [Rumor]](https://www.iclarified.com/images/news/97137/97137/97137-640.jpg)

![Apple Drops New Immersive Adventure Episode for Vision Pro: 'Hill Climb' [Video]](https://www.iclarified.com/images/news/97133/97133/97133-640.jpg)


The Adventures of Blink S3e8: Intro to GitLab CI/CD
Hey friends, and welcome back to the Adventures of Blink! Today's adventure is closely related to what we explored last week, where we delved into automation within the developer workflow using GitHub Actions. This week, we're exploring the same concepts, but in GitLab... so we can draw some comparisons in the realm of automation. TL/DR: Youtube Don't feel like reading? I got you - watch this adventure instead: Where GitHub and GitLab begin to diverge Up until now, you might have perceived GitHub and GitLab as essentially two sides of the same coin. They both revolve around Git, offer similar basic functionalities like task management and roadmapping, and facilitate collaboration amongst developers in a seemingly comparable manner. The core functions often feel quite alike as you work with your code. However, I think today we'll begin to see some more distinct divergences between these two platforms. GitLab proudly markets itself as a complete CI/CD solution, encompassing Continuous Integration and Continuous Delivery. These concepts should ring a bell if you've joined me on previous adventures (and I'll try to drop some links in the description or a pop-up to revisit those discussions). The key takeaway here is that GitLab aims to provide a comprehensive approach to these processes, and they've put some work into designing the experience that way. Let's examine how this works in practice. Just like we saw with GitHub Actions last week, GitLab's CI/CD tools are managed entirely as code using YAML files. One notable difference, however, is that GitLab provides more tooling to help you connect to the concepts easily. In GitLab, the software development lifecycle is thoughtfully organized. At the top of the menu, you'll find the Plan section. This is where issues are tracked, and the initial definition of work takes place as you're building out your project. Milestones are created here to mark progress and define the evolution of your application. Next, we move to the Code section. Think of this as the direct Git integration hub. This is where you handle tasks like merging code, creating branches, and managing commits and tags – essentially everything involved in dealing with the actual codebase and interacting with Git, both locally and in the cloud. But today, our primary focus will be on the Build section. Within the Build menu, you'll find options for Pipelines, Jobs, a Pipeline Editor, Pipeline Schedules, and Artifacts. These are the elements that govern how we assemble our code and prepare it for subsequent delivery processes. While it's not the entire deployment pipeline, the build step is the crucial starting point for CI/CD, transforming raw code into an executable artifact – tangible software to work with. To create a pipeline, we simply navigate to the Pipelines section. You'll notice it provides helpful starting options. One aspect I found particularly valuable during my exploration is the GitLab University. They've done an exceptional job of creating a wealth of resources to help you learn the product and maximize its potential. I highly recommend clicking that "Access GitLab University" link and exploring the additional learning materials they offer. Our adventure here today won't be a comprehensive deep dive into every facet of GitLab, but rather a look at its relationship to GitHub and its core concepts from a software engineer's perspective. For the deeper details, GitLab University is your go-to resource. For our demonstration today, we'll create a simple "Hello, World!" pipeline in GitLab. Clicking the "Create your first CI/CD configuration" button drops us into a familiar interface – much like the initial pipeline setup in GitHub Actions. It presents us with an editor and a basic YAML file pre-populated with some starter configurations. You can see here that it has defined several stages: build, test (containing unit-test and lint-test jobs), and deploy. Stages help organize your workflow logically. The build stage has a single build job, while the test stage includes both unit and lint testing jobs. This grouping helps in understanding the flow and can also define dependencies, such as the build job needing to complete before the test jobs can begin. Each of these jobs contains a script. The script section is essentially like working directly on your command line. The pre-populated examples use echo statements to print text to the screen. However, in a real-world scenario, this is where you would put your actual build commands. For a Java application, you might use mvn clean install. For a C program, you might have make followed by make install. Whatever commands you would execute on your local command line to compile and build your project go right here in these YAML statements. These commands are then passed to the GitLab Runner as actual shell commands. Looking at the unit-test example, you can see a sleep command as a placeholder. We mi
Hey friends, and welcome back to the Adventures of Blink!
Today's adventure is closely related to what we explored last week, where we delved into automation within the developer workflow using GitHub Actions. This week, we're exploring the same concepts, but in GitLab... so we can draw some comparisons in the realm of automation.
TL/DR: Youtube
Don't feel like reading? I got you - watch this adventure instead:
Where GitHub and GitLab begin to diverge
Up until now, you might have perceived GitHub and GitLab as essentially two sides of the same coin. They both revolve around Git, offer similar basic functionalities like task management and roadmapping, and facilitate collaboration amongst developers in a seemingly comparable manner. The core functions often feel quite alike as you work with your code. However, I think today we'll begin to see some more distinct divergences between these two platforms.
GitLab proudly markets itself as a complete CI/CD solution, encompassing Continuous Integration and Continuous Delivery. These concepts should ring a bell if you've joined me on previous adventures (and I'll try to drop some links in the description or a pop-up to revisit those discussions). The key takeaway here is that GitLab aims to provide a comprehensive approach to these processes, and they've put some work into designing the experience that way.
Let's examine how this works in practice. Just like we saw with GitHub Actions last week, GitLab's CI/CD tools are managed entirely as code using YAML files. One notable difference, however, is that GitLab provides more tooling to help you connect to the concepts easily.
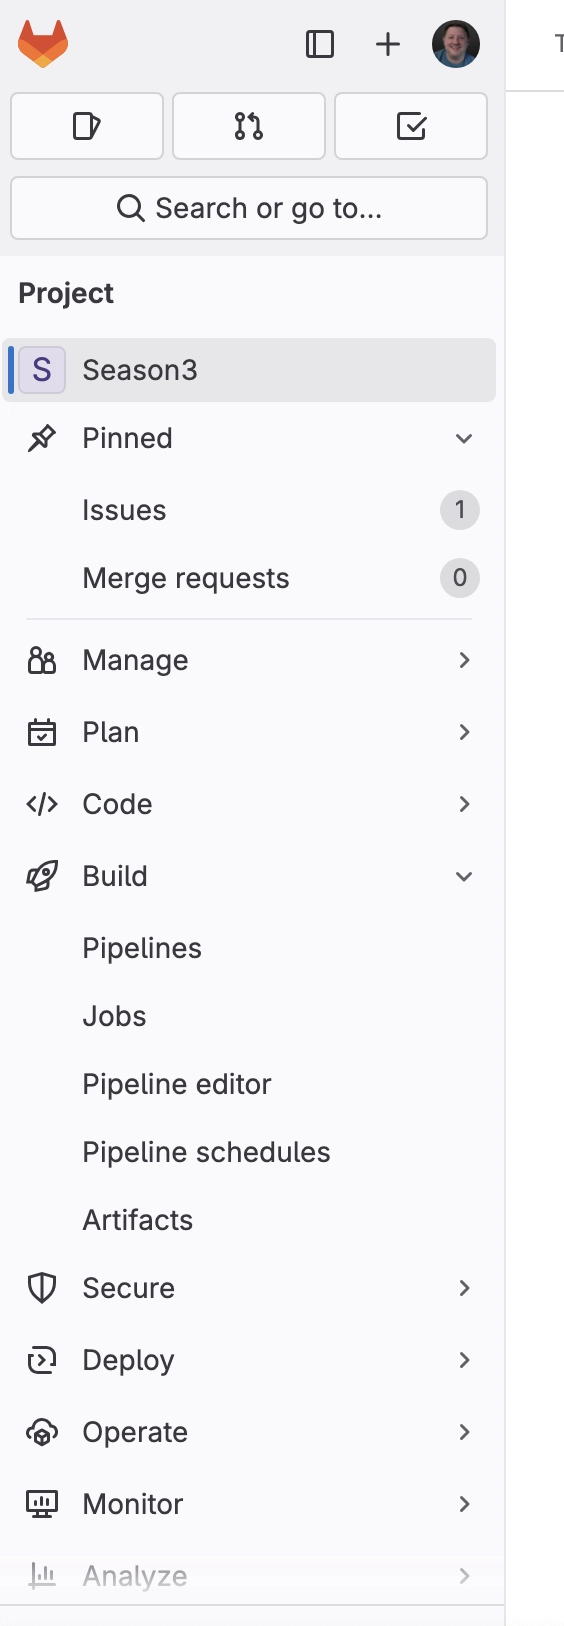
In GitLab, the software development lifecycle is thoughtfully organized. At the top of the menu, you'll find the Plan section. This is where issues are tracked, and the initial definition of work takes place as you're building out your project. Milestones are created here to mark progress and define the evolution of your application.
Next, we move to the Code section. Think of this as the direct Git integration hub. This is where you handle tasks like merging code, creating branches, and managing commits and tags – essentially everything involved in dealing with the actual codebase and interacting with Git, both locally and in the cloud.
But today, our primary focus will be on the Build section. Within the Build menu, you'll find options for Pipelines, Jobs, a Pipeline Editor, Pipeline Schedules, and Artifacts. These are the elements that govern how we assemble our code and prepare it for subsequent delivery processes. While it's not the entire deployment pipeline, the build step is the crucial starting point for CI/CD, transforming raw code into an executable artifact – tangible software to work with.
To create a pipeline, we simply navigate to the Pipelines section. You'll notice it provides helpful starting options. One aspect I found particularly valuable during my exploration is the GitLab University. They've done an exceptional job of creating a wealth of resources to help you learn the product and maximize its potential. I highly recommend clicking that "Access GitLab University" link and exploring the additional learning materials they offer. Our adventure here today won't be a comprehensive deep dive into every facet of GitLab, but rather a look at its relationship to GitHub and its core concepts from a software engineer's perspective. For the deeper details, GitLab University is your go-to resource.
For our demonstration today, we'll create a simple "Hello, World!" pipeline in GitLab. Clicking the "Create your first CI/CD configuration" button drops us into a familiar interface – much like the initial pipeline setup in GitHub Actions. It presents us with an editor and a basic YAML file pre-populated with some starter configurations.
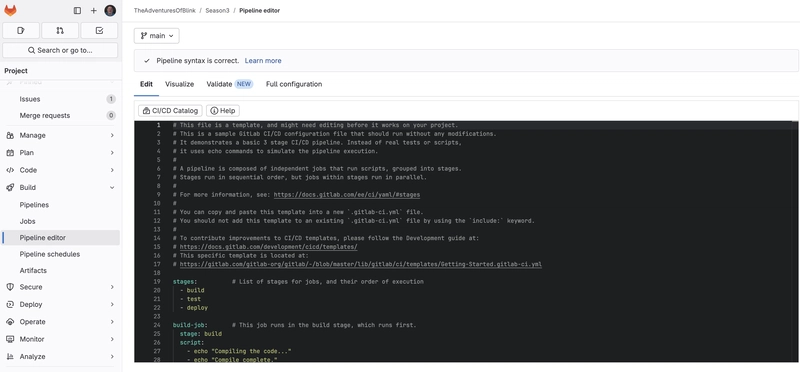
You can see here that it has defined several stages: build, test (containing unit-test and lint-test jobs), and deploy. Stages help organize your workflow logically. The build stage has a single build job, while the test stage includes both unit and lint testing jobs. This grouping helps in understanding the flow and can also define dependencies, such as the build job needing to complete before the test jobs can begin.
Each of these jobs contains a script. The script section is essentially like working directly on your command line. The pre-populated examples use echo statements to print text to the screen. However, in a real-world scenario, this is where you would put your actual build commands. For a Java application, you might use mvn clean install. For a C program, you might have make followed by make install. Whatever commands you would execute on your local command line to compile and build your project go right here in these YAML statements. These commands are then passed to the GitLab Runner as actual shell commands.
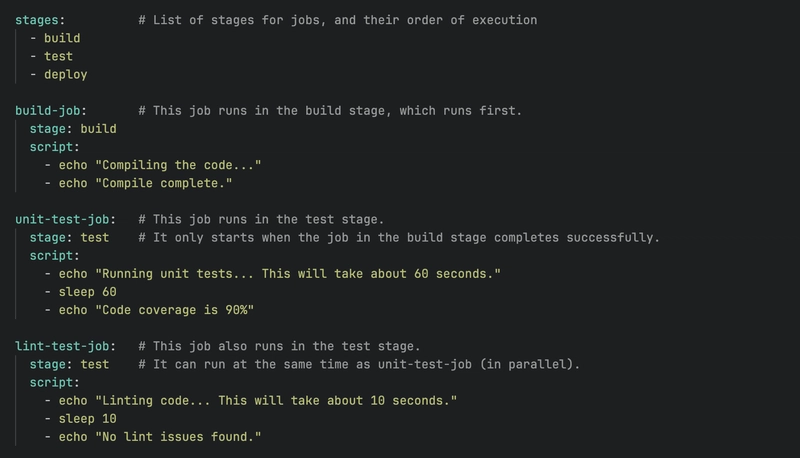
Looking at the unit-test example, you can see a sleep command as a placeholder. We might replace this with something like pytest to run our unit tests. You can also incorporate command-line switches, like the code coverage flag shown in the example. You essentially build out your testing commands just as you would manually, but defining them here automates the process through GitLab CI/CD.
Let's go ahead and commit these changes without making any significant modifications, just to get a feel for the process. GitLab will immediately show you the pipeline status, indicating that it's running. The first step is often syntax validation to ensure the pipeline configuration is correct. Once validated, the pipeline execution begins.
This is where the concept of stages becomes visually apparent. GitLab displays the workflow, showing the build stage executing first. Then, it moves to the test stage, where the unit-test and lint-test jobs can run in parallel. Finally, upon successful completion of the test stage, it proceeds to the deploy stage. Stages run sequentially, while jobs within a stage can (and often should) run concurrently to optimize execution time.
We can see the pipeline progressing in real-time. It completed the unit-test job and is now running the lint-test job (which, again, are just sleep commands for this example). Once the test stage is complete, it will move on to the deploy stage. This becomes the continuous workflow you'll interact with as you make changes to your code. You commit new features and tests, and the entire pipeline runs automatically.
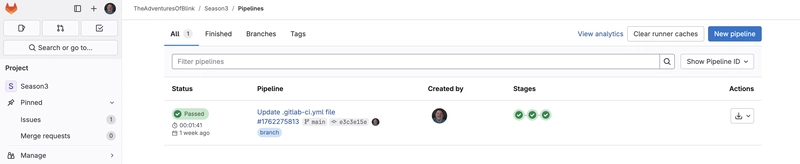
Just like in GitHub, GitLab provides this clear visual representation of your pipeline, allowing you to quickly understand the status of your jobs. If we navigate back to the Pipelines tab, we can see a summary view, including the creator, the stages of the last run (indicated by checkmarks), the total duration, and when it was executed. This gives us a successful "clean bill of health" for our pipeline run.
It's crucial to understand that a "green light" in your pipeline doesn't automatically equate to a successful deployment or a bug-free application. In our simple example, the pipeline completed without actually building or testing anything substantial. The real power of this tool lies in its ability to automate the tasks you should be doing consistently but might forget in the rush of development.
I strongly encourage you to view this as a helper, an automated assistant that takes care of those essential but sometimes overlooked steps. By embracing it as a tool to streamline your workflow, you'll find it less of an obstacle and more of a valuable asset. The beauty of this is that you can focus on writing code, commit your changes, and then check back later to see the automated processes unfold. You no longer have to manually remember and execute every step in your delivery pipeline.
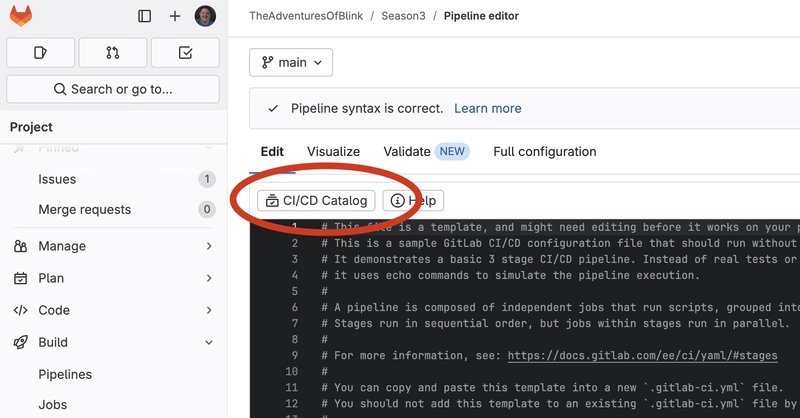
I briefly reopened the editor because I wanted to highlight something I missed earlier: the CI/CD Catalog button. Clicking on this opens up a comprehensive list of pre-configured tools designed to work seamlessly with GitLab CI/CD. This is an incredibly valuable resource for simplifying the integration of various technologies into your pipelines.
For instance, if you're working with Docker containers, you can click on the Docker entry, and it will provide you with guidance and even code snippets on how to integrate Docker builds directly into your pipeline. It outlines the necessary components to tell GitLab CI/CD how to build your containers.
Similarly, the catalog offers language support for various programming languages. If you're a Python developer, you can find information on how to interact with Python through GitLab CI/CD, including examples for linting (like Pylint), testing (like Pytest), building, releasing, and running unit tests – all the common tasks for a Python developer.
This library is extensive, currently boasting hundreds of items for a wide range of technologies. Whether you're using MkDocs for documentation, Helm charts for Kubernetes, Node.js, Maven, or Go, you'll likely find pre-built configurations and guidance to get you started. This level of documentation is invaluable, especially when dealing with less familiar technologies.
As you begin your journey with GitLab CI/CD, exploring this catalog is highly recommended. Start with your primary tech stack and gradually expand your repertoire as you become more comfortable. Even if you've never worked with a technology like Ruby on Rails, you can find resources here to understand how it's handled within the GitLab CI/CD framework. This eliminates the daunting task of figuring things out from scratch.
I hinted earlier that GitLab CI/CD extends beyond just the build pipeline, and this is a key differentiator from GitHub in my opinion. Take a look at these other tabs: Secure, Deploy, Operate, Monitor, Analyze.
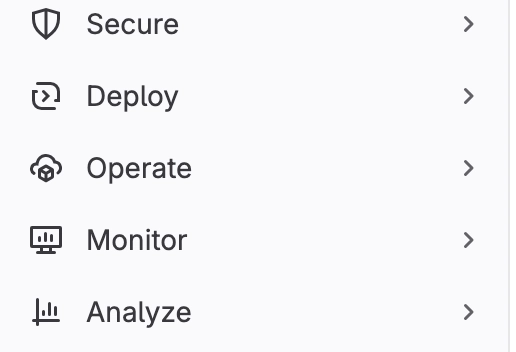
The Secure configuration allows you to integrate various security tests into your application lifecycle. This includes Static Application Security Testing (SAST) to identify vulnerabilities in your code, Infrastructure as Code (IaC) scanning to secure your configuration files, Dynamic Application Security Testing (DAST) to assess your running application for vulnerabilities, Dependency Scanning, Container Scanning, Pipeline Secret Detection to prevent accidental credential exposure, and even Coverage Fuzzing to uncover unexpected bugs. These tools are built right into the platform.
Moving on to Deploy, you have the ability to set up package registries and container registries directly within GitLab. This means that when you build and publish your code or container images, they are readily available within your project, accessible to authorized users. For open-source projects, this provides a convenient way to distribute your software. GitLab Pages even allows you to build static websites for your documentation directly within GitLab, treating documentation updates as Git commits – a powerful feature for developers.
The Operate tab offers integration with Kubernetes clusters, Terraform states, and a particularly strong integration with Google Cloud. By providing your credentials, you can configure GitLab to treat your Google Cloud account as a deployment target, allowing you to push your code directly from GitLab to Google Cloud for deployment.
Under Monitor, you'll find tools for error tracking, alerts, and incident management, enabling you to build proactive operational capabilities directly within GitLab.
Finally, the Analyze tab provides insights into your development processes. CI/CD analytics are crucial for understanding build performance and identifying bottlenecks. Value stream analytics help you assess the efficiency of your delivery pipeline, while contributor analytics provide visibility into who is contributing to your codebase, which can be valuable for recognizing and rewarding team efforts.
The real GitLab win: DevX
One of the most impressive aspects of my exploration has been GitLab's focus on developer experience. The tool is designed with developers in mind, offering comprehensive documentation, learning aids, and even shortcuts to help you navigate and get your work done efficiently. While you'll still end up with YAML files defining your configurations, you're not left with a blank slate. You're guided through the process, with user interface elements that visualize your YAML configurations, making it easier to learn and achieve more. This emphasis on developer experience is often overlooked, but it's critical for adoption and productivity. If developers find a tool difficult to use, they're less likely to embrace it.
Wrapping up
That wraps up today's episode of our tour of GitLab CI/CD. I hope you've gained a glimpse into the possibilities it offers. I'm excited to see how you automate your own workflows. We'll catch you next time!