TailwindCSS & DaisyUI in the Shadow DOM
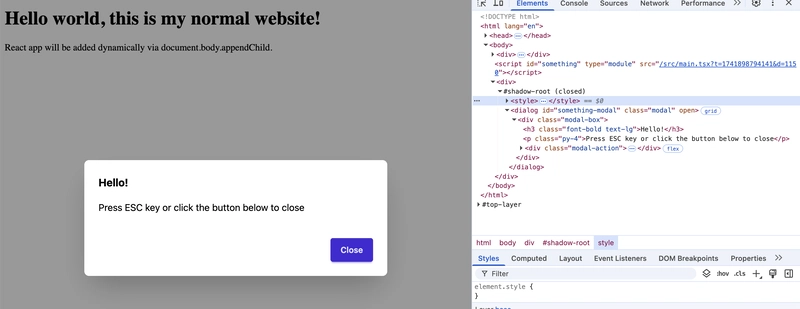
When injecting a React component into a third-party website—whether through a Chrome extension or a simple script—one of the biggest challenges is styling. CSS conflicts, unexpected overrides, and global styles can break your UI or make it look completely different from what you intended. The same is true of the host UI! The Shadow DOM provides a powerful solution by encapsulating your component and isolating it from the host page’s styles. However, using popular styling frameworks like TailwindCSS and DaisyUI inside the Shadow DOM isn’t straightforward. Since styles in the Shadow DOM don’t inherit from the global stylesheet, you need a strategy to ensure your component still benefits from Tailwind’s utility classes and DaisyUI’s prebuilt components. In this post, I'll walk you through the process of injecting a React component into the Shadow DOM while ensuring TailwindCSS and DaisyUI styles are properly applied. By the end, you'll have a working setup that you can use for script injection, Chrome extensions, or any scenario where you need a self-contained UI inside a third-party site. What is the Shadow DOM? The Shadow DOM is a web standard that allows developers to encapsulate HTML, CSS, and JavaScript within a self-contained scope, preventing styles and scripts from leaking in or out. This is particularly useful when injecting UI components into third-party websites, as it prevents conflicts with the site's existing styles and ensures your component looks and behaves consistently. Unlike the regular DOM, where styles can cascade globally, elements inside a Shadow DOM tree have their own isolated styles and scripts, making it ideal for building embeddable widgets, Chrome extensions, and injected scripts that need to maintain their design integrity. Setting up React Component Injection To inject a React component into a third-party website, you first need to create a container element and attach it to the page. However, instead of simply appending a div to document.body, we’ll use the Shadow DOM to encapsulate our component and prevent style conflicts. const container = document.createElement("div"); document.body.appendChild(container); const shadow = container.attachShadow({ mode: "open" }); This isolates everything we place inside shadowRoot from the rest of the page’s styles and scripts. Now, let’s render a simple React component inside the Shadow DOM using createRoot from React 18: createRoot(shadow).render(); What about Tailwind CSS and Daisy UI? We'll use Vite as a bundling solution as both Tailwind CSS and Daisy UI require importing CSS (the Get started with Tailwind CSS guide provides details on using Vite). The vite.config.ts file looks like: import { defineConfig } from "vite"; import react from "@vitejs/plugin-react"; import tailwindcss from "@tailwindcss/vite"; export default defineConfig({ plugins: [react(), tailwindcss()], build: { rollupOptions: { // Note: useful to produce a single JS file for a tag output: { entryFileNames: "index.js", chunkFileNames: "[name].js", assetFileNames: "[name].[ext]", }, }, }, }); Next, using TailwindCSS 4 and DaisyUI 5, configuration is handled entirely in a single CSS file. TailwindCSS version 4 includes :host in its CSS rules intended to apply to the entire DOM. Lucky for us, :host is a CSS pseudo-selector targeting the Shadow DOM host! For DaisyUI, we just need to include the root option as it defaults to :root if unspecified. Our CSS file looks like: @import "tailwindcss"; @plugin "daisyui" { root: ":host"; } Finally, our React Component must import this CSS file in a way that includes it in our bundled Javascript (rather than including it as a tag). This ensures the TailwindCSS and DaisyUI CSS rules only apply inside the Shadow DOM. It's also a better end-user experience for the person adding just one tag to their HTML. Luckily, Vite provides a ?inline modifier for CSS imports that produces a style string: import style from './index.css?inline'; export default function Component() { return ( {style} Hello world ); } Wrapping Up Notice the DOM structure in the developer tools window, and notice the host page remains un-styled There you have it! With this setup, you have React, TailwindCSS, and DaisyUI running inside an isolated Shadow DOM. Styles are correctly applied inside the Shadow DOM, while the regular host page UI remains completely unchanged. For more details and a jumping off point, check out the Github repository. If you need any help with React or Javascript development, please get in touch!

When injecting a React component into a third-party website—whether through a Chrome extension or a simple script—one of the biggest challenges is styling. CSS conflicts, unexpected overrides, and global styles can break your UI or make it look completely different from what you intended. The same is true of the host UI! The Shadow DOM provides a powerful solution by encapsulating your component and isolating it from the host page’s styles.
However, using popular styling frameworks like TailwindCSS and DaisyUI inside the Shadow DOM isn’t straightforward. Since styles in the Shadow DOM don’t inherit from the global stylesheet, you need a strategy to ensure your component still benefits from Tailwind’s utility classes and DaisyUI’s prebuilt components.
In this post, I'll walk you through the process of injecting a React component into the Shadow DOM while ensuring TailwindCSS and DaisyUI styles are properly applied. By the end, you'll have a working setup that you can use for script injection, Chrome extensions, or any scenario where you need a self-contained UI inside a third-party site.
What is the Shadow DOM?
The Shadow DOM is a web standard that allows developers to encapsulate HTML, CSS, and JavaScript within a self-contained scope, preventing styles and scripts from leaking in or out. This is particularly useful when injecting UI components into third-party websites, as it prevents conflicts with the site's existing styles and ensures your component looks and behaves consistently. Unlike the regular DOM, where styles can cascade globally, elements inside a Shadow DOM tree have their own isolated styles and scripts, making it ideal for building embeddable widgets, Chrome extensions, and injected scripts that need to maintain their design integrity.
Setting up React Component Injection
To inject a React component into a third-party website, you first need to create a container element and attach it to the page. However, instead of simply appending a div to document.body, we’ll use the Shadow DOM to encapsulate our component and prevent style conflicts.
const container = document.createElement("div");
document.body.appendChild(container);

const shadow = container.attachShadow({ mode: "open" });
This isolates everything we place inside shadowRoot from the rest of the page’s styles and scripts.
Now, let’s render a simple React component inside the Shadow DOM using createRoot from React 18:
createRoot(shadow).render(<Component />);
What about Tailwind CSS and Daisy UI?
We'll use Vite as a bundling solution as both Tailwind CSS and Daisy UI require importing CSS (the Get started with Tailwind CSS guide provides details on using Vite). The vite.config.ts file looks like:
import { defineConfig } from "vite";
import react from "@vitejs/plugin-react";
import tailwindcss from "@tailwindcss/vite";
export default defineConfig({
plugins: [react(), tailwindcss()],
build: {
rollupOptions: {
// Note: useful to produce a single JS file for a 


![[The AI Show Episode 142]: ChatGPT’s New Image Generator, Studio Ghibli Craze and Backlash, Gemini 2.5, OpenAI Academy, 4o Updates, Vibe Marketing & xAI Acquires X](https://www.marketingaiinstitute.com/hubfs/ep%20142%20cover.png)


![[FREE EBOOKS] The Kubernetes Bible, The Ultimate Linux Shell Scripting Guide & Four More Best Selling Titles](https://www.javacodegeeks.com/wp-content/uploads/2012/12/jcg-logo.jpg)


![From drop-out to software architect with Jason Lengstorf [Podcast #167]](https://cdn.hashnode.com/res/hashnode/image/upload/v1743796461357/f3d19cd7-e6f5-4d7c-8bfc-eb974bc8da68.png?#)


.png?#)


.jpg?#)


_Christophe_Coat_Alamy.jpg?#)


![Rapidus in Talks With Apple as It Accelerates Toward 2nm Chip Production [Report]](https://www.iclarified.com/images/news/96937/96937/96937-640.jpg)


