


![[The AI Show Episode 145]: OpenAI Releases o3 and o4-mini, AI Is Causing “Quiet Layoffs,” Executive Order on Youth AI Education & GPT-4o’s Controversial Update](https://www.marketingaiinstitute.com/hubfs/ep%20145%20cover.png)


![From Art School Drop-out to Microsoft Engineer with Shashi Lo [Podcast #170]](https://cdn.hashnode.com/res/hashnode/image/upload/v1746203291209/439bf16b-c820-4fe8-b69e-94d80533b2df.png?#)


(1).jpg?#)


_Inge_Johnsson-Alamy.jpg?width=1280&auto=webp&quality=80&disable=upscale#)


![Apple Developing AI 'Vibe-Coding' Assistant for Xcode With Anthropic [Report]](https://www.iclarified.com/images/news/97200/97200/97200-640.jpg)
![Apple's New Ads Spotlight Apple Watch for Kids [Video]](https://www.iclarified.com/images/news/97197/97197/97197-640.jpg)


Strapi Email and Password Authentication with Next.js 15: Part 1
Introduction Most applications require that an individual is verified and permitted to access resources. This ensures the security of the app. Strapi provides you with authentication mechanisms which include email and password, AuthO, AWS Cognito, GitHub, Google, etc. through its Users and Permissions providers feature. Thus, authentication bottlenecks are solved using Strapi. Next.js on the other hand is a popular frontend framework that allows users to build applications with the power of React components. It also supports authentication, session management and authorization through Middleware, Data Access Layer and Data Object Layer. Learn more here. In this tutorial, you will learn how to implement Strapi email and password authentication with Next.js frontend. Tutorial Series We will divide this tutorial into two series: Part 1 - Email and Password registration, Email confirmation, and Login Part 2 - Session Management, Data Access, password reset, and changing password GitHub Repository: Full Code for Strapi and Next.js Authentication Project The complete code for this project can be found in this repo: strapi-email-and-password-authentication Tutorial Goals In this tutorial, here are the concepts we will cover: Strapi Email and Password registration (signup) flow. Strapi Email confirmation flow. Strapi Email and Password Login (sign-in) flow Strapi Forgot Password flow Strapi Reset password flow Changing Password in Strapi with Authorization Next.js server actions, authentication, session management, middleware, and data access layer. Prerequisites Before we begin, ensure you have the following: Node.js runtime: Only Active LTS or Maintenance LTS versions are supported (currently v18, v20, and v22). A basic knowledge of Next.js and React should suffice. A SendGrid API Key. Visit this page to learn how to get yours. Optionally, a HTTP client. Postman is recommended. Introduction to Strapi Email and Password Authentication Authentication refers to the process of verifying that an entity has the correct credentials or permission to access resources. Strapi offers multiple authentication methods to secure your application: Users & Permissions Plugin: This is Strapi's built-in authentication system that provides email/password authentication, role-based access control, and third-party provider authentication. API Tokens: This allows authenticating REST and GraphQL API queries without user accounts, different token types such as read-only, full access, or custom. Third-Party Authentication Providers: Strapi supports numerous third-party authentication providers through the Users & Permissions plugin: Social providers: Facebook, Google, Twitter, GitHub, Discord, Twitch, Instagram, VK, LinkedIn, Reddit Enterprise providers: Auth0, AWS Cognito, etc. Single Sign-On (SSO): For enterprise users, Strapi offers SSO capabilities: Available with Enterprise plan. SSO allows administrators to authenticate through an identity provider (e.g. Microsoft Azure Active Directory). The email and password authentication in Strapi uses the Users & Permissions plugin and follows RESTful API patterns. If you are interested in knowing the concepts without digging into the technical aspect of this tutorial, please visit this documentation page. Now, let's install Strapi! Strapi Installation and Setup Create a folder where both your Strapi and Next.js app will reside. Give it any name. Strapi Installation Let's begin by installing Strapi. To create a new Strapi project, run the command below in your terminal. Ensure you are in the directory where you want to keep both your Strapi backend and Next.js frontend. npx create-strapi@latest The command above will be followed with some questions from the terminal. Depending on your preferred setup, you can select the answer you want. Here are the answers for this project. ? What is the name of your project? strapi-backend ... ? Please log in or sign up. Skip ? Do you want to use the default database (sqlite) ? Yes ? Start with an example structure & data? No ? Start with Typescript? Yes ? Install dependencies with npm? Yes ? Initialize a git repository? No NOTE: The name of the project is strapi-backend. Start Strapi Development Server Once you have successfully installed Strapi, cd into your strapi project and run the Strapi develop command. cd strapi-backend npm run develop This should start up your Strapi application in the URL: http://localhost:1337/admin. Enter your new admin credentials to continue. This is what your Strapi dashboard should look like after registering the new admin: To learn more about creating a Strapi project, read the Strapi CLI documentation page. In the next section, we will configure the Strapi email plugin to allow us to send emails. Configuring Strapi Email Plugin with SendGrid (St
Introduction
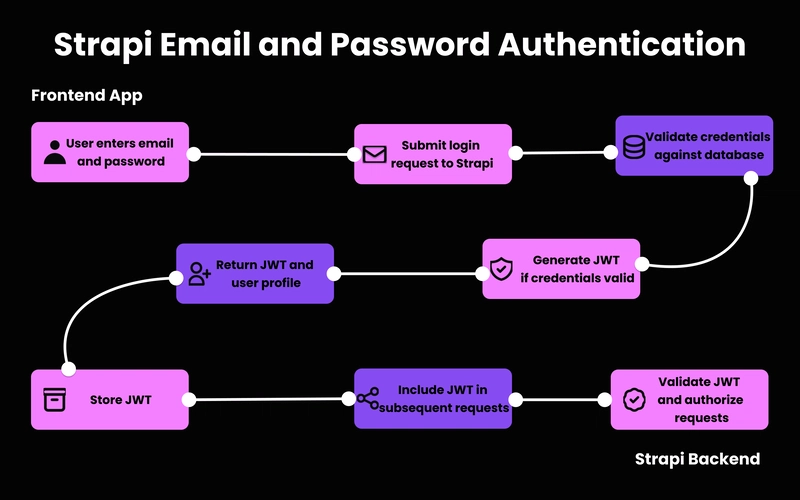
Most applications require that an individual is verified and permitted to access resources. This ensures the security of the app.
Strapi provides you with authentication mechanisms which include email and password, AuthO, AWS Cognito, GitHub, Google, etc. through its Users and Permissions providers feature. Thus, authentication bottlenecks are solved using Strapi.
Next.js on the other hand is a popular frontend framework that allows users to build applications with the power of React components. It also supports authentication, session management and authorization through Middleware, Data Access Layer and Data Object Layer. Learn more here.
In this tutorial, you will learn how to implement Strapi email and password authentication with Next.js frontend.
Tutorial Series
We will divide this tutorial into two series:
- Part 1 - Email and Password registration, Email confirmation, and Login
- Part 2 - Session Management, Data Access, password reset, and changing password
GitHub Repository: Full Code for Strapi and Next.js Authentication Project
The complete code for this project can be found in this repo: strapi-email-and-password-authentication
Tutorial Goals
In this tutorial, here are the concepts we will cover:
- Strapi Email and Password registration (signup) flow.
- Strapi Email confirmation flow.
- Strapi Email and Password Login (sign-in) flow
- Strapi Forgot Password flow
- Strapi Reset password flow
- Changing Password in Strapi with Authorization
- Next.js server actions, authentication, session management, middleware, and data access layer.
Prerequisites
Before we begin, ensure you have the following:
- Node.js runtime: Only Active LTS or Maintenance LTS versions are supported (currently v18, v20, and v22).
- A basic knowledge of Next.js and React should suffice.
- A SendGrid API Key. Visit this page to learn how to get yours.
- Optionally, a HTTP client. Postman is recommended.
Introduction to Strapi Email and Password Authentication
Authentication refers to the process of verifying that an entity has the correct credentials or permission to access resources.
Strapi offers multiple authentication methods to secure your application:
- Users & Permissions Plugin: This is Strapi's built-in authentication system that provides email/password authentication, role-based access control, and third-party provider authentication.
- API Tokens: This allows authenticating REST and GraphQL API queries without user accounts, different token types such as read-only, full access, or custom.
- Third-Party Authentication Providers: Strapi supports numerous third-party authentication providers through the Users & Permissions plugin: Social providers: Facebook, Google, Twitter, GitHub, Discord, Twitch, Instagram, VK, LinkedIn, Reddit Enterprise providers: Auth0, AWS Cognito, etc.
- Single Sign-On (SSO): For enterprise users, Strapi offers SSO capabilities: Available with Enterprise plan. SSO allows administrators to authenticate through an identity provider (e.g. Microsoft Azure Active Directory).
The email and password authentication in Strapi uses the Users & Permissions plugin and follows RESTful API patterns.
If you are interested in knowing the concepts without digging into the technical aspect of this tutorial, please visit this documentation page.
Now, let's install Strapi!
Strapi Installation and Setup
Create a folder where both your Strapi and Next.js app will reside. Give it any name.
Strapi Installation
Let's begin by installing Strapi. To create a new Strapi project, run the command below in your terminal. Ensure you are in the directory where you want to keep both your Strapi backend and Next.js frontend.
npx create-strapi@latest
The command above will be followed with some questions from the terminal.
Depending on your preferred setup, you can select the answer you want. Here are the answers for this project.
? What is the name of your project? strapi-backend
...
? Please log in or sign up. Skip
? Do you want to use the default database (sqlite) ? Yes
? Start with an example structure & data? No
? Start with Typescript? Yes
? Install dependencies with npm? Yes
? Initialize a git repository? No
NOTE: The name of the project is
strapi-backend.
Start Strapi Development Server
Once you have successfully installed Strapi, cd into your strapi project and run the Strapi develop command.
cd strapi-backend
npm run develop
This should start up your Strapi application in the URL: http://localhost:1337/admin. Enter your new admin credentials to continue.
This is what your Strapi dashboard should look like after registering the new admin:

To learn more about creating a Strapi project, read the Strapi CLI documentation page.
In the next section, we will configure the Strapi email plugin to allow us to send emails.
Configuring Strapi Email Plugin with SendGrid (Step-by-Step)
In this project, you will need the Strapi Email plugin to send emails.
For example, a confirmation email will be sent to a user when they register or sign up. So, you need to configure your Strapi Email plugin.
When you head over to Settings > Email Plugin > Configuration as shown below:

You will notice that the default email provider is sendmail, this is for local development. However, for production-ready applications, we will be using SendGrid as our email provider.
Install SendGrid provider
Providers can be installed using npm or yarn using the following format @strapi/provider-.
Install the SendGrid email provider which is available in the Strapi marketplace in your Strapi backend project by running the command below:
npm i @strapi/provider-email-sendgrid
Upon success, configure your provider as shown below:
Configure SendGrid Provider
Navigate to your Strapi project and locate the configuration file for plugins, ./config/plugins.ts. Add the following code:
module.exports = ({ env }) => ({
  email: {
    config: {
      provider: "sendgrid",
      providerOptions: {
        apiKey: env("SENDGRID_API_KEY"), // Required
      },
      settings: {
        defaultFrom: env("SENDGRID_EMAIL"),
        defaultReplyTo: env("SENDGRID_EMAIL"),
      },
    },
  },
});
Ensure you have your SendGrid API key and SendGrid email present in your Strapi project environment variable (strapi-backend/.env):
# Path: strapi-backend/.env
# ... Other environment variables

# SendGrid API Key
SENDGRID_API_KEY=YOUR_API_KEY
SENDGRID_EMAIL=YOUR_SENDGRID_EMAIL
Restart Strapi App
Restart your Strapi development server and visit the email configuration page. You will notice that the email provider is now SendGrid and the default email address is the one you provided in the configuration file.