


![[The AI Show Episode 144]: ChatGPT’s New Memory, Shopify CEO’s Leaked “AI First” Memo, Google Cloud Next Releases, o3 and o4-mini Coming Soon & Llama 4’s Rocky Launch](https://www.marketingaiinstitute.com/hubfs/ep%20144%20cover.png)


![Is this too much for a modular monolith system? [closed]](https://i.sstatic.net/pYL1nsfg.png)


_Andreas_Prott_Alamy.jpg?width=1280&auto=webp&quality=80&disable=upscale#)


![What features do you get with Gemini Advanced? [April 2025]](https://i0.wp.com/9to5google.com/wp-content/uploads/sites/4/2024/02/gemini-advanced-cover.jpg?resize=1200%2C628&quality=82&strip=all&ssl=1)


![Apple Shares Official Trailer for 'Long Way Home' Starring Ewan McGregor and Charley Boorman [Video]](https://www.iclarified.com/images/news/97069/97069/97069-640.jpg)
![Apple Watch Series 10 Back On Sale for $299! [Lowest Price Ever]](https://www.iclarified.com/images/news/96657/96657/96657-640.jpg)
![EU Postpones Apple App Store Fines Amid Tariff Negotiations [Report]](https://www.iclarified.com/images/news/97068/97068/97068-640.jpg)
![Apple Slips to Fifth in China's Smartphone Market with 9% Decline [Report]](https://www.iclarified.com/images/news/97065/97065/97065-640.jpg)


Simple Guide to Setting Up EC2 with Auto Scaling Groups (ASG) on AWS
Step 1: Create an EC2 Instance Before creating an Auto Scaling Group (ASG), we need an EC2 instance to use as a base for the Auto Scaling template. Go to the EC2 Dashboard: Navigate to the EC2 Dashboard in your AWS console. Launch an EC2 Instance: Click Launch Instance. Select an Amazon Machine Image (AMI): Choose an Amazon Linux 2 or any preferred AMI for your EC2 instance. Choose an Instance Type: Select t2.micro (Free Tier) or t3.micro for a test environment. Configure Instance: Leave the default settings unless you need specific configurations. Set the number of instances to 1. Add Storage: The default 8GB is enough for a simple test setup. Configure Security Group: Add rules for: HTTP (port 80) – for web access SSH (port 22) – for remote access (you can restrict to your IP for security) Review and Launch: Select or create a key pair to SSH into the instance. Launch the Instance. Step 2: Create a Launch Template A Launch Template defines the configuration for your EC2 instances. Go to EC2 Dashboard and click Launch Templates. Click “Create Launch Template”. Fill in the following fields: Name: Choose a name for the template (e.g., MyWebAppTemplate). AMI: Select the same AMI you used for the EC2 instance (e.g., Amazon Linux 2). Instance Type: Select the instance type (e.g., t2.micro). Key Pair: Select the key pair you created earlier. Security Group: Select the same security group you used for the EC2 instance. Click Create Launch Template. Step 3: Create an Auto Scaling Group (ASG) Now that we have the Launch Template, let’s create an Auto Scaling Group. Go to EC2 Dashboard > Auto Scaling Groups. Click “Create Auto Scaling group”. Configure the Auto Scaling Group: Name: Enter a name (e.g., MyWebAppASG). Launch Template: Choose the template you created earlier (e.g., MyWebAppTemplate). Version: Select the latest version. Desired Capacity: Set to 2 (this means 2 instances should be running). Minimum Capacity: Set to 2. Maximum Capacity: Set to 3. Configure Scaling Policies: Scaling Type: Choose Target Tracking Policy. Target Value: Set to 30% for CPU utilization. Review and Create the Auto Scaling Group. Step 4: Monitor EC2 Instances Scaling After setting up the ASG, AWS will automatically create the required instances. You will see something like this, where EC2 instances are automatically managed: Even if you terminate an instance manually, the ASG will automatically launch a new one to replace it. Step 5: Clean Up to Avoid Extra Costs When you're done testing, it's important to clean up resources: Terminate the Auto Scaling Group: This will stop it from launching new instances. Delete EC2 Instances: Terminate any EC2 instances that are still running. Delete Launch Templates (if no longer needed): This will prevent clutter in your account. Final Notes: Auto Scaling Groups incur costs, so remember to clean up after you’re done testing. You can use this setup to automatically scale your application based on traffic and performance metrics. That’s it! You’ve now created an EC2 instance, Launch Template, Auto Scaling Group, and learned how to clean up afterward to save costs. Feel free to ask if you have any questions!
Step 1: Create an EC2 Instance
Before creating an Auto Scaling Group (ASG), we need an EC2 instance to use as a base for the Auto Scaling template.
-
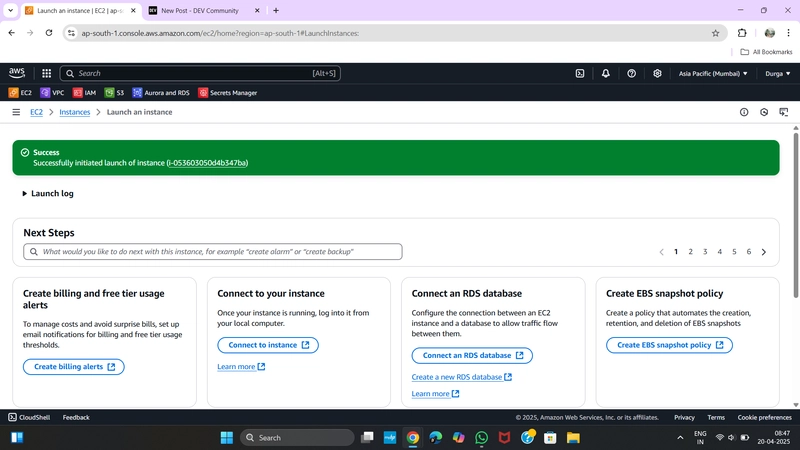
Go to the EC2 Dashboard:
- Navigate to the EC2 Dashboard in your AWS console.
-
Launch an EC2 Instance:
- Click Launch Instance.
-
Select an Amazon Machine Image (AMI):
- Choose an Amazon Linux 2 or any preferred AMI for your EC2 instance.
-
Choose an Instance Type:
- Select t2.micro (Free Tier) or t3.micro for a test environment.
-
Configure Instance:
- Leave the default settings unless you need specific configurations.
- Set the number of instances to 1.
-
Add Storage:
- The default 8GB is enough for a simple test setup.
-
Configure Security Group:
- Add rules for:
- HTTP (port 80) – for web access
- SSH (port 22) – for remote access (you can restrict to your IP for security)
- Add rules for:
-
Review and Launch:
- Select or create a key pair to SSH into the instance.
Launch the Instance.
Step 2: Create a Launch Template
A Launch Template defines the configuration for your EC2 instances.
- Go to EC2 Dashboard and click Launch Templates.
- Click “Create Launch Template”.
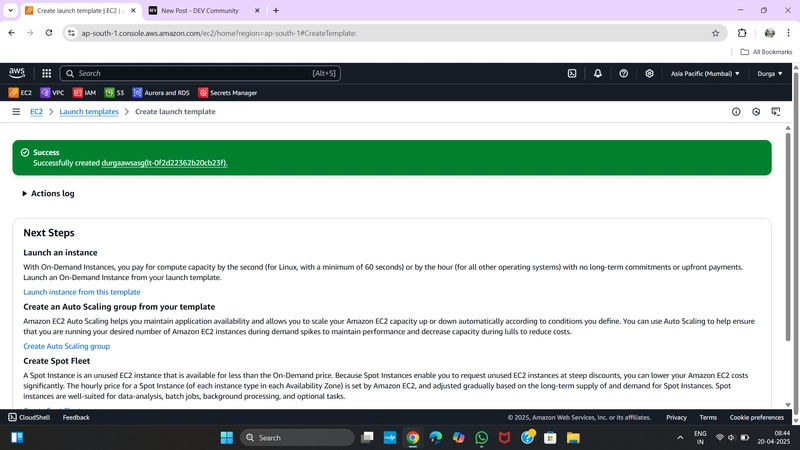
-
Fill in the following fields:
-
Name: Choose a name for the template (e.g.,
MyWebAppTemplate). - AMI: Select the same AMI you used for the EC2 instance (e.g., Amazon Linux 2).
- Instance Type: Select the instance type (e.g., t2.micro).
- Key Pair: Select the key pair you created earlier.
- Security Group: Select the same security group you used for the EC2 instance.
-
Name: Choose a name for the template (e.g.,
Click Create Launch Template.
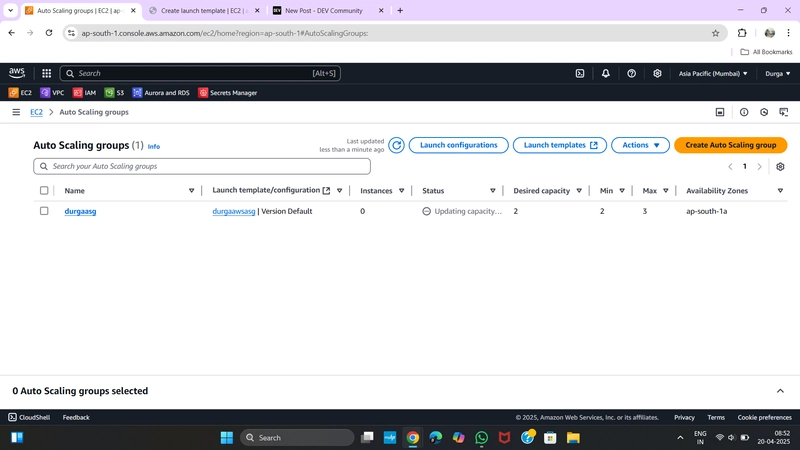
Step 3: Create an Auto Scaling Group (ASG)
Now that we have the Launch Template, let’s create an Auto Scaling Group.
- Go to EC2 Dashboard > Auto Scaling Groups.
- Click “Create Auto Scaling group”.
-
Configure the Auto Scaling Group:
-
Name: Enter a name (e.g.,
MyWebAppASG). -
Launch Template: Choose the template you created earlier (e.g.,
MyWebAppTemplate). - Version: Select the latest version.
- Desired Capacity: Set to 2 (this means 2 instances should be running).
- Minimum Capacity: Set to 2.
- Maximum Capacity: Set to 3.
-
Name: Enter a name (e.g.,
-
Configure Scaling Policies:
- Scaling Type: Choose Target Tracking Policy.
- Target Value: Set to 30% for CPU utilization.
Review and Create the Auto Scaling Group.
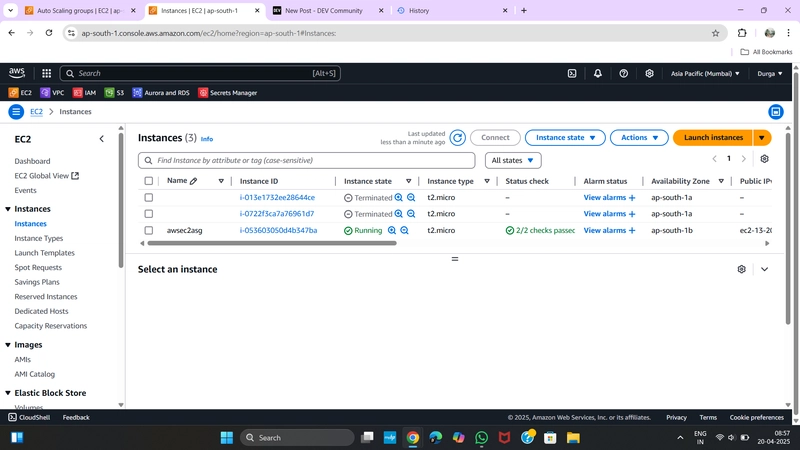
Step 4: Monitor EC2 Instances Scaling
After setting up the ASG, AWS will automatically create the required instances.
You will see something like this, where EC2 instances are automatically managed:
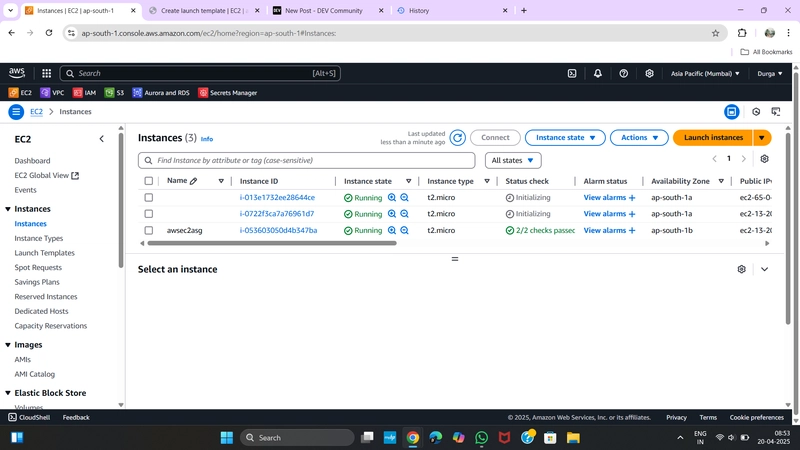
Even if you terminate an instance manually, the ASG will automatically launch a new one to replace it.
Step 5: Clean Up to Avoid Extra Costs
When you're done testing, it's important to clean up resources:
-
Terminate the Auto Scaling Group:
- This will stop it from launching new instances.
-
Delete EC2 Instances:
- Terminate any EC2 instances that are still running.
-
Delete Launch Templates (if no longer needed):
- This will prevent clutter in your account.
Final Notes:
- Auto Scaling Groups incur costs, so remember to clean up after you’re done testing.
- You can use this setup to automatically scale your application based on traffic and performance metrics.
That’s it! You’ve now created an EC2 instance, Launch Template, Auto Scaling Group, and learned how to clean up afterward to save costs.
Feel free to ask if you have any questions!