OpenAI Agents SDK + Multiple MCP Servers
OpenAI Agents SDK (Python) now supports Model Context Protocol (MCP) servers as tools! // Detect dark theme var iframe = document.getElementById('tweet-1904957755829481737-955'); if (document.body.className.includes('dark-theme')) { iframe.src = "https://platform.twitter.com/embed/Tweet.html?id=1904957755829481737&theme=dark" } The examples in the Agents SDK repository do not yet include one that runs multiple MCP servers at a time, so let's walk through a simple code demonstration of how to do that. In this quick guide, we'll use two MCP servers: Filesystem MCP Server: allows the agent to interact with your local file system. Slack MCP Server: enables the agent to interact with your Slack workspace. Python and Node First, ensure you have the required dependencies: pip install -U openai-agents npm install -g npx Slack App Also, if you try the Slack MCP server out, you need to create a Slack app (=Slack integration) and pass its bot token and installed workspace's team ID. Step 1: Head to https://api.slack.com/apps, click "Create New App", select "From a manifest", select your workspace, switch to YAML, and then past the following YAML data (you can change the app name if you want): display_information: name: Test MCP Connector features: bot_user: display_name: Test MCP Connector oauth_config: scopes: bot: - channels:history - channels:read - chat:write - reactions:write - users:read Step 2: Go to Settings > Install App; click the "Install to (workspace name)" button to enable the app in your Slack workspace and then set the following two variables on the terminal to run your agent app: # Settings > Install App > Bot User OAuth Token export SLACK_BOT_TOKEN=xoxb-.... # You can find this by running the following API call: # curl -s -XPOST https://slack.com/api/auth.test -H"Authorization: Bearer ${SLACK_BOT_TOKEN}" | jq .team_id export SLACK_TEAM_ID=T.... Step 3: Invite "Test MCP Connector" to the channels you want to read/write via MCP Now, you're ready for your first agentic workflow with multiple MCP servers! Python Demo Script Here is a complete Python code to run. You can create a Python script named app.py and then run python app.py. Please note that pip install -U openai-agents and npm install -g npx should be done beforehand. # # Demo: OpenAI Agents SDK + MCP Servers # # How to run this app: # $ pip install -U openai-agents # $ python app.py # # See also: # - https://openai.github.io/openai-agents-python/mcp/ # - https://github.com/openai/openai-agents-python/tree/main/examples/mcp # - https://github.com/modelcontextprotocol/servers/tree/main/src/ import asyncio import os import shutil import logging from agents import Agent, Runner, gen_trace_id, trace from agents.mcp import MCPServerStdio logging.basicConfig(level=logging.WARNING) # If you want to see more logs, enable the following lines: # logging.basicConfig(level=logging.INFO) # logging.getLogger("openai.agents").setLevel(logging.DEBUG) async def main(): # ---------------------------------------------------- # Filesystem MCP Server # ---------------------------------------------------- # How to enable this server: # Step 1: Set the directory you wish to allow access path_to_allow_access = os.path.dirname(os.path.abspath(__file__)) fs_command = f"npx -y @modelcontextprotocol/server-filesystem {path_to_allow_access}" fs_server = MCPServerStdio( name="FS MCP Server", params={"command": fs_command.split(" ")[0], "args": fs_command.split(" ")[1:]}, ) # ---------------------------------------------------- # Slack MCP Server # ---------------------------------------------------- # How to enable this server: # Step 1: Head to https://api.slack.com/apps and then create a new app using the following YAML: """ display_information: name: Test MCP Connector features: bot_user: display_name: Test MCP Connector oauth_config: scopes: bot: - channels:history - channels:read - chat:write - reactions:write - users:read """ # Step 2: Install the app into your Slack workspace and then set the following two variables: # export SLACK_BOT_TOKEN=xoxb-.... # export SLACK_TEAM_ID=T.... # Step 3: Invite "Test MCP Connector" to the channels you want to read/write via MCP slack_command = "npx -y @modelcontextprotocol/server-slack" slack_server = MCPServerStdio( name="Slack MCP Server", params={ "command": slack_command.split(" ")[0], "args": slack_command.split(" ")[1:], "env": { "SLACK_BOT_TOKEN": os.environ["SLACK_BOT_TOKEN"], "SLACK_TEAM_ID": os.environ["SLACK_TEAM_ID"], }, }, ) # ---------------------------------------------------- # Run the agentic workflow with th

OpenAI Agents SDK (Python) now supports Model Context Protocol (MCP) servers as tools!
// Detect dark theme var iframe = document.getElementById('tweet-1904957755829481737-955'); if (document.body.className.includes('dark-theme')) { iframe.src = "https://platform.twitter.com/embed/Tweet.html?id=1904957755829481737&theme=dark" }
The examples in the Agents SDK repository do not yet include one that runs multiple MCP servers at a time, so let's walk through a simple code demonstration of how to do that. In this quick guide, we'll use two MCP servers:
- Filesystem MCP Server: allows the agent to interact with your local file system.
- Slack MCP Server: enables the agent to interact with your Slack workspace.
Python and Node
First, ensure you have the required dependencies:
pip install -U openai-agents
npm install -g npx
Slack App
Also, if you try the Slack MCP server out, you need to create a Slack app (=Slack integration) and pass its bot token and installed workspace's team ID.
Step 1: Head to https://api.slack.com/apps, click "Create New App", select "From a manifest", select your workspace, switch to YAML, and then past the following YAML data (you can change the app name if you want):
display_information:
  name: Test MCP Connector
features:
  bot_user:
    display_name: Test MCP Connector
oauth_config:
  scopes:
    bot:
      - channels:history
      - channels:read
      - chat:write
      - reactions:write
      - users:read
Step 2: Go to Settings > Install App; click the "Install to (workspace name)" button to enable the app in your Slack workspace and then set the following two variables on the terminal to run your agent app:
# Settings > Install App > Bot User OAuth Token
export SLACK_BOT_TOKEN=xoxb-....

# You can find this by running the following API call:
# curl -s -XPOST https://slack.com/api/auth.test -H"Authorization: Bearer ${SLACK_BOT_TOKEN}" | jq .team_id
export SLACK_TEAM_ID=T....
Step 3: Invite "Test MCP Connector" to the channels you want to read/write via MCP
Now, you're ready for your first agentic workflow with multiple MCP servers!
Python Demo Script
Here is a complete Python code to run. You can create a Python script named app.py and then run python app.py. Please note that pip install -U openai-agents and npm install -g npx should be done beforehand.
#
# Demo: OpenAI Agents SDK + MCP Servers
#
# How to run this app:
# $ pip install -U openai-agents
# $ python app.py
#
# See also:
#  - https://openai.github.io/openai-agents-python/mcp/
#  - https://github.com/openai/openai-agents-python/tree/main/examples/mcp
#  - https://github.com/modelcontextprotocol/servers/tree/main/src/

import asyncio

import os
import shutil
import logging

from agents import Agent, Runner, gen_trace_id, trace
from agents.mcp import MCPServerStdio


logging.basicConfig(level=logging.WARNING)

# If you want to see more logs, enable the following lines:
# logging.basicConfig(level=logging.INFO)
# logging.getLogger("openai.agents").setLevel(logging.DEBUG)


async def main():

    # ----------------------------------------------------
    # Filesystem MCP Server
    # ----------------------------------------------------
    # How to enable this server:
    # Step 1: Set the directory you wish to allow access
    path_to_allow_access = os.path.dirname(os.path.abspath(__file__))
    fs_command = f"npx -y @modelcontextprotocol/server-filesystem {path_to_allow_access}"
    fs_server = MCPServerStdio(
        name="FS MCP Server",
        params={"command": fs_command.split(" ")[0], "args": fs_command.split(" ")[1:]},
    )

    # ----------------------------------------------------
    # Slack MCP Server
    # ----------------------------------------------------
    # How to enable this server:
    # Step 1: Head to https://api.slack.com/apps and then create a new app using the following YAML:
    """
display_information:
  name: Test MCP Connector
features:
  bot_user:
    display_name: Test MCP Connector
oauth_config:
  scopes:
    bot:
      - channels:history
      - channels:read
      - chat:write
      - reactions:write
      - users:read
    """
    # Step 2: Install the app into your Slack workspace and then set the following two variables:
    # export SLACK_BOT_TOKEN=xoxb-....
    # export SLACK_TEAM_ID=T....
    # Step 3: Invite "Test MCP Connector" to the channels you want to read/write via MCP
    slack_command = "npx -y @modelcontextprotocol/server-slack"
    slack_server = MCPServerStdio(
        name="Slack MCP Server",
        params={
            "command": slack_command.split(" ")[0],
            "args": slack_command.split(" ")[1:],
            "env": {
                "SLACK_BOT_TOKEN": os.environ["SLACK_BOT_TOKEN"],
                "SLACK_TEAM_ID": os.environ["SLACK_TEAM_ID"],
            },
        },
    )

    # ----------------------------------------------------
    # Run the agentic workflow with these two MCP servers
    # ----------------------------------------------------
    async with fs_server as fs, slack_server as slack:
        trace_id = gen_trace_id()
        print(f"View trace: https://platform.openai.com/traces/{trace_id}\n")

        with trace(workflow_name="Multi-MCP Server Demo Workflow", trace_id=trace_id):
            agent = Agent(
                name="OpenAI Agent w/ MCP Servers",
                instructions="Use the tools to access the filesystem and slack workspaces.",
                mcp_servers=[fs, slack],
            )
            prompt = input("Enter a prompt (MCP servers (fs, slack) are available): ")
            result = await Runner.run(starting_agent=agent, input=prompt)
            print(result.final_output)


if __name__ == "__main__":
    if not shutil.which("npx"):
        error = "npx is not installed. Please install it with `npm install -g npx`."
        raise RuntimeError(error)

    asyncio.run(main())
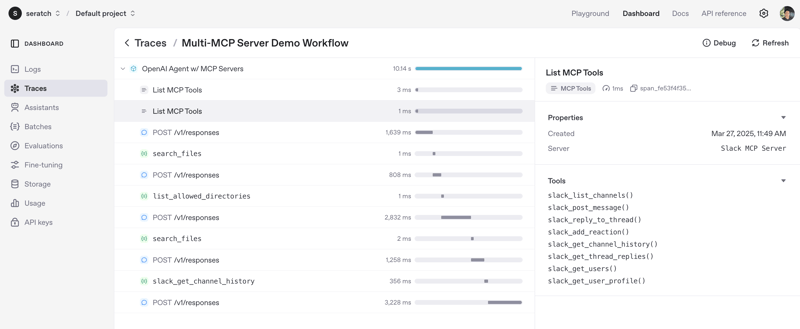
If everything works fine, you will see the output like below. I tested with "Can you help me find where app.py is, and also let me know the summary of the last 10 hours in #cat-lovers (C06CS8GRPC2)?" . You can use either of the two MCP servers for a prompt or both.
$ python app.py

Secure MCP Filesystem Server running on stdio
Allowed directories: [ '/Users/seratch/tmp/mcp-sample' ]
Starting Slack MCP Server...
Connecting server to transport...
Slack MCP Server running on stdio
View trace: https://platform.openai.com/traces/trace_*****************

Enter a prompt (MCP servers (fs, slack) are available): Can you help me find where app.py is, and also let me know the summary of the last 10 hours in #cat-lovers (C06CS8GRPC2)?

Received ListToolsRequest

Received CallToolRequest: {
  method: 'tools/call',
  params: {
    name: 'slack_get_channel_history',
    arguments: { channel_id: 'C06CS8GRPC2', limit: 100 }
  }
}

The `app.py` file is located at:

- `/Users/seratch/tmp/app.py`

### Summary from #cat-lovers in the last 10 hours:

1. **User <@U08KR020GLA> joined the channel.**

2. **User <@U03E94MK0> shared:**
- Tried doing yoga, but the cat assumed it was “attack the moving limbs” hour 


![[The AI Show Episode 142]: ChatGPT’s New Image Generator, Studio Ghibli Craze and Backlash, Gemini 2.5, OpenAI Academy, 4o Updates, Vibe Marketing & xAI Acquires X](https://www.marketingaiinstitute.com/hubfs/ep%20142%20cover.png)


![[FREE EBOOKS] The Kubernetes Bible, The Ultimate Linux Shell Scripting Guide & Four More Best Selling Titles](https://www.javacodegeeks.com/wp-content/uploads/2012/12/jcg-logo.jpg)


![From drop-out to software architect with Jason Lengstorf [Podcast #167]](https://cdn.hashnode.com/res/hashnode/image/upload/v1743796461357/f3d19cd7-e6f5-4d7c-8bfc-eb974bc8da68.png?#)


.png?#)


.jpg?#)


 (1).webp?#)


_Christophe_Coat_Alamy.jpg?#)


![Rapidus in Talks With Apple as It Accelerates Toward 2nm Chip Production [Report]](https://www.iclarified.com/images/news/96937/96937/96937-640.jpg)


