![[The AI Show Episode 142]: ChatGPT’s New Image Generator, Studio Ghibli Craze and Backlash, Gemini 2.5, OpenAI Academy, 4o Updates, Vibe Marketing & xAI Acquires X](https://www.marketingaiinstitute.com/hubfs/ep%20142%20cover.png)


![From drop-out to software architect with Jason Lengstorf [Podcast #167]](https://cdn.hashnode.com/res/hashnode/image/upload/v1743796461357/f3d19cd7-e6f5-4d7c-8bfc-eb974bc8da68.png?#)


.png?#)


.webp?#)


_Christophe_Coat_Alamy.jpg?#)
 (1).webp?#)


![Apple Considers Delaying Smart Home Hub Until 2026 [Gurman]](https://www.iclarified.com/images/news/96946/96946/96946-640.jpg)
![iPhone 17 Pro Won't Feature Two-Toned Back [Gurman]](https://www.iclarified.com/images/news/96944/96944/96944-640.jpg)
![Tariffs Threaten Apple's $999 iPhone Price Point in the U.S. [Gurman]](https://www.iclarified.com/images/news/96943/96943/96943-640.jpg)


Making Web Pages Come Alive with JavaScript (And AI Help)
You’ve likely experienced it — hovering over a button that changes color, submitting a form that instantly shows a confirmation, or scrolling through a site that adjusts smoothly to your device. That’s not magic. That’s JavaScript in action. What makes it even more exciting today is how much easier it is to learn and apply these interactions — thanks in part to AI. Whether you’re just starting or building on the basics, understanding how JavaScript works behind the scenes of a web page is a game-changer. In this post, we’ll show you how JavaScript lets you take control of the web page itself. And more importantly, how you can lean on AI to learn and experiment faster. Manipulating web pages with JavaScript HTML gives you structure. CSS makes it look nice. But JavaScript? That’s what gives your page dynamic. Let’s say you want a pop-up message after a user clicks a button. Or maybe a progress bar that responds when someone holds down a key. JavaScript makes all that possible by connecting what users do (click, scroll, type) to what the page does next. To understand how it all works, it helps to look at JavaScript from three angles: Where it operates, when it kicks in, and how it executes. Where? (The Target) JavaScript works with two main models: DOM (Document Object Model): Think of this as a blueprint of your page’s structure — every heading, button, form, and section is represented here. BOM (Browser Object Model): This handles the browser environment itself, like opening new windows, navigating browser history, or grabbing the URL. These models give JavaScript the power to reach into both your page and the browser and start manipulating them. When? (The Trigger) JavaScript responds to events. These might be: Page Load — when the page is first opened. User Interaction — clicking, typing, or touching something. Timers — running actions after a delay or at regular intervals. Each of these triggers can set off a chain reaction — executing code that updates text, changes styles, opens modals, or starts animations. How? (The Action) Here’s where your logic comes in. JavaScript uses functions, methods, and statements to define exactly what happens when an event occurs. You might write a function to: Show a tooltip on focus. Validate a form on submission. Toggle a dark mode theme on double-click. Once you’ve got the “where,” “when,” and “how” in place, the rest is just a matter of putting them together. A quick tour of key events JavaScript gives you a wide range of events to choose from, and each type helps you handle different kinds of user or browser behavior. Here are some of the most common and useful ones to know: Mouse events like click, mouseover, and contextmenu let you respond to mouse interactions. You can build features like right-click menus, hover effects, or drag-and-drop actions. Keyboard events such as keydown and keyup help you create shortcuts, input validation, or even game controls. You can detect when a user presses Enter or navigates with arrow keys. Focus and blur events allow you to respond when elements like input fields gain or lose focus — ideal for tooltips, highlighting fields, or preventing accidental actions. Form events like submit and change are essential for validating user input and handling data before it’s sent off. They’re great for improving the user experience in login forms, contact pages, or checkout flows. Window events respond to changes in the browser itself, such as resizing the window, scrolling, or loading the page. They’re handy for features like sticky headers or “back to top” buttons. Touch events let you build mobile-friendly interactions — like swipe gestures, long presses, or pinch actions — using touchstart, touchmove, and touchend. Drag and drop events open up possibilities for sorting lists, uploading files, or customizing layouts by letting users physically move elements on the page. Animation events like animationstart and animationend allow you to sync JavaScript actions with CSS animations — for example, showing a message once an animation finishes. Media and network events let you handle things like video playback, audio controls, or detecting when the user goes offline. You can pause background music when a video starts, or alert users if their connection drops. Custom events give you the power to define your own triggers — perfect for more advanced scenarios where built-in events just don’t cut it. Each of these event types opens up new ways to make your web pages interactive. And with AI tools by your side, you can explore them faster by asking for examples, modifying code, and testing new ideas as you go. Selecting elements Before you can make changes to the page, you need to grab the elements you want to work with. JavaScript gives you a few options to do this: getElementById() and Friends These are part of the older (but still very useful) fami
You’ve likely experienced it — hovering over a button that changes color, submitting a form that instantly shows a confirmation, or scrolling through a site that adjusts smoothly to your device. That’s not magic. That’s JavaScript in action.
What makes it even more exciting today is how much easier it is to learn and apply these interactions — thanks in part to AI. Whether you’re just starting or building on the basics, understanding how JavaScript works behind the scenes of a web page is a game-changer.
In this post, we’ll show you how JavaScript lets you take control of the web page itself. And more importantly, how you can lean on AI to learn and experiment faster.
Manipulating web pages with JavaScript
HTML gives you structure. CSS makes it look nice. But JavaScript? That’s what gives your page dynamic.
Let’s say you want a pop-up message after a user clicks a button. Or maybe a progress bar that responds when someone holds down a key. JavaScript makes all that possible by connecting what users do (click, scroll, type) to what the page does next.
To understand how it all works, it helps to look at JavaScript from three angles:
Where it operates, when it kicks in, and how it executes.
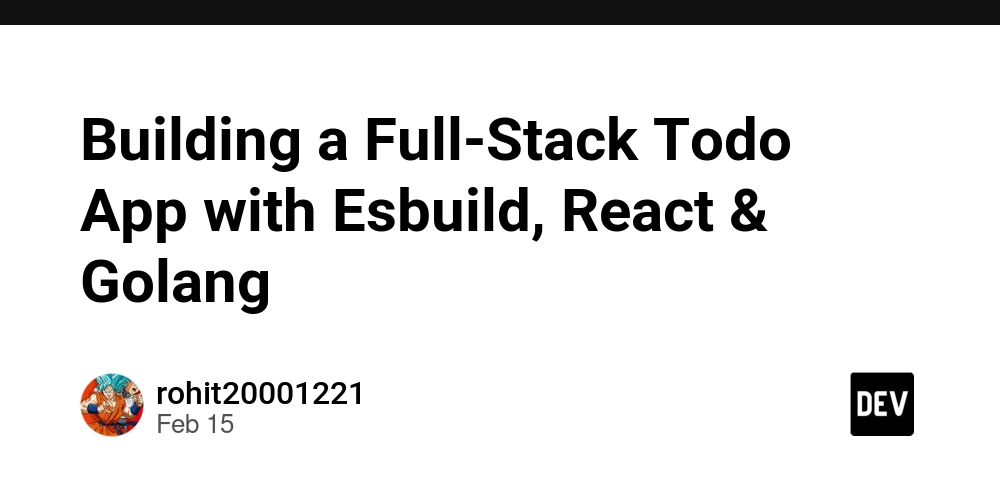
Where? (The Target)
JavaScript works with two main models:
DOM (Document Object Model): Think of this as a blueprint of your page’s structure — every heading, button, form, and section is represented here.
BOM (Browser Object Model): This handles the browser environment itself, like opening new windows, navigating browser history, or grabbing the URL.
These models give JavaScript the power to reach into both your page and the browser and start manipulating them.
When? (The Trigger)
JavaScript responds to events. These might be:
Page Load — when the page is first opened.
User Interaction — clicking, typing, or touching something.
Timers — running actions after a delay or at regular intervals.
Each of these triggers can set off a chain reaction — executing code that updates text, changes styles, opens modals, or starts animations.
How? (The Action)
Here’s where your logic comes in. JavaScript uses functions, methods, and statements to define exactly what happens when an event occurs.
You might write a function to:
Show a tooltip on focus.
Validate a form on submission.
Toggle a dark mode theme on double-click.
Once you’ve got the “where,” “when,” and “how” in place, the rest is just a matter of putting them together.
A quick tour of key events
JavaScript gives you a wide range of events to choose from, and each type helps you handle different kinds of user or browser behavior. Here are some of the most common and useful ones to know:
Mouse events like click, mouseover, and contextmenu let you respond to mouse interactions. You can build features like right-click menus, hover effects, or drag-and-drop actions.
Keyboard events such as keydown and keyup help you create shortcuts, input validation, or even game controls. You can detect when a user presses Enter or navigates with arrow keys.
Focus and blur events allow you to respond when elements like input fields gain or lose focus — ideal for tooltips, highlighting fields, or preventing accidental actions.
Form events like submit and change are essential for validating user input and handling data before it’s sent off. They’re great for improving the user experience in login forms, contact pages, or checkout flows.
Window events respond to changes in the browser itself, such as resizing the window, scrolling, or loading the page. They’re handy for features like sticky headers or “back to top” buttons.
Touch events let you build mobile-friendly interactions — like swipe gestures, long presses, or pinch actions — using touchstart, touchmove, and touchend.
Drag and drop events open up possibilities for sorting lists, uploading files, or customizing layouts by letting users physically move elements on the page.
Animation events like animationstart and animationend allow you to sync JavaScript actions with CSS animations — for example, showing a message once an animation finishes.
Media and network events let you handle things like video playback, audio controls, or detecting when the user goes offline. You can pause background music when a video starts, or alert users if their connection drops.
Custom events give you the power to define your own triggers — perfect for more advanced scenarios where built-in events just don’t cut it.
Each of these event types opens up new ways to make your web pages interactive. And with AI tools by your side, you can explore them faster by asking for examples, modifying code, and testing new ideas as you go.
Selecting elements
Before you can make changes to the page, you need to grab the elements you want to work with. JavaScript gives you a few options to do this:
getElementById() and Friends
These are part of the older (but still very useful) family of methods that let you select elements by ID, class, name, or tag.
Example:
const title = document.getElementById("main-title");
title.innerText = "Welcome!";
They’re simple, efficient, and still widely used — especially when you know exactly what element you’re targeting.
querySelector() and querySelectorAll()
These are more modern and let you use CSS-style selectors. That means you can write things like:
document.querySelector(".nav-item.active");
They offer more flexibility, especially when your HTML structure is more complex.
Not sure which one to use? A good rule of thumb:
Use getElementById() when you’re targeting a unique element.
Use querySelector() when you need more control with CSS-style selectors.
Either way, AI can help you experiment. Just type a prompt like, “Show me how to use querySelectorAll() to style all buttons with a certain class,” and you’ll get working code in seconds.
Handling user events
JavaScript really shines when it reacts to what users do on a page. And it all starts with event handling.
Event Handlers vs. Event Listeners
You can attach behavior in two main ways:
// Event handler
button.onclick = handleClick;
// Event listener
button.addEventListener("click", handleClick);
While both work, addEventListener() is the preferred method for most developers. It lets you attach multiple events to the same element and gives you more control, like stopping event bubbling or triggering a function only once.
Here’s a quick example:
button.addEventListener("click", function () {
 alert("You clicked the button!");
});
Now, if you only want that alert to appear the first time the button is clicked — then never again — you can pass an extra option to the event listener like this:
button.addEventListener(
 "click",
function () {
 alert("You clicked the button!");
 },
 { once: true }
);
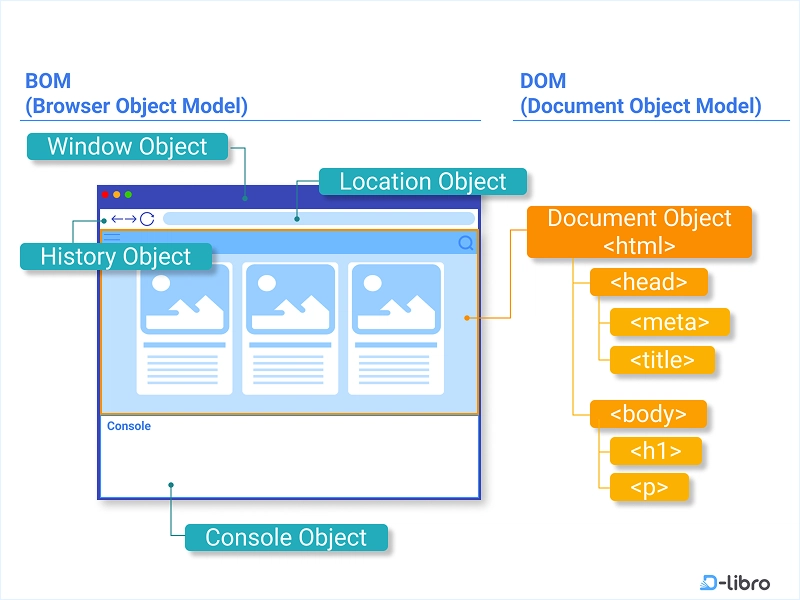
The Event Object
Whenever an event occurs — whether it’s a mouse click or a keypress — JavaScript creates an event object. This object gives you access to all kinds of useful info, like:
event.type — What kind of event was it?
event.target — Which element triggered the event?
event.preventDefault() — Stops a default browser behavior (like submitting a form).
This is especially useful when you want to build features like:
Custom right-click menus.
Keyboard shortcuts.
Click events that behave differently depending on where they happen.
Bringing it all together with real examples
Here’s where the fun begins. AI tools like ChatGPT can help you build real, interactive features — fast. Let’s look at a few examples you can try (or ask AI to generate for you):
1. A button that activates after page load
You might want to delay interaction until everything is ready:
window.addEventListener("load", () => {
 document.querySelector("#myButton").disabled = false;
});
2. Toggle dark mode on double click
Want to switch between light and dark themes? A double-click event on the page body can trigger a style change instantly.
document.body.addEventListener("dblclick", () => {
 document.body.classList.toggle("dark-mode");
});
These types of features used to take a while to set up. Now, with AI, you can describe the feature you want and get ready-to-run code back instantly. That means more time learning by doing — and less time stuck on the setup.
AI helps you practice and learn faster
The best way to understand JavaScript is to build things with it. And with AI, you can ask for help at any stage:
“Write code to disable a button for 5 seconds after it’s clicked.”
“How do I detect when a user resizes the window?”
“Can you explain what event.stopPropagation() does with an example?”
You can even paste in your own code and ask, “Why isn’t this working?” You’ll get feedback, suggestions, and solutions in seconds.
Final thoughts
Learning how to manipulate web pages with JavaScript opens up a whole new level of control. Whether it’s a simple hover effect or a custom event system, you’re giving your users an experience that feels engaging — and responsive.
Thanks to AI tools, you no longer have to wait until you’ve “mastered” JavaScript to start building web apps. You can ask questions, test code, and tweak ideas in real-time. And the more you experiment, the faster everything clicks.
If there’s one takeaway here, it’s this: JavaScript gives you the power to shape the user experience. And AI makes that power easier to acquire and use than ever before.
Keep experimenting. Keep asking questions. And don’t be afraid to build something — even if it’s small.
This article is a summary of “Learn JavaScript with AI — A Smarter Way to Code” by D-Libro.