![[The AI Show Episode 142]: ChatGPT’s New Image Generator, Studio Ghibli Craze and Backlash, Gemini 2.5, OpenAI Academy, 4o Updates, Vibe Marketing & xAI Acquires X](https://www.marketingaiinstitute.com/hubfs/ep%20142%20cover.png)


![From drop-out to software architect with Jason Lengstorf [Podcast #167]](https://cdn.hashnode.com/res/hashnode/image/upload/v1743796461357/f3d19cd7-e6f5-4d7c-8bfc-eb974bc8da68.png?#)


.png?#)


_Christophe_Coat_Alamy.jpg?#)


.webp?#)
 (1).webp?#)


![Apple Considers Delaying Smart Home Hub Until 2026 [Gurman]](https://www.iclarified.com/images/news/96946/96946/96946-640.jpg)
![iPhone 17 Pro Won't Feature Two-Toned Back [Gurman]](https://www.iclarified.com/images/news/96944/96944/96944-640.jpg)
![Tariffs Threaten Apple's $999 iPhone Price Point in the U.S. [Gurman]](https://www.iclarified.com/images/news/96943/96943/96943-640.jpg)


Level Up Your Portfolio: Building a Drag-and-Drop Terminal in React!
I'm thrilled to share the latest milestone in my journey to create the ultimate desktop environment portfolio! I've just finished implementing a fully functional terminal with draggable and resizable windows, all powered by custom code. github code live preview This feature allows users to interact with the simulated operating system in a familiar and intuitive way. I've even included some dummy commands to give you a taste of what's possible. Building a realistic desktop environment for a portfolio website is no small feat, and adding a functional terminal takes it to a whole new level. This terminal isn't just a static element; it's a dynamic, interactive component that allows users to explore and engage with the simulated operating system. Getting Started: Setting Up Your Next.js Project Before diving into the terminal code, let's walk through the initial setup. We'll be using Next.js for its robust features and excellent developer experience. Create a New Next.js App: Open your terminal and run the following command to create a new Next.js project: npx create-next-app my-terminal-app cd my-terminal-app This will set up a basic Next.js project structure for you. Install Required Packages: We'll need a package to handle drag-and-drop, and type definitions. Install them using npm or yarn: npm install react-rnd npm install -D @types/node @types/react @types/react-dom typescript react-rnd: This package provides powerful and flexible drag-and-resize functionality. It's perfect for creating resizable and movable windows, which is essential for our terminal. @types/*: These packages provide TypeScript type definitions for Node.js, React, and React DOM. Using TypeScript improves code quality and maintainability by adding static typing. typescript: needed for typescript support. Important Note Regarding next/dynamic: The next/dynamic import is a built-in feature of Next.js, not a separate package. It allows us to dynamically import components, which is crucial for client-side rendering. Since our terminal component relies on browser-specific APIs, we need to ensure it's not rendered on the server. Diving into the Code: React-Powered Terminal Magic Let's take a peek at the React JS code that powers this terminal. We're leveraging next.js for our application, react-rnd for the drag-and-resize functionality, and a custom TerminalComponent to handle the terminal logic. pages.tsx (Main Page): "use client"; import dynamic from "next/dynamic"; import { Rnd } from "react-rnd"; const TerminalComponent = dynamic(() => import("./components/Terminal"), { ssr: false, // Important: Disable server-side rendering }); export default function Home() { return ( ); } Here, we use react-rnd to make the terminal window draggable and resizable. The dynamic import ensures that the TerminalComponent is only loaded on the client-side, which is crucial since it relies on browser-specific APIs. index.tsx (Terminal Component): // components/Terminal.tsx "use client"; import React, { useEffect, useRef, useState } from "react"; import type { AvailableCommands, NestedCommands } from "../data/command"; const BashTerminal: React.FC = () => { // 1. Importing Dependencies and Defining Types: // (Import statements already present) // 2. Initializing State Variables: const [cmd, setCmd] = useState(""); const [output, setOutput] = useState(""); const [history, setHistory] = useState([]); const terminalRef = useRef(null); const [nestedMode, setNestedMode] = useState(null); const hostname = "terminal"; const username = "terminal"; const [directory, setDirectory] = useState("~"); // 3. Utility Functions: const print = (text: string, currentOutput: string): string => { return currentOutput + text; }; const command = (outputText: string, currentOutput: string): string => { return print(`${outputText}\n${username}@${hostname} ${directory} $ `, currentOutput); }; const empty = (currentOutput = ""): string => { return print(`${username}@${hostname} ${directory} $ `, currentOutput); }; const setup = (): string => { return empty(); }; const cd = (dir: string, param: string | undefined): string => { if (param === undefined) { return "~"; } if (param.charAt(0) === "/") { return param; } return `${dir}/${param}`; }; // 4. Command Definitions: const availableCommands: AvailableCommands = { pwd: () => directory, cd: (tokens) => { setDirectory(cd(directory, tokens[1])); return null; }, echo: (tokens) => tokens.slice(1).join(" "), clear: () => ({ clear: true }), history: () => history.join("\n"), help: () => "Available commands: clear, echo, cd, pwd, history, help, mycommand", mycommand: () => { setNestedMode("mycommand"); return "Entered mycommand mode. Type 'list', 'info', or 'exit'.";
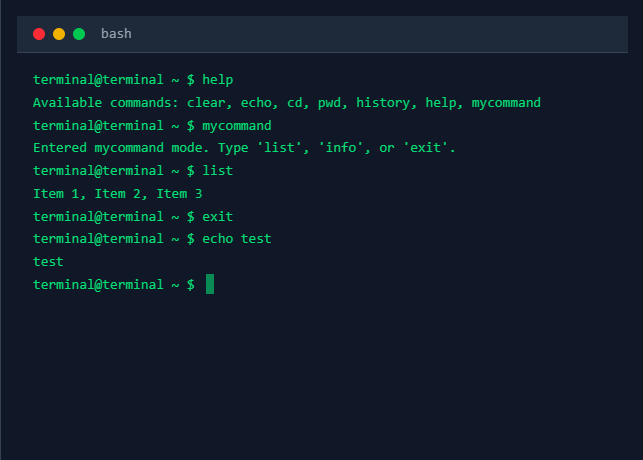
I'm thrilled to share the latest milestone in my journey to create the ultimate desktop environment portfolio! I've just finished implementing a fully functional terminal with draggable and resizable windows, all powered by custom code.
This feature allows users to interact with the simulated operating system in a familiar and intuitive way. I've even included some dummy commands to give you a taste of what's possible.
Building a realistic desktop environment for a portfolio website is no small feat, and adding a functional terminal takes it to a whole new level. This terminal isn't just a static element; it's a dynamic, interactive component that allows users to explore and engage with the simulated operating system.
Getting Started: Setting Up Your Next.js Project
Before diving into the terminal code, let's walk through the initial setup. We'll be using Next.js for its robust features and excellent developer experience.
-
Create a New Next.js App:
Open your terminal and run the following command to create a new Next.js project:
npx create-next-app my-terminal-app
cd my-terminal-app
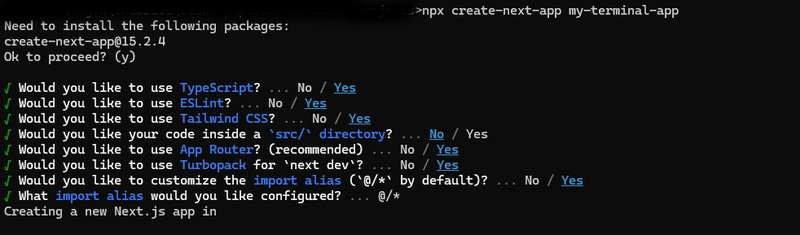
This will set up a basic Next.js project structure for you.
-
Install Required Packages:
We'll need a package to handle drag-and-drop, and type definitions. Install them using npm or yarn:
npm install react-rnd
npm install -D @types/node @types/react @types/react-dom typescript
- react-rnd: This package provides powerful and flexible drag-and-resize functionality. It's perfect for creating resizable and movable windows, which is essential for our terminal.
@types/*: These packages provide TypeScript type definitions for Node.js, React, and React DOM. Using TypeScript improves code quality and maintainability by adding static typing.
typescript: needed for typescript support.
Important Note Regarding next/dynamic:
The next/dynamic import is a built-in feature of Next.js, not a separate package. It allows us to dynamically import components, which is crucial for client-side rendering. Since our terminal component relies on browser-specific APIs, we need to ensure it's not rendered on the server.
Diving into the Code: React-Powered Terminal Magic
Let's take a peek at the React JS code that powers this terminal. We're leveraging next.js for our application, react-rnd for the drag-and-resize functionality, and a custom TerminalComponent to handle the terminal logic.
pages.tsx (Main Page):
"use client";
import dynamic from "next/dynamic";
import { Rnd } from "react-rnd";

const TerminalComponent = dynamic(() => import("./components/Terminal"), {
  ssr: false, // Important: Disable server-side rendering
});

export default function Home() {
  return (


  );
}
Here, we use react-rnd to make the terminal window draggable and resizable. The dynamic import ensures that the TerminalComponent is only loaded on the client-side, which is crucial since it relies on browser-specific APIs.
index.tsx (Terminal Component):
// components/Terminal.tsx
"use client";
import React, { useEffect, useRef, useState } from "react";
import type { AvailableCommands, NestedCommands } from "../data/command";

const BashTerminal: React.FC = () => {
  // 1. Importing Dependencies and Defining Types:
  // (Import statements already present)

  // 2. Initializing State Variables:
  const [cmd, setCmd] = useState("");
  const [output, setOutput] = useState("");
  const [history, setHistory] = useState([]);
  const terminalRef = useRef(null);
  const [nestedMode, setNestedMode] = useState(null);

  const hostname = "terminal";
  const username = "terminal";
  const [directory, setDirectory] = useState("~");

  // 3. Utility Functions:
  const print = (text: string, currentOutput: string): string => {
    return currentOutput + text;
  };

  const command = (outputText: string, currentOutput: string): string => {
    return print(`${outputText}\n${username}@${hostname} ${directory} $ `, currentOutput);
  };

  const empty = (currentOutput = ""): string => {
    return print(`${username}@${hostname} ${directory} $ `, currentOutput);
  };

  const setup = (): string => {
    return empty();
  };

  const cd = (dir: string, param: string | undefined): string => {
    if (param === undefined) {
      return "~";
    }
    if (param.charAt(0) === "/") {
      return param;
    }
    return `${dir}/${param}`;
  };

  // 4. Command Definitions:
  const availableCommands: AvailableCommands = {
    pwd: () => directory,
    cd: (tokens) => {
      setDirectory(cd(directory, tokens[1]));
      return null;
    },
    echo: (tokens) => tokens.slice(1).join(" "),
    clear: () => ({ clear: true }),
    history: () => history.join("\n"),
    help: () => "Available commands: clear, echo, cd, pwd, history, help, mycommand",
    mycommand: () => {
      setNestedMode("mycommand");
      return "Entered mycommand mode. Type 'list', 'info', or 'exit'.";
    },
  };

  const nestedCommands: NestedCommands = {
    mycommand: {
      list: () => "Item 1, Item 2, Item 3",
      info: () => "This is info within mycommand.",
      exit: () => {
        setNestedMode(null);
        return `\n${username}@${hostname} ${directory} $ `;
      },
    },
  };

  // 5. Command Execution:
  const run = async (cmd: string): Promise => {
    const tokens = cmd.split(" ");
    const commandName = tokens[0];

    if (nestedMode) {
      if (nestedCommands[nestedMode] && commandName in nestedCommands[nestedMode]) {
        const nestedModeObject = nestedCommands[nestedMode];
        if (typeof nestedModeObject === "object" && nestedModeObject !== null && commandName in nestedModeObject) {
          return nestedModeObject[commandName as keyof typeof nestedModeObject]();
        }
      }
      return `Command not found in ${nestedMode}: ${commandName}`;
    }

    if (commandName in availableCommands) {
      const result = availableCommands[commandName as keyof typeof availableCommands](tokens);
      if (result instanceof Promise) {
        return await result;
      }
      return result;
    }

    return commandName ? `Command not found: ${commandName}` : "";
  };

  // 6. Effect Hooks:
  useEffect(() => {
    setOutput(setup());
    terminalRef.current?.focus();
  }, []);

  useEffect(() => {
    if (terminalRef.current) {
      terminalRef.current.scrollTo({
        top: terminalRef.current.scrollHeight,
        behavior: "smooth",
      });
    }
  }, [output]);

  // 7. Event Handling:
  const handleKeyDown = async (e: React.KeyboardEvent) => {
    if (e.ctrlKey && e.shiftKey && e.key === "V") {
      e.preventDefault();
      navigator.clipboard.readText().then(text => setCmd(prev => prev + text)).catch(err => {
        console.error("Clipboard access failed:", err);
        alert("Clipboard access denied. Please check your browser permissions.");
      });
      return;
    }

    if (e.key === "Backspace") {
      e.preventDefault();
      setCmd(prev => prev.slice(0, -1));
    } else if (e.key === "Enter") {
      e.preventDefault();
      const cmdToRun = cmd.trim();
      if (cmdToRun) {
        setHistory(prev => [...prev, cmdToRun]);
        const result = await run(cmdToRun.toLowerCase());
        setOutput(prev => {
          const commandLine = `${username}@${hostname} ${directory} $ ${cmdToRun}`;
          let resultOutput: string | { clear: boolean } | null = "";
          if (result === null) resultOutput = `${username}@${hostname} ${directory} $ `;
          else if (typeof result === "object" && result.clear) return empty();
          else resultOutput = typeof result === "string" && result.includes("\n") ? result : `\n${command(typeof result === "string" ? result : "", "")}`;
          const lastPromptIndex = prev.lastIndexOf(`${username}@${hostname} ${directory} $ `);
          const cleanedPrev = lastPromptIndex !== -1 ? prev.substring(0, lastPromptIndex) : prev;
          return cleanedPrev + commandLine + (typeof resultOutput === "string" ? resultOutput : "");
        });
      } else setOutput(prev => empty(prev));
      setCmd("");
    } else if (e.key.length === 1 && !e.ctrlKey && !e.metaKey) setCmd(prev => prev + e.key);
  };

  // 8. Rendering the Terminal:
  return (


        bash


        {output}

          {cmd}
          |


  );
};

export default BashTerminal;
commands.tsx (Command Types):
interface AvailableCommands {
  pwd: () => string;
  cd: (tokens: string[]) => string | null;
  echo: (tokens: string[]) => string;
  clear: () => { clear: boolean };
  history: () => string;
  help: () => string;
  mycommand: () => string;
}

interface NestedCommands {
  mycommand: {
    list: () => string;
    info: () => string;
    exit: () => string;
  };
}

export type { AvailableCommands, NestedCommands };
This file defines the types for our commands, ensuring type safety and code clarity.
Technical Highlights:
- Client-Side Rendering with
next/dynamic: As mentioned earlier,next/dynamicwithssr: falseis crucial for our terminal component. Browser-specific APIs like DOM manipulation are only available on the client side. - Drag-and-Resize with
react-rnd:react-rndsimplifies the process of creating draggable and resizable elements. Its intuitive API and extensive customization options make it a great choice for our terminal windows. - State Management with
useState: We useuseStateto manage the terminal's state, including command input, output, and history. React's state management ensures that the terminal updates correctly in response to user interactions. - DOM Manipulation with
useRef:useRefallows us to access the terminal's DOM element for scrolling and focus management. This is essential for providing a smooth and responsive user experience. - Event Handling with
onKeyDown: We useonKeyDownto capture keyboard input, enabling users to type commands and interact with the terminal. - TypeScript for Type Safety: By using TypeScript and type definitions, we ensure that our code is type-safe, reducing the risk of runtime errors and improving code maintainability.
- Clipboard integration: added ctrl+shift+v for paste from clipboard.
Why These Packages?
-
react-rnd: I chosereact-rndbecause of its ease of use and flexibility. It provides a simple and efficient way to add drag-and-resize functionality to React components, which is essential for creating a realistic desktop environment. - TypeScript: I opted for TypeScript to improve code quality and maintainability. Its static typing helps catch errors early and makes the codebase easier to understand and refactor.
Looking Ahead: What's Next?
Stay tuned for more updates as I continue to build the "GOAT" portfolio website! What features are you most excited to see next? I'm planning to add more interactive elements, enhance the simulated operating system, and refine the overall user experience.
Some potential features I'm considering include:
- Implementing a file system and file explorer.
- Adding more complex commands and utilities.
- Creating a more visually appealing desktop environment.
- Adding more nested commands.
- Adding more commands to the available commands.
Looking Ahead: What's Next?
Stay tuned for more updates as I continue to build the 'GOAT' portfolio website! What features are you most excited to see next?