


![[The AI Show Episode 143]: ChatGPT Revenue Surge, New AGI Timelines, Amazon’s AI Agent, Claude for Education, Model Context Protocol & LLMs Pass the Turing Test](https://www.marketingaiinstitute.com/hubfs/ep%20143%20cover.png)


_roibu_Alamy.jpg?width=1280&auto=webp&quality=80&disable=upscale#)


.webp?#)


![M4 MacBook Air Drops to Just $849 - Act Fast! [Lowest Price Ever]](https://www.iclarified.com/images/news/97140/97140/97140-640.jpg)
![Apple Smart Glasses Not Close to Being Ready as Meta Targets 2025 [Gurman]](https://www.iclarified.com/images/news/97139/97139/97139-640.jpg)
![iPadOS 19 May Introduce Menu Bar, iOS 19 to Support External Displays [Rumor]](https://www.iclarified.com/images/news/97137/97137/97137-640.jpg)


@layer in CSS
Overview The @layer directive, the optional layer() function, and the layer keyword give you the ability to control cascading layers. Cascading layers is a way of grouping and ordering styles in a single source. They help browsers understand which styles to apply on a site. The source in CSS is where the browser gets its CSS rules from. This can be your styles on the site, user settings in the browser and system, and default browser styles. Learn more about this and other concepts in the Cascade Principle article. Example With cascading layers, you directly manage layers with different sets of CSS rules and decide which styles are specific and in what order to apply them. So they are useful for: resetting browser default styles; overwriting styles from CSS frameworks and libraries; styling components; storing styles in one place, for example, for the states of - interactive elements; colour themes, schemes and support for different colour modes. For example, here are the styles with @layer for the state of the button when in focus and when inactive. In the states layer we set the styles for :disabled and :focus-visible, and in components we set the button's default styles. @layer components, states; @layer components { .button { display: block; min-width: 210px; border: 2px solid transparent; border-radius: 6px; padding: 9px 15px; color: #000000; font-size: 18px; font-weight: 300; font-family: inherit; transition: background-color 0.2s linear; } .button:hover { background-color: #FFFFFF; cursor: pointer; transition: background-color 0.2s linear; } } @layer states { :focus-visible { border: 2px solid #FFFFFF; outline: none; } :disabled { background-color: #DDDDDD; } } Without cascading layers, we need to set styles to the .button class with the right pseudo classes. At the same time, we can't store them in one place in the file so that other developers don't accidentally overwrite them. .button { /* CSS-rules */ } .button:hover { /* CSS-rules */ } .button:focus-visible { /* CSS-rules */ } .button:disabled { /* CSS-rules */ } With cascading layers, it's easier to defeat third-party styles. For example, from Bootstrap. Let's imagine that we want to change the size of the first level header without painful search for the necessary Sass variables. Recent Updates Bootstrap Styles: .fs-1 { font-size: 2.5rem !important; } Our styles using cascading layers: @import url("https://cdn.com/bootstrap.min.css") layer; @layer { .fs-1 { font-size: 3rem; } } With older CSS features, this problem has to be solved in several ways. For example, with the !important modifier. .fs-1 { font-size: 3rem !important; } How to Spell There are several ways to declare cascading layers: @layer directive; layer keyword; layer() function. Layers can be named (named) or unnamed (anonymous). With named layers, you directly control the style order or define it in one place in the CSS file. Anonymous layers prevent other developers from manipulating the rules in them and ensure that all the rules you need are stored in one place in the file. This is especially useful when replacing styles from a CSS framework with your own. After compiling styles with cascading layers, you get regular CSS code. In the developer tool, you will notice that your styles are taken from the project file. The rules also tell you what the layer is and what it's called. For example, "Layer typography" or browser styles "Layer user agent stylesheet". ⚠️ Watch the size of the final styles file when you use @layer. With this directive, it's easy to end up with a file with a lot of CSS rules that overwrite each other. Directive @layer For named layers, specify a name after the @layer directive and list the necessary rules inside. The name of the layer can be anything in Latin. For example, application, framework, base, utilities, typography or theme. The names must be unique and not repeated. Exception - layers nested in other layers. @layer any-layer-name { /* One or more CSS rules */ } Layers can be nested within each other - grouped. A layer with others inside it is called a parent layer, and nested layers are called children. Note that a child layer cannot "go beyond" its parent. It cannot be linked to other child layers or even parent cascading layers. Here, the framework layer is the parent layer, and base and theme are the children: @layer framework { @layer base { /* One or more CSS rules */ } @layer theme { /* One or more CSS rules */ } } Child layers can have the same names as others outside of its parent. In this example, there are two completely different layers named base and framework.base, because the second base layer is inside the framework: @layer base { /* One or more CSS rules */ } @laye
Overview
The @layer directive, the optional layer() function, and the layer keyword give you the ability to control cascading layers.
Cascading layers is a way of grouping and ordering styles in a single source. They help browsers understand which styles to apply on a site.
The source in CSS is where the browser gets its CSS rules from. This can be your styles on the site, user settings in the browser and system, and default browser styles. Learn more about this and other concepts in the Cascade Principle article.
Example
With cascading layers, you directly manage layers with different sets of CSS rules and decide which styles are specific and in what order to apply them. So they are useful for:
- resetting browser default styles;
- overwriting styles from CSS frameworks and libraries;
- styling components;
- storing styles in one place, for example, for the states of - interactive elements;
- colour themes, schemes and support for different colour modes.
For example, here are the styles with @layer for the state of the button when in focus and when inactive. In the states layer we set the styles for :disabled and :focus-visible, and in components we set the button's default styles.
@layer components, states;

@layer components {
  .button {
    display: block;
    min-width: 210px;
    border: 2px solid transparent;
    border-radius: 6px;
    padding: 9px 15px;
    color: #000000;
    font-size: 18px;
    font-weight: 300;
    font-family: inherit;
    transition: background-color 0.2s linear;
  }

  .button:hover {
    background-color: #FFFFFF;
    cursor: pointer;
    transition: background-color 0.2s linear;
  }
}

@layer states {
  :focus-visible {
    border: 2px solid #FFFFFF;
    outline: none;
  }

  :disabled {
    background-color: #DDDDDD;
  }
}
Without cascading layers, we need to set styles to the .button class with the right pseudo classes. At the same time, we can't store them in one place in the file so that other developers don't accidentally overwrite them.
.button {
  /* CSS-rules */
}

.button:hover {
  /* CSS-rules */
}

.button:focus-visible {
  /* CSS-rules */
}

.button:disabled {
  /* CSS-rules */
}
With cascading layers, it's easier to defeat third-party styles. For example, from Bootstrap. Let's imagine that we want to change the size of the first level header without painful search for the necessary Sass variables.
class="fs-1">Recent Updates
Bootstrap Styles:
.fs-1 {
  font-size: 2.5rem !important;
}
Our styles using cascading layers:
@import url("https://cdn.com/bootstrap.min.css") layer;

@layer {
  .fs-1 {
    font-size: 3rem;
  }
}
With older CSS features, this problem has to be solved in several ways. For example, with the !important modifier.
.fs-1 {
  font-size: 3rem !important;
}
How to Spell
There are several ways to declare cascading layers:
-
@layerdirective; -
layerkeyword; -
layer()function.
Layers can be named (named) or unnamed (anonymous).
With named layers, you directly control the style order or define it in one place in the CSS file.
Anonymous layers prevent other developers from manipulating the rules in them and ensure that all the rules you need are stored in one place in the file. This is especially useful when replacing styles from a CSS framework with your own.
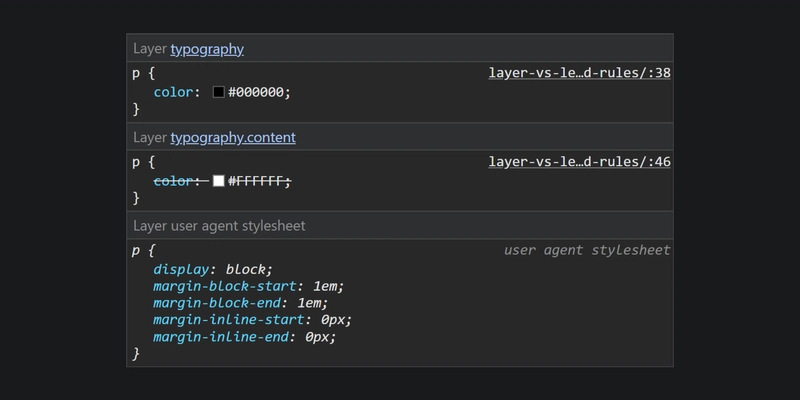
After compiling styles with cascading layers, you get regular CSS code. In the developer tool, you will notice that your styles are taken from the project file. The rules also tell you what the layer is and what it's called. For example, "Layer typography" or browser styles "Layer user agent stylesheet".
⚠️ Watch the size of the final styles file when you use
@layer. With this directive, it's easy to end up with a file with a lot of CSS rules that overwrite each other.
Directive @layer
For named layers, specify a name after the @layer directive and list the necessary rules inside. The name of the layer can be anything in Latin. For example, application, framework, base, utilities, typography or theme. The names must be unique and not repeated. Exception - layers nested in other layers.
@layer any-layer-name {
  /* One or more CSS rules */
}
Layers can be nested within each other - grouped. A layer with others inside it is called a parent layer, and nested layers are called children. Note that a child layer cannot "go beyond" its parent. It cannot be linked to other child layers or even parent cascading layers.
Here, the framework layer is the parent layer, and base and theme are the children:
@layer framework {
  @layer base {
    /* One or more CSS rules */
  }

  @layer theme {
    /* One or more CSS rules */
  }
}
Child layers can have the same names as others outside of its parent. In this example, there are two completely different layers named base and framework.base, because the second base layer is inside the framework:
@layer base {
  /* One or more CSS rules */
}

@layer framework {
  @layer base {
    /* One or more CSS rules */
  }
}
Layers can be listed in one place. Place their names separated by a comma after the @layer directive. Here we collected two layers in one line and got @layer layer-1, layer-2.
@layer layer-1, layer-2;

@layer layer-1 {
  /* One or more CSS rules */
}

@layer layer-2 {
  /* One or more CSS rules */
}
When listing child layers on a single line, specify the name of the parent layer first and the child layer after the dot. For example, we have a parent layer framework and child layers base and theme. When enumerating, the names of the children will be framework.base and framework.theme:
@layer framework.base, framework.theme;

@layer framework {
  @layer base {
    /* One or more CSS rules */
  }

  @layer theme {
    /* One or more CSS rules */
  }
}
Layers can be listed inside @layer as well. In this case, the name of the layer is again made up of the parent and child names. For example, in the framework layer we define the order in which the base styles base and theme dark styles are applied. The CSS rules themselves are stored in separate layers framework.base and framework.theme:
@layer framework {
  @layer base, theme;
}

@layer framework.base {
  /* One or more CSS rules */
}

@layer framework.theme {
  /* One or more CSS rules */
}
You can put other directives in @layer. For example, @media.
@layer framework {
  html {
    color: #000000;
    background: #FFFFFF;
  }

  @media (prefers-color-scheme: dark) {
    html {
      color: #FFFFFF;
      background: #000000;
    }
  }
}
For anonymous layers, only specify the @layer directive with the necessary rules inside.
@layer {
  /* One or more CSS rules */
}
Named layers can be inserted into anonymous layers. Other developers still cannot manipulate styles in them, as their parent remains anonymous. Here there are two children base and typography inside the anonymous layer:
@layer {
  @layer base {
    /* One or more CSS rules */
  }

  @layer typography {
    /* One or more CSS rules */
  }
}
How it Works
The order in which layer styles are applied affects the order in which they are arranged in the file or list. There are also peculiarities in the behaviour of CSS rules within them.
In a layer with CSS rules and another @layer, separate rules win. In this example, the paragraph text will be black (#000000) because the selector with this rule is outside the nested layer:
 class="text--pink">
 Paragraph
@layer typography {
  /* I win: */
  p {
    color: #000000;
  }

  /* I lost: */
  @layer content;
}

@layer typography.content {
  p {
    color: #FFFFFF;
  }
}
To avoid confusion, you can always put such rules outside @layer:
/* I lost: */
@layer typography {
  @layer content;
}

@layer typography.content {
  p {
    color: #FFFFFF;
  }
}

/* I win: */
p {
  color: #000000;
}
When the rules aren't nested inside @layer, they always win. For example, here the text will be black despite the styles for the .text--pink class in @layer:
 class="text--pink">
  Paragraph
/* I lost: */
@layer typography {
  .text--pink {
    color: #F498AD;
  }
}

/* I win: */
p {
  color: #000000;
}
A separate rule applies even if located above @layer, so the text is still black:
/* I win: */
p {
  color: #000000;
}

/* I lost: */
@layer typography {
  .text--pink {
    color: #F498AD;
  }
}
What if the layers have rules with the !important modifier? In this case, the order is defined as follows:
- A layer with
@layerwith the!importantproperty that sits above the others. - CSS rule outside
@layer. - A layer with
@layerwith no property with!important.
The pink text colour with the !important modifier from the typography layer wins here:
 class="text--pink">
  Paragraph
/* I win: */
@layer typography {
  .text--pink {
    color: #F498AD !important;
  }
}

/* I lost: */
p {
  color: #000000 !important;
}

/* I lost too: */
@layer typography {
  p {
    color: #FFFFFF !important;
  }
}
When you list the layers on a single line, the order of the layers is important. The first layer in the list is overwritten by the layer after it, and so on.
In the example, the paragraph text will again be black because layer-2 is after layer-1 and therefore higher in presentation order:
@layer layer-1, layer-2;

/* I lost: */
@layer layer-1 {
  p {
    color: #FFFFFF;
  }
}

/* I win: */
@layer layer-2 {
  p {
    color: #000000;
  }
}
Even if you increase the specificity of a paragraph from layer-1 with id, layer-2 still wins. So the text in the paragraph will remain black:
@layer layer-1, layer-2;

/* I lost: */
@layer layer-1 {
  p#light {
    color: #FFFFFF;
  }
}

/* I win: */
@layer layer-2 {
  p {
    color: #000000;
  }
}
Listing the child layers in a single line works the same way. This example has a parent framework and two children framework.base and framework.theme. The paragraph text will again be black because framework.theme is listed after framework.base:
@layer framework.base, framework.theme;

@layer framework {
  /* I win: */
  @layer theme {
    p {
      color: #000000;
    }
  }

  /* I lost: */
  @layer base {
    p {
      color: #FFFFFF;
    }
  }
}
For anonymous layers, it matters where they are in the file. So you can't add them anywhere like named ones. Below, the anonymous layer is in front of the named base, so the paragraph text is black:
/* I lost: */
@layer {
  p {
    color: #FFFFFF;
  }
}

/* I win: */
@layer base {
  p {
    color: #000000;
  }
}
If you place the anonymous layer after the named base, the text becomes white (#FFFFFFFF):
/* I lost: */
@layer base {
  p {
    color: #000000;
  }
}

/* I win: */
@layer {
  p {
    color: #FFFFFF;
  }
}
Keyword layer
The layer keyword is needed when applying anonymous layer rules when importing styles from another file. This is done with the @import directive.
Specify the word layer after @import and the path to the desired CSS file. To make sure that other styles and developers don't overwrite the rules from the anonymous layer, place it at the very end of the file. This trick helps to gather in one place the most important and basic styles that you don't want to change under any circumstances.
Here we replace the necessary styles from the tailwind.css file with styles from the anonymous layer:
@import url(tailwind.css) layer;

@layer {
  /* One or more rules */
}
You can place an anonymous layer before the @import line as well. In this case, the priority of these styles will be lower than that of the layers behind them.
@layer {
  /* One or more rules */
}

@import url(tailwind.css) layer;
Rules from one anonymous layer can be applied multiple times. Let's use the styles from the anonymous layer in the files base-forms.css, base-links.css and base-buttons.css:
@import url(base-forms.css) layer;
@import url(base-links.css) layer;
@import url(base-buttons.css) layer;

@layer {
  /* One or more rules */
}
layer() function
With layer(), you refer to a specific layer when importing styles from one file to another.
Let's imagine that we need to add our own basic styles for a site where we already use a CSS framework such as Bootstrap. Let's create a base layer with the necessary CSS rules and apply them in bootstrap.css:
@import url(bootstrap.css) layer(base);

@layer base {
  /* One or more rules */
}
layer() gives reuse of styles from the same named layer. Here styles from base are combined with others from headings.css and links.css files:
@import url(buttons.css) layer(base);
@import url(links.css) layer(base);

@layer base {
  /* One or more rules */
}
The function also comes in handy when you need a specific child layer inside an anonymous one. Let's imagine that we are adding our own basic styles for a site where we are using Bootstrap again. Let's create a child layer base inside the anonymous layer and access it directly using layer(base):
@import url(bootstrap.css) layer(base);

@layer {
  @layer base {
    /* One or more rules */
  }
}
All together
Directive, function and keyword can be combined. In this way you can more precisely define the order of layers in one place before declaring styles.
At the beginning of the file, list the layers after @layer. Let's arrange them so that the tailwind layer has a lower priority for overwriting third-party styles, and the application layer has the highest priority for its own styles. On the second line, import styles from tailwind.css and overwrite the necessary ones with the tailwind layer using layer(). After that we will define the CSS rules we need.
@layer default, tailwind, application;
@import url(tailwind.css) layer(tailwind);

@layer default {
  /* One or more rules */
}

@layer application {
  /* One or more rules */
}

@layer tailwind {
  /* One or more rules */
}
@import can be placed between lines with @layer. The result will be the same.
@layer default;
@import url(tailwind.css) layer(tailwind);
@layer application;

@layer default {
  /* One or more rules */
}

@layer application {
  /* One or more rules */
}

@layer tailwind {
  /* One or more rules */
}
If you need to apply multiple layers in the imported file, list them comma-separated on the same line as @import. The specification prohibits importing other files after a single line @layer.
@layer default;
@import url(frameworks.css) layer(bootstrap), layer(tailwind);
@layer application;

@layer default {
  /* One or more rules */
}

@layer application {
  /* One or more rules */
}

@layer bootstrap {
  /* One or more rules */
}

@layer tailwind {
  /* One or more rules */
}
How to Realise
Cascading layers in CSS are similar to layers in image editors like PhotoShop. You can add multiple layers for images to flexibly manage different effects and filters. Since the layers are transparent and don't mix with each other, it's easy to fix a mistake or add a new effect without changing the old one.
@layer, layer, and layer() solve style problems without changing selectors, and help avoid conflicts between different layers due to their position in CSS files. Often these problems arise from multiple style sources. For example, frameworks and libraries that are mostly used in large projects.
Support ❤️
It took a lot of time and effort to create this material. If you found this article useful or interesting, please support my work with a small donation. It will help me to continue sharing my knowledge and ideas.
Make a contribution or Subscription to the author's content: Buy me a Coffee, Patreon, PayPal.