![[The AI Show Episode 142]: ChatGPT’s New Image Generator, Studio Ghibli Craze and Backlash, Gemini 2.5, OpenAI Academy, 4o Updates, Vibe Marketing & xAI Acquires X](https://www.marketingaiinstitute.com/hubfs/ep%20142%20cover.png)


![From drop-out to software architect with Jason Lengstorf [Podcast #167]](https://cdn.hashnode.com/res/hashnode/image/upload/v1743796461357/f3d19cd7-e6f5-4d7c-8bfc-eb974bc8da68.png?#)


.png?#)


_Christophe_Coat_Alamy.jpg?#)
 (1).webp?#)


![iPhone 17 Pro Won't Feature Two-Toned Back [Gurman]](https://www.iclarified.com/images/news/96944/96944/96944-640.jpg)
![Tariffs Threaten Apple's $999 iPhone Price Point in the U.S. [Gurman]](https://www.iclarified.com/images/news/96943/96943/96943-640.jpg)


Installing Python dependencies in AWS Lambda: easy pip guide
Two easy ways to include a pip package for your Python Lambda function. Defining the problem I love AWS Lambda functions. For me, they provide a very handy way to run ad-hoc tasks when I need them, and basically for free. To some extent, I see them as a replacement for cron tasks when I don't have a 24/7 running server somewhere -- which, I think, most of us don't. Lambda is a platform-agnostic, multi-language, (a)synchronous1 code execution runtime. It allows for a vast variety of applications, ranging from simple notification forwarding to full-scale serverless applications. However, what Lambda lacks is built-in dependency management. Method 1: Installing a pip package inside the Lambda function The easiest way to include the necessary pip package is to install it within the Lambda function itself. We have limited possibilities for configuring the function runtime. However, we do have write access to the /tmp location of the underlying environment, and this is exactly what we will use to install the necessary packages. import subprocess import sys import boto3 from botocore.exceptions import ClientError subprocess.call( "pip install requests -t /tmp/ --no-cache-dir".split(), stdout=subprocess.DEVNULL, stderr=subprocess.DEVNULL, ) sys.path.insert(1, "/tmp/") import requests First, we use the subprocess and sys modules to call a subprocess and modify the search path so that the installed package can be accessed. Then, we call the subprocess function to install the pip package into the /tmp folder. Finally, we import the freshly installed package as usual. Considerations and limitations This method is quite easy and straightforward. It allows us to add a few lines of code to a function without the necessity of managing external dependencies (which we will discuss later). However, this solution may not be ideal in situations where you have complex dependencies used across multiple functions. Since Lambda functions are billed based on their execution time, the more dependencies are installed this way, the higher the cost will be and the slower the code will execute. Method 2: Creating Lambda layers This method is a bit more complicated. To properly create a Lambda layer that provides the necessary dependencies, the package must be structured in a specific way. First, we create a virtual environment for the required package (or packages): python3 -m venv lambda_layer source lambda_layer/bin/activate pip install requests As a result, we get the following directory structure in our Lambda layer: lambda_layer/ ├── bin │ ├── activate │ ├── activate.csh │ ├── activate.fish │ ├── Activate.ps1 │ ├── normalizer │ ├── pip │ ├── pip3 │ ├── pip3.13 │ ├── python -> python3 │ ├── python3 -> /usr/bin/python3 │ └── python3.13 -> python3 ├── include │ └── python3.13 ├── lib │ └── python3.13 │ └── site-packages │ ├── certifi │ ├── certifi-2025.1.31.dist-info │ ├── charset_normalizer │ ├── charset_normalizer-3.4.1.dist-info │ ├── idna │ ├── idna-3.10.dist-info │ ├── pip │ ├── pip-24.2.dist-info │ ├── requests │ ├── requests-2.32.3.dist-info │ ├── urllib3 │ └── urllib3-2.3.0.dist-info ├── lib64 -> lib └── pyvenv.cfg However, we don’t need all of these contents. What we actually need is only the lib directory. So, we take it and archive it: mkdir python cp -r lambda_layer/lib/ python/ zip -r python-requests.zip python/ The last step is to upload this layer to AWS: aws lambda publish-layer-version --layer-name python-requests-layer \ --zip-file fileb://python-requests.zip \ --compatible-runtimes python3.13 \ --compatible-architectures "arm64" Now, this layer will be available for us to use in our functions: Considerations and limitations This method allows for more complex and extensive dependencies inside your Lambda functions. It provides immutable package versions in your runtime. However, it requires managing external dependencies and their versions manually2. In situations involving multiple interconnected package dependencies, the safest approach is to create a single Lambda layer containing all the required packages from your local machine. Just make sure that the code and its dependencies work as intended. Lambda functions can be executed both synchronously and asynchronously. ↩ Which also can be automated pretty easily: uploading a new layer requires just seven lines of a shell script and a requirements.txt file. ↩
Two easy ways to include a pip package for your Python Lambda function.
Defining the problem
I love AWS Lambda functions. For me, they provide a very handy way to run
ad-hoc tasks when I need them, and basically for free. To some extent, I see
them as a replacement for cron tasks when I don't have a 24/7 running server
somewhere -- which, I think, most of us don't.
Lambda is a platform-agnostic, multi-language, (a)synchronous1 code
execution runtime. It allows for a vast variety of applications, ranging from
simple notification forwarding to full-scale serverless applications.
However, what Lambda lacks is built-in dependency management.
Method 1: Installing a pip package inside the Lambda function
The easiest way to include the necessary pip package is to install it within
the Lambda function itself.
We have limited possibilities for configuring the function runtime. However, we
do have write access to the /tmp location of the underlying environment, and
this is exactly what we will use to install the necessary packages.
import subprocess
import sys

import boto3
from botocore.exceptions import ClientError

subprocess.call(
    "pip install requests -t /tmp/ --no-cache-dir".split(),
    stdout=subprocess.DEVNULL,
    stderr=subprocess.DEVNULL,
)
sys.path.insert(1, "/tmp/")
import requests
First, we use the subprocess and sys modules to call a subprocess and
modify the search path so that the installed package can be accessed.
Then, we call the subprocess function to install the pip package into the
/tmp folder.
Finally, we import the freshly installed package as usual.
Considerations and limitations
This method is quite easy and straightforward. It allows us to add a few lines
of code to a function without the necessity of managing external dependencies
(which we will discuss later).
However, this solution may not be ideal in situations where you have complex
dependencies used across multiple functions. Since Lambda functions are billed
based on their execution time, the more dependencies are installed this way,
the higher the cost will be and the slower the code will execute.
Method 2: Creating Lambda layers
This method is a bit more complicated.
To properly create a Lambda layer that provides the necessary dependencies, the
package must be structured in a specific way.
First, we create a virtual environment for the required package (or packages):
python3 -m venv lambda_layer
source lambda_layer/bin/activate
pip install requests
As a result, we get the following directory structure in our Lambda layer:
lambda_layer/
├── bin
│   ├── activate
│   ├── activate.csh
│   ├── activate.fish
│   ├── Activate.ps1
│   ├── normalizer
│   ├── pip
│   ├── pip3
│   ├── pip3.13
│   ├── python -> python3
│   ├── python3 -> /usr/bin/python3
│   └── python3.13 -> python3
├── include
│   └── python3.13
├── lib
│   └── python3.13
│       └── site-packages
│           ├── certifi
│           ├── certifi-2025.1.31.dist-info
│           ├── charset_normalizer
│           ├── charset_normalizer-3.4.1.dist-info
│           ├── idna
│           ├── idna-3.10.dist-info
│           ├── pip
│           ├── pip-24.2.dist-info
│           ├── requests
│           ├── requests-2.32.3.dist-info
│           ├── urllib3
│           └── urllib3-2.3.0.dist-info
├── lib64 -> lib
└── pyvenv.cfg
However, we don’t need all of these contents. What we actually need is only the
lib directory. So, we take it and archive it:
mkdir python
cp -r lambda_layer/lib/ python/
zip -r python-requests.zip python/
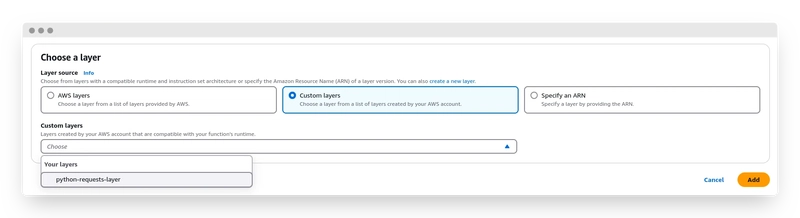
The last step is to upload this layer to AWS:
aws lambda publish-layer-version --layer-name python-requests-layer \
    --zip-file fileb://python-requests.zip \
    --compatible-runtimes python3.13 \
    --compatible-architectures "arm64"
Now, this layer will be available for us to use in our functions:
Considerations and limitations
This method allows for more complex and extensive dependencies inside your
Lambda functions. It provides immutable package versions in your runtime.
However, it requires managing external dependencies and their versions
manually2.
In situations involving multiple interconnected package dependencies, the
safest approach is to create a single Lambda layer containing all the required
packages from your local machine. Just make sure that the code and its
dependencies work as intended.
-
Lambda functions can be executed both synchronously and asynchronously. ↩
-
Which also can be automated pretty easily: uploading a new layer requires just seven lines of a shell script and a
requirements.txtfile. ↩