![[The AI Show Episode 142]: ChatGPT’s New Image Generator, Studio Ghibli Craze and Backlash, Gemini 2.5, OpenAI Academy, 4o Updates, Vibe Marketing & xAI Acquires X](https://www.marketingaiinstitute.com/hubfs/ep%20142%20cover.png)


![From drop-out to software architect with Jason Lengstorf [Podcast #167]](https://cdn.hashnode.com/res/hashnode/image/upload/v1743796461357/f3d19cd7-e6f5-4d7c-8bfc-eb974bc8da68.png?#)


.png?#)


.webp?#)


_Christophe_Coat_Alamy.jpg?#)
 (1).webp?#)


![Apple Considers Delaying Smart Home Hub Until 2026 [Gurman]](https://www.iclarified.com/images/news/96946/96946/96946-640.jpg)
![iPhone 17 Pro Won't Feature Two-Toned Back [Gurman]](https://www.iclarified.com/images/news/96944/96944/96944-640.jpg)
![Tariffs Threaten Apple's $999 iPhone Price Point in the U.S. [Gurman]](https://www.iclarified.com/images/news/96943/96943/96943-640.jpg)


Identifying Spam Emails through ML Classification with AWS ☁️
This setup allows you to build, train, deploy, and serve the spam classifier entirely on AWS in a scalable and cost-effective way. You can achieve this spam classification task using AWS services in a fully serverless and scalable manner. You can build and deploy a spam classifier using AWS services. We'll break it down into clear sections, covering data storage, pre-processing, model training, deployment, and inference. We will classify emails as Spam or Ham using AWS services. The process involves: Uploading Data to Amazon S3 (Storage) Pre-processing and Feature Engineering (AWS Lambda or SageMaker Processing) Training the Naive Bayes Model (Amazon SageMaker) Deploying the Model for Real-time Inference (SageMaker Endpoint or AWS Lambda) Creating an API for Predictions (API Gateway + Lambda) Logging and Monitoring (CloudWatch) 1. Upload Dataset to Amazon S3 AWS S3 will be used to store the dataset (spam_ham_dataset.csv) and trained model files. Create an S3 Bucket Go to the AWS S3 console. Click Create Bucket: Set a unique bucket name (e.g., spam-classifier-bucket). Enable Public Access Block (for security). Click Create Bucket. Upload Dataset Inside your bucket, click Upload. Select the spam_ham_dataset.csv file. Click Upload. 2. Pre-process Data using AWS Lambda We’ll use AWS Lambda to pre-process the text data. Create a Lambda Function Go to AWS Lambda Console: Click Create Function. Select Author from Scratch. Enter Function Name (e.g., SpamPreprocessing). Choose Python 3.9 as the runtime. Click Create Function. Add Permissions for S3 Click on the role name to open its details of a Lambda Function: Configuration Tab. In the Permissions tab, you will see the policies attached to the role. Click on Add permissions and then Create inline policy. To attach the specified permission to an AWS Lambda function, you need to modify the IAM role associated with the Lambda function. The IAM role defines what permissions the Lambda function has. Under Configuration: Permissions, attach the policy: { "Version": "2012-10-17", "Statement": [ { "Sid": "Statement1", "Effect": "Allow", "Action": ["s3:GetObject", "s3:PutObject"], "Resource": "arn:aws:s3:::spam-classifier-bucket/*" } ] } Review the permissions, specify details, and tags. and hit Create Policy. By following these steps, you have attached the necessary S3 permissions to your Lambda function, allowing it to perform s3:GetObject and s3:PutObject actions on the specified S3 bucket. 3. Upload NLTK (Natural Language Toolkit) Dependencies Since NLTK requires extra libraries, create a Lambda Layer: Install dependencies locally in your machine: mkdir python pip install nltk scikit-learn pandas joblib -t python/ zip -r layer.zip python Go to AWS Lambda > Layers > Create Layer. Upload layer.zip Select Available 2 Python Layers (AWSLambdaPowertoolsPythonV3-python39-x86_64 and AWSSDKPandas-Python39) Attach the layers to your Lambda function. If your .zip file exceeds the size limit and you encounter an error during upload, you can resolve this by first uploading the .zip file to an AWS S3 bucket. Once the file is successfully uploaded to S3, navigate to the AWS Lambda console and select the zip file in AWS Lambda Upload From Option. 4. Write Pre-processing Code This script is designed to preprocess text data for a spam classification task using AWS Lambda and S3. It downloads a dataset from an S3 bucket, preprocesses the text by removing non-alphabetic characters, converting to lowercase, tokenizing, removing stopwords, and lemmatizing. The processed data is then saved back to S3. The script utilizes the NLTK library for text processing and Boto3 for interacting with AWS S3. The pre-processing steps are encapsulated in a lambda_handler function, making it suitable for deployment as an AWS Lambda function. import boto3 import pandas as pd import re # S3 setup s3 = boto3.client('s3') bucket_name = "spam-classifier-bucket" dataset_key = "spam_ham_dataset.csv" processed_key = "processed_data.csv" # Define stopwords manually (common words in English) STOP_WORDS = { "i", "me", "my", "myself", "we", "our", "ours", "ourselves", "you", "your", "yours", "yourself", "yourselves", "he", "him", "his", "himself", "she", "her", "hers", "herself", "it", "its", "itself", "they", "them", "their", "theirs", "themselves", "what", "which", "who", "whom", "this", "that", "these", "those", "am", "is", "are", "was", "were", "be", "been", "being", "have", "has", "had", "having", "do", "does", "did", "doing", "a", "an", "the", "and", "but", "if", "or", "because", "as", "until", "while", "of", "at", "by", "for", "with", "about", "against", "between", "into", "through", "during", "before", "after", "above", "below", "to", "from", "up", "down", "in", "out", "on", "off", "over", "under", "
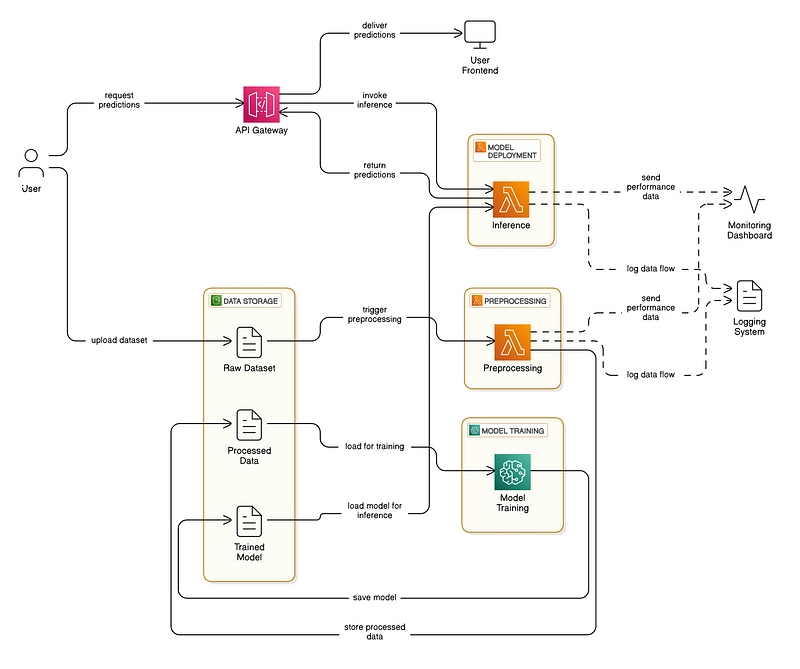
This setup allows you to build, train, deploy, and serve the spam classifier entirely on AWS in a scalable and cost-effective way. You can achieve this spam classification task using AWS services in a fully serverless and scalable manner. You can build and deploy a spam classifier using AWS services. We'll break it down into clear sections, covering data storage, pre-processing, model training, deployment, and inference.
We will classify emails as Spam or Ham using AWS services. The process involves:
- Uploading Data to Amazon S3 (Storage)
- Pre-processing and Feature Engineering (AWS Lambda or SageMaker Processing)
- Training the Naive Bayes Model (Amazon SageMaker)
- Deploying the Model for Real-time Inference (SageMaker Endpoint or AWS Lambda)
- Creating an API for Predictions (API Gateway + Lambda)
- Logging and Monitoring (CloudWatch)
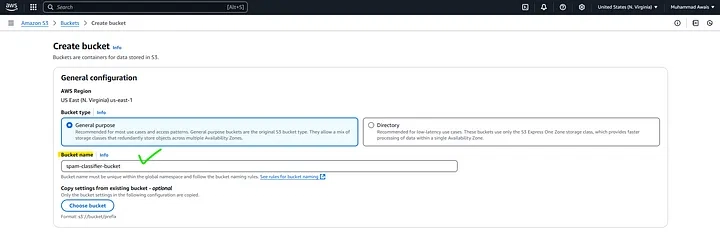
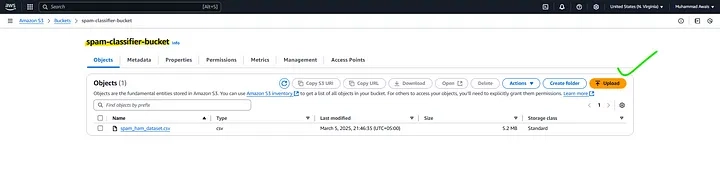
1. Upload Dataset to Amazon S3
AWS S3 will be used to store the dataset (spam_ham_dataset.csv) and trained model files.

Create an S3 Bucket
- Go to the AWS S3 console.
- Click Create Bucket: Set a unique bucket name (e.g., spam-classifier-bucket).
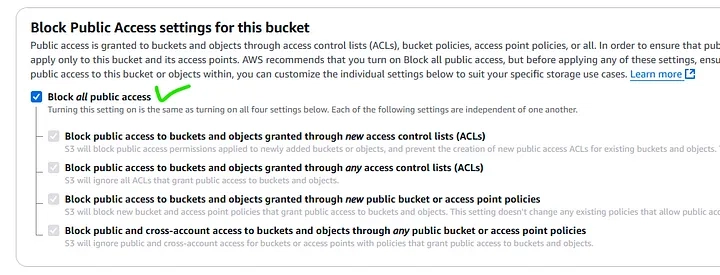
- Enable Public Access Block (for security).
- Click Create Bucket.
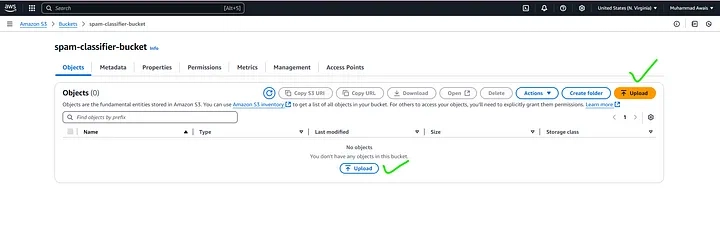
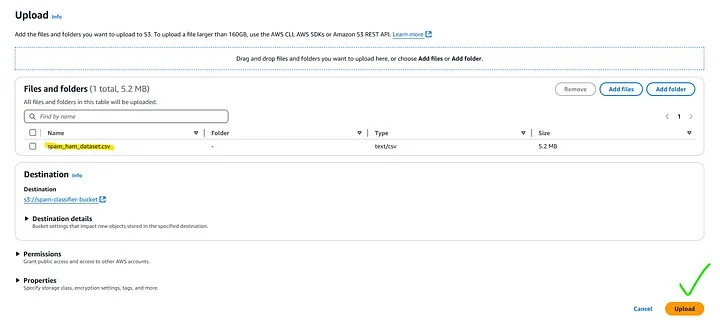
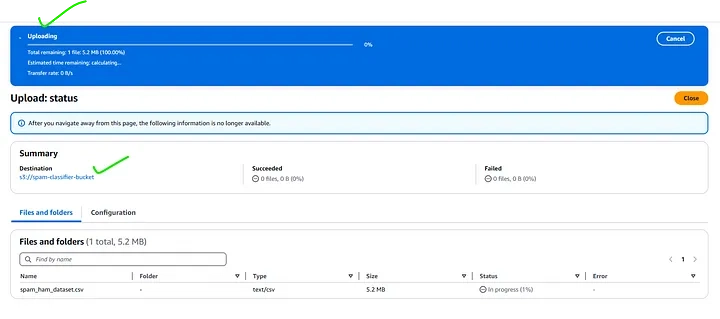
Upload Dataset
- Inside your bucket, click Upload.
- Select the spam_ham_dataset.csv file.
- Click Upload.
2. Pre-process Data using AWS Lambda
We’ll use AWS Lambda to pre-process the text data.
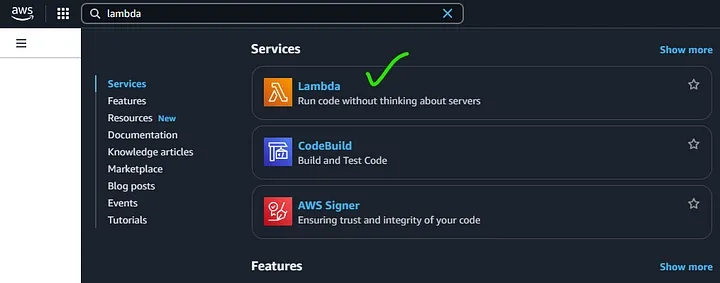
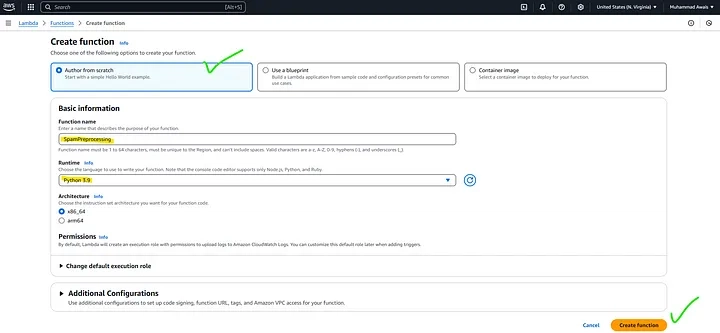
Create a Lambda Function
- Go to AWS Lambda Console: Click Create Function.
- Select Author from Scratch.
- Enter Function Name (e.g., SpamPreprocessing).
- Choose Python 3.9 as the runtime.
- Click Create Function.
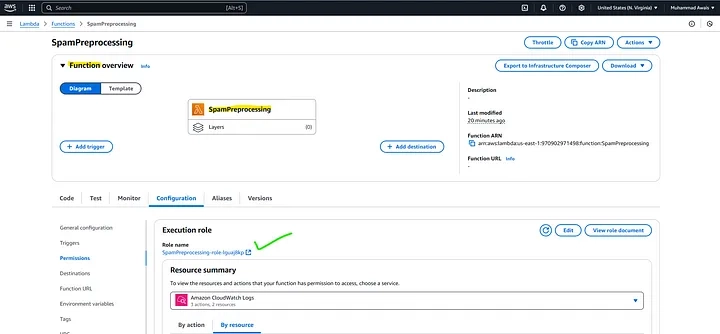
Add Permissions for S3
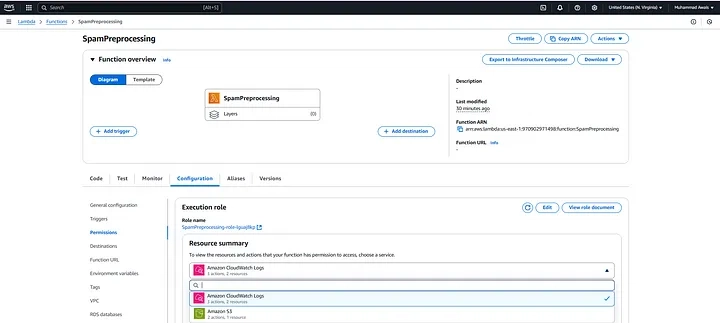
- Click on the role name to open its details of a Lambda Function: Configuration Tab.
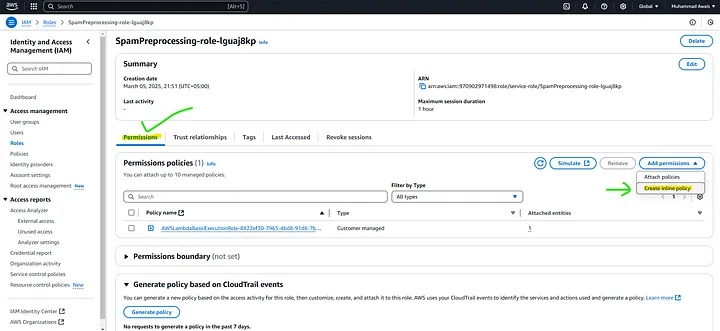
- In the Permissions tab, you will see the policies attached to the role.
- Click on Add permissions and then Create inline policy. To attach the specified permission to an AWS Lambda function, you need to modify the IAM role associated with the Lambda function. The IAM role defines what permissions the Lambda function has.
Under Configuration: Permissions, attach the policy:
{
 "Version": "2012-10-17",
 "Statement": [
  {
   "Sid": "Statement1",
   "Effect": "Allow",
            "Action": ["s3:GetObject", "s3:PutObject"],
            "Resource": "arn:aws:s3:::spam-classifier-bucket/*"
  }
 ]
}
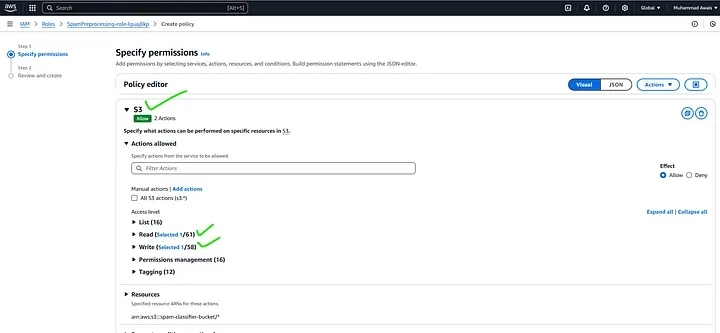
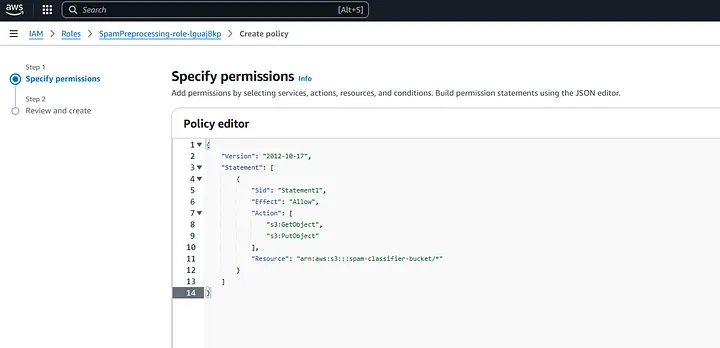
Review the permissions, specify details, and tags. and hit Create Policy.
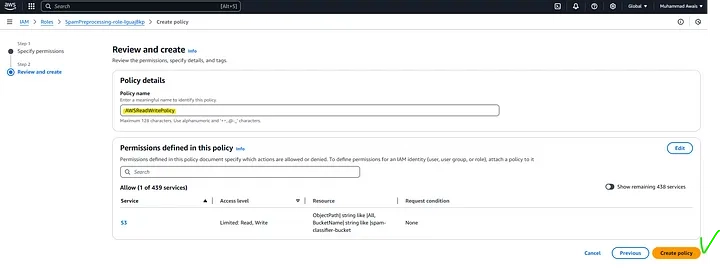
By following these steps, you have attached the necessary S3 permissions to your Lambda function, allowing it to perform s3:GetObject and s3:PutObject actions on the specified S3 bucket.
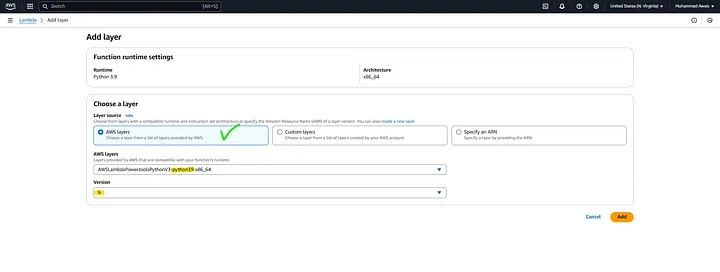
3. Upload NLTK (Natural Language Toolkit) Dependencies
Since NLTK requires extra libraries, create a Lambda Layer:
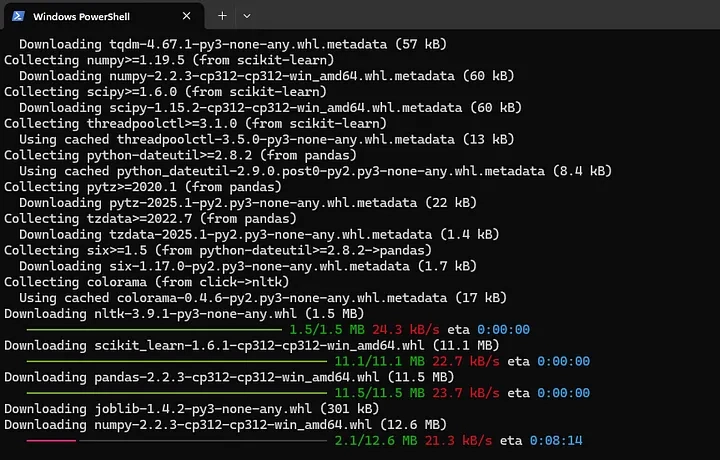
Install dependencies locally in your machine:
mkdir python
pip install nltk scikit-learn pandas joblib -t python/
zip -r layer.zip python
- Go to AWS Lambda > Layers > Create Layer.
- Upload layer.zip
- Select Available 2 Python Layers (AWSLambdaPowertoolsPythonV3-python39-x86_64 and AWSSDKPandas-Python39)
- Attach the layers to your Lambda function.
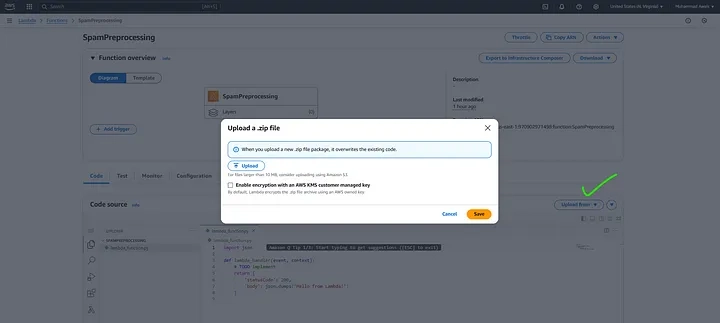
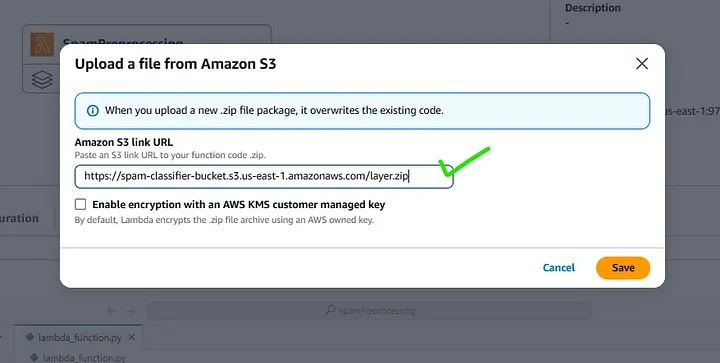
If your .zip file exceeds the size limit and you encounter an error during upload, you can resolve this by first uploading the .zip file to an AWS S3 bucket.
Once the file is successfully uploaded to S3, navigate to the AWS Lambda console and select the zip file in AWS Lambda Upload From Option.
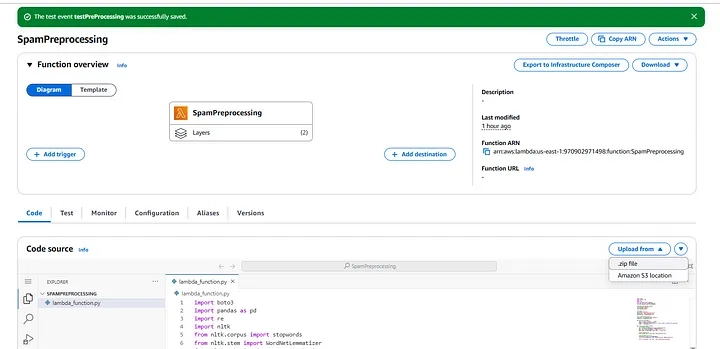

4. Write Pre-processing Code
This script is designed to preprocess text data for a spam classification task using AWS Lambda and S3. It downloads a dataset from an S3 bucket, preprocesses the text by removing non-alphabetic characters, converting to lowercase, tokenizing, removing stopwords, and lemmatizing. The processed data is then saved back to S3. The script utilizes the NLTK library for text processing and Boto3 for interacting with AWS S3. The pre-processing steps are encapsulated in a lambda_handler function, making it suitable for deployment as an AWS Lambda function.
import boto3
import pandas as pd
import re
# S3 setup
s3 = boto3.client('s3')
bucket_name = "spam-classifier-bucket"
dataset_key = "spam_ham_dataset.csv"
processed_key = "processed_data.csv"
# Define stopwords manually (common words in English)
STOP_WORDS = {
"i", "me", "my", "myself", "we", "our", "ours", "ourselves", "you", "your", "yours",
"yourself", "yourselves", "he", "him", "his", "himself", "she", "her", "hers",
"herself", "it", "its", "itself", "they", "them", "their", "theirs", "themselves",
"what", "which", "who", "whom", "this", "that", "these", "those", "am", "is", "are",
"was", "were", "be", "been", "being", "have", "has", "had", "having", "do", "does",
"did", "doing", "a", "an", "the", "and", "but", "if", "or", "because", "as", "until",
"while", "of", "at", "by", "for", "with", "about", "against", "between", "into",
"through", "during", "before", "after", "above", "below", "to", "from", "up", "down",
"in", "out", "on", "off", "over", "under", "again", "further", "then", "once", "here",
"there", "when", "where", "why", "how", "all", "any", "both", "each", "few", "more",
"most", "other", "some", "such", "no", "nor", "not", "only", "own", "same", "so",
"than", "too", "very", "s", "t", "can", "will", "just", "don", "should", "now"
}
# Simple Lemmatization (Removing 'ing', 'ed', 's' endings)
def simple_lemmatize(word):
if word.endswith("ing"):
return word[:-3] # running -> run
elif word.endswith("ed"):
return word[:-2] # played -> play
elif word.endswith("s") and len(word) > 1:
return word[:-1] # cars -> car
return word
# Text preprocessing function
def preprocess_text(text):
text = re.sub(r'[^a-zA-Z\s]', ' ', text) # Remove non-alphabetic characters
words = text.lower().split() # Tokenize by splitting on spaces
filtered_words = [simple_lemmatize(word) for word in words if word not in STOP_WORDS]
return ' '.join(filtered_words)
def lambda_handler(event, context):
# Load dataset from S3
obj = s3.get_object(Bucket=bucket_name, Key=dataset_key)
data = pd.read_csv(obj['Body'], encoding='latin-1')
# Rename columns
data = data.rename(columns={"v1": "label", "v2": "text"})
data['label'] = data['label'].map({'ham': 0, 'spam': 1})
# Apply text preprocessing
data['cleaned_text'] = data['text'].apply(preprocess_text)
# Convert processed data to CSV format
processed_csv = data.to_csv(index=False)
# Upload back to S3
s3.put_object(Bucket=bucket_name, Key=processed_key, Body=processed_csv)
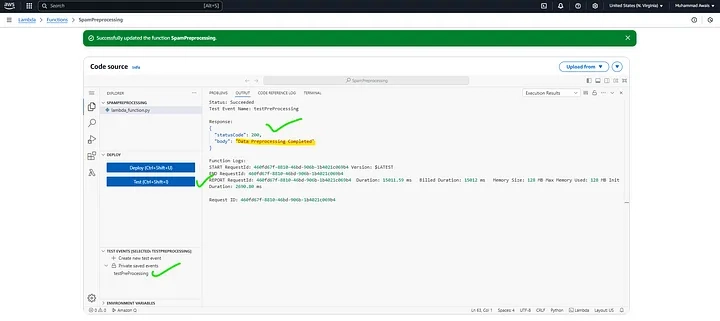
return {"statusCode": 200, "body": "Data Preprocessing Completed"}
To increase the timeout for your AWS Lambda function to 30 seconds, follow these steps to ensure that it runs smoothly without timing out. First, navigate to the AWS Lambda Console and locate the function you want to modify. Once selected, go to the “Configuration” tab and then click on “General configuration”.
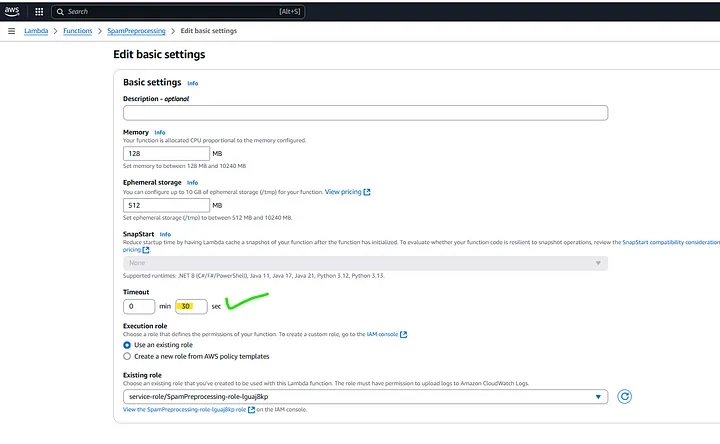
Deploy and Test the Lambda function.
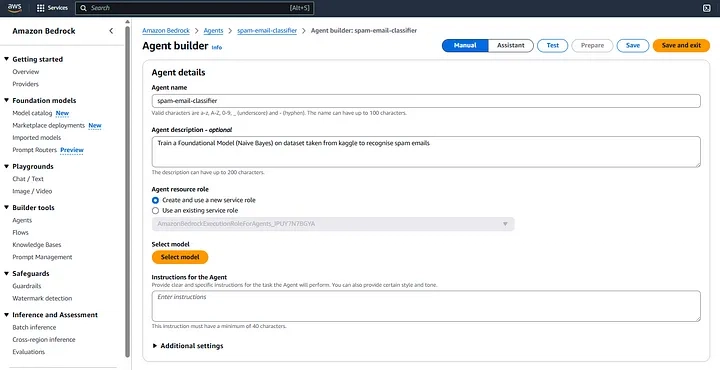
To train a Naive Bayes Classifier using Amazon SageMaker, start by navigating to the AWS Management Console and opening Amazon SageMaker. First, create a Unified SageMaker Studio Domain if you haven’t already. Then, go to “Notebook Instances” in the left panel and click on “Create Notebook Instance.” Provide a unique name for your instance, choose an instance type (e.g., ml.t2.medium for basic workloads), and create or select an IAM role with the necessary S3 access permissions. Configure additional settings like storage and security as needed, then click “Create Notebook Instance.” Once the notebook instance is available, open JupyterLab and install any required dependencies. You can then load your dataset, preprocess the data, and train a Naive Bayes Classifier using scikit-learn or another machine learning library. Finally, evaluate the model and deploy it using Amazon SageMaker’s built-in deployment services.
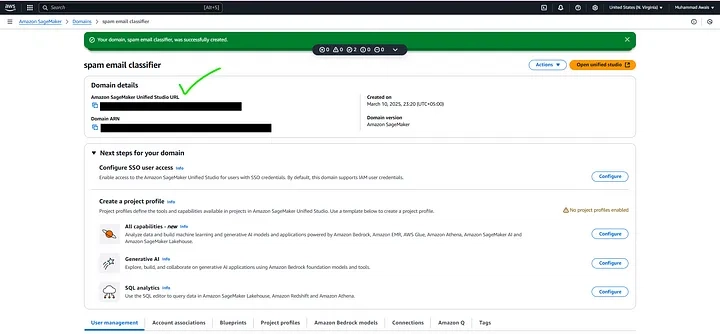
To open Amazon SageMaker Studio, simply navigate to the provided SageMaker Studio URL in your browser. It will seamlessly redirect you to the AWS Sign-In page, where you need to log in using your AWS account credentials. Once authenticated, the SageMaker Studio environment will open, giving you access to a fully managed integrated development environment (IDE) for machine learning. From there, you can start creating notebooks, training models, and deploying AI solutions effortlessly.
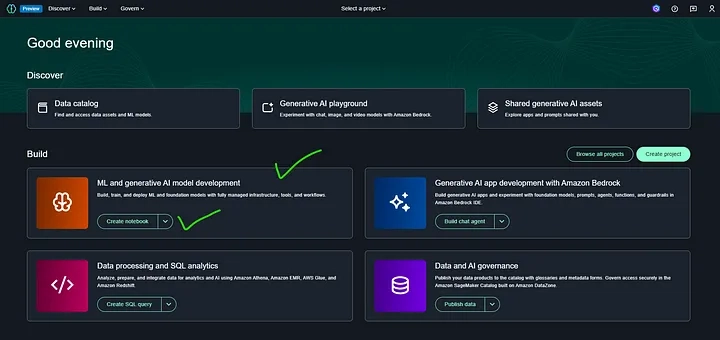
Domain management in Amazon SageMaker refers to the process of setting up and controlling access to SageMaker Studio environments. It allows administrators to configure user permissions, manage resources, and customize settings for machine learning workflows. Through SageMaker domain management, users can create, update, and monitor studio domains, ensuring seamless collaboration and efficient ML development within an organization.
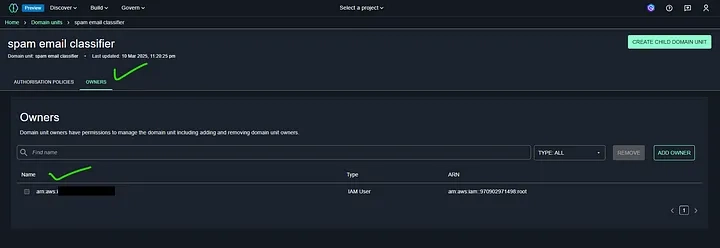
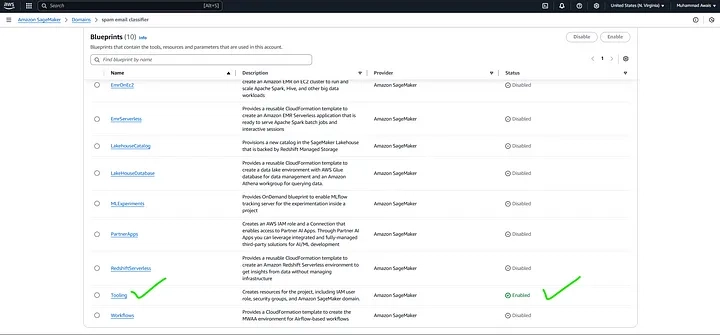
In Amazon SageMaker Unified Studio, a project profile acts as a template for creating projects within your SageMaker environment. It includes a set of blueprints, which are predefined settings used to set up projects. The project profile determines whether a blueprint is automatically applied when a project is created or if users can enable it later when needed.
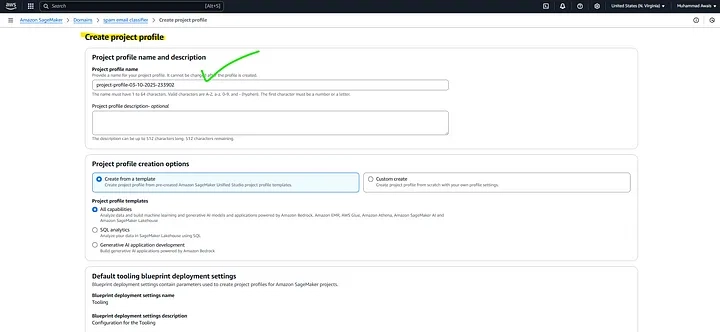
After successfully creating a new SageMaker Studio domain under Domain Management in Amazon SageMaker Unified Studio, along with a project profile added from the root IAM AWS account, the next step is to create a new project.
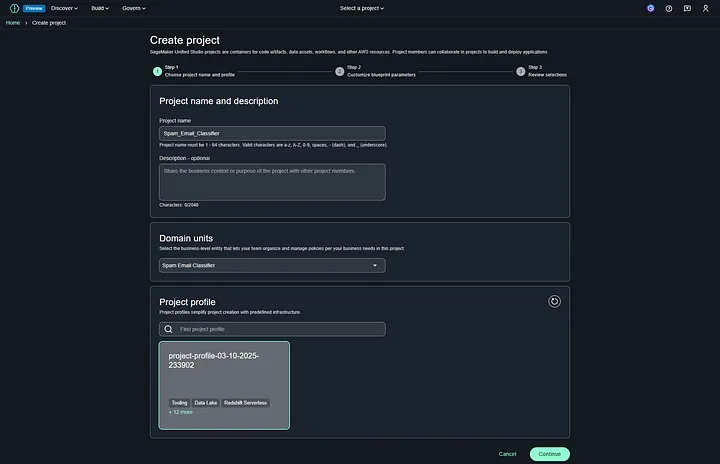
The project creation failed in the Amazon SageMaker Domain section because the necessary permissions for accessing tooling in blueprints are not available when using the IAM root AWS account. SageMaker relies on blueprints to configure projects, and these require specific IAM permissions, which are not granted to the root account by default.

To enable project creation in Amazon SageMaker, you need to grant permissions for tooling in the Blueprints tab within the SageMaker Domain. This issue occurs when the required IAM permissions are not assigned, preventing access to blueprints. To resolve this, navigate to the SageMaker Domain Management section in the AWS Console, select the Blueprints tab, and modify the permissions.
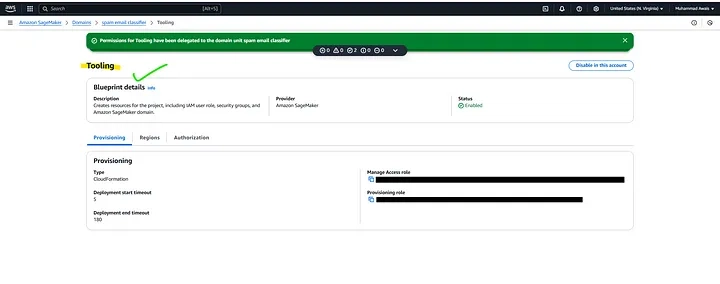
Your project My_Project_m83fdstv is currently being created along with its associated resources in Amazon SageMaker. This process involves setting up the necessary infrastructure, including compute instances, storage, and permissions, based on the selected blueprint and configurations. Once completed, you’ll be able to start using your project for model training, deployment, and data analysis within SageMaker Unified Studio. You can monitor the progress in the Projects section of the SageMaker console.
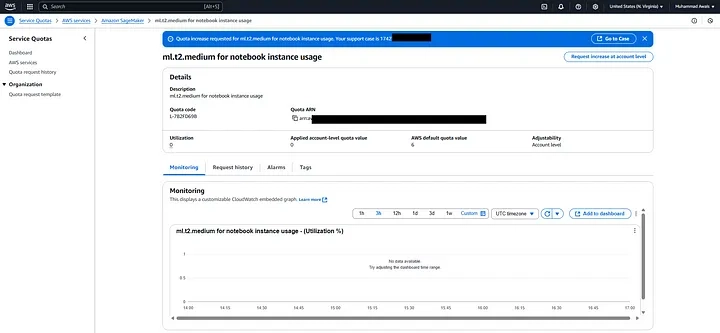
“Notebook instances” are a legacy feature. You might consider creating a SageMaker domain and using JupyterLab or Code Editor instances instead.
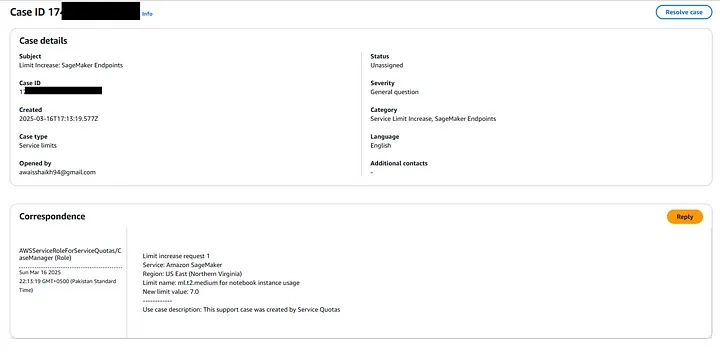
Additionally, my current quota is set to 0, so i’ll need to request an increase. New accounts typically have lower quotas than the default limits.
To open Amazon SageMaker Studio, simply navigate to the provided SageMaker Studio URL in your browser. It will seamlessly redirect you to the AWS Sign-In page, where you need to log in using your AWS account credentials. Once authenticated, the SageMaker Studio environment will open, giving you access to a fully managed integrated development environment (IDE) for machine learning. From there, you can start creating notebooks, training models, and deploying AI solutions effortlessly.
5. Train the Model using SageMaker
We’ll use Amazon SageMaker to train a Naive Bayes Classifier.
Create a SageMaker Notebook
- Go to Amazon SageMaker → Notebook Instances.
- Click Create Notebook Instance.
- Choose ml.t2.medium.
- In IAM Role, select Create new role and allow S3 access.
Install Dependencies
In the Jupyter Notebook, install required libraries:
!pip install pandas scikit-learn joblib
Train and Save the Model
Let’s train the model using AWS SageMaker — load your dataset, preprocess the data, and train a Naive Bayes Classifier using scikit-learn or another machine learning library.
import boto3
import joblib
import pandas as pd
from sklearn.feature_extraction.text import TfidfVectorizer
from sklearn.model_selection import train_test_split
from sklearn.naive_bayes import MultinomialNB
from sklearn.metrics import accuracy_score

# Load preprocessed data from S3
s3 = boto3.client('s3')
bucket_name = "spam-classifier-bucket"
processed_key = "processed_data.csv"

obj = s3.get_object(Bucket=bucket_name, Key=processed_key)
data = pd.read_csv(obj['Body'])

# Feature extraction
vectorizer = TfidfVectorizer(max_features=3000)
X = vectorizer.fit_transform(data['cleaned_text']).toarray()
y = data['label']

# Train/Test split
X_train, X_test, y_train, y_test = train_test_split(X, y, test_size=0.2, random_state=42)

# Train model
model = MultinomialNB()
model.fit(X_train, y_train)

# Evaluate
y_pred = model.predict(X_test)
print(f"Accuracy: {accuracy_score(y_test, y_pred)}")

# Save model and vectorizer
joblib.dump(model, "spam_classifier.pkl")
joblib.dump(vectorizer, "tfidf_vectorizer.pkl")

# Upload to S3
s3.upload_file("spam_classifier.pkl", bucket_name, "models/spam_classifier.pkl")
s3.upload_file("tfidf_vectorizer.pkl", bucket_name, "models/tfidf_vectorizer.pkl")
6. Deploy Model using AWS Lambda
Finally, evaluate the model and deploy it using Amazon Lambda built-in deployment services.
- Create a new Lambda function (SpamPrediction).
- Add the S3 permissions.
- Use this Inference Code:
import boto3
import joblib
import json
import re
from nltk.tokenize import word_tokenize
from nltk.corpus import stopwords

s3 = boto3.client('s3')
bucket_name = "spam-classifier-bucket"

def load_model():
    obj = s3.get_object(Bucket=bucket_name, Key="models/spam_classifier.pkl")
    return joblib.load(obj['Body'])

def load_vectorizer():
    obj = s3.get_object(Bucket=bucket_name, Key="models/tfidf_vectorizer.pkl")
    return joblib.load(obj['Body'])

model = load_model()
vectorizer = load_vectorizer()

def preprocess_text(text):
    text = re.sub(r'[^a-zA-Z]', ' ', text)
    tokens = word_tokenize(text.lower())
    return ' '.join(tokens)

def lambda_handler(event, context):
    text = json.loads(event['body'])['text']
    processed_text = preprocess_text(text)
    vectorized_text = vectorizer.transform([processed_text])
    prediction = model.predict(vectorized_text)
    return {"statusCode": 200, "body": json.dumps({"prediction": "Spam" if prediction[0] == 1 else "Ham"})}
7. Expose API using API Gateway (Detailed Guide)
Now that we have our AWS Lambda function (SpamPrediction) ready for making predictions, we need to expose it as an API so that users can send text messages and get a Spam/Ham classification. We’ll use AWS API Gateway to create a REST API that integrates with our Lambda function.
7.1: Open the API Gateway Console
- Sign in to your AWS Console.
- Search for API Gateway in the AWS services search bar.
- Click on API Gateway to open the service.
- Under Create API, select REST API (private or public API access).
- Click Build.
7.2: Create a New API
- Choose the Protocol → Select REST API.
- Under Create new API, select New API.
- Enter the following details:
- API Name → SpamClassifierAPI
- Description → API for Spam/Ham Classification
- Endpoint Type → Regional (for public access).
- Click Create API.
7.3: Create a New Resource
A Resource is like an endpoint (/classify) that we’ll use for making requests.
- Under your API (SpamClassifierAPI), go to the Resources section.
- Click Create Resource.
- Enter:
- Resource Name: classify
- Resource Path: /classify (this will be part of the API URL).
- Check Enable API Gateway CORS (important for cross-domain requests).
- Click Create Resource.
7.4: Create a New Method (POST)
We need to allow users to send text for classification. We’ll use POST because it allows users to send data in the request body.
- Click on the newly created /classify resource.
- Click Create Method.
- From the dropdown, select POST.
- Click on the checkmark (✔) to confirm.
- Under Integration Type, select Lambda Function.
- Check Use Lambda Proxy Integration.
- Enter the Lambda function name → SpamPrediction (the function we created earlier).
- Click Save.
- When prompted, click OK to allow API Gateway to invoke your Lambda function.
7.5: Enable CORS (Cross-Origin Resource Sharing)
CORS is required if you want to call this API from a web frontend.
- Select the /classify resource.
- Click Actions → Enable CORS.
- Select:
- Access-Control-Allow-Origin → * (Allows all origins)
- Access-Control-Allow-Methods → POST, OPTIONS
- Click Enable CORS and Replace Existing CORS Headers.
7.6: Deploy the API
Before we can use the API, we need to deploy it.
- Click Actions → Deploy API.
- Under Deployment Stage, click New Stage.
- Enter:
- Stage Name: prod
- Stage Description: Production version
- Click Deploy.
7.7: Get the API Endpoint
Once deployed, you’ll get an Invoke URL. This is the public URL for your API.
- In the API Gateway console, go to Stages → prod.
- Copy the Invoke URL (e.g., https://sample-aws-email-classify.execute-api.us-east-1.amazonaws.com/prod).
- Your API endpoint is:
https://sample-aws-email-classify.execute-api.us-east-1.amazonaws.com/prod/classify
7.8: Test the API with Postman or cURL
Using Postman
- Open Postman.
- Select POST method.
- Enter the API URL:
https://sample-aws-email-classify.execute-api.us-east-1.amazonaws.com/prod/classify
// BODY Payload (JSON)
{
  "text": "Congratulations! You have won a free lottery ticket. Claim now!"
}
You should receive a response like:
  "prediction": "Spam"
}
Using cURL (Command Line)
Run this command in Terminal or Command Prompt:
url -X POST "https://sample-aws-email-classify.execute-api.us-east-1.amazonaws.com/prod/classify" \
     -H "Content-Type: application/json" \
     -d '{"text": "Hello, how are you?"}'
{
  "prediction": "Ham"
}