


![[The AI Show Episode 144]: ChatGPT’s New Memory, Shopify CEO’s Leaked “AI First” Memo, Google Cloud Next Releases, o3 and o4-mini Coming Soon & Llama 4’s Rocky Launch](https://www.marketingaiinstitute.com/hubfs/ep%20144%20cover.png)


.jpg?width=1920&height=1920&fit=bounds&quality=70&format=jpg&auto=webp#)


.jpg?#)


![Apple to Shift Robotics Unit From AI Division to Hardware Engineering [Report]](https://www.iclarified.com/images/news/97128/97128/97128-640.jpg)

![Apple Shares New Ad for iPhone 16: 'Trust Issues' [Video]](https://www.iclarified.com/images/news/97125/97125/97125-640.jpg)


How to use Terraform resource to manage Infrastructure
Introduction Terraform uses resource blocks to define and manage infrastructure components like virtual networks, compute instances, and higher-level services such as DNS records. Each resource block represents one or more infrastructure objects within your Terraform configuration. In this hands-on lab, you’ll launch an EC2 instance running a PHP web application. Then, using the Terraform Registry documentation, you’ll create a security group to make the application publicly accessible. Requirements Latest Terraform installed locally An AWS Account A HCP Terraform account with HCP Terraform locally authenticated. A HCP Terraform variable set configured with your AWS credentials. VS Code. Clone the example repository Clone the Learn Terraform Resources repository, which includes example configurations for provisioning an AWS EC2 instance. git clone https://github.com/hashicorp-education/learn-terraform-resources Change directory to the newly cloned repository. cd learn-terraform-resources You should see the following files in the repository: 1. init-script.sh: contains the provisioning script to install dependencies and start a sample PHP application 2. terraform.tf: contains the terraform block that defines the providers required by your configuration 3. main.tf: contains the configuration for an EC2 instance 4. outputs.tf: contains the definitions for the output values of your resources 5. README.md: describes the repository and its contents Open the main.tf file to review the two resource blocks: random_pet.name and aws_instance.web. NOTE: You can review random_pet resource by opening random_pet documentation page and aws_instance resource at aws_instance documentation page. Create infrastructure Open the terraform.tf file, uncomment the cloud block, and replace the organization name with your own HCP Terraform organization. Your organization name is gotten from HCP Terraform Account you created in the Requirements section and Terraform will create workspace (learn-terraform-resource) automatically for you in your organization. Run terraform init to initialize your configuration. N.B: I encountered an error because of required version specified in my terrafom.tf file, so I changed it to my current version of Terraform. Apply your configuration to provision the two resources, and confirm the action by typing yes when prompted. terraform apply The domain-name output will display your EC2 instance's endpoint once the deployment is complete. However, the URL won't load yet because port 80 hasn't been configured to allow incoming traffic. NOTE: If you get this error after running terraform apply, it means you need to associate your AWS credentials to your organization workspace created. Error: error configuring Terraform AWS Provider: no valid credential sources for Terraform AWS Provider found. │ │ Please see https://registry.terraform.io/providers/hashicorp/aws │ for more information about providing credentials. │ │ Error: failed to refresh cached credentials, no EC2 IMDS role found, operation error ec2imds: GetMetadata, request send failed, Get "http://169.254.169.254/latest/meta-data/iam/security-credentials/": dial tcp 169.254.169.254:80: i/o timeout │ │ │ with provider["registry.terraform.io/hashicorp/aws"], │ on main.tf line 4, in provider "aws": │ 4: provider "aws" { To rectify this: Head to your organization and select your workspace(learn-terraform-resource) Select variables and click Add variables. Create two environment variables, one for aws access key key ID and one for aws secret access key Run terraform apply again and the error disappears. Your workspace now displays the list of all of the resources it manages and the outputs for your configuration. Associate security group with instance To allow access to the EC2 instance's web server, define a security group that permits incoming traffic on port 80 and allows all outgoing traffic. Then, associate this security group with your instance. Open the AWS Provider documentation page. Search for security_group and select the aws_security_group resource. Your security group resource should be similar to the following: resource "aws_security_group" "web-sg" { name = "${random_pet.name.id}-sg" ingress { from_port = 80 to_port = 80 protocol = "tcp" cidr_blocks = ["0.0.0.0/0"] } egress { from_port = 0 to_port = 0 protocol = "-1" cidr_blocks = ["0.0.0.0/0"] } } Next, update your aws_instance.web resource to use the newly created security group. According to the aws_instance Argument Reference, the vpc_security_group_ids argument expects a list of security group IDs. Add the vpc_security_group_ids argument to the aws_instance.web resource as a list by enclosing the aws_security_group.web-sg.id attribute in square brackets. Save the changes and run
Introduction
Terraform uses resource blocks to define and manage infrastructure components like virtual networks, compute instances, and higher-level services such as DNS records. Each resource block represents one or more infrastructure objects within your Terraform configuration.
In this hands-on lab, you’ll launch an EC2 instance running a PHP web application. Then, using the Terraform Registry documentation, you’ll create a security group to make the application publicly accessible.
Requirements
- Latest Terraform installed locally
- An AWS Account
- A HCP Terraform account with HCP Terraform locally authenticated.
- A HCP Terraform variable set configured with your AWS credentials.
- VS Code.
Clone the example repository
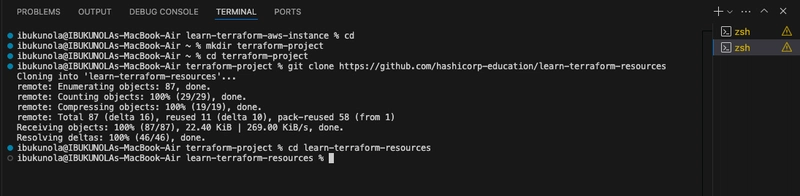
- Clone the Learn Terraform Resources repository, which includes example configurations for provisioning an AWS EC2 instance.
git clone https://github.com/hashicorp-education/learn-terraform-resources
- Change directory to the newly cloned repository.
cd learn-terraform-resources
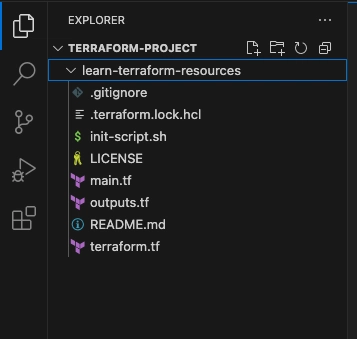
You should see the following files in the repository:
1. init-script.sh: contains the provisioning script to install dependencies and start a sample PHP application
2. terraform.tf: contains the terraform block that defines the providers required by your configuration
3. main.tf: contains the configuration for an EC2 instance
4. outputs.tf: contains the definitions for the output values of your resources
5. README.md: describes the repository and its contents
Open the main.tf file to review the two resource blocks: random_pet.name and aws_instance.web.
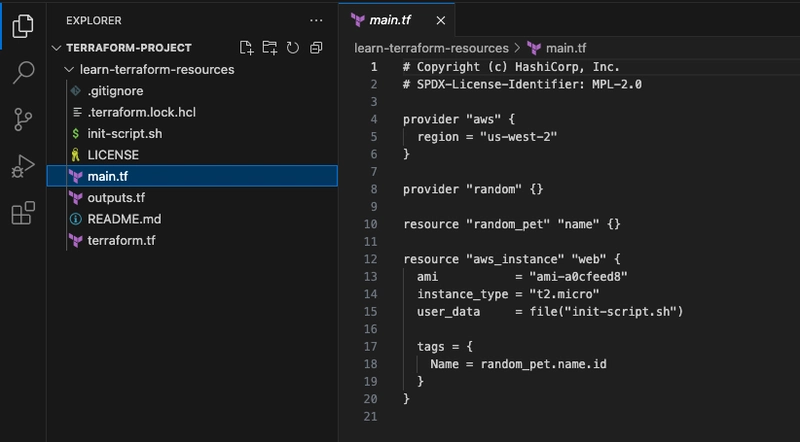
NOTE: You can review random_pet resource by opening random_pet documentation page and aws_instance resource at aws_instance documentation page.
Create infrastructure
Open the terraform.tf file, uncomment the cloud block, and replace the organization name with your own HCP Terraform organization.
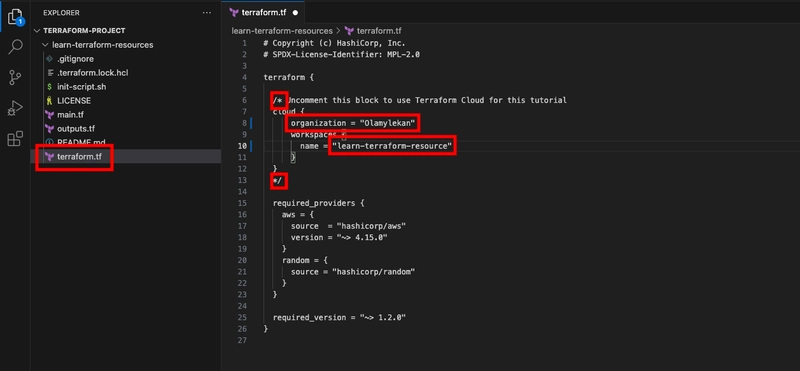
Your organization name is gotten from HCP Terraform Account you created in the Requirements section and Terraform will create workspace (learn-terraform-resource) automatically for you in your organization.
- Run
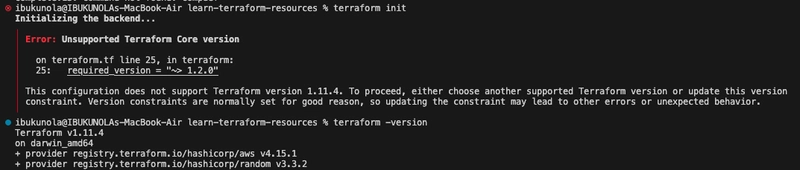
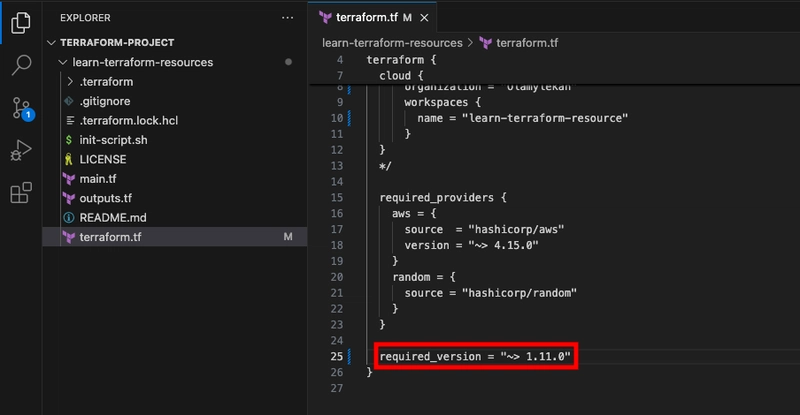
terraform initto initialize your configuration.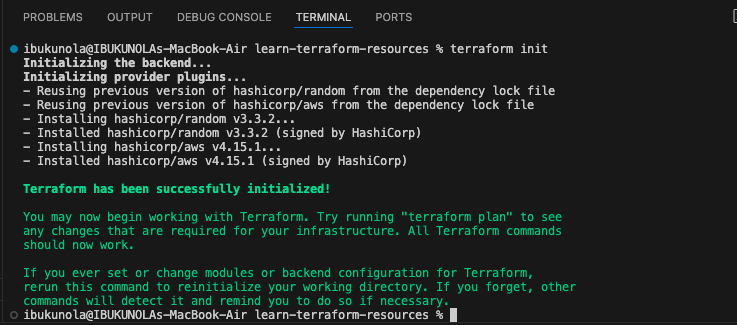 N.B: I encountered an error because of required version specified in my terrafom.tf file, so I changed it to my current version of Terraform.
- Apply your configuration to provision the two resources, and confirm the action by typing yes when prompted.
terraform apply
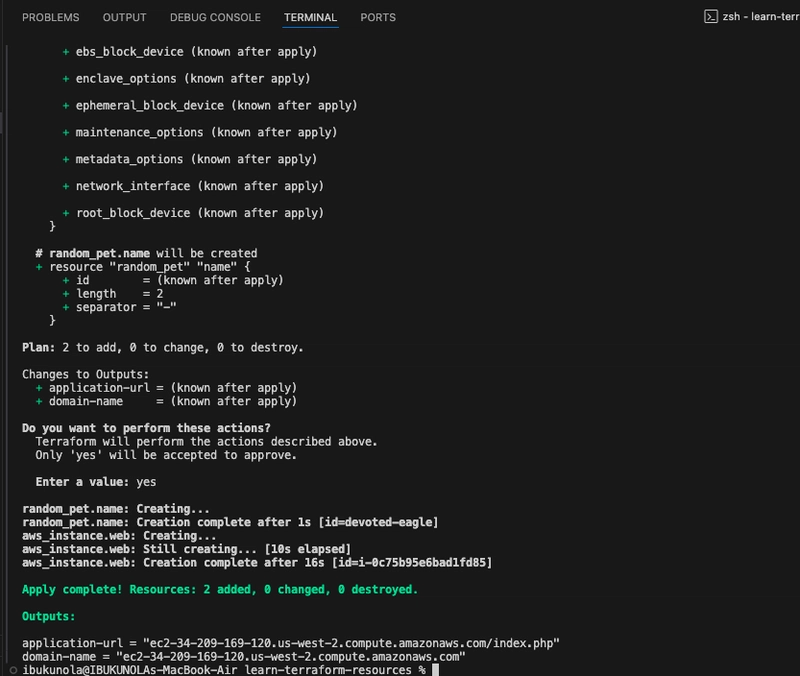
- The domain-name output will display your EC2 instance's endpoint once the deployment is complete. However, the URL won't load yet because port 80 hasn't been configured to allow incoming traffic.
NOTE: If you get this error after running terraform apply, it means you need to associate your AWS credentials to your organization workspace created.
 Error: error configuring Terraform AWS Provider: no valid credential sources for Terraform AWS Provider found.
│
│ Please see https://registry.terraform.io/providers/hashicorp/aws
│ for more information about providing credentials.
│
│ Error: failed to refresh cached credentials, no EC2 IMDS role found, operation error ec2imds: GetMetadata, request send failed, Get "http://169.254.169.254/latest/meta-data/iam/security-credentials/": dial tcp 169.254.169.254:80: i/o timeout
│
│
│   with provider["registry.terraform.io/hashicorp/aws"],
│   on main.tf line 4, in provider "aws":
│    4: provider "aws" {
To rectify this:
- Head to your organization and select your workspace(learn-terraform-resource)
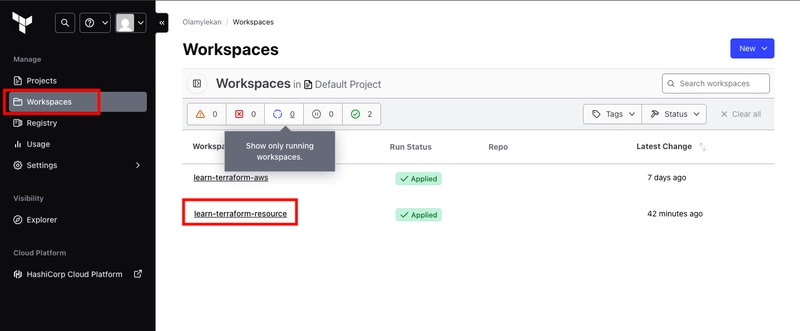
- Select variables and click Add variables.
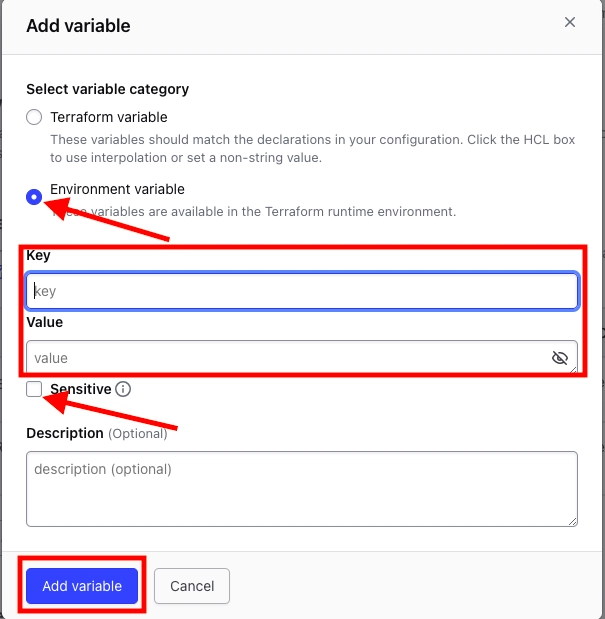
- Create two environment variables, one for aws access key key ID and one for aws secret access key
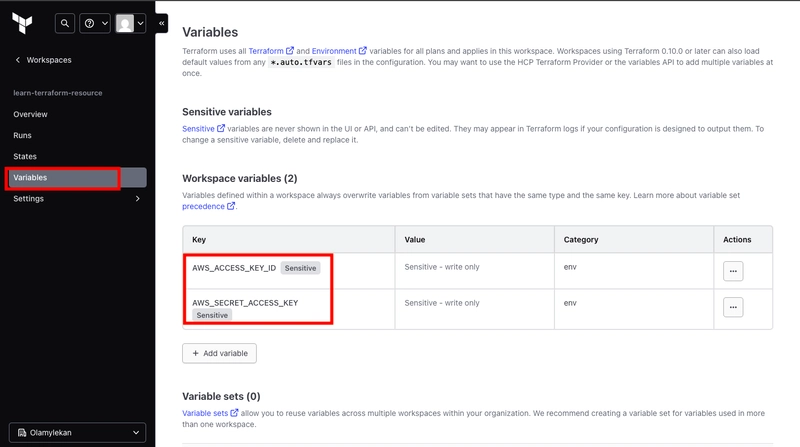
- Run terraform apply again and the error disappears.
Your workspace now displays the list of all of the resources it manages and the outputs for your configuration.

Associate security group with instance
To allow access to the EC2 instance's web server, define a security group that permits incoming traffic on port 80 and allows all outgoing traffic. Then, associate this security group with your instance.
- Open the AWS Provider documentation page. Search for security_group and select the aws_security_group resource.
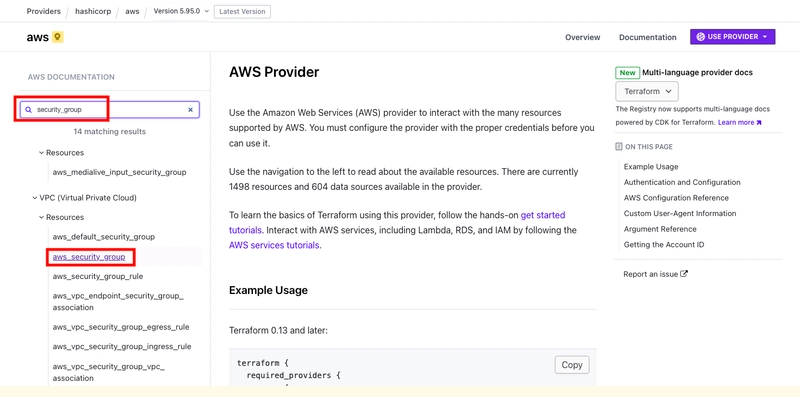 Your security group resource should be similar to the following:
resource "aws_security_group" "web-sg" {
  name = "${random_pet.name.id}-sg"
  ingress {
    from_port   = 80
    to_port     = 80
    protocol    = "tcp"
    cidr_blocks = ["0.0.0.0/0"]
  }

  egress {
    from_port   = 0
    to_port     = 0
    protocol    = "-1"
    cidr_blocks = ["0.0.0.0/0"]
  }
}
- Next, update your aws_instance.web resource to use the newly created security group. According to the aws_instance Argument Reference, the vpc_security_group_ids argument expects a list of security group IDs.
- Add the vpc_security_group_ids argument to the aws_instance.web resource as a list by enclosing the aws_security_group.web-sg.id attribute in square brackets.

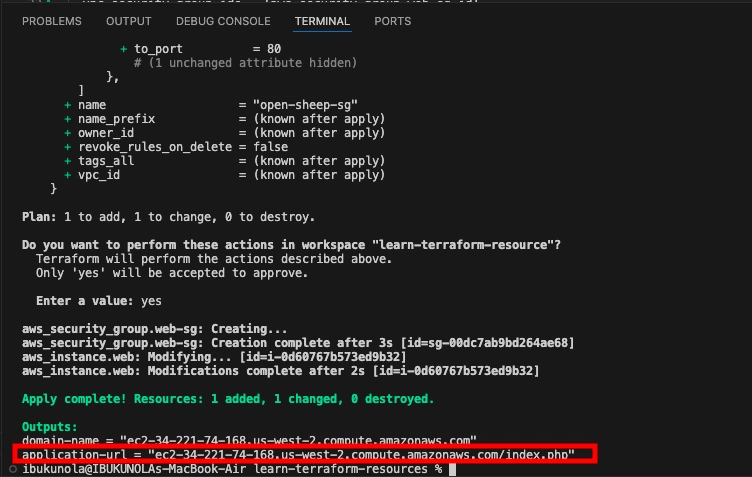
- Save the changes and run terraform apply.
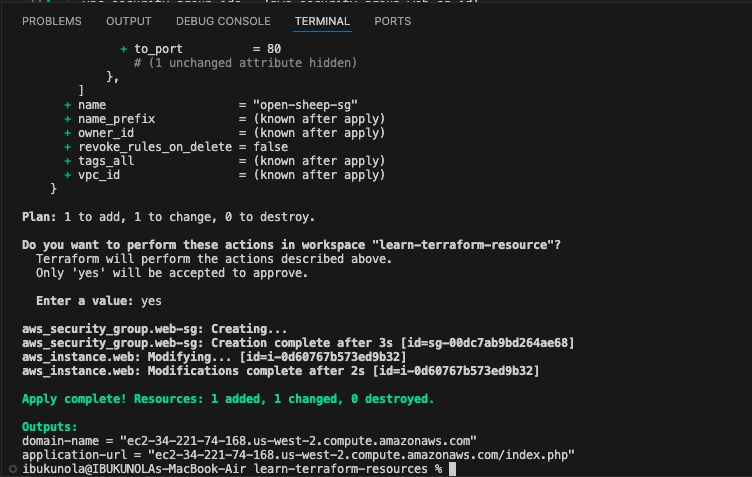
- To verify that your EC2 instance is now publicly accessible, open your browser and navigate to the application-url shown in Terraform's output to view the PHP application. Make sure the address begins with http (not https).
http:\\[application-url]
Deploying the PHP application on the EC2 instance may take up to 10 minutes. If you see a “...took too long to respond” message, wait a few minutes and try accessing the application again.

Thanks for staying till the end