![[The AI Show Episode 142]: ChatGPT’s New Image Generator, Studio Ghibli Craze and Backlash, Gemini 2.5, OpenAI Academy, 4o Updates, Vibe Marketing & xAI Acquires X](https://www.marketingaiinstitute.com/hubfs/ep%20142%20cover.png)


![From drop-out to software architect with Jason Lengstorf [Podcast #167]](https://cdn.hashnode.com/res/hashnode/image/upload/v1743796461357/f3d19cd7-e6f5-4d7c-8bfc-eb974bc8da68.png?#)


.png?#)


.webp?#)


_Christophe_Coat_Alamy.jpg?#)
 (1).webp?#)


![Apple Considers Delaying Smart Home Hub Until 2026 [Gurman]](https://www.iclarified.com/images/news/96946/96946/96946-640.jpg)
![iPhone 17 Pro Won't Feature Two-Toned Back [Gurman]](https://www.iclarified.com/images/news/96944/96944/96944-640.jpg)
![Tariffs Threaten Apple's $999 iPhone Price Point in the U.S. [Gurman]](https://www.iclarified.com/images/news/96943/96943/96943-640.jpg)


How to Link a Subdomain from GoDaddy to AWS S3, CloudFront Using Route 53 and ACM
INTRODUCTION If you’re using AWS S3 static website hosting and CloudFront Distribution for your static or dynamic content, you’ll likely want to serve it using your own custom subdomain instead of the default CloudFront URL. In this guide, I’ll walk you through how I linked a subdomain from GoDaddy to AWS CloudFront using Route 53. By the end of this guide, you’ll have a custom subdomain (e.g., sub.yourdomain.com) pointing to your CloudFront distribution using Route 53. PREQUISITES AWS account GoDaddy domain CloudFront distribution A Route 53 hosted zone for your domain STEP-BY-STEP GUIDE Step 1: Create an AWS S3 Bucket There are two ways to link your subdomain to CloudFront: The Easy Way – Using S3 Static Website Hosting (Public Access) The Secure Way – Using CloudFront with Origin Access Control (OAC) In this guide, we’ll start with The Easy Way, then cover The Secure Way later in another guide To host your static website on S3, start by creating a new bucket: Click Create Bucket in the S3 console. Enter a unique bucket name (e.g., bucket-dev). Disable 'Block all public access. Click Create bucket. Step 2: Uploading files to the S3 Bucket Once you have created the S3 bucket, run npm run build to generate a dist or build folder. Open the S3 bucket and click Upload, then click Add files Navigate to the dist folder, and upload only files in the folder. Click Add folder, select the necessary folders inside dist, and click Upload. Step 3: Enable Static Website Hosting Go to the properties tab in the S3 bucket, scroll down to Static website hosting, and click Edit. Enable Static website hosting, select Host a static website as the hosting type. Input index.html as the Index document and click Save changes. Ensure that index.html is in the root of your bucket and not inside a subfolder like assets/. Step 4: Set Bucket Policy for Public Access Go to Bucket policy in the permissions tab, and paste this, using your bucket name { "Version": "2012-10-17", "Statement": [ { "Effect": "Allow", "Principal": "*", "Action": "s3:GetObject", "Resource": "arn:aws:s3:::YOUR_BUCKET_NAME/*" } ] } Test Your Website: Copy the Bucket website endpoint from the Static website hosting section. Paste it into your browser. If the website does not open: Ensure the index.html is in the root of your bucket. Verify that the bucket policy is correctly set. Ensure Static website hosting is enabled. Step 5: Create Cloudfront distribution In the AWS console, navigate to Cloudfront. Click Create Distribution. Use the bucket website endpoint as your origin domain Click Create Distribution. Connecting Your Custom Domain (Route 53 & GoDaddy) Step 1: Requesting SSL Certificate Go to AWS Certificate Manager (ACM) in your AWS Console and click Request a Certificate. Select Request a public certificate, then click Next In the Domain names section, enter the domains you want the certificate for. For example, sub.yourdomain.com and www.sub.yourdomain.com (It's best to include both). Select DNS validation - recommended then click Request On the newly created certificate, you'll see the domains section. Copy the CNAME name, CNAME value and type and navigate to route 53 on the AWS console. Open Route 53 in the AWS Console and navigate to your hosted zone. Click Create record then: Select CNAME as the Record type Paste the CNAME name and value. For sub.yourdomain.com: Copy the CNAME Name and CNAME Value from ACM. Paste them exactly into Route 53. Click Create record. Repeat the same steps for www.sub.yourdomain.com, using the second set of CNAME details from ACM. Remember you will be creating two records on route 53, for sub.yourdomain.com and www.sub.yourdomain.com, using the different CNAME names and values provided to you in ACM. Wait a few minutes for AWS to process the validation. The certificate status in ACM will change from Pending validation to Success once it's approved. If your SSL certificate validation is taking too long, double-check that you've added the correct CNAME records from AWS Certificate Manager (ACM) to Route 53. Missing or incorrect records can delay the process. Attaching SSL Certificate to CloudFront Distribution Once your SSL certificate is issued, follow these steps to attach it to your CloudFront distribution: Open Cloudfront on the AWS console. Click on your CloudFront distribution to open its settings. Click Edit settings. Scroll down to custom SSL certificate, then choose the certificate you requested in ACM and click Save changes. (You need to attach an SSL Certificate because you want to use a secure HTTPS connection and you want to use your own custom domain (e.g. sub.yourdomain.com) Creating NS records in Godaddy for Route 53 If your domain is registered with GoDaddy but you want AWS Route 53 to handle your DNS, you'll need to update your Name Servers (NS) records in GoDaddy. This tells GoDaddy
INTRODUCTION
If you’re using AWS S3 static website hosting and CloudFront Distribution for your static or dynamic content, you’ll likely want to serve it using your own custom subdomain instead of the default CloudFront URL. In this guide, I’ll walk you through how I linked a subdomain from GoDaddy to AWS CloudFront using Route 53.
By the end of this guide, you’ll have a custom subdomain (e.g., sub.yourdomain.com) pointing to your CloudFront distribution using Route 53.
PREQUISITES
AWS account
GoDaddy domain
CloudFront distribution
A Route 53 hosted zone for your domain
STEP-BY-STEP GUIDE
Step 1: Create an AWS S3 Bucket
There are two ways to link your subdomain to CloudFront:
The Easy Way – Using S3 Static Website Hosting (Public Access)
The Secure Way – Using CloudFront with Origin Access Control (OAC)
In this guide, we’ll start with The Easy Way, then cover The Secure Way later in another guide
To host your static website on S3, start by creating a new bucket:
Click Create Bucket in the S3 console.
Enter a unique bucket name (e.g., bucket-dev).
Disable 'Block all public access.
Click Create bucket.
Step 2: Uploading files to the S3 Bucket
Once you have created the S3 bucket, run npm run build to generate a dist or build folder.
Open the S3 bucket and click Upload, then click Add files
Navigate to the dist folder, and upload only files in the folder.
Click Add folder, select the necessary folders inside dist, and click Upload.
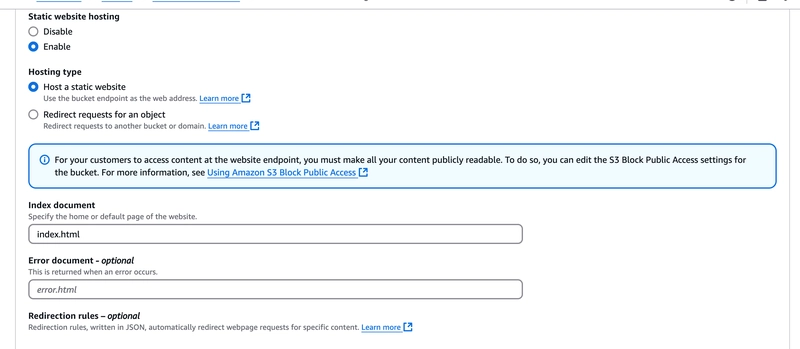
Step 3: Enable Static Website Hosting
- Go to the properties tab in the S3 bucket, scroll down to Static website hosting, and click Edit.
Enable Static website hosting, select Host a static website as the hosting type.
Input index.html as the Index document and click Save changes.
Ensure that index.html is in the root of your bucket and not inside a subfolder like assets/.
Step 4: Set Bucket Policy for Public Access
- Go to Bucket policy in the permissions tab, and paste this, using your bucket name
 {
  "Version": "2012-10-17",
  "Statement": [
    {
      "Effect": "Allow",
      "Principal": "*",
      "Action": "s3:GetObject",
      "Resource": "arn:aws:s3:::YOUR_BUCKET_NAME/*"
    }
  ]
}
- Test Your Website:
Copy the Bucket website endpoint from the Static website hosting section.
Paste it into your browser.
If the website does not open:
Ensure the index.html is in the root of your bucket.
Verify that the bucket policy is correctly set.
Ensure Static website hosting is enabled.
Step 5: Create Cloudfront distribution
In the AWS console, navigate to Cloudfront.
Click Create Distribution.
Use the bucket website endpoint as your origin domain
Click Create Distribution.
Connecting Your Custom Domain (Route 53 & GoDaddy)
Step 1: Requesting SSL Certificate
Go to AWS Certificate Manager (ACM) in your AWS Console and click Request a Certificate.
Select Request a public certificate, then click Next
In the Domain names section, enter the domains you want the certificate for.
- For example, sub.yourdomain.com and www.sub.yourdomain.com (It's best to include both).
Select DNS validation - recommended then click Request
On the newly created certificate, you'll see the domains section.
Copy the CNAME name, CNAME value and type and navigate to route 53 on the AWS console.
Open Route 53 in the AWS Console and navigate to your hosted zone.
Click Create record then:
Select CNAME as the Record type
Paste the CNAME name and value.
For sub.yourdomain.com:
Copy the CNAME Name and CNAME Value from ACM.
Paste them exactly into Route 53.
Click Create record.
Repeat the same steps for www.sub.yourdomain.com, using the second set of CNAME details from ACM.
Remember you will be creating two records on route 53, for sub.yourdomain.com and www.sub.yourdomain.com, using the different CNAME names and values provided to you in ACM.
Wait a few minutes for AWS to process the validation.
The certificate status in ACM will change from Pending validation to Success once it's approved.
If your SSL certificate validation is taking too long, double-check that you've added the correct CNAME records from AWS Certificate Manager (ACM) to Route 53. Missing or incorrect records can delay the process.
Attaching SSL Certificate to CloudFront Distribution
Once your SSL certificate is issued, follow these steps to attach it to your CloudFront distribution:
Open Cloudfront on the AWS console.
Click on your CloudFront distribution to open its settings.
Click Edit settings.
Scroll down to custom SSL certificate, then choose the certificate you requested in ACM and click Save changes. (You need to attach an SSL Certificate because you want to use a secure HTTPS connection and you want to use your own custom domain (e.g. sub.yourdomain.com)
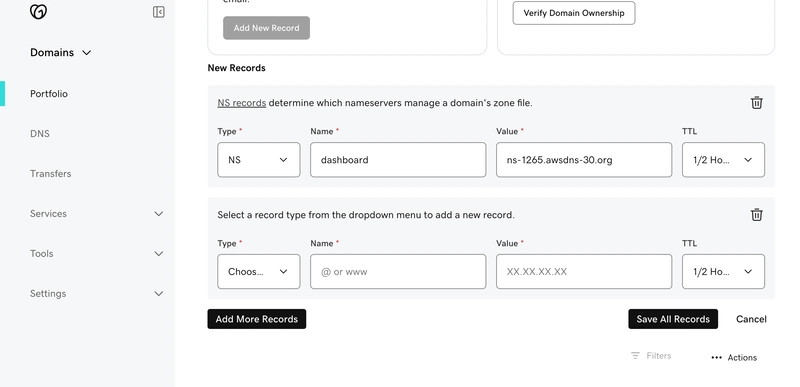
Creating NS records in Godaddy for Route 53
If your domain is registered with GoDaddy but you want AWS Route 53 to handle your DNS, you'll need to update your Name Servers (NS) records in GoDaddy. This tells GoDaddy to let Route 53 manage your domain’s DNS settings.
Step 1: Adding Nameservers to Godaddy
- In AWS Route 53, go to the Hosted zones section from the sidebar.
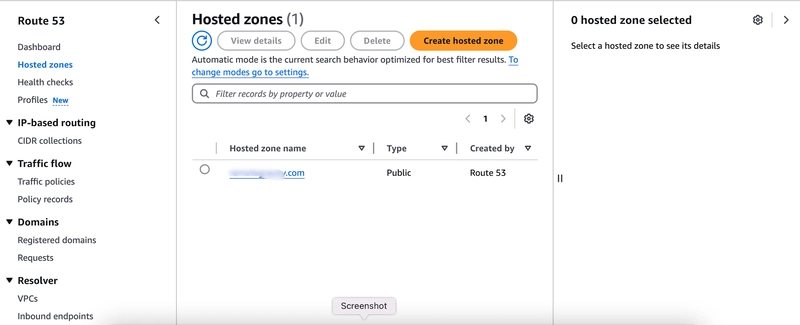
Select the hosted zone for your domain.
Look for the record with the type labeled NS (Name Server) and click on it to view the name server details.
In GoDaddy, go to Portfolio from the side menu, then click on DNS.
Click Add New Record, then copy the NS record values from AWS Route 53 and paste them as the Value. Set the Type to NS, and for the Name, use sub (from sub.yourdomain.com).
Repeat this for all four name server records. This means all four records will have Name as sub from (sub.yourdomain.com) and Type as NS but with the four different Values. Once this is complete, click save all records.
Create a Route 53 Record for CloudFront
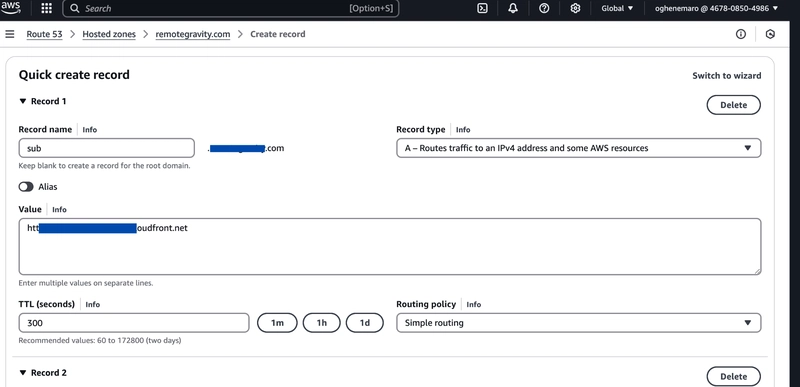
In Route 53, go to your hosted zone, then click create record.
Choose CNAME as the Record type.
In the Record name field, enter only sub (from sub.yourdomain.com) since Route 53 automatically appends your main domain (.yourdomain.com).
Enter your CloudFront Distribution domain name
as the Value.Create a similar record for www.sub from (www.sub.yourdomain.com) as Route 53 will automatically attach .yourdomain.com, so you do not need to enter the entire name. This step is optional.
Click Create Record.
Wait for DNS Propagation
It can take a few minutes to hours for changes to take effect.
You can check if it's working by visiting your subdomain (sub.yourdomain.com).
Final Verification: Check DNS Propagation
After setting everything up, you’ll need to wait for DNS changes to propagate. This process can take a few minutes to several hours. To check if your subdomain is resolving correctly, use a DNS lookup tool like whatsmydns.net:
Go to whatsmydns.net.
Enter your subdomain (sub.yourdomain.com).
Select CNAME as the record type.
Click Search to see if your subdomain is pointing to your CloudFront distribution across different locations worldwide.
References
https://aws.amazon.com/s3/
https://aws.amazon.com/route53/
https://aws.amazon.com/cloudfront/
https://aws.amazon.com/certificate-manager/