


![[Webinar] AI Is Already Inside Your SaaS Stack — Learn How to Prevent the Next Silent Breach](https://blogger.googleusercontent.com/img/b/R29vZ2xl/AVvXsEiOWn65wd33dg2uO99NrtKbpYLfcepwOLidQDMls0HXKlA91k6HURluRA4WXgJRAZldEe1VReMQZyyYt1PgnoAn5JPpILsWlXIzmrBSs_TBoyPwO7hZrWouBg2-O3mdeoeSGY-l9_bsZB7vbpKjTSvG93zNytjxgTaMPqo9iq9Z5pGa05CJOs9uXpwHFT4/s1600/ai-cyber.jpg?#)


![[The AI Show Episode 144]: ChatGPT’s New Memory, Shopify CEO’s Leaked “AI First” Memo, Google Cloud Next Releases, o3 and o4-mini Coming Soon & Llama 4’s Rocky Launch](https://www.marketingaiinstitute.com/hubfs/ep%20144%20cover.png)


![Rogue Company Elite tier list of best characters [April 2025]](https://media.pocketgamer.com/artwork/na-33136-1657102075/rogue-company-ios-android-tier-cover.jpg?#)


_Andreas_Prott_Alamy.jpg?width=1280&auto=webp&quality=80&disable=upscale#)


![What’s new in Android’s April 2025 Google System Updates [U: 4/18]](https://i0.wp.com/9to5google.com/wp-content/uploads/sites/4/2025/01/google-play-services-3.jpg?resize=1200%2C628&quality=82&strip=all&ssl=1)


![Apple Watch Series 10 Back On Sale for $299! [Lowest Price Ever]](https://www.iclarified.com/images/news/96657/96657/96657-640.jpg)
![EU Postpones Apple App Store Fines Amid Tariff Negotiations [Report]](https://www.iclarified.com/images/news/97068/97068/97068-640.jpg)
![Apple Slips to Fifth in China's Smartphone Market with 9% Decline [Report]](https://www.iclarified.com/images/news/97065/97065/97065-640.jpg)


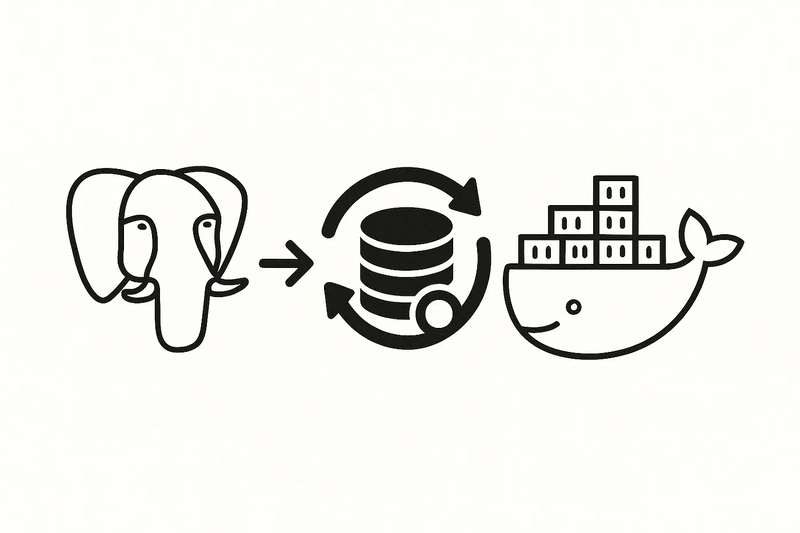
How to deploy a Postgres continuous backup solution in under 5 minutes using Docker
[Song of the day: HELL ON ME — Johnny Huynh] Hey there! I was recently looking to help a collaborator out with backing up a Postgres database and thought it would be a great idea for a blog post. So, let’s begin. Table of contents Deployment Method General Prerequisites Step 1: Gathering S3-Compatible Bucket Credentials Step 2: Get your schedule in Cron format Step 3: (Optional) Gather Sentry Credentials Step 4: Convert your postgres credentials to a connection URL Step 5: Filling out the .env file Step 6: Deploying Building the image for a version other than 14,15 and 16 GitHub Regarding stricter permissions for AWS Deployment Method There are 2 ways to deploy the backup solution: Using the Railway Template Using Docker on your machine / cloud We will go over each of the 2 step by step to not miss anything General Prerequisites — Required regardless the method A Cloudflare / Backblaze / AWS Account An accessible PostgreSQL database, version 16 to 14 (Optional) A Sentry Account Step 1: Gathering S3-Compatible Bucket Credentials Provider 1: AWS Head over to console.aws.amazon.com and login Navigate over to the S3 Dashboard in the region of your choice 3. Create or choose a bucket — Note down the bucket name and its region 4. Navigate over to AWS IAM 3. Click on Users then “Create User” 4. Give it the name “pg-backup” or whatever else you’d like 5. Assign the permission “AmazonS3FullAccess” (Note: As the permission’s name suggests, this grants the user FULL access to ALL s3 buckets, so a more restricted permission set is advised. Check the end of the post for detailed instructions) 5. Proceed to the next page and confirm the user creation. 6. You should now be on the “Users” page. Select the one you just created 7. Navigate over to “Security Credentials” 8. Select “Create Access Key” under “Access Keys” Choose “Other” on the Use Case Skip description (or dont?) 9. Save both the Access Key and Secret Access Key Provider 2: Cloudflare (R2) Head over to dash.cloudflare.com and login Choose “R2 Object Storage” from the sidebar 3. Create or choose a bucket and note down its name 4. Click on API > Manage API Tokens (See picture) 5. Create an “Account Token” like below: Set its name Change permissions to “Object Read & Write” Specify your backup bucket Click “Create” 6. Of the values shown Copy: The Access Key ID The Secret Access Key The Jurisdiction-Specific Endpoint Provider 3: Backblaze B2 Head over to https://secure.backblaze.com and sign in Click “Create a Bucket” and choose the following: Private files No encryption No Object Lock 3. From the info of the bucket, note: The Endpoint The Bucket name The Region (found in the endpoint, its first subdomain. For example, the region in the pic is eu-central-003) 4. Now, head over to https://secure.backblaze.com/app_keys.htm 5. Create an Application Key with the following properties A Name Access to ONLY the backup bucket Read & Write scopes 6. Note down the “Key ID” and “Application Key” as “Access Key ID” and “Secret Access Key” respectively Step 2: Get your schedule in Cron format Backups run on a cron job. So, we need the schedule for example “Every day at midnight” to become “0 0 * * *” Your options are: Use the prompt “cron schedule {schedule}” on ChatGPT Use crontab.guru To freshen up your memory on Cron: It uses the format [second] [minute] [hour] [day_of_month] [month] [day_of_week] , so * * * * * * runs every second. Also: * means “Every {minutes / hours / days etc}” */a (a is a number) means “Every a {minutes / hours / days etc}” Step 3: (Optional) Gather Sentry Credentials If you want to check the status of your backups, you will need Sentry for monitoring. So let’s begin. Head over to sentry.io and login If you haven’t yet, create a project by going to the top side of your sidebar, selecting “Projects” then on the top right, “Create new project” Now, head over to “Crons” then “Add Monitor” 4. Add a name, set it to your desired project, and add the cron schedule from the previous step. You can, of course, mess around with the other settings as well. Then press Create. 5. Copy the monitor slug like shown below and store it: 6. We now need the Sentry DSN: Go to Settings Select Projects Choose the project you used when creating the monitor Go to Client Keys Copy and store the DSN And that’s all for Sentry. Step 4: Convert your postgres credentials to a connection URL That’s one of the easy steps. If you already have a connection URL, you can skip this step. Anyway, to convert connection credentials to a URL, use this format: postgresql://[username]:[password]@[db-host]:[port]/[database] A note for Supabase users: The image doesn’t support IPv6. So please use the session pooler instead*.* Step
[Song of the day: HELL ON ME — Johnny Huynh]
Hey there! I was recently looking to help a collaborator out with backing up a Postgres database and thought it would be a great idea for a blog post. So, let’s begin.
Table of contents
Deployment Method
General Prerequisites
Step 1: Gathering S3-Compatible Bucket Credentials
Step 2: Get your schedule in Cron format
Step 3: (Optional) Gather Sentry Credentials
Step 4: Convert your postgres credentials to a connection URL
Step 5: Filling out the .env file
Step 6: Deploying
Building the image for a version other than 14,15 and 16
GitHub
Regarding stricter permissions for AWS
Deployment Method
There are 2 ways to deploy the backup solution:
Using the Railway Template
Using Docker on your machine / cloud
We will go over each of the 2 step by step to not miss anything
General Prerequisites — Required regardless the method
A Cloudflare / Backblaze / AWS Account
An accessible PostgreSQL database, version 16 to 14
(Optional) A Sentry Account
Step 1: Gathering S3-Compatible Bucket Credentials
Provider 1: AWS
Head over to console.aws.amazon.com and login
Navigate over to the S3 Dashboard in the region of your choice
3. Create or choose a bucket — Note down the bucket name and its region
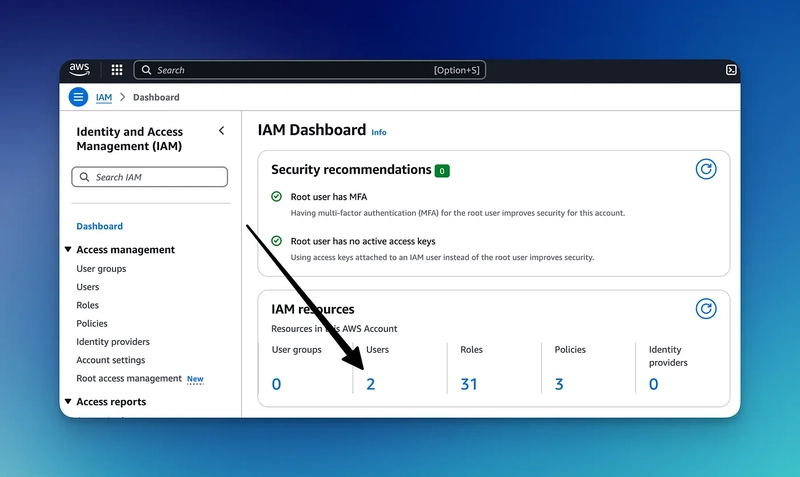
4. Navigate over to AWS IAM
3. Click on Users then “Create User”
4. Give it the name “pg-backup” or whatever else you’d like
5. Assign the permission “AmazonS3FullAccess”
(Note: As the permission’s name suggests, this grants the user FULL access to ALL s3 buckets, so a more restricted permission set is advised. Check the end of the post for detailed instructions)
5. Proceed to the next page and confirm the user creation.
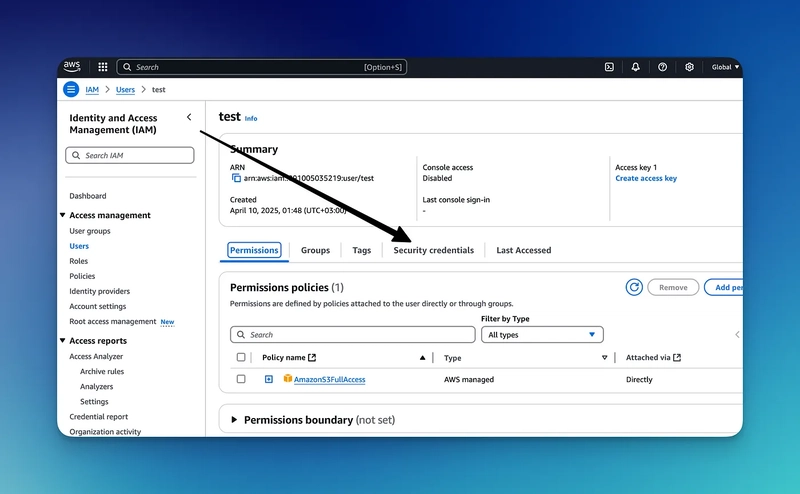
6. You should now be on the “Users” page. Select the one you just created
7. Navigate over to “Security Credentials”
8. Select “Create Access Key” under “Access Keys”
Choose “Other” on the Use Case
Skip description (or dont?)
9. Save both the Access Key and Secret Access Key
Provider 2: Cloudflare (R2)
Head over to dash.cloudflare.com and login
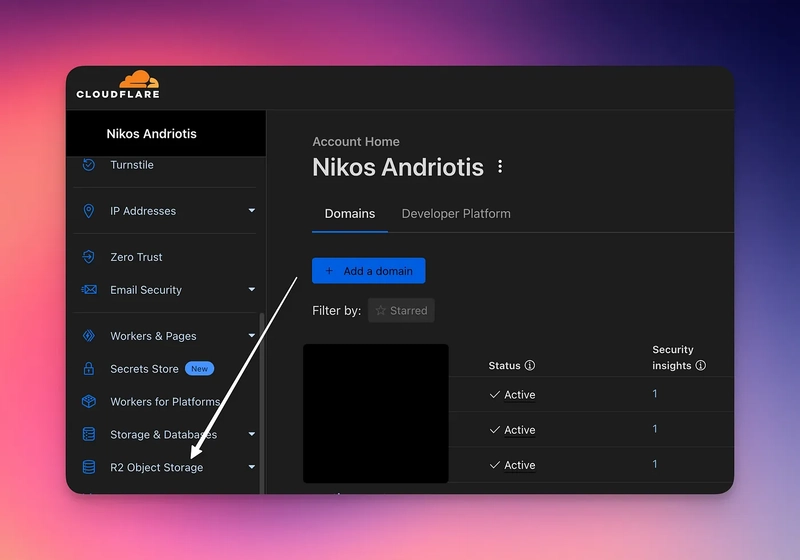
Choose “R2 Object Storage” from the sidebar
3. Create or choose a bucket and note down its name
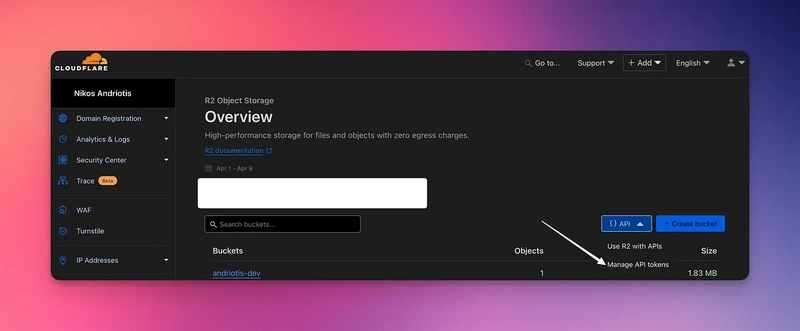
4. Click on API > Manage API Tokens (See picture)
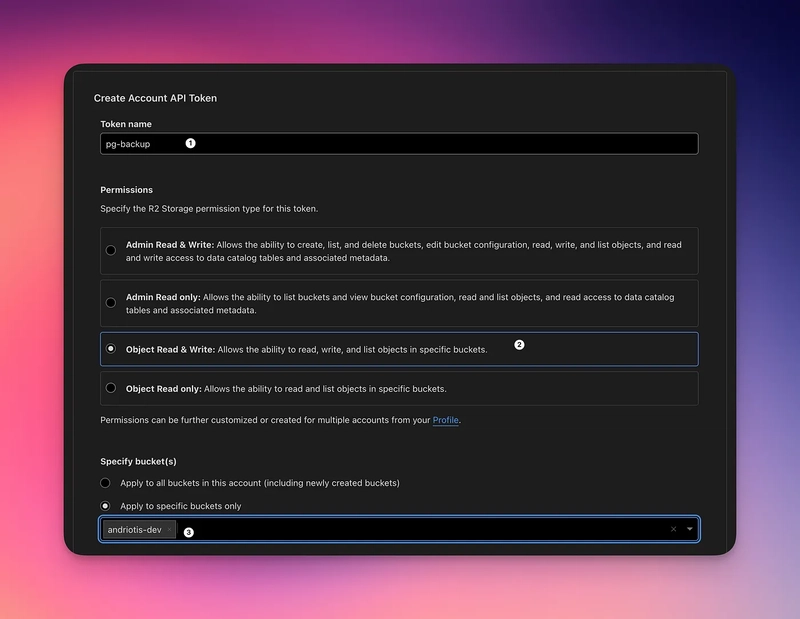
5. Create an “Account Token” like below:
Set its name
Change permissions to “Object Read & Write”
Specify your backup bucket
Click “Create”
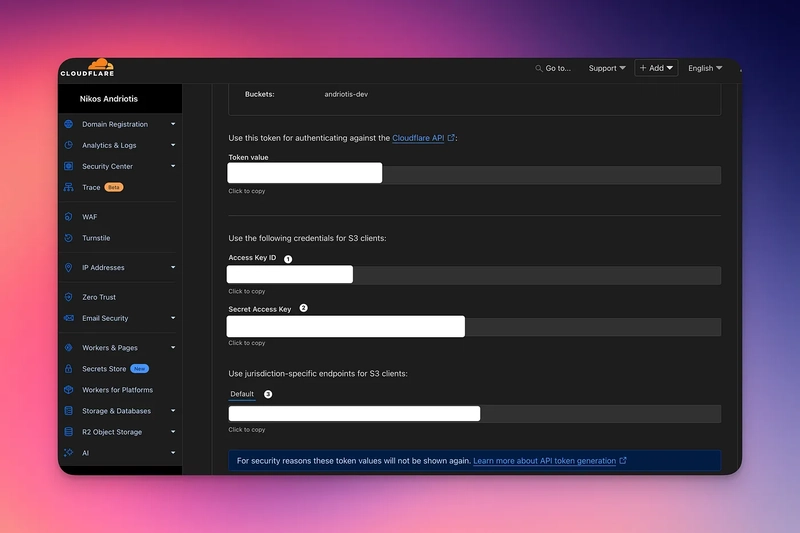
6. Of the values shown Copy:
The Access Key ID
The Secret Access Key
The Jurisdiction-Specific Endpoint
Provider 3: Backblaze B2
Head over to https://secure.backblaze.com and sign in
Click “Create a Bucket” and choose the following:
Private files
No encryption
No Object Lock
3. From the info of the bucket, note:
The Endpoint
The Bucket name
The Region (found in the endpoint, its first subdomain. For example, the region in the pic is
eu-central-003)
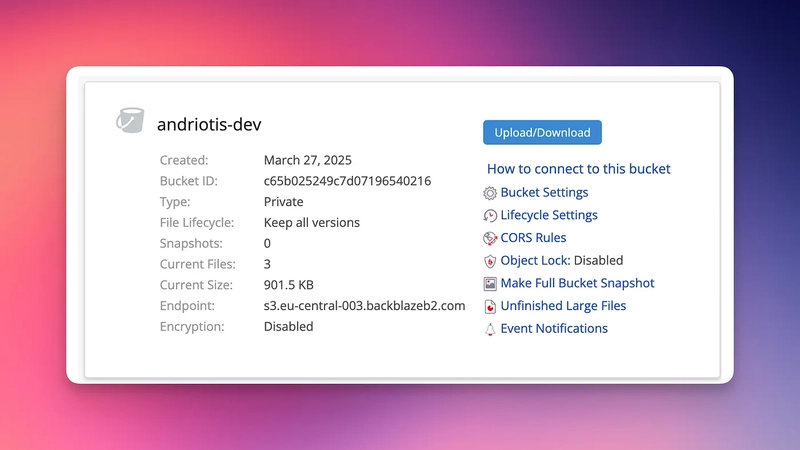
4. Now, head over to https://secure.backblaze.com/app_keys.htm
5. Create an Application Key with the following properties
A Name
Access to ONLY the backup bucket
Read & Write scopes
6. Note down the “Key ID” and “Application Key” as “Access Key ID” and “Secret Access Key” respectively
Step 2: Get your schedule in Cron format
Backups run on a cron job. So, we need the schedule for example “Every day at midnight” to become “0 0 * * *”
Your options are:
Use the prompt “cron schedule {schedule}” on ChatGPT
Use crontab.guru
To freshen up your memory on Cron:
It uses the format [second] [minute] [hour] [day_of_month] [month] [day_of_week] , so
* * * * * * runs every second. Also:
*means “Every {minutes / hours / days etc}”*/a(a is a number) means “Everya{minutes / hours / days etc}”
Step 3: (Optional) Gather Sentry Credentials
If you want to check the status of your backups, you will need Sentry for monitoring. So let’s begin.
Head over to sentry.io and login
If you haven’t yet, create a project by going to the top side of your sidebar, selecting “Projects” then on the top right, “Create new project”
Now, head over to “Crons” then “Add Monitor”
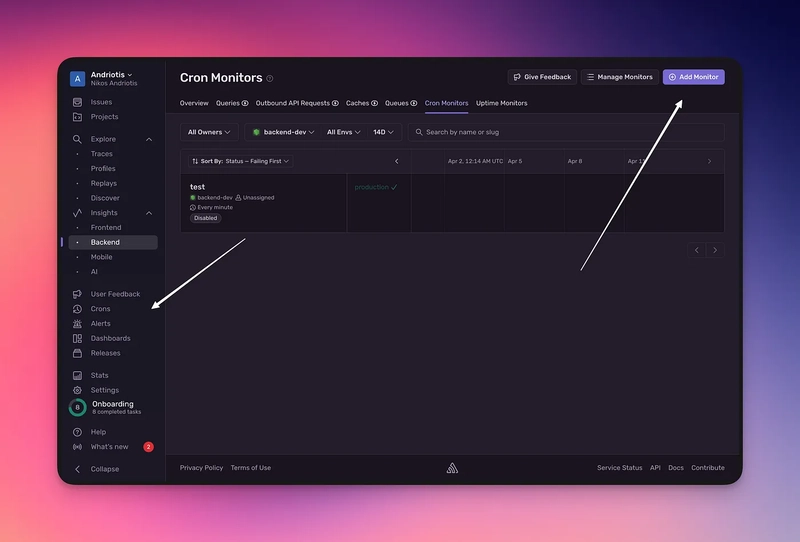
4. Add a name, set it to your desired project, and add the cron schedule from the previous step. You can, of course, mess around with the other settings as well. Then press Create.
5. Copy the monitor slug like shown below and store it:
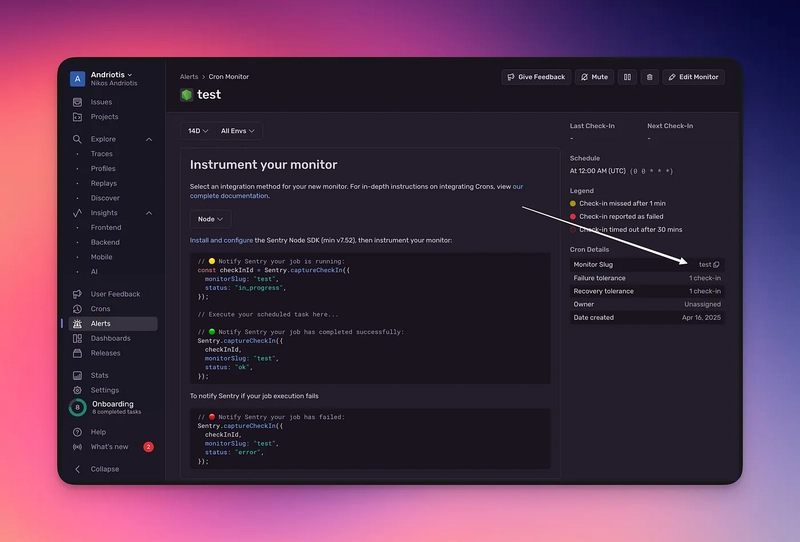
6. We now need the Sentry DSN:
Go to Settings
Select Projects
Choose the project you used when creating the monitor

Go to Client Keys
Copy and store the DSN

And that’s all for Sentry.
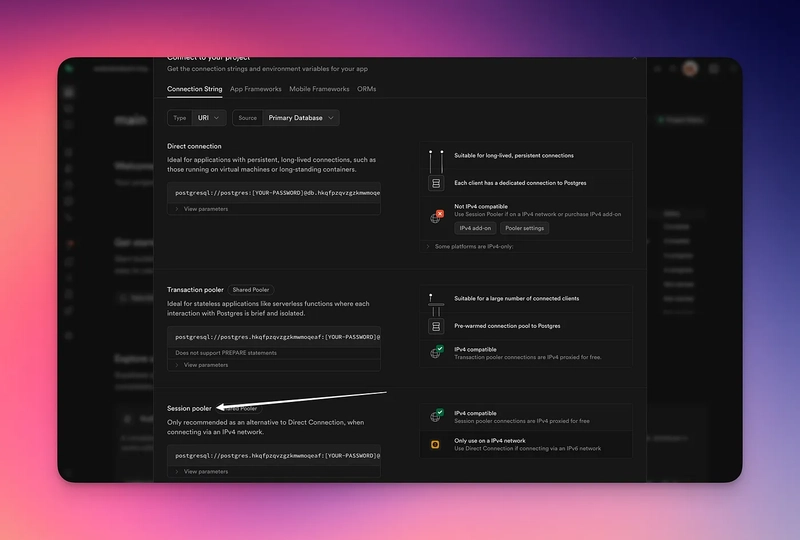
Step 4: Convert your postgres credentials to a connection URL
That’s one of the easy steps. If you already have a connection URL, you can skip this step. Anyway, to convert connection credentials to a URL, use this format:
postgresql://[username]:[password]@[db-host]:[port]/[database]
A note for Supabase users:
The image doesn’t support IPv6. So please use the session pooler instead*.*
Step 5: Filling out the .env file
You will need to pass the backup config to the container somehow. Here’s how to do that:
- Download the
.env.presetfrom GitHub:
curl -o .env "https://raw.githubusercontent.com/andriotisnikos1/pg-backup/refs/heads/main/.env.preset"
2. Fill out the env vars. Let’s go over them one by one:
S3-Compatible ENVs
S3_REGIONIs the S3-API compatible region. Fill it withautoif using Cloudflare, or the region that you copied if not using CloudflareS3_ENDPOINTIs the endpoint to your bucket. Leave empty if using AWS, use the “ Jurisdiction-Specific Endpoint” if you are using Cloudflare and the bucket “Endpoint” if using BackblazeS3_AUTH_KEY_IDIs the “Access Key ID”S3_AUTH_KEY_SECRETIs the “Secret Access Key”S3_BUCKETis the bucket name
Backups Configuration ENVs
BACKUPS_CRON_SCHEDULEIs the schedule from Step 2BACKUPS_MAX_KEEP_COUNT(Optional modification, defaults to 5) Is the amount of newest backups to keep before deleting the old onesBACKUPS_FILE_IDENTIFIER(Optional) Is a string appended to the backup file’s names to distinguish them from others. For example, a configuration with the identifier set to “andriotis” will result in files with naming like so:{date}-{random 32 chars}.andriotis.dump. If left unset, the backup files will follow the{date}-{random 32 chars}.dumpconventionBACKUPS_USE_PG_DUMPALL(Optional, defaults to “false”). Activatespg_dumpallinstead ofpg_dump. Used for bumping entire clusters, instead of a singular DB with its tables and data
Postgres Configuration ENVs
-
POSTGRES_URLIs the URL constructed at Step 4
(Optional) Sentry Configuration
SENTRY_ENABLED“true” or “false”, enables Sentry. Defaults to “false”SENTRY_DSNIs the DSN of your project, we copied this at Step 3SENTRY_MONITOR_SLUGIs the slug of the monitor we created at Step 3
Step 6: Deploying
A note before deploying:
Postgres 16 was released in 2023 and Postgres 15 in 2022. So if your DB is recent, you’re most probably using PG 16. The backup will error out if you’re using an incompatible version so you should probably check it before deploying. You can check the version of your DB by running the query:
select version();
- Docker
- For Postgres 16:
docker run -d \
    -v "./.env:/app/.env" \
    andriotisnikos1/pg-backup
- For Postgres 15
docker run -d \
    -v "./.env:/app/.env" \
    andriotisnikos1/pg-backup:pg-15
- For Postgres 14
docker run -d \
    -v "./.env:/app/.env" \
    andriotisnikos1/pg-backup:pg-14
2. Railway
Go to the template and click Deploy Now — Postgres 16 is required!
Input the .env file contents from the previous step
Click deploy
3. Paid Deployment (Hire me!)
If deployment is a hassle, i can do it for you as well as guide you with collecting the right ENV values and answering any of your questions for a coffee (5$). You can find me on fiverr: https://www.fiverr.com/s/BRadeNz
Building the image for a version other than 14,15 and 16
If you want to build for another version, first make sure it supports pg_dump and/or pg_dumpall then:
Clone the repo
Build the image for your version
# clone repo
git clone https://github.com/andriotisnikos1/pg-backup.git

# cd
cd pg-backup

# build
docker build -t pg-backup --build-arg POSTGRES_VERSION=[your-version] .
GitHub
https://github.com/andriotisnikos1/pg-backup
Regarding stricter permissions for AWS
Go to the AWS S3 on your desired region
Select your bucket, then click on “Copy ARN”
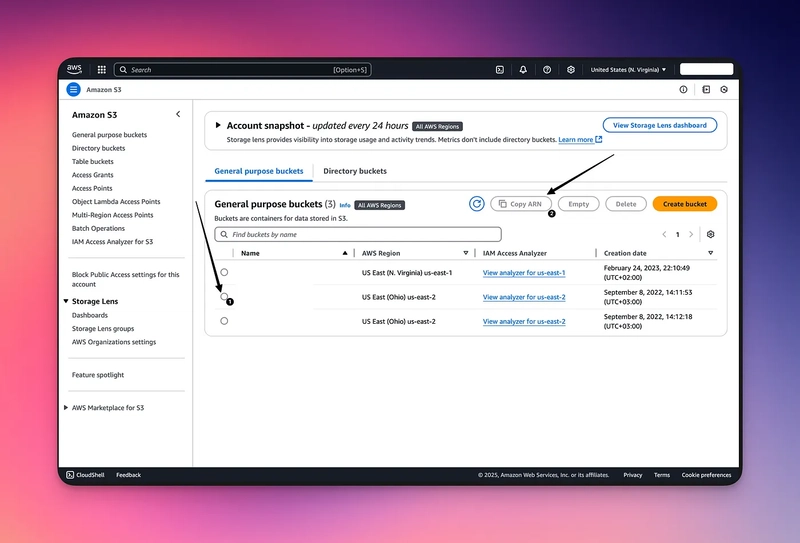
3. Go back to IAM
4. Click on Policies, then Create Policy
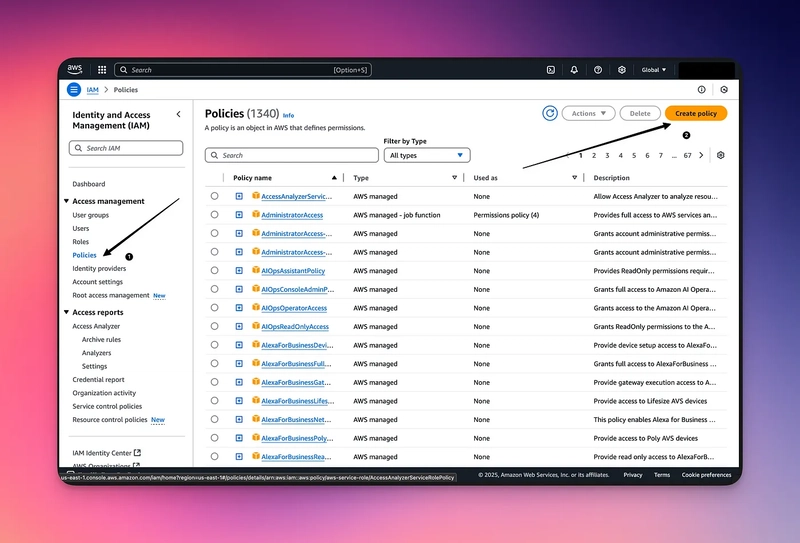
5. Switch to JSON mode and paste in the following:
{
 "Version": "2012-10-17",
 "Statement": [
  {
   "Sid": "Statement1",
   "Effect": "Allow",
   "Action": [
    "s3:ListBucket",
    "s3:PutObject",
    "s3:GetObject",
    "s3:DeleteObject"
   ],
   "Resource": [
    "[ARN from previously]"
   ]
  }
 ]
}
Don’t forget to replace your ARN!
This restricts permissions for your user to just the following on your specified bucket:
Retrieving objects
Listing objects
Adding objects
Deleting objects
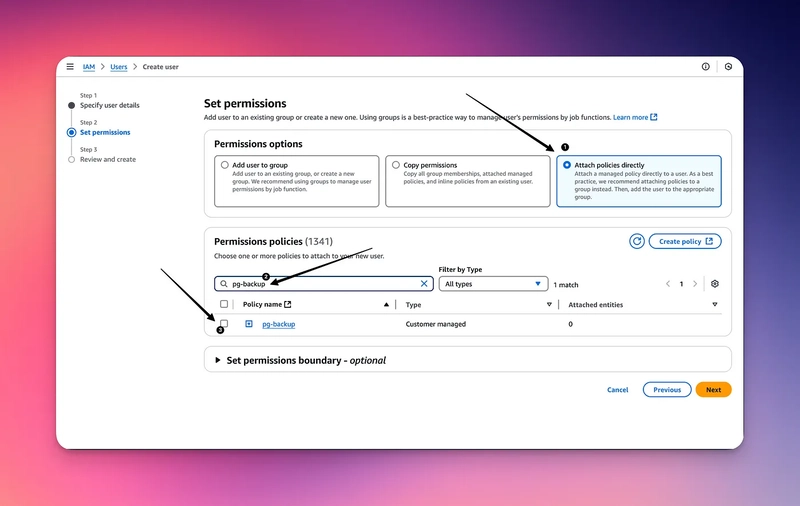
5. Click Continue, give your policy a name (i named it pg-backup) then click Create policy.
6. Now, when creating your user, you can attach the policy to it, giving it just enough permissions to do its job.
The steps for AWS credentials continue normally for the user creation flow, like in step 1!