


![[The AI Show Episode 143]: ChatGPT Revenue Surge, New AGI Timelines, Amazon’s AI Agent, Claude for Education, Model Context Protocol & LLMs Pass the Turing Test](https://www.marketingaiinstitute.com/hubfs/ep%20143%20cover.png)


![Hostinger Horizons lets you effortlessly turn ideas into web apps without coding [10% off]](https://i0.wp.com/9to5mac.com/wp-content/uploads/sites/6/2025/04/IMG_1551.png?resize=1200%2C628&quality=82&strip=all&ssl=1)


![This new Google TV streaming dongle looks just like a Chromecast [Gallery]](https://i0.wp.com/9to5google.com/wp-content/uploads/sites/4/2025/04/thomson-cast-150-google-tv-1.jpg?resize=1200%2C628&quality=82&strip=all&ssl=1)


![Apple Drops New Immersive Adventure Episode for Vision Pro: 'Hill Climb' [Video]](https://www.iclarified.com/images/news/97133/97133/97133-640.jpg)

![Most iPhones Sold in the U.S. Will Be Made in India by 2026 [Report]](https://www.iclarified.com/images/news/97130/97130/97130-640.jpg)


How to Deploy a FastAPI App to Azure with Docker, ACR, and GitHub Actions
Shipping a containerized app to the cloud doesn’t have to be complicated. In this blog post, I’ll walk you through deploying a Dockerized application to Azure step-by-step from pushing your image to Azure Container Registry (ACR) to automating your deployments with GitHub Actions. Whether you're building your first cloud native app or just need a quick blueprint for setting up Azure CI/CD, this walkthrough has you covered with screenshots, code snippets, and tips to avoid common pitfalls. Prerequisites Before starting, ensure you have the Azure CLI installed and you're logged in. Follow the installation guidehere A GitHub repository containing your Dockerfile & FastAPI code. Step 1. Create an Azure Container Registry (ACR) We'll: Create a Container Registry. Push our Docker image to ACR Take note of the login server, username, and password Create Container Registry In the Azure Portal, click Create a resource > Container Registry. Use these settings. Subscription: Your Azure subscription Resource group: Create or use an existing one Registry name: Give your container a unique name Location: Choose your region Pricing plan: Basic Skip Networking, Encryption, and Tags. Click Create after "Validation passed" appears. Push Your Image Your ACR deployment is now created and completed we have to push our image store in local machine (VSCode) to the remote container. Make sure you are in the folder/path that contains the image Once deployed: Click Go to resource. Scroll down and select Pushing a container image You'll see instructions like these (note: Azure provides generic hello-world example commands that we'll need to modify): To push your FastAPI application instead of the hello-world example, use these commands modify the example commands to fit your project: # Login to your Azure Container Registry az acr login --name # Build your FastAPI Docker image (if not already built) docker build -t . # Tag your local image with your ACR address docker tag fastapidemo myfastapidemo.azurecr.io/fastapidemo:latest # Push your tagged image to Azure Container Registry docker push myfastapidemo.azurecr.io/fastapidemo:latest Best practice: use explicit version tags (v1.0, v2025‑04‑23, etc.). You should see an output similar to mines. Verify your image was pushed successfully with: az acr repository list --name --output table You can also see it from the Azure portal. Step 2. Create an APP Service & Web App In this Section you will: Create an App Service Plan (Linux) Create a Web App for Containers Link it to ACR An AppService is an HTTP-based service for hosting web applications, REST APIs, and mobile back ends. A WebApp is an AppService that focuses on hosting web applications. In Azure Portal, search App Services > Create > Web App Basics Every Field with an (* = required) must be filled Use these Settings: Resource Group: Select your resource group Name: Create a Unique name Publish(*): Container Operating System(*): Linux Region: Select your region Pricing plan: Free F1 (to keep cost low) Example. Hit Next and skip for the Database page Configure the container Use the settings: Image Source: Azure Container Registry Registry: Select the ACR registry Authentication: Managed identity Image: fastapidemo (your image name) Tag: latest (your image tag) For the tag its best practice to avoid generic tags such as :latest instead use 1.O I only use latest for demonstration purposes Hit Next Networking Enable public access: On Hit Next Monitor + secure Enable Application Insights: No In production its best to turn on to track and logs your apps data Enable Defender for App Service: leave blank Hit Next and Skip the Tags page Review + Create -> Create You should now see your basic web app all you have to do is verify your configurations now click Create If you receive any failed deployments error switch to a different region and redeploy Access & Verify Web App On success, select Go to resource and open the Default Domain to confirm the app loads. If you set everything up right you should see your containers page. If you have any issues on the resource page under Deployment Center > View logs you will see where your deployment failed. Step 3. Set Up GitHub Actions CI/CD We will: Enable Deployment Center Generate a workflow file Add GitHub secrets Enable deployment Center In your Web App portal on the left side select Deployment > Deployment Center If you see the red "SCM basic authentication is disabled for your app. Click here to go to your configuration settings to enable." it needs to be enabled. Click it and under Platform settings toggle SCM Basic Auth Publishing: On Save the changes above and continue to update the app. Connect to GitHub Source: Github

Shipping a containerized app to the cloud doesn’t have to be complicated.
In this blog post, I’ll walk you through deploying a Dockerized application to Azure step-by-step from pushing your image to Azure Container Registry (ACR) to automating your deployments with GitHub Actions.
Whether you're building your first cloud native app or just need a quick blueprint for setting up Azure CI/CD, this walkthrough has you covered with screenshots, code snippets, and tips to avoid common pitfalls.
Prerequisites
Before starting, ensure you have the Azure CLI installed and you're logged in. Follow the installation guidehere
A GitHub repository containing your Dockerfile & FastAPI code.
Step 1. Create an Azure Container Registry (ACR)
We'll:
- Create a Container Registry.
- Push our Docker image to ACR
- Take note of the login server, username, and password
Create Container Registry
In the Azure Portal, click Create a resource > Container Registry.
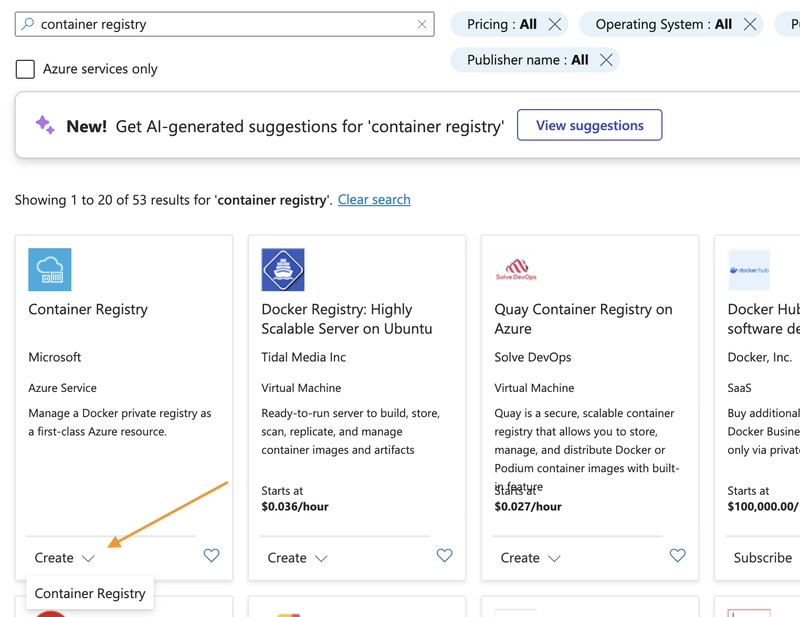
Use these settings.
Subscription: Your Azure subscription
Resource group: Create or use an existing one
Registry name: Give your container a unique name
Location: Choose your region
Pricing plan: Basic
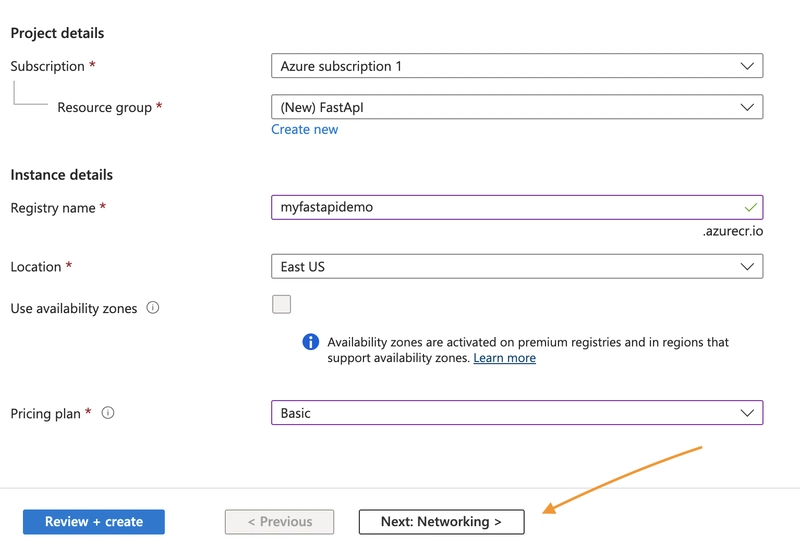
Skip Networking, Encryption, and Tags.
Click Create after "Validation passed" appears.
Push Your Image
Your ACR deployment is now created and completed we have to push our image store in local machine (VSCode) to the remote container.
Make sure you are in the folder/path that contains the image
Once deployed:
Click Go to resource.
Scroll down and select Pushing a container image
You'll see instructions like these (note: Azure provides generic hello-world example commands that we'll need to modify):
To push your FastAPI application instead of the hello-world example, use these commands modify the example commands to fit your project:
# Login to your Azure Container Registry
az acr login --name

# Build your FastAPI Docker image (if not already built)
docker build -t  .

# Tag your local image with your ACR address
docker tag fastapidemo myfastapidemo.azurecr.io/fastapidemo:latest

# Push your tagged image to Azure Container Registry
docker push myfastapidemo.azurecr.io/fastapidemo:latest
Best practice: use explicit version tags (v1.0, v2025‑04‑23, etc.).
You should see an output similar to mines.
Verify your image was pushed successfully with:
az acr repository list --name --output table

You can also see it from the Azure portal.
Step 2. Create an APP Service & Web App
In this Section you will:
- Create an App Service Plan (Linux)
- Create a Web App for Containers
- Link it to ACR
An AppService is an HTTP-based service for hosting web applications, REST APIs, and mobile back ends.
A WebApp is an AppService that focuses on hosting web applications.
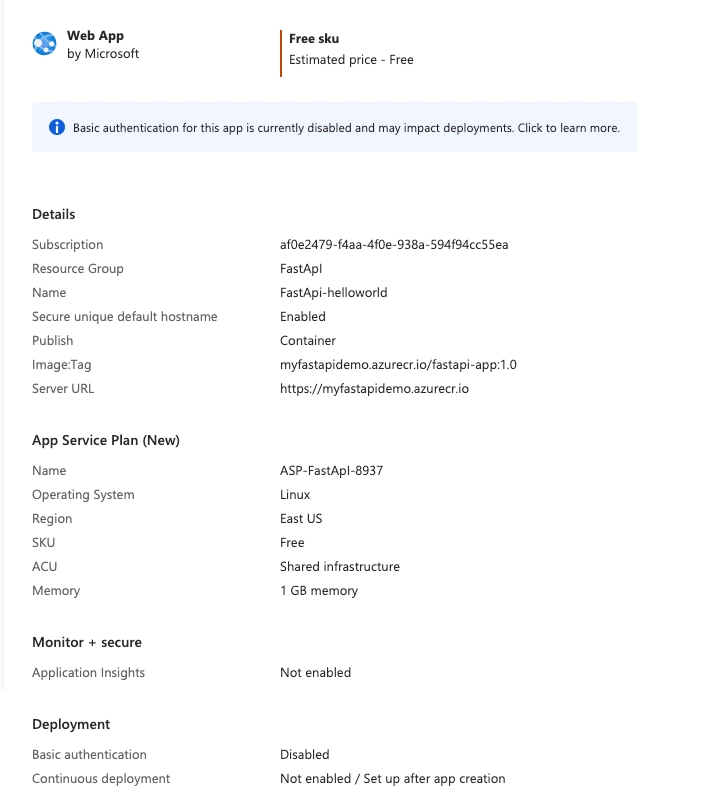
In Azure Portal, search App Services > Create > Web App
Basics
Every Field with an (* = required) must be filled
Use these Settings:
Resource Group: Select your resource group
Name: Create a Unique name
Publish(*): Container
Operating System(*): Linux
Region: Select your region
Pricing plan: Free F1 (to keep cost low)
Example.
Hit Next and skip for the Database page
Configure the container
Use the settings:
Image Source: Azure Container Registry
Registry: Select the ACR registry
Authentication: Managed identity
Image: fastapidemo (your image name)
Tag: latest (your image tag)
For the tag its best practice to avoid generic tags such as :latest instead use 1.O I only use latest for demonstration purposes
Hit Next
Networking
Enable public access: On
Hit Next
Monitor + secure
Enable Application Insights: No
In production its best to turn on to track and logs your apps data
Enable Defender for App Service: leave blank
Hit Next and Skip the Tags page
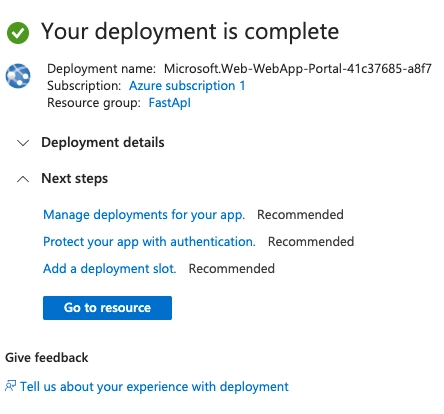
Review + Create -> Create
You should now see your basic web app all you have to do is verify your configurations now click Create
If you receive any failed deployments error switch to a different region and redeploy
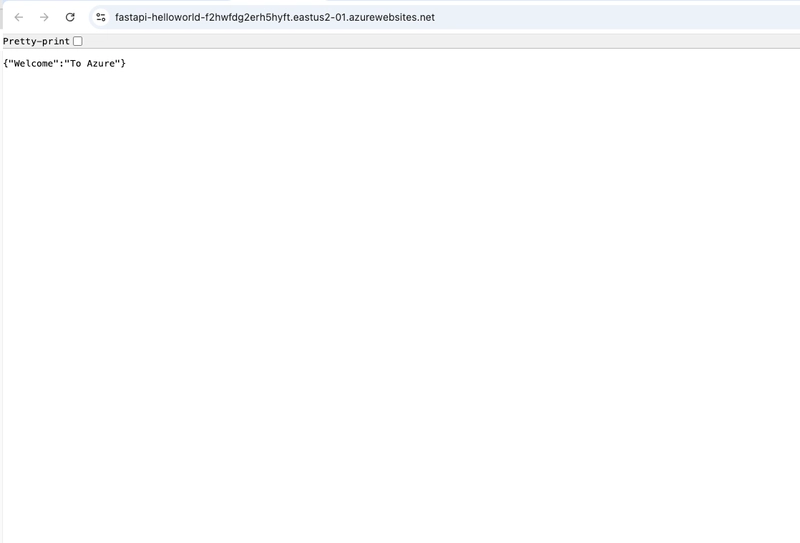
Access & Verify Web App
On success, select Go to resource and open the Default Domain to confirm the app loads.
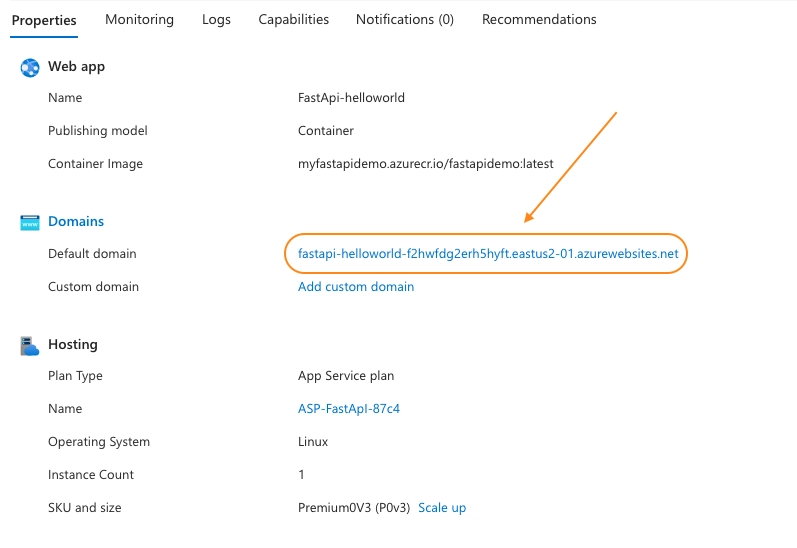
If you set everything up right you should see your containers page.
If you have any issues on the resource page under Deployment Center > View logs you will see where your deployment failed.

Step 3. Set Up GitHub Actions CI/CD
We will:
- Enable Deployment Center
- Generate a workflow file
- Add GitHub secrets
Enable deployment Center
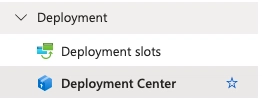
In your Web App portal on the left side select Deployment > Deployment Center
If you see the red "SCM basic authentication is disabled for your app. Click here to go to your configuration settings to enable." it needs to be enabled.
Click it and under Platform settings toggle SCM Basic Auth Publishing: On
Save the changes above and continue to update the app.
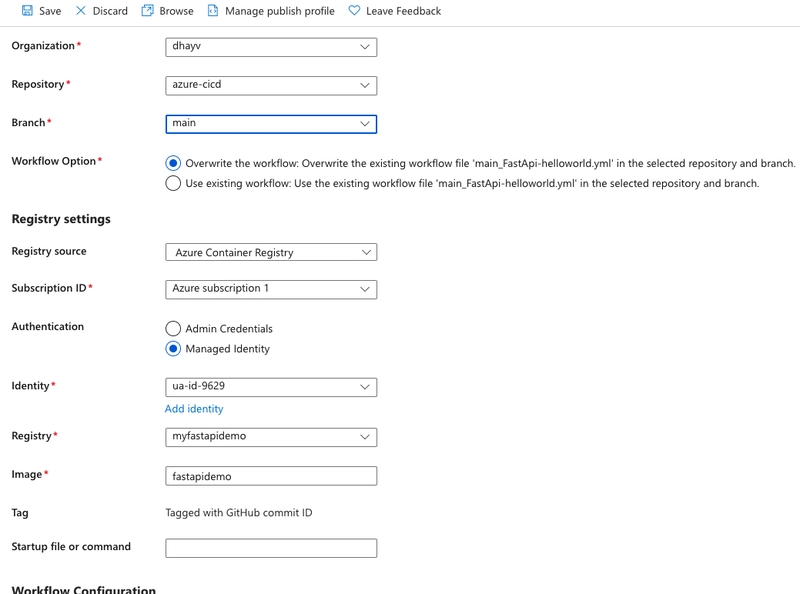
Connect to GitHub
Source: Github Actions

Authorize GitHub, select repo + branch once completed fill in your repos details.
The rest of your Registry settings should auto‑populate (note the managed identity it shows).
In a new tab access your container registry.
Azure Portal > your ACR > Settings > Identity > User Assigned.
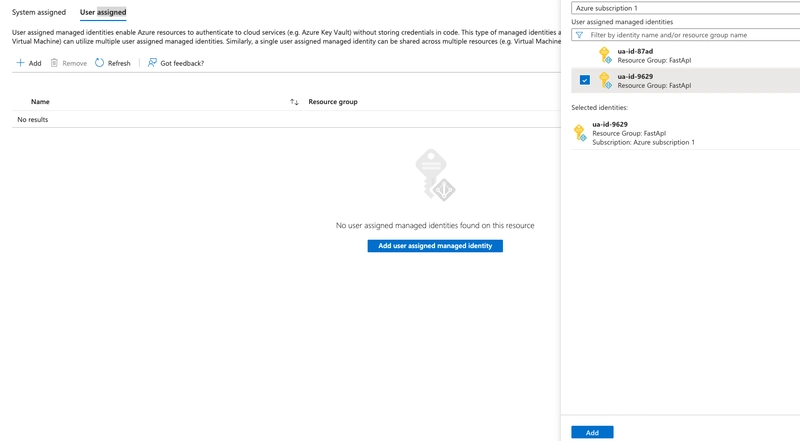
Add the user assigned managed identity you have listed in Deployment Center.
Now head on back to your deployment center
Hit the Save button up above
Our build will fail we will resolve this issue in the next.
✏️ Fix the generated workflow
Head over to your GitHub repo — you'll see a new folder named .github/workflows.
This was automatically created by Azure Deployment Center when you enabled CI/CD.
Open the .yml file inside (e.g., azure-webapps.yml) — and click the ✏️ pencil icon to edit it directly in GitHub.
The code is a general-purpose template — we’ll customize it to match our actual Azure setup.
Replace the Docker login block with Azure‑based auth: